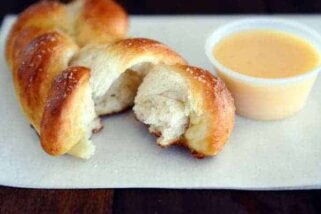
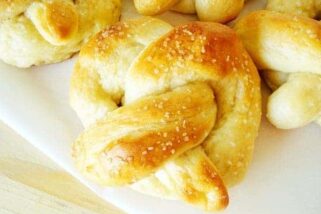
Soft Pretzel Rolls
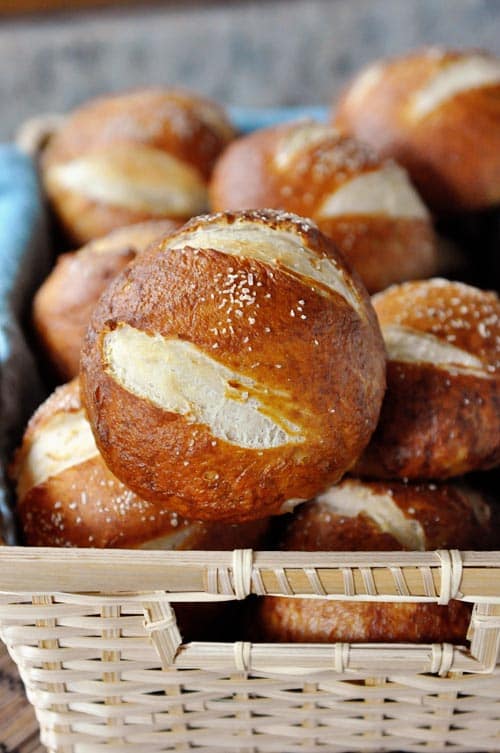
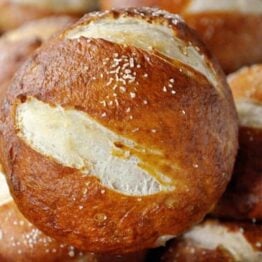
Out of the oven these soft pretzel rolls are perfectly puffy and wonderfully salty and chewy. They look like they come from a gourmet bakery!
So I know I tend to be a bit dramatic about food, but I kid you not, these soft pretzel rolls are one of the best breads to ever come out of my kitchen.
And I’ve made a lot of bread over the years.
Brian didn’t even believe I actually made these (rude!) because they look like something that would come from a gourmet bakery or fancy restaurant, neither of which happen to be in big supply in my cute little town.
In his defense, I do have to admit that even I let out a real, live squeal of joy when I first made these and they came out of the oven looking like, well, pretzel rolls!
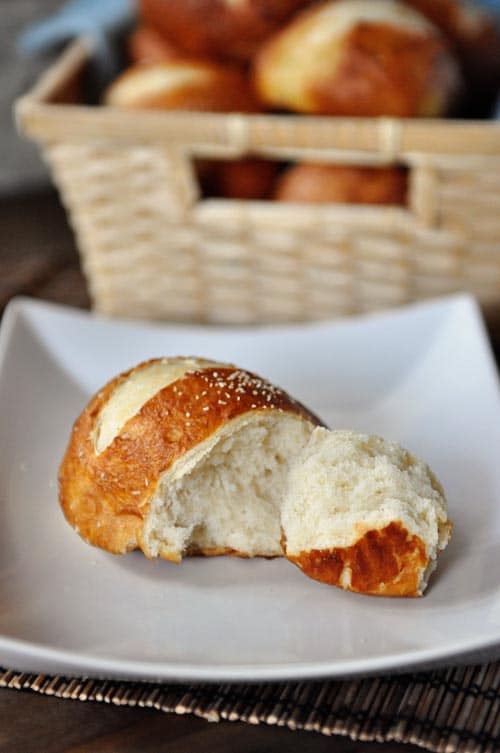
Rich, dark brown color, perfectly puffed and wonderfully salty and chewy. I promise that not only are these absolutely makeable (not nearly as hard as you think, I promise!), they will solidify instant rockstar status. I’m not kidding…just look at them.
I just looked and now I want to eat 50 right this minute.
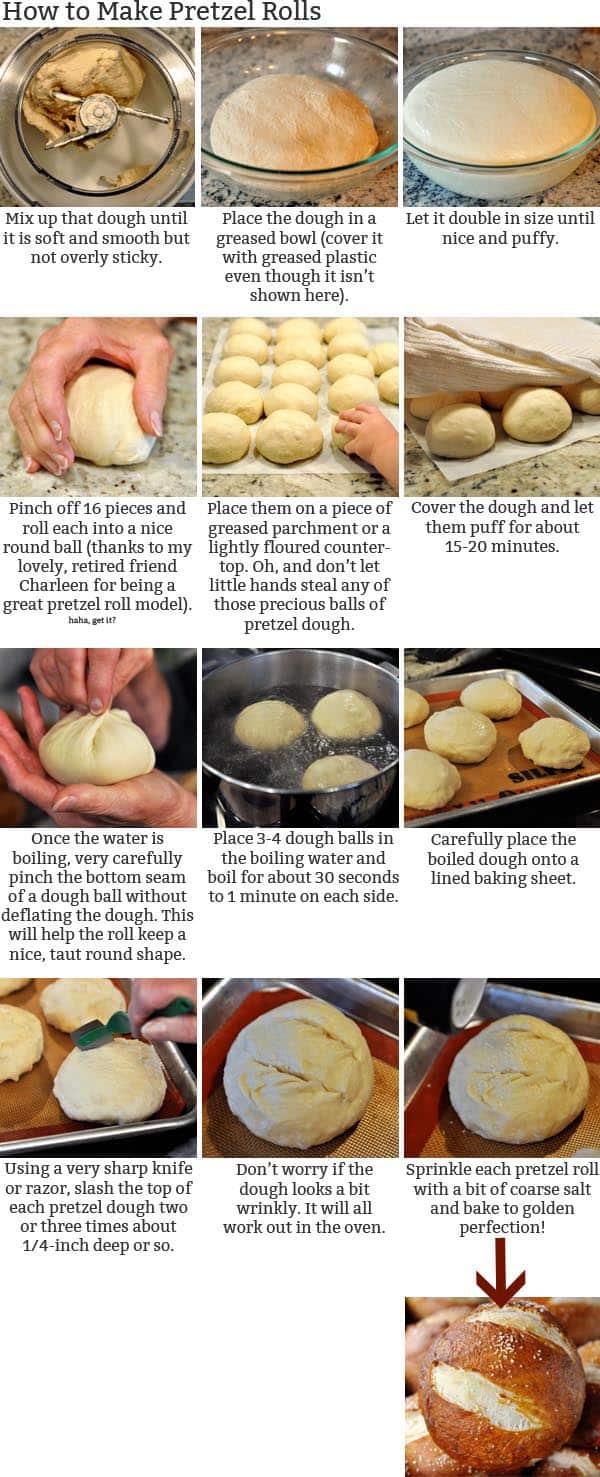
I’ve included a step-by-step below for anyone a little hesitant about delving into the world of pretzel rolls (don’t be hesitant!).
Boiling the dough in a baking soda water bath prior to baking gives the pretzel rolls a delightfully chewy texture and helps crisp up the outside of the roll while baking.
And can I just emphasize again for the sake of emphasizing that: oh my heavens, these rolls are amazing.
Through the many revisions of this recipe, we’ve enjoyed these babies with everything from soup to spaghetti to buns for sandwiches and grilled hamburgers.
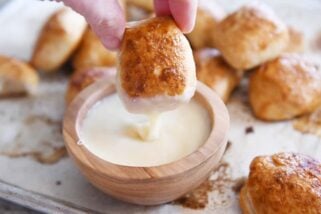
Well, that’s when any of the rolls actually make it to mealtime. Most often, we gobble these perfectly perfect pretzel rolls up after they exit the oven and our favorite way to enjoy them is slightly warm with a thick wedge of sharp cheddar cheese.
Rockstar status, baby, rockstar status.
One Year Ago: Glazed Chocolate Chip Scones
Two Years Ago: Hearty Turkey and Bean Chili
Three Years Ago: Autumn Minestrone Soup
Amazing Soft Pretzel Rolls
Ingredients
Dough:
- 1 tablespoon instant yeast
- 2 tablespoons canola or vegetable oil
- 2 cups warm milk, about 100-110 degrees F
- 1 ½ cups warm water, about 100-110 degrees F
- 2 teaspoons salt
- 6 ½ – 8 cups unbleached all-purpose flour
Water Bath and Extras:
- 3 quarts water
- 1 tablespoon sugar
- ¼ cup baking soda
- Coarse salt for sprinkling
Instructions
- In the bowl of an electric mixer (or you can do this by hand in a large bowl), stir together the yeast, oil, milk and water. Add the salt and two cups of the flour. Add the rest of the flour gradually until a soft dough is formed and knead for 3-4 minutes. You may not need to use all the flour depending on many different factors (see the note) – add the flour until a soft dough is formed that clears the sides of the bowl. It is similar in texture to bagel dough and should be slightly more stiff and less sticky than, say, roll dough, but definitely still soft and not overfloured.
- Transfer the dough to a lightly greased bowl, cover it with greased plastic wrap and let it rise until doubled in size (1-2 hours).
- Portion the dough into 16 pieces and roll each piece of dough into a lovely little round ball. Here’s a great tutorial on how to do that quickly and efficiently.
- Lay out the rolls on lightly greased parchment or a lightly floured counter. Make sure the dough balls won’t stick! Let them rest for 15-20 minutes.
- While the dough rests, bring the water, sugar and baking soda to a boil in a large 5-6 quart saucepan.
- Working with one piece of dough at a time, carefully take it off the parchment or counter, flip it over in your hand and pinch the bottom to form a little pucker and help the dough form a nice, taut ball. Take care not to deflate the dough; you should pinch just the very edge of the dough.
- Place 3-4 dough balls in the boiling water and boil for 30 seconds to 1 minute on each side (the longer you boil, the chewier the baked pretzel roll will be).
- With a spatula, remove the dough from the boiling water and let the excess water drip off into the pan. Place the boiled dough balls onto lined baking sheets (lined with lightly greased parchment or a silpat liner).
- Preheat the oven to 425 degrees F.
- Using a very sharp knife or razor, slice 2-3 cuts into the top of each unbaked roll about 1/4-inch deep or so. It’s important to use a very sharp blade so that it cuts the dough without deflating it. It’s ok if the dough looks wrinkly and kind of funny. It will work itself out during baking. Lightly sprinkle each dough ball with coarse salt.
- Bake for 20-22 minutes until the rolls are deep golden brown. These rolls definitely taste best the same day they are made; however, lightly warmed in the microwave for a few seconds will do wonders for pretzel rolls 1-2 days old.
Notes
Recommended Products


Recipe Source: Mel’s Kitchen Cafe (originally inspired by many versions online that made me decide to create my own variation; I wanted more milk in the dough than water, different amount of salt and instant yeast, simpler method for mixing the dough, among many other factors)
Made per the recipe with fantastic results. Brushed with butter post oven. Wondering if using melted butter in place of the canola would upset the chemistry any. Anyone tried this?
Do you think Rice Milk or water would work instead of milk? DS has severe dairy, soy, and egg allergies.
Hi Tori – I’ve never used rice milk so I can’t say for sure on that one. I wouldn’t substitute water – the milk helps add a different sort of texture and flavor to the dough (helps tenderize it a bit, too). You would have to experiment with milk substitutes; worth a try. Good luck!
I just made these for the first time tonight (followed the recipe exactly), but mine don’t look anything like your pictures. Did you do an egg wash on yours to get that rich, shiny brown crust? Mine are still very tasty, but I over-baked the first 8 because I kept waiting for them to turn that rich brown color. . . Thanks!
Mary – I don’t put an egg wash on them but I have noticed that my rolls brown differently/better based on the oven rack position. In my oven – and it will differ with each oven – my rolls brown better in the upper third of the oven. Using convection mode, which I do not, can also make a difference and sometimes rolls won’t brown as well on convection. I hope your next batch turns out perfect!
HTML Generator Sample Page
Thanks for the recipe! Wanted to show off my modification. Using 12oz of dough and large ramekin, we made pretzel bread bowls to serve our beer-cheese soup in.
Made these today and they are wonderful. My kids love them. I took them to a meeting and everyone told me I was ruining their low-carb diets and I shouldn’t bring them again because they are too good to resist. They were actually pretty easy and not too time consuming. I’m serving them tonight with soup but I’m going to make burgers with them tomorrow. Yummmm!
Thank you so much for posting this recipe and in particular for the instructions on rolling a perfect ball! I have tried several times over the years to make pretzel rolls from different recipes and have never had any that came out just the way I wanted them to so I had always stuck with pretzel bites. These came out perfect!
My boyfriend and I gave these a try yesterday as a reward for a weekend of hard work. AMAZING! We sprinkled half of the batch with chili salt and the other half with garlic salt. It gave them a really nice kick. We dipped them in honey dijon and German mustard just to try them and were so excited that we fried up some eggs to make sandwiches. They are gone now and we can’t wait to do it again. Consider your site bookmarked!
I made these today (4th recipe from you in 2 days!), and they are so good! More labor intensive than other rolls, but so worth it! Your step by step instructions were perfect! I used the recommendation to dry the rolls with a tea towel after boiling them and before putting them on a sheet sprayed with cooking spray. No sticking at all. I made 8 large hamburger rolls and 24 dinner rolls. They won’t last long here! Now…off to finish my grocery list so I can make more of your recipes this week! 😉
Thank you, Thank you for this delicious recipe! I’ve seen recipes for pretzel rolls on a few blogs but decided to go with yours as it seemed the most detailed and instructive. I made these last night for a family party and they were absolutely wonderful. You’re right, rockstar status! The instructions and pictures were super helpful and they really weren’t that hard to make (coming from someone who isn’t a bread maker).
i made these to go with your roasted cauliflower soup (which was awesome too, btw), and they were so great! the kids loved them and started chowing down on them with the leftover white cheddar we had from the soup before i could even get the soup on the table. they were so wonderful (and seriously amazing hot with the white cheddar!). i was surprised there were any left after the meal, but the kids snuck them for breakfast and let me sleep in. everybody wins! 🙂
I was wondering if these can be made and then freeze? My husband loves this type of rolls for sandwiches, and it hard to find at my bakery.
Lori – I’ve frozen these after I’ve baked them and let them cool and they thaw and reheat very well.
Nevermind! Just saw there was a tutorial! I’m going to check it out for next time. 🙂
Mel-How on Earth do your pretzel roll balls look so perfect?? Mine look lumpy and bumpy.
I know there has to be a trick to this and that my impatience is probably the problem. 🙂
So, ive made pretzel rolls before only I shaped mine differently. Tonight I was talking to a friend about homemade breads and he said there used to be a restaurant in town that made pretzel bread, not rolls. More like loaves of bread. He said it had a soft interior and not too crusty on top. Sounded kind of boring to me, but I googled Pretzel Bread and came across this recipe. Your rolls look better than mine. I found that when you shape them into a knotted shape, you can get soggy areas where the water bath pools in the crevices. So I think your smooth ones are best! Anyway, do you think I could divide this dough into say, eights instead of 16ths, and boil the minimum amount of time to keep the crust from being too chewy, and make small loaves instead of rolls? Hmmmm….worth trying or possibly a huge waste of time?
Hi Lori – yes, I definitely think you could make these into small loaves. Sounds like a great idea!
Mel:
We LOVE the pretzel rolls. I know this is rudimentary, but how do you turn them I to the croutons to go with the cauliflower cheddar soup?
Thank you!!
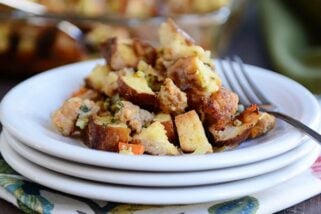
Catherine – I cut the pretzel rolls into cubes, drizzle them very, very lightly with olive oil, toss with a bit of salt and pepper, throw them on a baking sheet and bake at 400 degrees until they are golden, tossing once or twice. It takes about 15-20 minutes I’d say (although keep checking so they don’t burn!).
Why is the milk listed twice and not as 3 1/2 c warmed?
Janet – I’m sorry but I’m confused by your question. The milk is listed in the ingredients just once (as 2 cups). The total amount of liquid with water is 3 1/2 cups. Does that help?
Being a complete novice in the world of yeast, I’ve now made these twice and they came out amazing both times. We could not believe how many we all ate at one sitting! So couple questions about them. Can I use this recipe to make the pretzel bites you’ve posted before? And after I boil the dough, how long can they sit there on the pan before I bake them? I like them best right out of the oven so I’m wondering if I can boil them in advance and have them sitting on the counter til I’m ready to bake them.
Marci – so glad these are working out for you. In answer to your question, while I haven’t tried it myself, yes, I’m sure you could make smaller “bites” out of them. I wouldn’t leave them on the pans longer than about 30-45 minutes. They tend to rise too high and then completely deflate in the oven.
Hi Mel!
Love the recipe. My family and I just had them for dinner and they were delicious! However, we had a very VERY difficult time getting them off of the greased parchment paper. We followed the recipe to the letter and are experienced bakers so we are puzzled as to how this happened.
You have very kindly responded to every other issue except for people who have the buns stick to the pan. Is this an issue you were having as well? Is there any way to fix that if we make the recipe in the future. Thanks and you have a lovely blog!
Hi Alison – I haven’t had the sticking issue when greasing the parchment paper so to be quite honest, I’m not sure what to tell you to do differently. I use parchment paper from King Arthur Flour that is slightly thicker than the roll from the store, in case that might make a difference. Other than that, I grease the parchment liberally with cooking spray and these rolls have always popped right off. The baking soda/sugar in the water is what makes them tend to stick (I made the mistake once of forgetting to grease the parchment when I made these and the chewy pretzel bites which is a similar recipe and the entire bottom of the rolls tore off after baking). I haven’t made a conscious effort to do this but maybe I tend to do it anyway – but perhaps really draining the excess water after boiling from the rolls before placing them on the baking sheet would help too. Good luck!
I was sure I had messed these up several times (did the dough rise too long, did I overcook them, ect). Nope,they were actually simple to make and absolutely delicious! My husband already asked me to make them again. Thank you for the wonderful recipe and excellent instructions!
I’m going to try these in my bread machine on the dough setting. I will let you know how they come out.
Hi Mel – I LOVE your recipes. I have made many things from your recipe list and love everything I’ve tried.
I made the pretzel rolls tonight. I followed your recipe exactly and most of them turned out great! A few of them were kind of “doughy” still after baking.
I’m wondering if they didn’t boil long enough or perhaps I didn’t bake them long enough?
Do you have any insight on what I might try the next time I make them to get away from the doughy-ness?
Merry Christmas!
Thanks!
Melody
Hi Melody – I think if they were overly doughy it might be because the needed a longer baking time. Even a minute or so could help (also, I’ve found that the longer I boil them, the doughier they are so I wouldn’t boil them any longer than the recipe states). Good luck if you try them next time!
With 3 1/2 cups of liquid, I had to add A LOT more than 8 cups of flour. And dividing it into 16 pieces still gave me giant (like bread-bowl-sized) rolls. They tasted great, but is that how they are supposed to be?
Michelle – yes, that is how the recipe is written. Flour amounts can vary widely based on location and altitude and even how each person measures the flour (in yeast bread recipes I usually give the flour amounts as a guideline and suggest going by the look and feel of the dough more than hard fast measurements). Sounds like you could make more like 20 rolls with your batch of dough.
Hi Mel! I always make your lion house dinner rolls for Thanksgiving, but when I saw this recipe, I KNEW they had to be part of the feast this year. Don’t worry, I still made the lion house rolls, too, because they are so stinking fantastic, and I can’t imagine Thanksgiving without them. Anway, these pretzel rolls are A-MA-ZING. I had no leftovers 🙁 and a couple people even dubbed them the best item to grace the dinner table. The step-by-step instructions for forming the rolls are so helpful, too. That’s one of the reasons I love your blog so much! Thank you for sharing this recipe. You’re the best!
Thanks for the recipe! I make a half batch and either make 8 large or 16 small rolls (the smaller size is perfect for potlucks). Also, I’ve modified the recipe slightly to use active dry yeast instead of instant.
Hello Mel!
Well, I made these rolls again for Thanksgiving and I made them as rolls, not hamburger buns. They came out great! Everyone loved them. We had other rolls at dinner, but none of them got touched!
After rolling them into balls, I put them on a piece of plastic rap sprayed well with cooking spray. After rising, they lifted off easily for the boil bath, so I did not do the “pinch technique” you suggest since they were still well ball shaped with slightly flattened bottoms (could be a good start toward my hamburger buns!)
I did some research online on yeast, and came up with this info I thought your readers might find helpful.
*******
EXPIRATION DATE & TESTING YEAST
Expiration Date (printed on the yeast’s package) – Yeast does expire. Yeast will last longer than the date printed on the packet if it is kept in the refrigerator. It will last even longer in the freezer (for up to a year or even more).
Testing Yeast – Sugar is used in testing yeast. To test yeast: Add 1/2 teaspoon of sugar to the yeast when stirring it into the water to dissolve. If it foams and bubbles within 10 minutes, you know the yeast is alive and active.
*******
I used my old, outdated yeast dated Nov. 1, 2012, that has been kept in the freezer ever since I bought it, and in the jar it came in. I tested it, and it worked fine. Started noticeably foaming and bubbling in about 2 minutes, and had a full 1/4″ of foam on top in about 5 minutes. The rolls rose fast and high too!
The moral of the story is: Keep your yeast in the freezer, and if in doubt, give it a test. It is either active or not, so if it gets a good “head” pretty fast, it will be good for the job. If you see little or no action after 10 minutes, you’ll need to make a trip to the store. (;<)
Hello again . I am replying to my own above post . I made these pretzels again and followed the recipe exactly as before .The only thing different that I did was ..as I took each pretzel out of the soda water bath with the slotted spatula I carefully rolled it onto some clean tea towels to absorb the liquid. I super greased the pans and when they were done they hardly stuck. I found that out of the three pans I used to bake them ,(because they are so big) the non stick one did not stick ……..so that takes care of the sticking problem for me ……..:) Soaking up the excess liquid , greasing the pan well AND buying two more non stick cookie sheets . I hope this helps somebody out there with their buns sticking to the baking sheet problem . What an awesome recipe this is . 🙂
I made these buns and they are terrific.They also have become mine and hubby’s favorite breakfast toast when sliced in two. I have 1 major problem and this is that the buns are sticking to the baking sheet when done and I have to scrape them off and lose part of each bun in the process.I do grease the pan before putting them on the sheet as I don’t have access to parchment paper. I really don’t know what to do as they always stick .Can you help me? Am I greasing the pan to heavily? or is my oven too hot? (425 degrees) or are they in the oven too long? ( 18 -20 minutes) .Thank you so much for an absolutely amazing recipe.They really do taste like they’ve come out of a bake shop and to tell you the truth ..even if I end up having to scrape my heart out getting each one off the sheet it is worth it believe me . 🙂 ….Paulette
I wanted to thank you for this wonderful online recipe. I found pretzel buns last year at my local Costco. And I was hooked. They’re now my all time favorite bread-food and I was determined to bring some to my relatives this holiday season. Unfortunately, this year the stores didn’t offer any…then I stumbled across your website while searching for these buns. Your recipe seemed so well thought out you unknowingly convinced me to try my hand at baking this Thanksgiving.
I’ve never made bread in my life but, apparently, I knocked the buns out of the park! Everyone couldn’t believe I made these soft chewy morsels by hand (Literally! Kneading dough always looked so easy on t.v. I now have a new appreciation for how people made bread without machines.)
Anyways, thank you for providing such a simple recipe even a novice like me could turnout an impressive first-time batch.
Happy Holidays!!!
~dan
Hi Mel, I made these tonight by hand, and what a disappointment. They were flat and looked like hockey pucks. I followed the recipe step by step, except for adding a bit of honey (i like the dough a bit sweeter), and they looked nice and fluffy until the water bath. They came out of the water w/ a yellowish crust and just didn’t puff up during baking at all.
I wonder what went wrong?
rikki – sorry these didn’t work out for you. Is there a chance you added too much flour? That and boiling for too long can make it so they don’t want to puff up very well during baking.
I plan on making these for my family for Thanksgiving, and I was wondering, when you make them ahead and freeze them, how do you defrost and warm them?
Hi Devra – I just defrost at room temperature and then warm them lightly in the microwave (a minute or so on 50% power). Good luck!
Sorry, just saw your earlier comment about that!
Have you tried freezing the rolls after they are cooked?
I couldn’t wait to make these as we LOVE the ones from Costco. They were very tasty, although pretty tough on the exterior. Maybe I put them in the boiling water too long. It didn’t stop us from eating them! (That’s all my kids ate at dinner. :/)
I don’t have a thermometer so is there any other way to figure out the warm temperature of the milk/water? Does it have to be a specific warm temperature or can I just use medium warm from the sink (water)?
Victoriya – it doesn’t necessarily need to be a super specific temp as long as it isn’t ultra-hot (otherwise it can kill the yeast). Medium warm water from the tap should work fine.
thank you…..well gonna try it, what can it hurt???????
Hey Mel! These were awesome. Followed the recipe- like always- and your recipes never disappoint! Had them with your Hearty Beef Stew and we were all happy! My toddler didn’t like the “gravy” on the stew but my 1 yr old gobbled all of it up! Everyone loved these rolls. I thought about sharing some with my neighbors, but I don’t want to… 🙂
Mel – I have to first say that I love your blog. I have tried several of your recipes and have loved every one. You make food that speaks to my heart! I have shared your blog with all of my sisters and tons of friends. We have had lengthy conversations about your food.
With all of that said I have to tell you about a sandwich I recently ate. It was shaved turkey, red onion and cranberry cream cheese on a pretzel roll. It was absolutely devine and when I saw this pretzel roll recipe I thought “I know what I will be doing with my Thanksgiving leftovers.” Thank you again for taking the time to share your passion for food with me.
Thanks, Mel, for your reply.
Never really thought the yeast, once it starts off like gang-busters, might not be able to stay strong for the long haul.
The only thing with not flattening the dough balls, is I really want hamberger buns, not just rolls.
Can you suggest how I might adapt the recipe to achieve that? and how much dough in oz. I should use for each hamburger bun?
Thanks!
Hi Noel – I think you could still use them for hamburger buns if they look like the ones in my picture (tall and fluffy). But if you really want them flatter, you’ll have to try gently pushing them down just a tiny bit. Too much and they will turn out like your first batch, I’m afraid. I didn’t measure out the dough in ounces, sorry, so I’m not sure how many ounces each dough ball should be.
Can I make these the day before and bake them the next day???
JoAnn – I haven’t tried that but most yeast breads/rolls can be prepared that way. Good luck if you try it!
Oh, I just realized I left this out.
I did make a egg-water wash and brushed that on then sprinkled with Kosher salt just before baking.
Hello Mel,
I have been wanting to make pretzel rolls ever since Windy’s and Sonic came out with their buns (haven’t tried them), so I went scurrying over the internet, and found your recipe. I didn’t have such good luck, and I am not a stranger to cooking and bread making, so I don’t quite know what went wrong.
I put some photos up for you at this location:
https://plus.google.com/photos/106982244175925572414/albums/5943231090201725377?authkey=CIHA7bvQuuL-3QE
I wanted hamburger buns to use for pulled pork, so I also found some hamburger bun recipes (looking for how to shape), and instead of leaving the dough balls as balls, I flattened them out into approx. 3″ rounds. I made some with 3-oz. of dough, and some with 5-oz. of dough, and I did not due the “bottom pinch” as you described. Instead, I used the shinny side of freezer paper and lightly sprayed it with cooking spray, and they came off easily when it was time for the water bath.
I used Fleischmann’s Bread Machine yeast, and even though is is a year out of date, I keep it in the freezer, so it fired up like gang-busters when added to the warm water and sugar. Once my dough was made (I used a Kitchen Aid Mixer) my dough didn’t even take an hour to more then double in size. The dough was slightly sticky, but rolled easily on the counter top using your method in the “Shaping Perfect Rolls” tutorial.
I let the flattened dough balls rise for maybe 20 minutes before I did the water bath. I made the 3-oz. ones first, did the water bath about 45 seconds on each side (water boiling all the time), and only waited a few minutes before getting them into the oven. As you can see, they didn’t rise very much, though they came out soft and tasted good.
Next I tried 5oz. of dough thinking that would solve the problem. This time I let them rise about an hour before the water bath, and only 30 seconds on each side in the bath this time. I then put them on the baking sheet and let them rise some more, maybe another 30 minutes before baking them. They did rise some each time above, and I thought they would rise more (and to the right size) in the oven. Didn’t really happen.
These did come out higher, but sort of “pointed” tops, and the dough seemed to spread out more then rise (going from a 3″ round to a 4″).
My buns seem to have a more “muddled” surface (from the water bath I guess) then your rolls do.
OK! Will be looking for your suggestions! Putting the pulled pork in the freezer until I can get these buns right!
Hi Noel – well, it’s always hard to say what went wrong exactly, especially if you adjusted the recipe/method a bit. My first inclination is to say don’t flatten the dough balls. By doing so, they’ll never get puffy like you hoped for and is probably one of the main reasons they stayed flattened after boiling and baking. This dough is quite different than other yeast hamburger bun recipes that aren’t boiled (even the texture of the dough is different). Also, even though your yeast proofed and looked “ok” the fact that it was expired can definitely impact it being effective for the 2nd rise. Expired yeast may proof just fine but it doesn’t have enough oomph and power to effectively get the dough through all the rises and the baking. Those two factors alone (not flattening the rolls and using non-expired yeast) could definitely help. I’d encourage you to make the recipe exactly like in the step-by-step and the way I posted it and see if you have better luck. Let me know if you try them again and if you have any other questions. Good luck!
Mel, great recipe! tried these several times already. Have you ever tried making a jalepeno cheese pretzel roll?
jenny van allen – I haven’t tried that variation but it sounds delicious!
I made these delicious rolls and they were fantastic! They looked so professional and were not difficult to make. Thanks for the great photos. I’m inspired.
I’ve made pretzel rolls in the past and they taste great and look good but not great. I can’t get mine this even brown color like yours. Do you use an egg wash? Do you turn your pans mid-bake? Also, I just made these the other day and put them in a bread bag but they are now damp. I thought I cooled them completely. How do you store your breads? Thanks!
Dana – I don’t use an egg wash and I don’t turn the baking pans. I have noticed that some of my boiled breads (like these and bagels) get a bit wet when enclosed in a bag. I still do it anyway (I’m usually freezing them) just because I haven’t found a great alternative.
I just got done baking these, and they smell amazing. However, they are sticking terribly to the parchment paper. 🙁 Half of the roll is ripping up when trying to remove them. I am guessing I was supposed to lightly grease the paper?? Also, it appears that your rolls have an egg wash on them, as mine did not come out so shiny. Otherwise, this was a great, easy-to-follow recipe, and I am looking forward to eating these with our rootbeer pulled pork tonight. 🙂 Thanks for the recipe.
Also, after re-reading my comment, I realized all of my grammatical errors! Embarrassing! 🙂 I should also thank you for the chocolate cake and magical frosting! The cake was fabulous, and that’s what is most important to the birthday boy! Right?!:)
I’m super sad! I have had success with all of your rolls before, but when I tried to make these for my sons birthday dinner they didn’t rise? I have no idea what I did? But perhaps my milk and water was too hot? I warmed them on the stove with a thermometer, but maybe it ended up being too hot. I may try them again, but not today. How did you warm your milk.
Jen – I usually warm my milk/water in the microwave.
I did it! I am eating a warm pretzel roll fresh from the oven. Delicious! The whole time I was making them, I kept asking myself: “Why did you ever attempt to make this recipe? This one is out of your league.” But they look just like yours . . .well pretty much like yours. 🙂 They are so tasty. I did overcome my fear of twisting the bottoms after raising and this procedure wasn’t hard at all. A wonderful Mel original — you rock, Mel!
Made these today and hello! Amazing is right! I froze half after the proof and before the boil and I’ll boil them for an extra minute right from the freezer when we’re ready for more, as I’ve done with soft pretzels in the past. I can’t say enough how much we loved these rolls!
hello yum!! i made these the day that you posted the recipe. i have never made a dough that required boiling, but they were awesome!! the crusty crunch when i split them apart…mmm
my family was happy too. seriously you’ve got all the other fellow food bloggers beat when it comes to most everything, especially bread!!