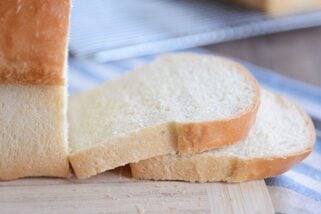
The Best Whole Wheat Bread
Check out this post for not one, but three, healthy, unprocessed, homemade, delicious whole wheat bread recipes. Homemade bread is worth it!
For the last several years, I’ve been making all of our family’s bread. It seemed like a daunting task at first but now it is such a part of my routine that it barely makes an impact in my day (and the bread is done start-to-finish in about 2 hours or so).
I make a bread every week or so and freeze it after it has cooled. I’ve found that slicing the bread before I put it in a freezer bag makes my life much easier because I can take out a slice at a time and avoid the dry, crumbly, homemade bread phenomenon that my kids despise when I am making their sandwiches.
I simply pull out a slice or two of bread and microwave it for 25 seconds at 50% power. Woila! Tender, fresh bread ready for sandwich making (or for a nice slather of butter and jam).
I know that many of you have your own favorite whole wheat bread recipe. There are so many good ones out there.
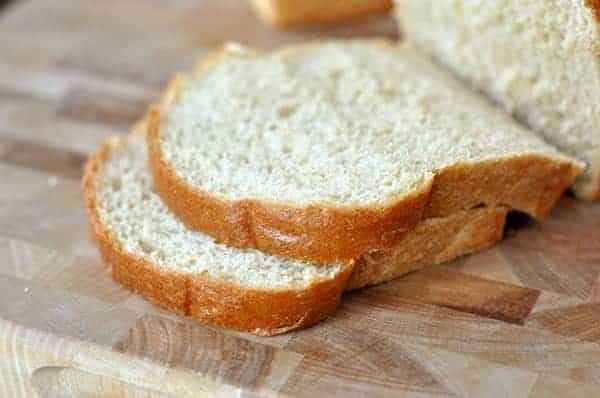
I’d like to share with you my favorites. I alternate making these and love them both equally. Both recipes produce a light but sturdy loaf, perfect for sandwiches or just for eating with dinner.
And don’t even get me started on homemade bread for toast in the mornings. Oh, divine.
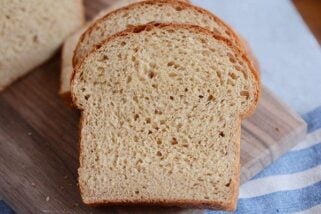
The first recipe is one perfected by my friend, Mel’s, mom. Her bread has quite a legacy and lives up to it’s fame. I’ve adapted the recipe slightly to fit what I normally have on hand (as in, I never have dough enhancer so substituted gluten and powdered milk).
It is a bit lighter in texture than the second recipe, due to a couple cups of white flour.
The second recipe is one I’ve had for years and mimics the recipe from the notorious Bosch bread mixer. It has less oil than the first recipe and a few other different ingredients (like honey instead of sugar).
Here are a couple tips I’ve found to help with breadmaking:
- I follow Bosch’s recommendations and use instant yeast. Because of this, I only ever let my bread rise after shaping the dough into loaves and placing them in the pans. They rise once in the pans and then I put them in a cold oven, turn it on to 350 degrees and bake for 32 minutes exactly. It turns out beautiful, not burned, loaves. (Note: Remember each oven is different. Experiment around a little, and do what works best with your particular oven.)
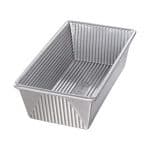
- I have a specific loaf pan that I absolutely swear by: The Chicago Metallic Commercial Bread Pan. I’ve done side-by-side baking comparisons with my other non-stick loaf pans, dark loaf pans, glass loaf pans, and hands down, every time the Chicago Metallic pans turn out a perfect loaf. The edges don’t get burned, the bread slides out perfectly without leaving crusty remnants, and they are heavy and durable. Love them. I use the standard 1-pound loaf pan (which is the equivalent to the 8 1/2-inch by 4 1/2-inch loaf pan).
- As long as we are talking brands, let me tell you another product I love for breadmaking: these perfect bread bags. I was sick and tired of trying to stuff my loaves in ziploc bags or other ill-fitting plastic bags. These bags are perfect. I freeze the bread right in them and they are the perfect size. (Incidentally, I also order my vital wheat gluten from King Arthur Flour.)
- I personally like to use white whole wheat flour. I prefer the light texture over red whole wheat but either kind will work in these recipes. I used to grind my flour with a Nutrimill wheat grinder, but now have a Wolfgang Flour Mill. Here is a post on popular wheat grinders and another on wheat/wheat grinding in general for more information.
Granted, bread making can be time consuming but the rewards are worth it when my son heartily exclaims that he doesn’t want to eat the French Toast Sticks at school and would rather have a sandwich on mom’s bread (and this is the kid who hates sandwiches). Hallelujah for the exit of French Toast Sticks in his diet.
Darcy’s Whole Wheat Bread {The Recipe I Use Most}
Ingredients
- 15-17 cups wheat flour, about 80 ounces
- 2 tablespoons instant yeast
- ½ cup vital wheat gluten
- 1000 mg Vitamin C, crushed, or 1 tablespoon lemon juice or white vinegar
- 6 ½ cups very warm water
- ⅔ cup oil
- ⅔ cup honey or sugar
- 2 tablespoons salt
Instructions
- In a large bowl (or stand mixer, like the almighty Bosch), mix together 5 cups of wheat flour, yeast, vital wheat gluten and Vitamin C (or lemon juice or vinegar). Add the warm water and mix well. Add the oil and honey (or sugar) and mix again.
- Cover the bowl and let the mixture sit for 10 minutes. Add the salt and start the mixer (or mix by hand), adding the remaining flour until the dough pulls away from the sides of the bowl to form a soft dough. You may not need to add all of the flour! Judge the dough by feel not by the amount of flour you’ve used. It might be slightly sticky but should hold it’s shape.
- Let the dough knead for 7 minutes in the stand mixer (or 15 minutes by hand). Form into 5 loaves (for the 8 1/2 X 4-inch loaf pans) and place into greased bread pans. Let rise until the bread is 2 inches above the top of the bread pan.
- Bake at 350 degrees for 25 minutes (I like to let the bread rise 1 inch above the top of the pans and then put the bread in a cold oven and turn the oven on to 350 degrees and bake the bread for 32 minutes).
Notes
Recommended Products

LuAnn’s Whole Wheat Bread {With my Adaptations}
Ingredients
- 5 ½ cups warm water
- ½ cup sugar
- ½ cup oil
- 2 tablespoons instant yeast
- 2 tablespoons salt
- 2 tablespoons vital wheat gluten
- 2 tablespoons nonfat dry milk
- 2 cups (284 g) white flour
- 8-10 cups (1136 to 1420 g) whole wheat flour
Instructions
- Lightly spray bread pans with cooking spray and set aside.
- Mix the water, sugar, oil, yeast, salt, gluten and dry milk together in the bowl of an electric mixer or by hand. Add the white flour and mix well.
- Continue adding the whole wheat flour until the dough cleans the sides of the bowl and the dough is soft but not overly sticky.
- Knead for 10 minutes until a soft, smooth dough has formed. Using oil or cooking spray to grease your hands and countertops, form the dough into 4 loaves.
- Place the loaves into the bread pans and cover with lightly greased plastic wrap. Let them rise until the dough has risen about 1 1/2 inches above the top of the bread pan.
- Place the bread pans carefully in a cold oven. Turn the oven on to 350 degrees and bake for 38 minutes.
- Remove from the oven and turn out the bread onto a wire rack. Let cool completely before placing in bags to put in the freezer.
Notes
Bosch Foolproof Whole Wheat Bread
Ingredients
- 6 cups warm water
- 2 ½ tablespoons instant yeast
- 2 tablespoons salt
- ½ cup oil
- ⅔ cup honey
- 2 tablespoons vital wheat gluten
- 12-15 cups whole wheat flour
Instructions
- Mix 8-9 cups fresh wheat flour and 2 ½ tablespoons yeast together in the bowl of an electric mixer (or in a large bowl by hand). Add 6 cups warm water and mix to paste consistency.
- Cover and let sponge 10-15 minutes.
- Add salt, honey, oil, and gluten. Mix by hand or if using an electric mixer, turn to speed 1 or 2 as motor bears down and add additional flour until dough pulls away from sides of bowl (be careful not to add too much flour). Let the mixer knead the dough for five minutes. (If using hands, knead for 10 minutes.)
- Use oil or cooking spray on your hands to form six equal loaves.
- Take dough immediately from bowl and fill lightly greased (or nonstick) loaf pans ½ to 2/3 full. Cover with lightly greased plastic wrap to keep moist. Let the bread rise until doubled, approximately 1 ½ inches above the top of the pan.
- Place the bread carefully in a cold oven. Turn the oven to 350 degrees and bake for 38 minutes. Let cool completely before placing in bags to put in the freezer.

I am going to attempt LuAnn’s ww bread this afternoon and wondered if I understood all the comments previously entered. So if I use active dry yeast, I should increase amount by 1/2 TBSP, proof it first, then follow the recipe. Then do I put in a large bowl to let rise until double in volume, punch down and then proceed to shaping the loaves and let rise again??? Or just one rise in the pans???
Kira – did you make this already? Sorry for the delay in answering your comment. If you use active dry yeast, yes, increase the amount by 1/2 tablespoon, proof it in warm water and a bit of sugar first and then follow the recipe. You’ll want to let the dough rise once in a large bowl, punch down, shape into loaves and then let them rise in the pan (with instant yeast you can sometimes skip that first rise but you don’t want to skip it if you use active dry yeast). Hope that helps!
how do you glase bread before the oven?
Add some applesauce to whole wheat bread recipe…..I have been doing this for years and makes the bread taste better!
Mel, I have a gas oven. So far I’ve been preheating the oven, then putting the pans in. Next baking day, I am going to try your way. I will let you know how it works. Thanks again. Oh, by the way, regarding WI winters, I found out that for me, by getting out in the winter (snowshoes are my new passion) I actually enjoy winter 🙂
Karen – let me know how it goes! I think we are all going to invest in snowshoes this upcoming winter – great idea!
Hi Mel, When you put your dough in the cold oven, then turn the oven on to bake, does it matter if you have a gas or electric oven? I love your recipe and have been using it for a month now, it’s my husband favorite.
Karen – that’s a good question and the answer is I don’t know. I’ve never baked with a gas oven so I don’t know how it heats up differently. Do you have an electric or gas oven? And has this recipe worked out ok for you?
Hi, just made the Bosch w.w bread tonight. It was awesome. I did have one question, though. I’m new to making bread, and I’m kinda naieve, so, how do you fit 6 loaves in the oven all at once? And if you only do half, how does the other half not get over-proofed while waiting?
Just want to make sure I’m doing this right….it was actually my first time making loaf bread.
Chavah – I do bake all six loaves at once. I put three in the back and three in the front – one of the front side ones I have to angle a little bit to fit in there but they are all crammed in there together. I notice that the back loaves get a little more browned and if I was on top of things, I would probably rotate them all halfway through baking but I don’t want the bread to fall so it is what it is. I agree, if there are half left out, I think they would over-rise so I bake them all at once. Hope that helps!
I love Lu Ann’s recipe for Whole Wheat bread! I have made 2-3 loaves every Sunday after church for over a month now and am hooked. My kids are eating it a lot, and I’m constantly looking for an excuse to have it toasted. I also love giving it to others as a thank-you for something as the loaves always turn out so pretty. I have found that adding 2 Tbs of fresh lemon juice in the first step with all the other indredients gives an even better rise (this was recommended on the back of a whole wheat flour bag). I am a working mother right now, and with this recipe I can still fit in making bread for my family. LOVE IT! Thanks so much for sharing this gem.
Beth – thank you! I’m thrilled to know that this whole wheat bread recipe has been a great thing for your family. I agree – it is the best toasted! I’ve heard actually that adding a bit of vitamin c helps with the rise. Sometimes I’ll throw in a crushed vitamin c tablet. Thanks for letting me know!
Mel, I was so excited to try your wheat bread. I started putting ingredients in my Bosch and realized that I have normal yeast, not instant yeast. I tried to use my normal yeast by adding an extra rise, but it was quite a mess in the end. Do you think I could use normal yeast doing your recipes exactly as above? I have a Costco pack of normal yeast and really don’t want to go buy instant yeast.
Marian – is it active dry yeast that you are referring to? If that is the case and you want to use it in this recipe, add an additional 1/2 tablespoon yeast to the recipe and proof all of the yeast in the warm water before adding the other ingredients. Let the yeast foam and bubble – then you’ll know it is ‘active’ and you can proceed with the recipe (oh, also if you use active dry yeast, the bread will probably taste better if you give it a first rise in a large bowl). Hope that helps!
where do you buy wheat gluten? OK, does it matter that I have a kitchenaid and not a bosch? I think with a bosch you can make more bread but with a kitchenaid you can’t. do you know? thx!
emily – I buy wheat gluten at my grocery store. It is usually by the flour (but I can’t find it at Walmart – just my everyday grocery store). I also buy it online at kingarthurflour.com when I am planning ahead. I don’t know much about making bread in a Kitchenaid. I’m guessing it will still work if you cut the recipe down but I don’t want you to burn out your motor so it may be best to check with the manufacturer.
You mentioned that you adapted the 1st recipe and use gluten and powdered milk, since you don’t have the dough enhancer on hand. I never have powdered milk on hand, but I do have dough enhancer and vital wheat gluten. 🙂 So would I do 4 Tbs. of dough enhancer to equal the 2 Tbs. of gluten and the 2 Tbs. of powdered milk?
Thanks so much!
Hi Lisa – the 2 tablespoons of gluten was my own addition to the recipe so if you have dough enhancer, substitute 2 tablespoons of it for the powdered milk. Hope that helps!
Sorry, another question. Can you do this in a KitchenAid stand mixer?
Sally – I only have experience using a Bosch mixer to make bread. I have friends that use Kitchenaid mixers, although I don’t know what size the motor is they are using. I know a Kitchenaid can overheat pretty easily so take it slowly, and I think it will be ok! If anything, you could mix the ingredients in the kitchenaid and take them out to knead it by hand.
Where can you get vital wheat gluten? Do they sell it at the store or health food stores? Thanks.
Hi Sally – I can usualy find it at most grocery stores by the flour but I’ve noticed that there are a few that don’t carry it. Health food stores normally carry it or I like to buy mine online (at kingarthurflour.com).
I also prefer using an electric knife on homemade bread–you can get slices much thinner and more uniform.
angie – no dumb questions here, I promise. I just use an every day serrated knife to cut my bread but my sister-in-law uses her electric knife and cuts perfect slices. I am going to try that next time – slicing all the bread with the electric knife and then freezing it. Other than that, I’m afraid I don’t have any other tips – my slices are usually pretty irregular!
this is probably a dumb question… but how do you slice your bread?? i love making homemade bread, but am never able to get thin “sandwich bread” slices. any tips or suggestions on this?
I have to say I figured a bread pan was a bread pan. But since I needed some new loaf pans anyway, and you have NEVER steered me wrong, I ordered the pans you recommended in this post. WOW! My bread has never looked so good! The bread came out beautifully and they cleaned up like a dream. Once again I find my self saying, “Thanks, Melanie!”
Of course he would prefer home made bread.;-)
It’s healthier anyway.
Barbados has a great sweet bread that Barbadians enjoy at Christmastime.
It’s fairly easy to make.
http://www.xomba.com/bajan_sweet_bread_christmas_barbados_style
Sara – thanks for your tips. I definitely don’t have that version of a Nutrimill because as wonderful as mine is, it is not self-cleaning and it makes a huge mess. I’m so glad you love yours!
Coreen – if you have dough enhancer, use three tablespoons for this recipe. Have fun making bread!
Katie – I’m so happy for you that you have a Bosch. I love mine (which is already pretty clear since I talk about it all the time). Anyway, I just use the Bosch bowl to mix up my bread – I don’t combine any ingredients in another bowl unless a recipe specifically calls for it, and even then, I usually throw everything together when making bread.
As for your second question, as unbelievable as the Bosch is for making bread, it doesn’t tackle small projects very well so I almost always use my hand mixer for making muffins, cakes or when I have to cream a small amount of butter because mine does exactly what yours does. I use my Bosch almost exclusively for breads, cookies and large batches of frostings.
Let me know if you have any other questions!
Hi Kira – kneading does differ based on doing it by hand or with a mixer. Kneading by hand requires more time to develop the gluten in the bread, especially if you are making a whole wheat dough. Not kneading long enough (either by hand or mixer) can make your bread/rolls hard and dense. Hope that helps!
I just started making bread and look forward to trying your recipes. I’ve loved everything I’ve tried of yours.
I just thought I’d let the person know who is interested in buying a Nutrimill know that the new one is self-cleaning, and it has never gotten a speck of flour in my house when I grind. I don’t know what loud is in terms of a wheat grinder, but I don’t think it’s very loud. I’m pretty sure you can grind as little as you like, too. I’ve absolutely loved it! It is a little too big to keep on the counter, though.
I also thought I’d tell you a tip a neighbor gave me. Maybe there’s a reason you don’t do this, but it saves a lot of time and my bread turns out great. Once your dough is in the pans, preheat your oven to 225 for one minute and turn it off. Put the loaves in the over and let them raise. They raise in my oven in about 20 minutes. The lady who told me this said hers raise in 10-15. Then turn the oven on to 350 and cook 30 minutes total.
Thanks for all your tips and wonderful recipes!
Yay! Milk and corn free bread that won’t taste like Bark! My fiancee is allergic to corn and milk and the 2nd recipe has neither! MWAHAHA!
I also recieved the Nutrimill and a Bosch several years ago for my birthday and used to make all our bread, but I had a couple of babies and got out of the habit. I wanted to thank you for inspiring me to get back to it, I’m excited to try these recipes. One question though, if I do have dough enhancer on hand and wanted to use it, what would the substitution be?
Couple ?’s!
1) I just got the Bosch Universal mixer. So when making bread are you just using the one bowl (mixing up 1st ingredients with the dough hook?) then adding the flour? Or do you mix 1st ingredients in one bowl with a spoon or hand electric mixer and then add the ingredients in your bosch with dough hook?
2) Also, do you find with your bosch mixer if you do not have much in the bowl it does NOT knead or mix? I halfed a bread recipe for BBQ chicken bread braid and it just spun the dough in the bowl….
Also, when I tried to make your blueberry muffins (delicious by the way) to cream the cup of sugar and butter it was not even combining them – I had my cookie paddles on it at the time……just wondering if I have a faulty machine?
Any thoughts would be great! Thanks so much for your blog – love it!
I can’t wait to try this! A quick question though, I noticed in one of your bread recipes that kneading by hand vs. mixer the time was different. Is that always the case with kneading? I wonder if that is why my rolls were not as beautiful as yours when I made them. How does kneading the wrong amount of time affect the dough?
Emily – thanks for your comment! I’ve never used a kitchenaid for making bread but I’ve had friends that do it all the time, however, I know that different Kitchenaids have different size motors and the larger the motor the better capacity to knead the bread (I have had a few other friends burn out their motors). To play it safe, I’d definitely halve the recipe or make it by hand.
And yes, you can usually find vital wheat gluten at any major grocery store (and sometimes even at Walmart). It is usually by the flour. When I’ve run out and don’t have time to buy it online before I want to use it, I’ll get it at the store, but where I live, sometimes I have to go a couple places before I find it.
About the flour, you can definitely buy whole wheat flour. I know many people do, since it isn’t feasible for everyone to grind their own wheat. Every grocery store I have been in has the whole wheat flour by the regular flour. I’ve heard great reviews about Bob’s Red Mill brand as well as Montana Wheat, if they have it. Good luck!
Amy – I grind my own flour because a) I was lucky enough to get a wheat grinder about seven years ago for Christmas b) I have a lot of stored wheat in my basement and c) because as I did more research about grinding wheat I learned that the faster it is used after it is ground means it has more nutritional value – wheat loses health benefits after it is ground. By grinding it myself, I can use it immediately and get the most nutrition out of it.
Melanie, I LOVE your recipes and am now intrigued to try my hand at making bread. I’ve never done it before, but you’ve never led me astray. I did have a couple questions, though. With these recipes making so many loaves, will a Kitchenaid mixer be able to handle the dough, or would I need to halve the recipe?
Also, can I find vital wheat gluten anywhere other than online?
And finally (sorry so many questions!), can i buy white whole wheat flour, or is that something I’d have to grind myself?
I love your stuff. Thanks for all the time and fabulousness!
Mel… Why do you grind your own flour??
soft and fluffy and ultra-nutritious! i’m proud to say that i haven’t bought a loaf of bread for over a year. that said, i still find your bullet points very useful–i’ll be looking into those bread bags!
I’ll have to try these both! I love making bread at home–well, I love eating it but am a bit impatient with the baking process–but haven’t done it in a few months. Thanks for sharing your favorite w/w bread recipes!
Yay you got a new look and an address! Congrats! This bread looks really good! I just went and got some whole wheat flour so I’m excited to make this bread. Thanks!
Mel,
I just wanted to let you know that I LOVE LOVE LOVE your website! I love the new layout and I try almost all of your recipes (once I am settled again I will be trying this yummy wheat bread). Just wanted to let you know that I really appreciate the extra effort you put into explaining your dishes and the easy and yummy dinner ideas that you post. My husband thanks you too, he is a big fan of meatballs now! Thank you again for your awesome website!
Kaitlyn – I lightly coat my Chicago Metallic bread pans with cooking spray. The ones I linked to in my email are not non-stick so a little grease helps the bread come out. Just a light coating. Hope that helps!
Janine – I don’t own the Wolfgang Flour Mill (otherwise known as KoMo Fidibus Classic) but I’ve read some great reviews and seen some other bloggers who have it and swear by it. So it is on my wish list and I need to save my pennies for it (it’s a bit more expensive than the Nutrimill). The main advantages I’ve seen of the Wolfgang mill over the Nutrimill that makes me very interested in it is that you can keep the Wolfgang mill on your counter (it is enclosed in a wood box) and it does not get a speck of flour or grain anywhere. You can grind a tablespoon of wheat at a time and not have a mess to clean up. Not only that, but it is self-cleaning and you don’t have to take it apart to clean it out. It is also much quieter than the Nutrimill. I’ve been leaning toward it because I could grind the flour I need RIGHT then, as needed, which keeps the nutrition levels higher in your wheat flour and also means I don’t have to pull out the Nutrimill everytime I want to grind (which necessitates grinding it outside or in my garage and cleaning everything up). I’ve found that the Nutrimill is quite messy. It gets flour everywhere. It’s not bad at all if I grind it outside but that’s hard in the winter and because of the mess and loud noise, I can’t grind whenever I want or as needed. I grind in bulk and then freeze a lot of the wheat flour.
Now, I must say that although the Wolfgang flour mill has merits, the Nutrimill is also an amazing mill. I’ve used it for 7 years and although I have a few gripes with it (like the noise and the mess), it is one of the top-ranked flour mills and really lives up to it’s name. I’ve never had a part break on it and have only ever replaced the filters (which are about .25 each). I’ll use it for a while still and really, really like it, but I have my eyes set on the Wolfgang mill, still. I just wanted to reassure you that the Nutrimill is still a great purchase, in my opinion, but if you are interested in any of the issues I have with it, it might be worth checking out the Wolfgang mill. Let me know what you decide!
Melanie,
What do you use to grease the Chicago Metallic pans? Or, how do you get the bread out without sticking if you don’t use anything to grease them with? Thanks!
Wow! You’ve hit the big time now Mel! I love it…..
Hi. I really enjoy your blog and all your wonderful recipes!
I purchase the vital wheat gluten by the bulk (6 or 8 cans) from a vendor in Mesa AZ. (I bake 4 to 5 loaves weekly.) Troy will mail for $5 a case and he’s at http://www.preparingwiselyonline.com.
Your Bosch recipe is very similar to mine. I use only 1/4 cup oil (canola or grapesee) and 1/4 cup honey. I also increase the yeast and salt to 3 TBSP each. Also, I use 1/2 cup vital wheat gluten. I’ve never had an issue with “crumbly” bread… 2 TBSP sounds like not enough, but I think I will start lowering my 1/2 cup because that seems kinda’ high. I also purchased the William Sonoma bread pans that are coated. I think they were more expensive; but they are lifetime and that’s worth it to me. Happy Spring Break!
Love the new look! And I love these loaves! Mmmm, bread and carbs. 🙂
Congrats on the move!!!
Hello, longtime lurker, new commenter, love your website and your recipes. I was heading out to buy a nutrimill tomorrow to start grinding my own flour as well, but saw your post, and was wondering about the other grinder you mentioned, the Wolfgang one? I haven’t heard of this one, and was quite taken with the Nutrimill. Can you possibly tell me some of the pros and cons of it, and why you like the other one? I value your insight, as you seem to be on the same path as myself in the cooking department, although I think you are perhaps a mile or two ahead of me on the path!! Thanks so much!
Jenn – I use the 1 pound size but I’m sure either would be fine, just depends on how big you like your loaves to turn out!
Looks great Melanie! I have been making whole wheat bread for my family for many years now, but have just recently heard about a new trick. I use 5 HEAPING tablespoons of Vital Wheat Gluten, instead of the usual 2 T my recipe calls for. Sounds like over kill, doesn’t it! It makes the bread absolutely heavenly. And, it really helps the bread stay fresh for days afterwords. It’s made a real difference.
Your new site looks wonderful as well. Great job, thanks for all of the great recipes!
I just started making all of our bread about a month ago… I’m never turning back! Something that I do after the loaves have cooled is get out my electric knife and slice them all up. I love that it allows me to control the width of the slices better and they’re perfect for sandwiches!
I love the recipe that I use but will definitely try yours!
I have been searching for a great whole wheat recipe forever! Thank you! Absolutely love your site!
Thank you so much for this post!! I have been wanting to make my own bread for a long time. It just seemed like such a daunting task. I am going to get some of those pans asap. Thanks again!
Mel, you are inspiring me to make all of our bread again. I fell off that wagon when I returned to the work force a few years ago and I miss home made bread so much!
Which size bread pan do you have? I see there is a 1 pound and a 1 1/2 pound size.
I am still in the stage where I bake a loaf here and there. I would love to bake all of our bread. I know I will love both of these recipes. I have needed some good loaf pans so I ordered the ones you like on Amazon. I know I can’t go wrong when you recommend something.
I have been looking for some good loaf pans. Even better is they are buy three get one free on Amazon right now! Thanks!