DIY Homemade Yogurt
Have you ever tried making your own homemade yogurt? This detailed post will give you all of the tools you need to make it yourself at home!
I have to tell you that since moving to our tiny little town stuck in the Northern reaches of Minnesota, I’ve realized that if I don’t start getting in touch with the inner reaches of my resourceful soul (I swear, it’s in here somewhere), I’m going to be in big trouble.
Mainly because I don’t have the same access to groceries and “things” that I used to have. Let’s face it – I was spoiled. Big time.

And now my family is learning the true meaning behind the phrase “make it do or do without” or rather “make it ourselves or do without” in our food-loving case.
I’m not saying we can’t buy stuff; we can. But I don’t have the luxury of seventeen flavors of organic, Greek yogurt staring me in the face at the store. Which brings me to this post. In fact, I’m so excited to share it with you that my fingers may or may not be shlowken…I mean, shaking.
In the last three months, I’ve made this DIY yogurt nearly weekly.
I wanted to really have the method perfected before sharing it with you, and I can honestly say I am as sold on making this yogurt as a regular part of our lifestyle as I am making all of our bread, which was a huge leap for me when I first started over three years ago but now seems like second nature.
Once you get the hang of it, this yogurt is practically mindless. I have it down to a science.
I know that by starting it by 3:00 or 4:00 in the afternoon, I’ll be ready to pop it in the oven for an overnight rest by 10:00 or 11:00 and it will be strained and devour-able by 2:00 the next afternoon.
Besides taking the yogurt’s temperature (think of it as a beloved child you are nurturing) and moving it from point A to point B, this couldn’t be simpler.
When I initially tried it, I figured it would be kind of neat-o and novel to make my own yogurt. But I didn’t count on the absolute delicious, creaminess of this yogurt. In my opinion, it beats out any storebought yogurt I’ve ever had – Greek or regular. And if you live in the boonies like I do where grocery prices are a little bit inflated, it’s very cost efficient to make it yourself.
I’ve included a step-by-step tutorial along with the recipe. And I’ve added lots and lots of notes to the recipe in order to help you along (basically my finds after dozens of times making this) so please settle in and read through it all.
It’s riveting and educational and it will make you smarter while changing your life.
Ok, not really to any of those things, but seriously…get on the yogurt making bandwagon! You’ll definitely be the cool kid in town, no doubt about it, and I’ll be here to hold your hand through the journey. Promise.


DIY Homemade Yogurt
Ingredients
- 1 gallon milk
- ½ to 1 cup nonfat dry milk powder, optional
- ½ cup plain yogurt with live and active cultures, look at the ingredient list to make sure it includes Lactobacillus bulgaricus and Streptococcus thermophilus
- Fruit syrup, if desired (recipe below)
Instructions
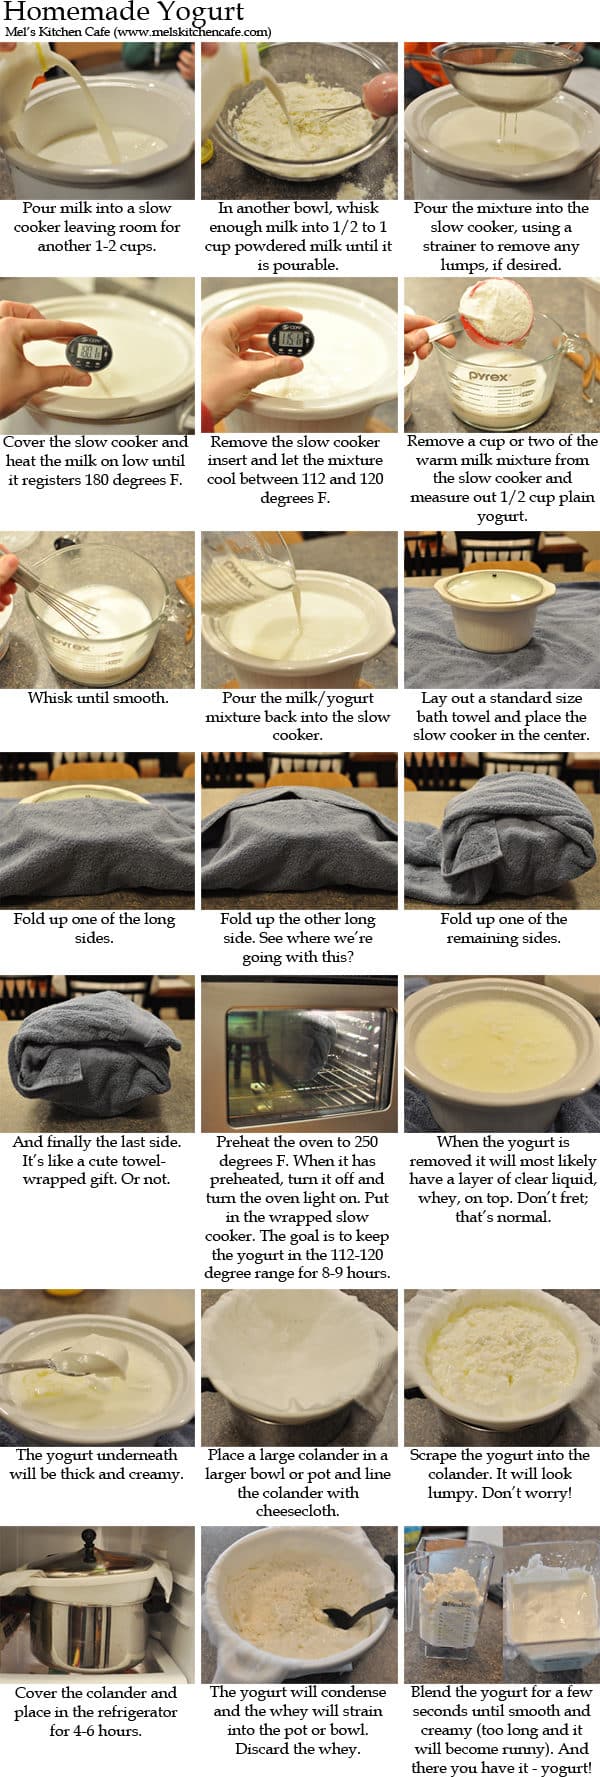
- Pour one gallon of milk into a 5-quart slow cooker, leaving enough room for 1-2 cups more liquid. See the note above for adjustments if you are working with a larger or smaller slow cooker or pan. Whisk a cup or so of milk into 1/2 to 1 cup powdered milk until the mixture is smooth. The powdered milk is optional but adds protein and creaminess. Pour or strain the powdered milk mixture into the slow cooker. Cover the slow cooker and heat on low until the mixture reaches 180 degrees F (in my slow cooker, this takes about 2-3 hours, although each slow cooker will heat a bit differently). Remove the slow cooker insert and let the milk cool to between 112 and 120 degrees F. Too warm or too cool and the milk won’t culture into yogurt. Without any stirring to help cool, it takes 1-2 hours for the milk to cool. Stirring will help the milk cool more quickly.
- Once the milk has cooled to that temperature range, measure out 1/2 cup plain yogurt (Greek or regular) in a small bowl and whisk in 1 or so cups of the warm milk into the yogurt. Whisk the yogurt/milk mixture into the warm milk. Now lay out a standard size bath towel and place the covered slow cooker in the center. Fold up each side until it makes a neat little towel wrapped package and the slow cooker is completely insulated. Preheat the oven to 250 degrees F. Once the oven is fully preheated, turn it off. Turn the oven light on. This will help maintain the warmth of the oven while the yogurt cultures. Place the towel-wrapped slow cooker into the warm oven. Let the wrapped pot sit in the warm oven for 8-12 hours. The idea is to keep the milk/yogurt mixture in the 112-118 degree range for that period of time. It is what cultures the milk and turns it into yogurt.
- After 8 or so hours, remove the pot, take off the bath towel and take off the lid. The mixture should be very thick and set and it may have a layer of clear liquid on the top (whey). If it is still too liquidy, return it to the warm oven for a longer period of time. If you think your oven may not be holding warmth, you may need to preheat it to 250 degrees and then turn it off every couple of hours but usually just keeping the oven light on after preheating it once should do the trick.
- Once the milk has successfully cultured and turned to yogurt, line a colander or strainer with cheesecloth and set it over a large pot or bowl. Pour the yogurt into the strainer. It may be lumpy but as long as it’s thick, it will strain just fine. Using lowfat milk will produce more whey and the yogurt will need more straining time; using whole milk will produce less whey and you may not even need to strain it at all. Place it in the refrigerator and let it drain for 4-6 hours. There will be quite a bit of whey in the pot or bowl. Discard this liquid. Scrape the yogurt off the cheesecloth into a bowl or other container. Whisk to recombine the yogurt. My yogurt, at this point, looks almost like cottage cheese and has little lumps no matter how much I whisk it, so I pour it into my blender and blend it for a few seconds (too long and it will become runny). The yogurt can be stored in the refrigerator for 1-2 weeks. If you want to continue making yogurt like this, reserve 1/2 cup of the yogurt to use as a starter in your next batch.
Notes
Recommended Products


Yogurt Inspiration: Taken from Annie’s Eats and Jillee, among many other sources and sites around the internet


Made it its awesome! I thought I ruined it the first step but it was awesome! I love controlling how sweet it is! Thanks for all your scientific documentation
One more suggestion. I place the bowl on a heating pad set to low and cover everything up with a heavy towel. Leave it for about 6 hours. Works great and frees up the oven.
Hi Heather – glad this worked out so well despite the hiccups. Try a different brand of yogurt for the starter if the tartness seems off. My homemade yogurt is more mellow in flavor than plain yogurt from the store (which I like) but if you want more tartness, the brand of starter may make a difference…and also, letting it culture longer, even if it’s set will probably help enhance that flavor.
I have to say this really is a fail proof method or mine would have flopped! I mis-read and thought the milk had to reach 212 before cooling and adding yogurt. It took a lot longer than 2-3 hours but then realized it was not supposed to be that high. Followed everything else. Then I got up in the middle of the night to find my oven totally cool. Preheated to 250 and left it on warm. (My light only comes on when the door opens or closes. ) I also left it in the oven longer as I realized that I didn’t have cheese cloth. I ended up using an old clean pillow case and it worked beautifully! It is delicious! I only wish it was a little more tart. Any suggestions?
Literally, yesterday I said to hubby that I was going to learn to make yogurt! I’m so excited that you read my mind! 🙂
When I strain my yogurt, I line the colander with coffee filters instead of cheesecloth. Works perfectly!
Kate (and others) – thank you so much for all your feedback! Methinks I’ll be doing an update to this yogurt post as soon as I try out some of the other methods. The steps I included in my tutorial are no-fail (if you ask me) but I’d love to find a way to streamline the process so I’m going to try it out with the mason jars and perhaps heating it to a hotter temp. I’ll report back!
Janette – I’ve kept mine in the fridge as long as a week (we go through it pretty fast) but I think a good rule of thumb is to keep it as long as the milk expiration on the carton (perhaps even a bit longer since it’s been cultured).
This was actually my last post on my food recipe blog. We’ve been making it at least weekly (2x a week for a while) since the beginning of summer.
A couple things: 1- even with whole milk the finished yogurt is less sour and more creamy if you strain it. We always do and use the whey for pancakes – yum! 2 – we heat our milk to 195 deg F for 10 min, before cooling the milk down. 3- use only a teaspoon or two of yogurt. 4 – we put mason jars with the milk in a cooler with another jar or two filled with simmering water… close the cooler lid and it stays the right temp for the ~4-5 hours it takes to firm up.
We heat the milk hotter because it makes for a thicker yogurt. Why? well, Harold McGee’s “On Food and Cooking” says that manufacturers cook the milk for 30 min at 185 deg F or 195 deg F for 10 min, this “denatures the whey protein lactoglobulin, whose otherwise unreactive molecules then participate by clustering on the surfaces of the casein particles. With the helpful interference of the lactoglobulins, the casein particles can only bond to each other at a few spots, and so gather not in clusters, but in a fine matrix of chains that is much better at retaining liquid in its small interstices.”
Translated: the hot temps is needed to unfold a particular protein that will help the yogurt be thicker at the end of the day.
Not as practical for your slow cooker, but it makes fabulous thick wonderful yogurt for us!
Hi Mel, thanks for this great recipe. I always enjoy your site. Just wondering how long homemade yogurt is typically good for? I know you have a large family, so it might not “last” very long in your house, 🙂 but maybe someone else could chime in?
Thanks!
tsmith – good point! I forgot to add that in the instructions, so I’ll edit because that is very important that the yogurt starter have active, live cultures.
Leigh Anne – adding the nonfat dry milk significantly increases the protein content in the yogurt.
Awesome Mel! I have been wanting to make my own Greek yogurt cuz I too am in the same rural boat as you….just warmer in Texas….haha! Since this is Greek yogurt, does it have the same high-protein content as the store bought? I use it in my morning smoothies to help me feel full longer. And it helps to keep my kids full too, which is hard to do! My local store only carries sugar-filled yoplait, so when we go to the big city I buy some plain Greek. But now, I am gonna make my own! You make it look so easy! Thx!
Make sure the yogurt you are using for your starter contains live and active cultures. Check the packaging, not all yogurt does. I also add a package of unflavored gelatin to the milk after it has been heated to 180. It makes a nice thick yogurt without straining. If I am in a hurry, I heat the milk on the stove and then set the pot in the sink with a little bit of water for a quick cool down before I add the yogurt starter.
This yogurt information looks very interesting. I will have to try it on a weekend.
I also wanted to comment that I have been hoping to try the Spaghetti Pie recipe sooner rather than later. But oh baby, is it ever good. Thanks for all you do.
Pat
…Now pinning! :o)
…Thank you so much for this! Great tutorial and again, thank you, as I know this was no small feat.
…Enjoy your day!
…Blessings. :o)
Hi Mel! I never comment but have been a reader for the past year. I love your blog! I just had to comment today because I noticed that you also have the small piggy whisk, the cutest! =)
wow this post makes it look so simple. I’m going to give it a try this weekend. My kids and I love greek yogurt but in NYC I pay about $2.00 for a single serving cup. It really adds up when you are buying yogurt for 6 people.
Oh, Mel! I’ve been wanting to try making my own yogurt, but I needed very clear instructions from someone like you! Thanks 🙂
Wow! I’m excited. I think my life might change forever once I give this a shot!
I second Jen’s question, would any of you that say you make ricotta cheese please pass along the recipe you use?
I’ve been using this method for a couple years, but I don’t heat the milk up in the crock pot. I turn my crock pot on low while I use a stockpot on the stove to heat the milk to 176 degrees (the temperature milk is heated to for making yogurt commercially). This takes about 20 minutes. Then I put the stock pot into an ice bath in my kitchen sink for approximately 4 minutes, watching the temperature carefully to get it between 112 and 115. I then pour the milk into the crock pot and continue from there. It shortens the whole process by several hours. Love your pictures, Mel!
My ancient oven doesn’t have a light. Could I just keep the oven on at 250 for the duration?
I know that Mel said she hasn’t tried this with nonfat milk, but has anyone else? I’d love to hear your results!
Any experience making yogurt with milk substitutes?
For those who commented about using the whey, do you have a good recipe for making ricotta cheese with it?
I have never tried making my own yogurt, but have thought about it more and more recently. My daughter and I love yogurt (Greek in particular) but even on sale, a small container can cost $.50-$.75.
I’ve been making my own yogurt for a while using the method in Jennifer Reese’s book, Make the Bread, Buy the Butter (http://www.amazon.com/dp/1451605870/?tag=googhydr-20&hvadid=7682999557&hvpos=1t1&hvexid=&hvnetw=g&hvrand=12111526531630074376&hvpone=&hvptwo=&hvqmt=e&ref=pd_sl_7d9801p7qr_e). It uses the stove instead of the crock pot, but I personally prefer it. The one time I made a crock pot yogurt I don’t think it cultured all the way. But your tried-and-true method looks like it’s worth a try, even just to compare.
As someone else mentioned, don’t throw away the whey! It still has nutritional value. When I have some I use it in place of water when I make bread.
Also, I got tired of buying and using cheesecloth, so I bought a pack of those white flour-sack style dish cloths from Target and I use them for all my straining needs. I just dampen one before using it to line the colander. Easy to wash and use again.
To all those wondering about milk substitutes – someone left a comment on my Facebook post saying that yogurt can be made with soy milk, rice milk, coconut milk, etc. I have NOT tried it, but apparently others have. Good luck!
let me re-phrase you get you yogurt for 4 for the price of 1 that’s better than half 😉
Thanks for the instructions! What brand of thermometer is that?
Awesome!! I was surprised how easy this looks. Fantastic tutorial, Mel!
I make my yogurt a similar way, but there’s even less work – I usually make it in a smaller crock pot, but you’ll get the idea – 1/2 gallon milk in slow cooker. Cook on low for 3 hours. Turn off for 3 hours. After 3 hours stir in 1/2 c plain yogurt. Wrap up crock pot in blanket and let sit overnight. ( I usually start the whole process at about 3:00 in the afternon). In the morning put a cloth over strainer and pour in yogurt. Let sit for however long… Works great!
I love this! I love when I can make something at home froml scratch instead of always having to rely on a store. Thank you for sharing this!
I can’t use my oven light since it smells like it’s melting if I leave it on too long. My oven does have a cool dehydration feature that allows me to set the temp as low as 100 degrees. Would that do the trick for the 8 hour culturing period?
Judy – you’d have to experiment and see but if you could set it to 115 degrees, that should be perfect.
Don’t throw away your whey, use it as the liquid the next time you make bread, yummy! Try making yogurt cheese, too, I’m hooked.
Great instructions, by the way. Takes all the scary out of it!
To Amanda’s comment: You only save money this way. You can never buy yogurt for cheaper than you can make it yourself. I have done the math many times. Whether you buy organic milk, raw milk, or regular store bought, making your own yogurt is way cheaper! Even at $2 a quart you can’t beat the price of making it yourself. My opinion is that it also tastes better :). 4 qt.s of yogurt = 1 gallon of milk. A cheap gallon at Costco is $1.89, so you get your yogurt made at home for half the price of the store bought stuff that has more junk in it and doesn’t even taste as good. No electric waste really either… maybe a few cents… IT’s worth it 🙂
Mel- I would call this true Greek yogurt. Regular yogurt doesn’t strain the whey (I don’t). Watching America’s Test Kitchen the other day, they said that was the only difference…. and to your credit… the American brands of Greek yogurt, not one of them actually strain the whey in their processing methods. They all cheat and use pectin.
I do a couple things different but the only one that really matters is to keep mine simple… after heating the milk, I pour it out into quart size jars leaving room to add the yogurt culture to each container. Then I put all the jars into a large pot
of warm water with the lid on and the water to the level of the yogurt in the jars. Place in the warm oven (heated to 170 then turned off)…. I don’t strain the whey. It rises to the top and I dump it out or use it for other things… Mine has never been lumpy this way. It’s very smooth and I love the fact that I can keep it easily stored. We do go through a lot of yogurt, but I like it this way!
Love you stuff as always!
Great tips, Amanda E! All my quart jars are in storage but it may be worth digging them out to try it this way. I’d love to find an alternative to blending and maybe even straining. Thanks!
Don’t throw out your whey! It is really easy to make ricotta with it. Or use it instead of buttermilk in baked goods.
Didn’t realize the lumps were normal, and hadn’t even thought to just put it in the blender to smooth it out. Duh moment.:)
Thank you! I tried to make homemade yogurt a couple times last winter and was skunked both times. Thank you so much for this detailed tutorial. I’ll be giving it a whirl very soon!
Nancy – I read on Jillee’s site that she uses whole milk and doesn’t strain it so using a lower fat milk is probably the reason for the straining time.
Nancy, it IS thick and creamy after it incubates in the oven, but if you were to discard the whey and stir it up, it would still be runnier than a thick, Greek-style yogurt. If that doesn’t bother you, then you could use it at that point but it’s too runny for me, which is why I like to strain it. After it strains, it’s lumpy like cottage cheese, so the quick blend in the blender helps smooth it out. I’m using 1% milk so those factors may change if you use a fuller-fat milk.
I’m confused, why drain it and blend it if, after it comes out of the oven, it’s already thick and creamy? Or is it because it’s not thick enough to be yogurt?
Trisha – I honestly don’t know. You’d have to experiment or google to see if anyone else has tried it.
Homemade yogurt isn’t for everyone. It takes time and effort. If you read through the post before the recipe, you’ll note that the reason I have started to do this is because I live in a remote area of Northern Minnesota where yogurt, especially organic Greek, is very expensive. So for me, it is cost effective. Plus, there is a sense of total awesomeness and Pioneer-ish-ness when making your own yogurt (even though Pioneers didn’t have slow cookers or ovens, just go with it). Sometimes it’s not about saving money; in this case, it’s a twofold purpose for me: making something I can’t find easily and feeling a sense of accomplishment from making yet another food staple instead of buying it.
Do you think you could use soy milk for this? My kids can’t have regular milk and I have been trying to figure something out for yogurt because they love it. Thanks so much for your website and all the time you put into it! 🙂
We’ve done this for about a year and love it! Slightly different method…we don’t put it in the oven, just wrap it twice (once with a big beach towel and then wrap a giant, fairly thick blanket around the whole thing) and we leave in on the counter, and in the morning it’s yogurt. The weird thing is, we recently got a new crockpot and it didn’t work in the new one (it turned out a little lumpy..?) I think it might get a little hotter than my old one did. I’d imagine if I do a little tweaking/monitor the temp I could get it to work in the new one. Love your clear, precise directions and photos. You rock!
I am questioning how much money this would save, if you factor in the electricity cost. Here I can get 32 oz of organic yogurt for $4 (less often with a coupon), but organic milk is $6+ a gallon, so even if I made my own, the $2 in savings is largely eaten up by electricity.
This looks like a fail-proof method. I have tried a few different ones and this looks the easiest. I am excited to try it. How much yogurt are you left with after straining? I know you mentioned that there is more whey with 1% or 2 % milk. I have made yogurt with whole milk and even added heavy cream to it. It makes a decadent treat.
Geez, Mel, are you reading my mind??? I JUST told my husband I’ve been craving yogurt and that I miss having it in our regular rotation. After I hung up the phone, I checked my FB wall and saw this new post – couldn’t have been more than five minutes after I’d mentioned my craving!
Wow Mel! I am impressed. That seems like a lot of work for yogurt. I bet it is delicious though. I will do a lot more than most people for food prep. ( weighing ingredients, making most things homemade, etc. ) But homemade yogurt is something I never thought of. You might have just inspired me! 🙂 homemade croissants were probably my most difficult but this looks doable. Thanks Mel!
I was just talking to my husband about making homemade yogurt to save some money (we eat LOTS of yogurt!) and he didn’t think it would be worth it but it looks like it will basically be the cost of 1 gallon of milk for an equal amount of yogurt (for plain, anyway) so I think I will try this! Thanks! About what temperature does your oven seem to stay at with the oven light on (say about 1/2 way through the process)? I ask because my oven light doesn’t work (it won’t stay on and comes on unexpectedly other times) but my utility room is basically a tiny little hole that is always really hot compared to the rest of the house. I wonder if I could make it in there?
Katie Rose – I don’t have an oven thermometer so I don’t know the exact temperature the oven stays, although from what I read online as I’ve gone through this process, the thought is that your oven should maintain right around the 250 preheated temperature (hence using the oven light to help it stay warm and not lose all the heat) to incubate the yogurt. Does that make sense? You could use any number of incubation methods as long as the yogurt stays between the 112-120 mark for the 8-10 hours. If your oven light isn’t working, you can preheat the oven to 250 degrees and then turn it off every few hours to keep it warm enough.
Are you reading my mind again, Mel? Just yesterday, after reading an article in a food magazine about homemade yogurt, I was searching the web for recipes. Seriously- and then this morning I see that you have posted this recipe! I am so excited that you have been making it (aka perfecting it!), so now I know the tried and true method! While it saddens me that you (being such a foodie), are so limited in the ingredients you can purchase in your new town, I am happy that you are finding creative ways to make your favorite foods despite your limited local resources! 🙂