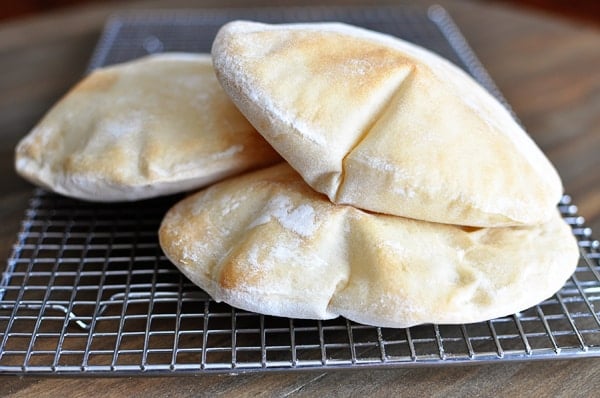
Homemade Pita Bread
Pita bread is surprisingly easy to make at home; in this post, you’ll get all the tips and tricks to make the pita breads puff perfectly!
I think the puffing aspect of pita bread is what scares the bejeebies out of most people who think they might, at some point in their life, want to try making pita bread on their own at home.
Or maybe that’s just me since I’m pretty sure most normal people don’t go around obsessing about the pitfalls of pita bread.
I had these epic nightmares of what would happen when all of my children had their faces pressed to the lighted oven door to watch the at-home science experiment of how pitas puff to make perfect little pockets…and I subsequently envisioned their dejected expressions when the pitas.did.not.puff.
Because I was sure that would happen and that vision was definitely not going to win me mother-of-the-year award.
Oh wait, that actually did happen. See? Non-puffing pitas are a serious bummer.
However, I was forced to revisit the pita bread conundrum when I came across a chicken recipe I had to try immediately (which I’ll be sharing on Friday) and which called for pita bread.
I couldn’t bring myself to ruin a deliciously inviting meal with the cardboard-variety pitas I’ve spied (and yes bought) at the store on past occasions.
So I took a deep breath.
Embarked on some deep meditation to calm my inner angst.
And I made pitas.
And let me tell you, they were so wonderfully successful that I am kicking myself for not making them before.
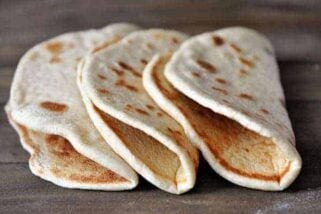
Yes, yes, there were a few that refused to puff. But thankfully there were enough that did magically puff to appease the four little grubby faces watching in amazement.
The trick with pitas, I learned after making a triple batch, is that a) they need to be rolled out as evenly as possible (overly thin or thick spots in the same pita round make for trouble when puffing) and b) the top of the pita dough needs to be a tad bit moist (no dry dough!) in order to perform the puff.
Seriously, pita bread is one of the easiest yeast doughs to make.
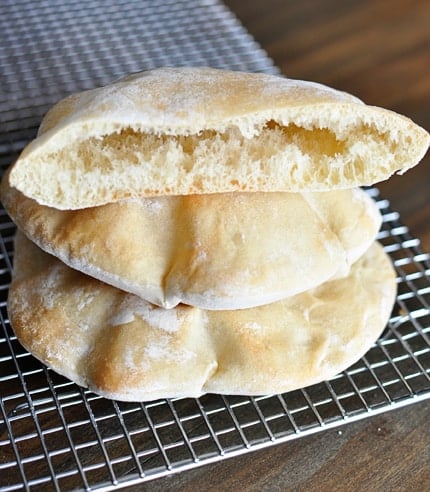
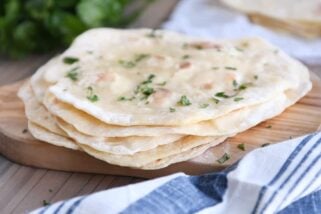
And how could you not feel superhuman when you’ve just created a piece of bread that has a pocket inside of it for goodness sakes.
That alone is worth the effort to make them.
A.pocket.in.bread. It’s revolutionary, I tell you.
One Year Ago: Grilled Rosemary Buttermilk Chicken
Two Years Ago: BBQ Pulled Pork Sandwiches {Slow Cooker}
Three Years Ago: Chipotle Chicken Tacos
Homemade Pita Bread
Ingredients
- 1 tablespoon instant yeast
- 1 ¼ cups warm water
- 1 teaspoon salt
- 3 to 3 ½ cups (426 to 497 g) all-purpose flour (see note)
Instructions
- In the bowl of a stand mixer or in a large bowl (if mixing by hand), combine the water, yeast, salt and 1 1/2 cups flour. Beat to form a soft batter-like consistency. Add additional flour until the dough starts to come together. It may look rough and shaggy at first but as it continues kneading, it will come together. Add enough flour to form a soft dough that clears the sides of the bowl (but is still slightly tacky to the touch – see the note above) and knead for 4-5 minutes with an electric mixer or 8-9 minutes by hand until the dough is smooth and elastic.
- Turn the dough onto a lightly floured countertop and divide the dough into six equal pieces. Roll the dough pieces into a ball shape. Lightly cover the balls of dough and let them rest for 10-15 minutes. Roll each dough ball into a thin disc, about 1/4-inch thick. Do your best to keep an even thickness throughout the entire disc of dough since this helps the dough puff in the oven (among other things). Let the pita rounds rest, lightly covered, for 30-40 minutes until they are slightly puffed.
- While the pita rounds are resting, preheat the oven to 425 degrees F. There are two methods for baking the pita bread. 1) Use a baking stone. Preheat the stone in the oven for 30-40 minutes (while the pita rounds are resting). When ready to bake, gently lift a pita disc, with your fingers or a large spatula, and flip it onto the hot baking stone (if your stone is large enough you can bake more than one at a time). Flip the dough so that the side that was resting on the counter is now facing up. You want the the side that has been exposed to air (the dry side) to be down on the baking stone and the side that is more doughy and moist to be facing up – this helps the pita puff up. If you bake one or two and they aren’t puffing, spritz the top of the pita round with a light mist of water before baking. 2) If you don’t have a baking stone, preheat the oven like normal and then when the pitas have rested, gently flip two of them onto a large, rimmed baking sheet lined with parchment paper. Again, make sure you flip them so the side that was resting on the counter is now facing up. Spritz with water, if needed.
- Bake the pitas for 10 minutes, until they are starting to brown very lightly on top and they have puffed several inches high. Keep in mind, though, that it won’t be unusual to have some pitas that just refuse to puff. Still take them out after 10 minutes – they will make great flatbreads and will still taste delicious even if they don’t have the magical pocket inside. The trick to great pita puffing is to roll the pita evenly and to make sure the dough isn’t dry on top when it goes in the oven (hence the reason for flipping the pita onto the baking stone or baking sheet). Don’t get discouraged if your pitas don’t all puff. I had some non-puffers and we made little pizzas out of them and/or used them to roll around the filling instead of stuffing inside the pita. The baked and cooled pitas can be frozen or stored covered at room temperature for 1-2 days.
Notes
Recommended Products

Recipe Source: adapted slightly from Under the High Chair, found via Pinterest


I found your blog last week while looking for a great by recipe. Your French rolls are easy and to die for.
I tried my hand at your pita bread this morning and they came out amazing! I used a couple of tricks I learned while making tortillas that might have helped.
I use active dry yeast so I proofed it with a teaspoon of sugar.
While resting I covered the dough with damp paper towels that are lightly sprayed with cooking spray. After I rolled out, I picked them up on the rolling pin so not to stretch them (think picking up a pie crust). And I put on individual pieces of parchment to rest and rise, once again covered with sprayed damp paper towels. I preheated my cookie sheet and flipped the pita dough onto the sheet and peeled off the parchment.
They all puffed beautifully. Wish I could show you a picture!
Thank you!
Love the tips, thank you!
All of my pitas puffed up! Great recipe and super easy! Thank you =]
All of my pitas puffed!!!!! I’ve never bought the store brands bc they honestly look gross and dry. I let them rise on parchment already laid out on the cookie sheets and just tossed them in the oven like that, mainly bc I forgot to flip. They all puffed, thank you so much for this recipe!
Great recipe. After they cool, I run a knife around the edges and spit them to make two very thin rounds. I place these under the broiler until golden. After they are cool, I put them in a plastic bag and refrig them. I make little pizzas out of them. They’ll last a month in the refrigerator.
Adding 2 tbsp of Olive Oil add great taste.
If you don’t have a baking stone use a cookie sheet instead while the oven is heated. It’s almost the same results
I’ll appreciate some German bread and rolls recipes.
made these for the first time today and they turned out wonderfully and taste sooooo good, thanks so much for this recipe 😀
TRYING to make Pita Pockets so I can make Pita Chips out of them. This was my 4th attempt at pita making. First two I followed used active dry yeast (dedemed recipe), third used instant yeast (Bhavna on YT) and fourth, your recipe and outstandingly descriptive lesson in working with yeast. What I noticed was automatically different in yours is the time allowed for the yeast to rise, patience is a virtue. Also, theirs let the dough rise in the bowl as a whole before making balls, yours is different. They do a final dough roll out then into the oven, where yours rolled out are allowed to rise for quite a long time. There were other differences too but with yours I was able to finally get a pocket for the first time. 2 out of 6 puffed. I’m not sure if I let them rise to long on the last rise (after roll out), they were like 1/2 inch thick (I got sidetracked and lost time) and 4 came out soft and poofy with cooked through dough, really like pillows that didn’t poof.
I know I’m on the right track with your recipe as it makes more since. Hope this helps anyone who’s also on this road, in the meantime I’m getting good at making other stuff with the ones that don’t poof. But! this recipe is starting to flick my “out with the birds” switch on my tolerant scale for recipes. I followed all recipes exactly, except possibly letting them rise maybe a bit to long on the last rising time. I am in the middle of the U.S and have around a month in late summer I don’t even try to make dough the reg. way because of the humidity and it’s March, perfect humidity for bread making. After this try I went and bought a new roller, one with no handles so I can feel the rolling to tell if I’m allowing the rolling pin weight to do the work or if I’m pushing with force. Also feeling the rolling might help even the dough easier. I’ll let you know. Thank you so much for sharing your brain with us, it has REALLY help me work through this process. Oh my heart went Pitter Patter watching those 2 FINALLY POOF! ThanK YOU!
I made these last night for the first time and all six puffed really well. I used a parchment covered cookie sheet (not pre-heated) and flipped them with the help of a spatula. I also added a tbsp of olive oil to the dough and it had a wonderful texture.
I’ve often made your Greek-style flatbread, so it’s going to be a toss up next time! Love your site generally and have used so many recipes! Best wishes from Toronto…
To get the pitas to puff they need to be transferred to the hot pAn unbothered. I heat a large cookie sheet that can fit All 6 pitas in the oven. After rolling out the balls with plenty of flour, I transfer them to a large piece of floured parchment paper. That way when they are done resting I can flip them gently without them sticking to the counter. If you pinch them or they stick to the counter they will deflate and not puff up. Then I just slide the parchment with flipped pita rounds right onto the hot pan and bake at 500 degrees for 5 minutes
I tried a very similar recipe to yours (it said to add a couple tsp of olive oil for additional flavor). I actually let the dough rest for a little over 2 hours and got a nice puffy dough.. rolled it out, divided into 10 balls/disks.. baked them.. they puffed.. fabulous aftermath! BUT I let them cool down to save and they turned hard and they definetly do not look as puffy as yours do in the finished product pic.. any thoughts? thank you!! 🙂
Alexis – If they turned stiff after cooling, it sounds to me as though they were overbaked which would definitely cause that to happen. Also, covering the hot pitas from the oven with a towel helps keep in the moisture as they cool. Sorry they didn’t out the way you were hoping!
Darn…I should have read through the comments.
Only 1 puffed which was a miracle because they all stuck to the parchment paper. I’ve never had that happen before. Maybe I’ll give it another go but maybe not.
I was wanting pita bread and didn’t have any. I was getting ready to text my husband to pick some up on his way home and thought “maybe I should just try to make it”. That’s why I love your site…I can come straight here and instantly have a great tutorial for homemade pita bread. It was wildly successful and easy. Thanks!
I was certain that none of mine were going to puff because not a single one rose a single little bit while they were sitting on the counter. But they all puffed! I feel like a rockstar!!! Can’t wait to eat them — the Greek chicken in the crock pot is KILLING me….it smells so fantastic.
🙁 None of mine are puffing. I don’t have much counter space so I put each round on a cookie sheet to rest. They got puffy, but then lost it all when I had to peel each off the sheet. I see now looking at your photo of the finished puffed pitas that you must have used waaaay more flour to roll out than I did. How are they still moist on the bottom with all that flour though? Especially if I follow the tip of letting them rest on floured parchment paper?
CraftyHourMom – sorry your pitas aren’t puffing. You might try a bit of nonstick cooking spray instead of flour if they aren’t moist enough on the bottom. As many times as I’ve made these, I still have a few that don’t like to puff either.
While on vacation we ate the most delicious pitas at a Greek restaurant. I hate the store bought ones….yuck! I knew I had to try to make my own and my first thought was “I bet I can find a recipe on Mel’s site!” You never fail me! I’m going to try these this weekend.
I made your rolls last night……we’re have the rest of them with meatball subs tonight. They were super easy and the family loved them. (I hid the 6 that were leftover so they wouldn’t dissappear before dinner.)
My husband and I love to cook and I often think about doing a website to organize our recipes, but then I think “why bother, I have Mel’s site!”. Seriously, I bet at least 50% of my most frequently used recipes come from you. Keep up the great work !
Hi Mel, i tried the pitas and i was thrilled with how they turned out! i found that using a silicone cookie sheet to rise and transfer 4 at once to my baking stone helped alot.
they were perfect!
Thank you so much for your recipes 🙂
Totally worked! I had another pita recipe that I’d used several times before, but it was always hit or miss on which ones (if any) would puff. I was excited to try this recipe and it did not disappoint! I only had 15 minutes to let them rise after rolling them out, but they still worked. Also, mine only baked for 6-8 minutes. Any longer, and I was worried they would be dry/crispy. I used the tip of letting the rounds rise on lightly floured parchment paper for easy flipping onto my cookie sheet. Last tidbit: after pulling them out of the oven, I stacked the pitas between slightly damp towels. This way they go back flat (still have the pocket though!) and it helps keep them soft and pliable.
Huge flops as pitas — no puff, no pocket. But surprisingly successful as an after-school snack — the kids loved them!
Thanks for sharing this recipe.
I made these today and while they didn’t puff well, when I cut them open there was a nice pocket. I will try baking them a couple of minutes less next time, because they were crisp.
Last week I made tortillas for the first time and this week pita bread. The grocery stores have lost a customer for both.
I have made this 3 times and have only had 1 pita actually puff. 🙁 My husband actually told me last time to not ever attempt it again and just stick with what I know. Darn him. Anyway, just read through the comments. I’ll have to give it one more go and try putting them on individual pieces of parchment – I’ve just been using my Tupperware mat and my oven is like 5 steps from my table, so hopefully by cutting down the whole 5 steps walking distance and the individual parchment will make them puff better?? 🙁 We love the chicken. My husband’s just not crazy about eating “a pile of chicken” when the pitas don’t puff, even though the flavor is still good. He apparently doesn’t like piling it on the pita, wants to stuff the pita. LOL
It worked! They all puffed! My first batch were too crunchy. I found that a cooking time of 8 minutes worked best. They got progressively better as the batches went on. Can’t wait to make these again now that I am more familiar with the technique. Thanks for this recipe. I am using them for chicken caesar pitas tonight. It’s been forever since I made them because I was so tired of the dry pita bread.
Laura – no, you don’t need to preheat the baking sheet, at least according to the recipe. However, if you are using that method and the pitas aren’t puffing, trying to preheat the baking sheet may help with puffing (I’ve only used the baking stone method).
I have a quick question. Are we supposed to preheat the baking sheet as we would the baking stone or use it at room temperature? Thanks!
Marci – yes, maybe try flouring more. Maybe you already tried this but let each pita round rise on its own small piece of floured parchment so you can flip each one separately or use a large spatula to flip the pita and parchment onto the baking sheet and then gently remove the parchment.
Okay, I tried it again and 1 puffed this time. I definitely think the problem is that they are sticking to the counter and then getting deflated by the time I get them
To the stone. I tried spraying a little oil on te cupboard and using parchment. Any other suggestions? Should I just flour the cupboard heavily?
Marci – sorry your pitas didn’t puff! It does take a bit of practice…it sounds like your dough was soft and elastic enough. Maybe the transferring was part of the problem. If they deflate quite a bit in the transfer, they might not want to puff. Perhaps letting them rest on a sheet of parchment paper or a towel or something else that would allow you to gently pick up the pita and flip it onto the baking sheet instead of actually having to lift the dough. Make sense?
Seriously Mel how do you do it! Have a house full of little ones and bust out making glorious homemade products like these? I have wanted to make homemade pita bread for a while but just haven’t gotten around to trying it.
Well not a single one popped! Dang, I was so confident after reading your bread tutorial. I’m awful with bread! I wasn’t able to transfer them very smoothly from my counter to the stone and I lost my uniform roll. Is that my problem? The dough seemed so soft and elastic I thought I had nailed the flour part
Ron
Espically for, Judy F.
In the middle east we took the leftover Pita or Arabic Bread cut or break into small hunks and deep fry and treat like Crutons with Fattouch (LebaneseBread Salad) or any salad for that matter. Fry it sorta crispy.
Hey Miss Lana – I’m guessing the olive oil in the recipe is just to help the dough be pliable and soft. I’m pretty sure (but not 100%) that it doesn’t impact the “puffability” so in my opinion, I think you are fine leaving it out, especially since it will cut a few calories. Love the idea of pita chips, by the way!
LaRene – you could try thatbut I found the best way to ensure they don’t dry is to flip the side up that had been resting on the counter since there were absolutely no dry spots. Let me know if you trait another way!
Karla – I’ve seen those same kind of attachments although I’ve never used them and yes, I think they would probably work to help an even thickness for the pitas. I generally just use even pressure on the rolling pin and turn the dough in quarter circles as I go.
I came across your site and have made and love lots of your recipes. I just got done making these. Yummy. I did exchange the all purpose flour for Whole Wheat Flour and they turned out great. I only made 6 pitas just to give it a try. I used a baking stone, and could fit 3 on the stone. I only had one pita not puff. which is fine because I use pitas for homemade pizza once a week already and pita chips. Currently I only buy the Ezekiel pitas and they are not cheap. Never been so excited about making something. Time to stock my freezer with homemade pitas.
Your pita bread looks perfect. I can see they are the perfect carrier for something succulent….can’t wait to see your post on Friday. 🙂
I am so excited to try these out in my new oven. We are currently moving, but this looks like a great recipe to hold us through moving week–pita pockets for everyone!! Thank you so much!
“Marilla, look at the PUFFS!” (That’s all I could think about while reading this post.)
So, I tried this today, as the recipe is stated. I probably used about 3 cups of flour total. I got some that looked like they were almost going to rise…and then didn’t. That being said, we were able to use a sharp knife and cut slits down the middle and it was about as good as anything. We stuffed them with chicken BLT toppings. Thank you!
That pita bread looks so light and fluffy…the small ingredient list gets me to want to try….:-)
Well, I just tried it with 100% whole wheat and regular yeast (because that’s what I had on hand-I did let it rise once before dividing it into balls) and I ended up with flat bread. But you can snip them open and have pockets anyway. They just aren’t magical, but they taste fabulous!
These look awesome! Do you think that putting something of equal height at each end of a rolling pin would help with keeping the dough even? Ii know i have seen rolling pins with attatchments like that for pie crust before. 🙂
This sounds wonderful. I just bought some store bought pitas and was VERY disappointed in the lack of flavor (unless you consider cardboard a flavor!).
I would usually be so intimidated by a bread recipe-especially something like pita bread. But, this looks awfully simple. May have to put my brave pants on and give it a try 🙂
I generally do not bake (except meats or poultry). However, these intrigue me. I wonder if I could put them through my pasta machine to make them evenly thick. They might not end up being perfectly round, but I suspect I might not care.
Thank you!! I always just make do with the flat bread recipe when I need a pocket, but sometimes you really need a pocket!
Has anyone tried freezing these? As a single girl these would be too much for one shot . Thanks!
Instead of flipping onto a pan when ready to bake, how about just misting the top and have them raise on the pan?
You are amazing!!! I was hoping to try making your BLT pita pockets this week, and I was just going to buy the pita bread. Thank you so much for posting this, and thank you for all of your wonderful recipes!!! 🙂
I usually make pita chips after a day or so when my pitas are getting a little less soft. It’s so yummy, and my kids actually prefer them with hummus dip than regular plain pitas. You just brush both sides with a little olive oil, sprinkle with kosher salt and pepper, cut into triangles and bake 5-10 minutes at 350 until they’re crispy to your liking.
Melanie, my pita recipe calls for mostly all the same things, but it also says to add 2 TBSP of olive oil at the end once the other ingredients have been added and started mixing. Thoughts?
I have made pitas before in the way way past. Glad you reminded me of them, the perfect pocket for chicken salad sandwiches. Now can you figure out a way to make the leftovers into pita chips?
I’ve never made homemade pita but wow, those puffed up beautifully! Very nice job. And great tips if I ever get around to making pita!
Melanie…you are my bread baking hero! I have always wanted to try to make pita bread at home, but was to chicken to try it. I am going to give this recipe a try as soon as I can! 🙂 I’m looking forward to seeing the chicken recipe that you made to pair with the pita bread!
I’ve always been scared of pitas, but yes, the stuff in the grocery store tastes awful. I have to get brave and try this.
This is exactly why I’m going to baking school in the fall – fear of un-puffed pitas.
You don’t use exact amounts unless a weight is given and then publish your recipe without weights? please redo with weights.