Easy Rustic Crusty Bread with Tutorial {No Mixer, No Kneading}
This homemade rustic crusty bread is the most delicious bread that will ever come out of your oven! No kneading or a stand mixer required!
This is the bread recipe that can change your life. I’m serious. Just scroll down and read through the comments and then you’ll believe me. Here are a couple comments among hundreds of rave reviews:
One of the best bread recipes I have ever made! A real favorite with my family and excellent for sandwiches. Super easy!
I made this recipe for the first time this past weekend and it turned out perfect! It truly was an incredibly easy recipe to follow.
This is the first bread recipe i’ve ever successfully made! It’s delicious and so easy I used active dry yeast, and the working with yeast tutorial was a huge help! great recipe, Mel.
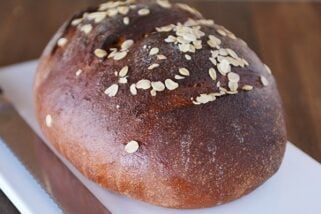
This rustic crusty bread recipe is perfect for beginning and expert bread makers alike. It’s like a perfect loaf you’d get right out of a bakery – for a fraction of the cost. Many artisan-type loaves of bread like this take days to make, but this bread recipe only takes a few hours!
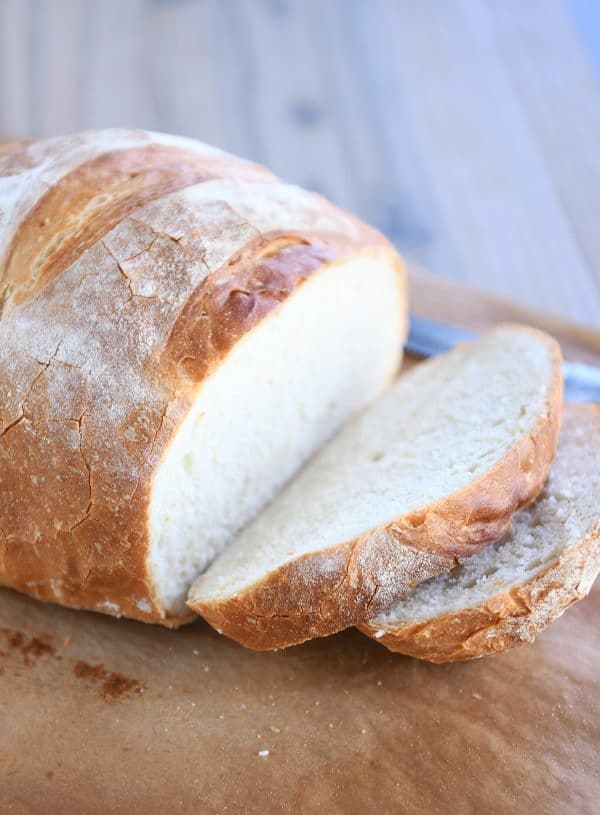
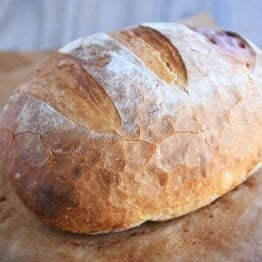
And you won’t believe how easy it is. Not only is it no-knead, but you don’t need a stand mixer, electric mixer or any kind of mixer to make it. Just a bowl and a spoon. From start to finish, it is ready to bake in about 2-3 hours. The crust is golden, thin and crunchy, and the crumb is tender and soft.
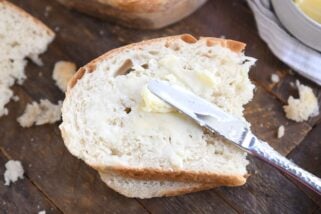
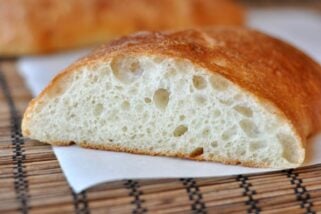
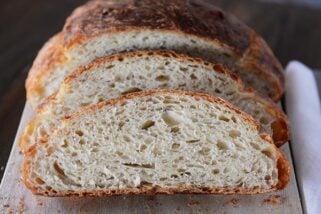
It doesn’t have the airy holes of a no-knead type bread, the crumb is tighter and slightly more dense, but it is glorious for paninis, garlic bread or just served plain (think: tear off chunks as you go!) with a wide variety of meals.
The recipe makes between two and four loaves, depending on how big you want to make them. I usually make two bigger loaves out of the batch, and I like to bake up both loaves the same day and pop one in the freezer for easy access next time we get the hankering for delicious, crusty bread.
How to Make Rustic Crusty Bread
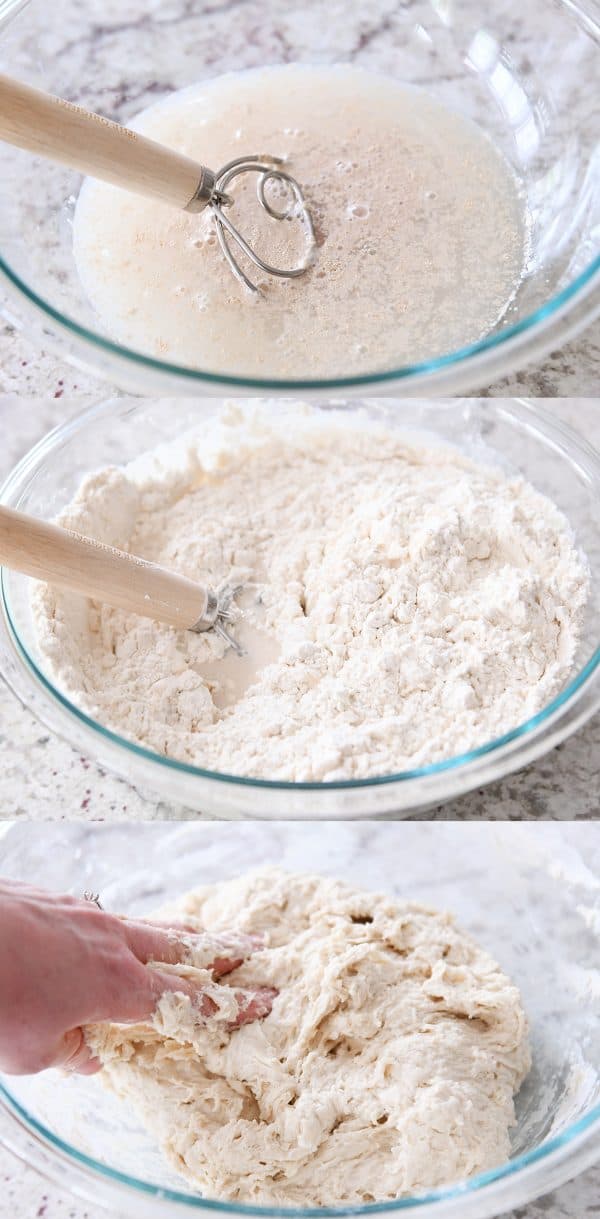
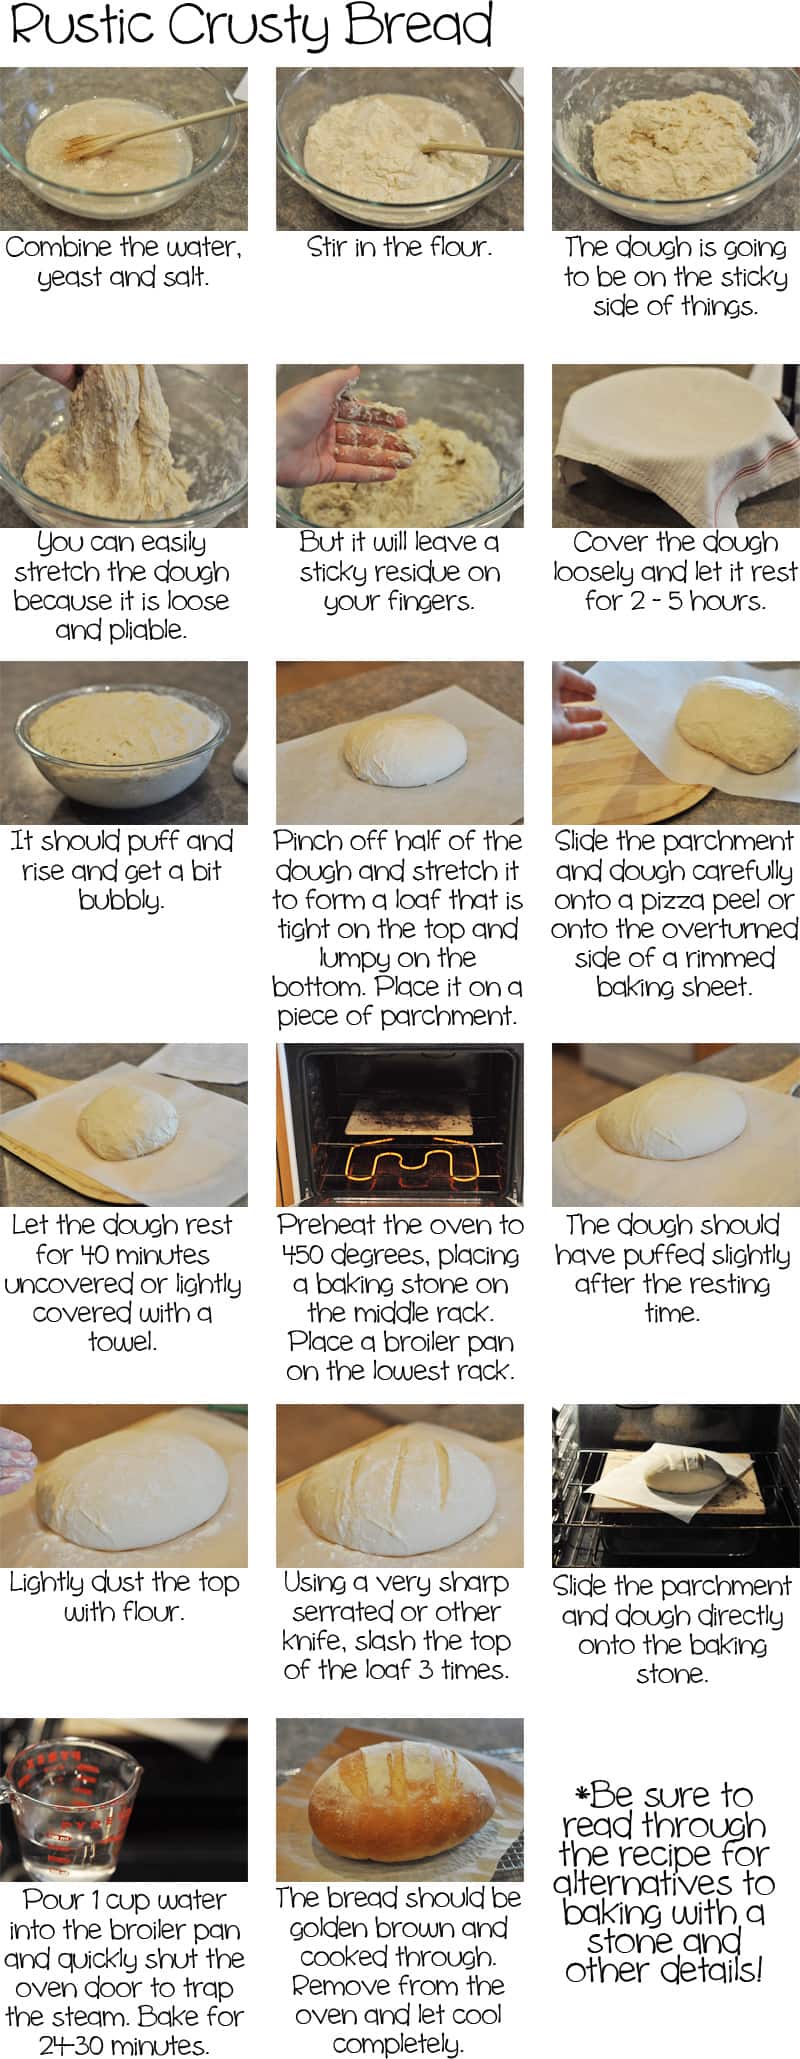
In a large bowl, combine the water, yeast and salt. Give it a little mix. And then add in the flour. Make sure to measure the flour with a light hand (or use the weight measure). You can mix with a spoon or spatula; I have been converted to the wonders of this Danish dough hook {aff. link}, but eventually with this dough, I get in there with my hands and mix it up the rest of the way.
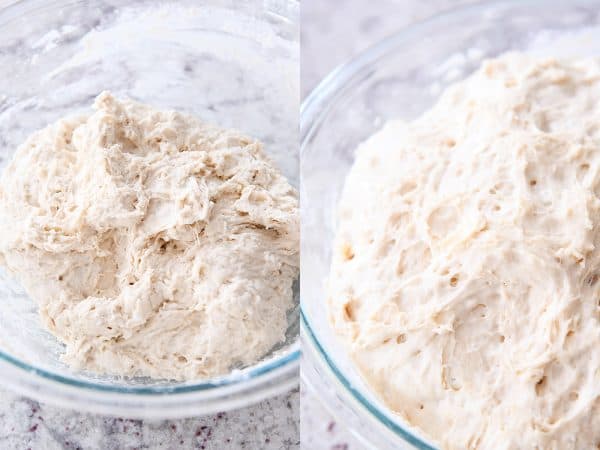
The texture of the dough will be shaggy and much softer and stickier than a traditional kneaded bread dough. Make sure there are no pockets of flour and the dough is well mixed.
Cover the dough right in the bowl and let it rise until puffy and doubled.
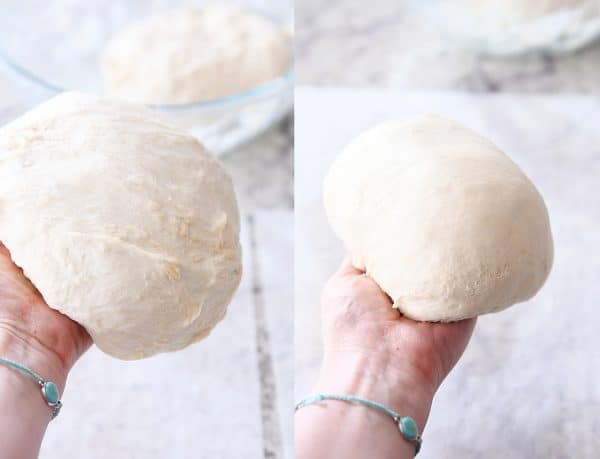
At this point, to shape into loaves, I grease my hands really well with cooking spray and split the dough into two pieces (you can make four smaller loaves out of the batch, if desired). Take one of the pieces and work it in your hands, turning the edges underneath until it’s a relatively tight, smooth loaf. Regrease your hands if the dough is super sticky.
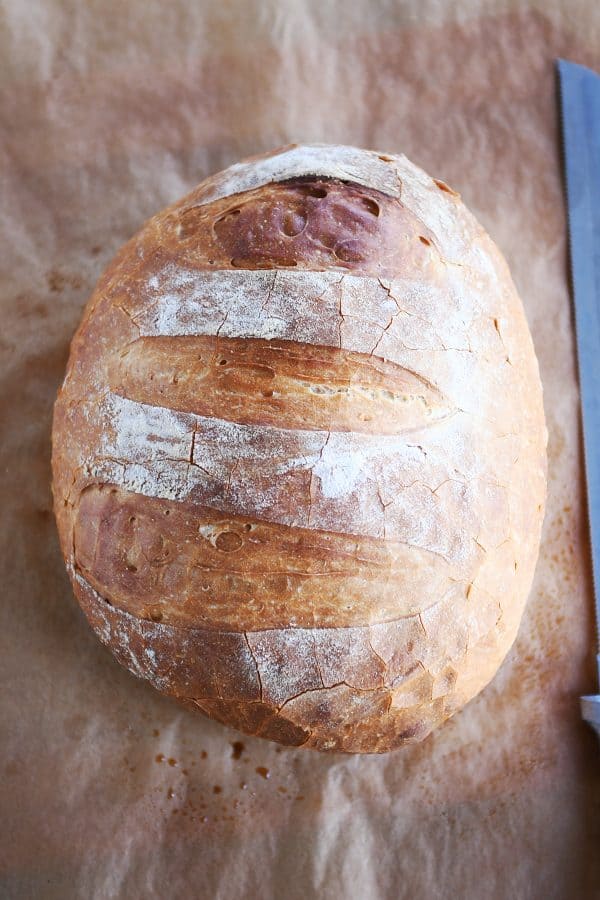
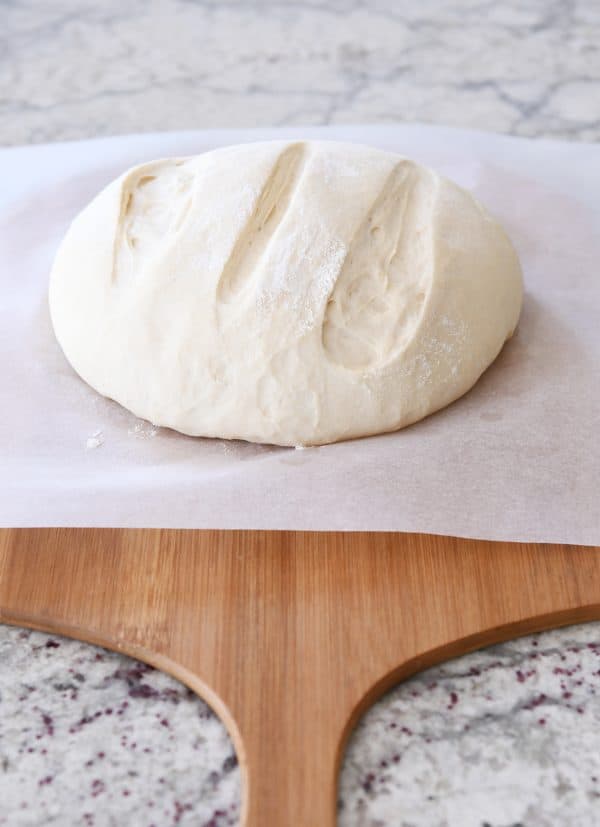
Place each loaf in the center of a piece of parchment paper and dust the top lightly with flour. Using a baker’s lame {aff. link}, razor, or really sharp knife, slash the dough 3-4 times on top, about 1/2-inch deep or so.
When I originally posted this recipe, I waited to slash the dough until after it had risen, but this sometimes causes the dough to deflate completely (especially if you don’t have a really sharp razor or knife), so I’ve started doing the slash action before it rises. Haven’t looked back. Works great and you still get the definitive, pretty “decoration” on top of the loaf as it bakes.
Cover the dough and let it rise until puffy (it won’t necessarily double in size).

Carefully slide the parchment with the loaf on top onto a baking/pizza peel {aff. link}. I suppose now is the time to mention that you want to preheat a baking stone {aff. link} in the oven to 450 degrees F and let it preheat at that temp for 20-30 minutes before baking the bread. If you don’t have a baking stone, you can try preheating an overturned aluminum baking sheet (although it may warp and bend out of shape a little at that temp, so be careful).
I highly recommend both a pizza peel and a baking stone for this recipe. Totally worth it for this bread alone.
Once the baking stone has preheated long enough, carefully slide the parchment and bread onto the baking stone. Note: I have never had parchment paper catch fire in the oven using this recipe (or homemade pizza), but take care that the parchment doesn’t touch the heating element or sides of the oven. Also, I think the thinner/cheaper the parchment paper, the more chance this could happen.
You can put a broiler pan on the bottom of the oven and add 1-2 cups hot water OR you can toss a few ice cubes onto the bottom of the oven right after sliding the bread onto the stone and then quickly (but gently) close the oven door. The steam from the water is going to help create that beautiful crust.

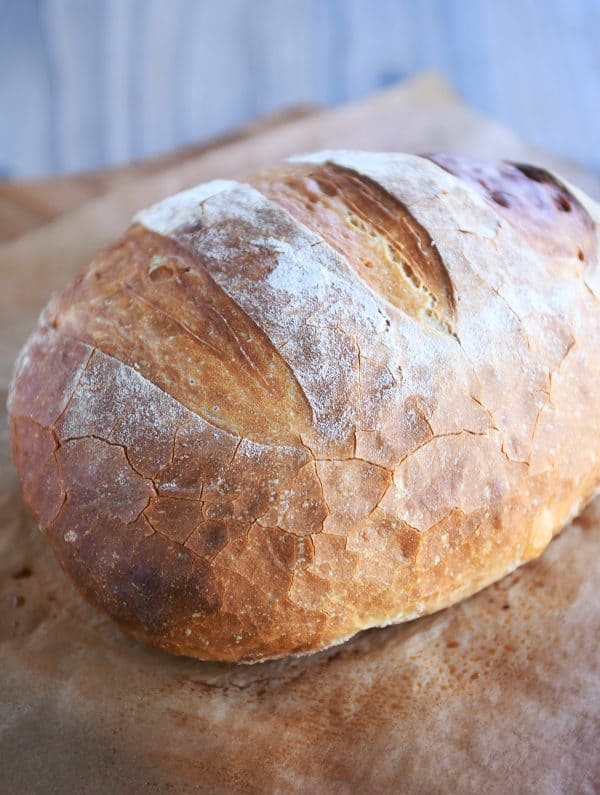
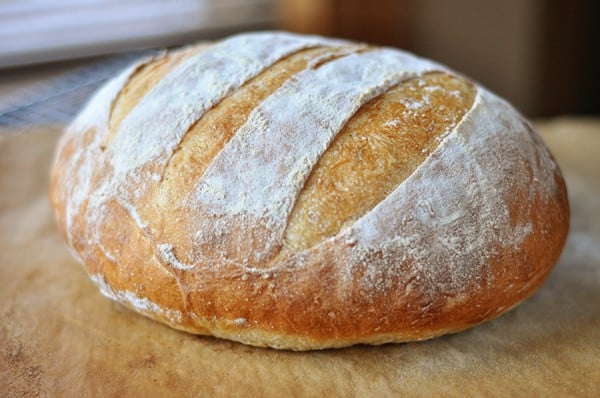
Bake the bread for about 25 minutes, give or take. It’ll puff even more in the oven. Look at that golden crust! Wowser.
This rustic crusty bread is my go-to bread to take to new neighbors, friends in need of a pick-me-up or when I am taking dinner into someone, and I make it several times a month just for our family to enjoy. It really is a life changing recipe.
I hope you’ve been able to see just how easy it is to make! I have no doubt you’ll feel like a total bread making rock start after you make this rustic crusty bread!
Equipment for Rustic Crusty Bread
While this bread doesn’t require a stand mixer, I’ve found the following to be helpful, especially if you want to ensure perfect crusty bread every time! Affiliate links for the products below.
- Baker’s lame (for slashing the bread)
- Parchment paper
- Pizza paddle/peel
- Baking stone
- Best inexpensive, bread knife ever
- Optional: Danish dough whisk
Easy Rustic Crusty Bread
Ingredients
- 3 cups warm water, about 100 degrees
- 1 ½ tablespoons instant yeast
- 1 tablespoon salt, I use coarse, kosher salt
- 6 ½ cups (923 g) unbleached, all-purpose flour, plus more for dusting dough (see note)
Instructions
- In a large bowl mix yeast and salt into 3 cups lukewarm water (about 100 degrees). Stir in flour, mixing until there are no dry patches. Dough will be quite loose. Cover lightly with a kitchen towel but don’t seal the bowl airtight. Let the dough rise at room temperature 2 hours (or up to 5 hours).
- Bake at this point or refrigerate, covered in an airtight container, for as long as two weeks. When ready to bake, cut off a grapefruit-size piece with serrated knife (I have only ever made two loaves out of the batch of dough so I just divide the dough in half to form my first loaf). Turn the dough in your hands to lightly stretch the surface, creating a rounded top and a lumpy bottom. Put the dough on a piece of parchment paper set on a pizza peel or a rimmed baking sheet turned upside down.
- Slashing: you can dust the top of the dough lightly with flour and slash now (before rising) or wait until after the loaf has risen. I’ve found waiting and slashing the dough after rising can sometimes cause the loaf to collapse, so after making this bread for years, my preferred method is to dust the top of the loaf lightly with flour at this step, before rising, and slash the top with a baker’s lame or sharp knife 3-4 times.
- Let the dough rest for 40 minutes for room temperature dough; if you have used the dough out of the refrigerator, let it rest for 1 1/2 hours. Repeat with remaining dough or refrigerate it.
- Place a broiler pan on the bottom rack of the oven (if you don’t have a broiler pan – no worries! Tossing 5-6 ice cubes in the bottom of the oven when you put in the bread works really well, too). Place a baking stone on the middle rack and preheat oven to 450 degrees. Heat the stone at that temperature for 20 minutes before baking.
- After the dough has rested and is ready to bake, if you haven’t already (see step #3), dust the dough lightly with flour, slash the top with serrated or very sharp knife three times.
- Slide the dough (with the parchment paper) onto the baking stone. Pour one cup of hot water into the broiler pan (or toss 5-6 ice cubes in the bottom of the oven) and shut the oven quickly but gently to trap the steam. Bake the bread until well browned, about 24-28 minutes. Cool completely.
Notes
Recommended Products


Recipe Source: adapted from The New York Times via Jeff Hertzberg’s Artisan Bread in Five Minute a Day
Recipe originally published February 2012; updated May 2019 with new pictures, recipe notes, commentary.
Really, really delicious!
I made this today and it was superb! I found the dough incredibly sticky as well (our elevation is 2500 ft.) But the results were so great I will keep messing with the flour until it works. I have seen this recipe before but I was intimidated by it. Thanks for breaking it down!
Update: I stuck with it and baked two beautiful loaves, although they’re not very tall. They’re exceptionally tasty, though! I served it to the in-laws for dinner tonight and got rave reviews. The next time I make this, I’ll try adding more flour to see if that makes the loaves form a little better.
Elevation is only about 1200 feet, so nothing special.
same thing happened to me, I just went with it and it still came out amazing!!
I had the same problem with my dough. It was super runny and sticky after the first rise, so I ended up adding nearly one cup more flour and kneading it by hand until it came together. Don’t worry about adding a bit more flour–my loaves baked up beautifully. Thanks for the post, Mel.
Jennie and Ashley – out of curiosity, what elevation do you both live at? I’ve never had to add more than the 6 1/2 cups but if you can’t stretch the dough (like in the pictures) then yes, you may need to add more flour. Just like most yeast doughs, you’ll still want to judge it by texture which is why I wanted to include the step-by-step photos. I don’t think it’s too late to salvage it, Ashley. Try stirring or kneading in another 1/4 to 1/2 cup of flour and letting it rest/rise again. If the dough can’t hold its shape after forming into a loaf then that’s probably a good indication a bit more flour is needed. Good luck, ladies! Let me know how it turns out.
Jennie I am having the same problem! Mine has been rising for over 2 hours and when I tried to grab a hunk it stuck all over my hands and then kind of shrunk down. Dough Puddle is the perfect description to what I’m looking at. I’m wondering if I needed more flour as well. Is it too late to salvage it?
I’m making this right now – I really hope it comes out as nice as yours! The dough came out really, really sticky, even after the first rise. It’s not forming a nice shape as it’s resting. It kind of looks like a dough puddle. Should I have added more than the 6 1/2 cups of flour at the beginning? Oh well, I’ll see how it comes out in a little while…
Btw, I love your blog and use your recipes all the time. So yummy! In fact, on Thanksgiving, my husband said your turkey gravy recipe was better than he’s ever had before, so good he wanted to drink it.
What a perfect looking bread. I tried making it before but not quite successful. The crust and taste of my “failing bread” was okay, but inside didn’t have air pocket as I like them to be. I guess I’ll follow your recipe and give it a try again….and YES, (raising my hand), I love panini! 🙂
Marie – the recipe states instant yeast so that’s what I use and I alternate between the SAF and Fleischmann brand. Hope that helps!
HI Mel,
Can you be a little more specific for me about the yeast you use for this recipe? (brand, dried, active, etc)
Thanks!
Kathleen – don’t push the steam if it just won’t work…it will still taste great!
Jamy – thanks for the compliment! I use a Nikon D90 with the 50mm/1.8 or sometimes the 35mm/1.8 lens.
Beautiful pictures! I just love your photography. Mind if I ask what camera you have?
This was so good and so easy! Not scared to make my own bread now!
I noticed several were asking about using whole wheat. I like King Arthur white whole wheat and I use vital wheat gluten if I’m going 100%. I don’t add if I’m only going half ap and half white wheat. I also like to add 1/2 cup oil to the recipe when I want a soft sandwich bread. The addition of oil is fantastic for everything like cinnamon rolls, pizza crust, flatbread and buns. I blog about this recipe as well and love how easy Mel made the tutorial!
Mel, I make my bread just like this and use 7 cups white whole wheat flour and 3 1/2 cups water. I store in a plastic shoe box with lid and let it rise in the microwave, then I store in the fridge whenever I want to make fresh bread. This same dough makes awesome flatbread in the cast iron with a lid. It will make about 13, you can freeze. You’re tutorial is fantastic and so is your spreadsheet. A-types just love your work. Keep it up!
If you can stand the wait and leave some of the dough in the refrigerator it will get somewhat sour with time (5-9 days). I usually make a second batch while the first is raising to have for later in the week.
Hi, Looks like a great recipe. Do you have to steam? I have a tiny oven that is why I am asking. Thanks.
I’ve made this several times and have used both bleached and unbleached flour without noticing a difference. Honestly, I sometimes forget the water to dump in the broiler pan too (I make this from memory and sometimes with 3 kids under 4…I forget stuff!) and it also turns out fine then, though using the water is better. It’s a really, really forgiving recipe – we love it!
sweetpea – you know, I don’t really know the answer to your question because I only ever buy unbleached flour (I but it in big 20# bags at Sam’s Club). I haven’t used regular bleached flour in years so I don’t have it on hand to test it out in this recipe. My guess is that it won’t make a huge difference. I’d use what you have on hand (bleached or unbleached). I’m pretty sure Jeff Hertzberg (author of Artisan Bread in 5 Minutes a day) uses unbleached flour as his standard since it is a bit more widely accepted and saluted in professional baker’s worlds.
Jone – I suppose you could divide in half and make one loaf but it doesn’t take any additional effort to make the full batch and then you have two loaves to enjoy (the baked loaves freeze beautifully).
Diane K – if you don’t have a broiler pan, another aluminum-type pan would work but don’t use a glass pan! If the pan heats up and you add water that isn’t hot enough, your glass pan will crack so substitute a broiler pan with an aluminum or other metal pan.
Cammee – I’m sure you could make this in your Bosch but I think it would be a bit of a nightmare because the dough is so much stickier and wetter than regular bread dough that I can see it just getting caught around the middle part of the Bosch. So reach inward and get in touch with your inner pioneer – I don’t want you cursing my name when your Bosch is covered in sticky bread dough (plus the dough is soft enough it really isn’t too difficult to dig out a wooden spoon and just go at it).
We are huge panini fans here. I can’t wait to try this bread. Do we have to make it in a bowl and stir it with our own hands like the pioneers, or can we be lazy and use our Bosch?
This looks so amazing. Thank you for kindly sharing. I can’t wait to get started!
I’m pretty sure I don’t own a broiler pan, so would it be tragic if I just put the water in any old baking dish?
Also, I’m sure I haven’t mentioned enough how much I love your website – I can try new foods without needing to go out and restock my pantry, and you have great recipes from simple to a little more complex… Anyway, I’m a huge fan.
I have used my large sided cookie sheet/jellyroll pan…good luck-:)
I’ve made this recipe a lot and love it every time. A few months ago, though, my (round pizza) stone cracked in four pieces halfway through the baking time. I researched this on-line and found out that stones can crack in the presence of moisture (which the cup of boiling water would certainly do). So I’ve been making it on a baking sheet since then and it’s been almost just as good (my pizza is definitely not as good though so I need to go buy another stone!) I don’t expect anyone to stop using their stone based just on my experience, but I thought I’d just post it as a general warning. Thanks for the great picture tutorial, Mel!
Mine did the exact same thing! Thanks for the idea about a baking sheet!
I use Old Stone Oven 14×16 stone. Excellent reviews, thick, maintains even heat. Have baked many loaves of artisan breads and pizzas.
Could you divide the 3 ingredients in half and just make one loaf?
does using unbleached AP flour as opposed to bleached AP flour really make a difference? (I want to be fair
to the recipe).
A suggestion for any other non-panini press owners out there – – I use my waffle iron or george forman grill. Both work great at making paninis! I have an overnight artisan bread recipe that I like, but I’m curious to try this one.
This looks so good! I am so excited to make it. I have been looking for a recipe for a crusty bread like this. I hope mine will turn out as nice as yours! Thanks.
Looks amazing and easy. Making it to go with Italian Wedding Soup for dinner tonight. Hope it turns out good! Thanks!
Michelle T. – I’ve never used whole wheat flour in it (yet) so I can’t attest to how it would turn out. I think if it were white whole wheat and you also add a bit of gluten flour then it should fare pretty well. I’m hoping to try it in the next few weeks but if anyone gets to it first, let me know how it goes!
Heather – I only bake one loaf at a time. It doesn’t hurt the second loaf to sit and rise for a bit while the first loaf is baking. Of course, if you have a large enough baking stone, you could probably bake them both at the same time.
Love panini’s! & I love my Griddler! I was lucky enough to have my chef sister buy me one for my wedding- bless her.
This recipe looks amazing. Do you think it would work with whole wheat flour?
The Artisan Bread in 5 minutes a day is one of the best cookbooks I own! There are so many great variations! This past weekend I made the buttermilk base, and made cinnamon “roll” bread for french toast=amazing!!
One of my favorites, is to add fresh (or dried) thyme and rosemary to the base. It makes the most amazing bread!
I’ve always wanted to know how to make this kind of bread, and your guide seems very simple and easy to use! Your bread turned out so lovely. Thanks for sharing.
Can you bake both loaves at the same time?
We are totally on the Artisan Bread in Five Minutes a Day bandwagon–it’s fun to see you messing with it too. I try to keep some dough in my fridge at all times so we can just pull off a hunk and have bread for dinner anytime we want in any shape we want (made baguettes and epi last week!). And paninis, oh, yes. We have the same panini grill and use the heck out of it!
Rachel, they have a similar recipe in their Healthy Bread in Five Minutes a Day cookbook that is made with hard white wheat flour but it adds vital wheat gluten and a smaller amount of all-purpose flour.
Anyone ever tried it with hard white wheat flour?
YES YES YES!
I’ve made this several times….. it’s DELICIOUS!
I want to also strongly urge your readers to NOT EAT THIS straight out of the oven. It does not taste as good. You HAVE to let it cool completely…. it messes with the texture if you don’t.
The most amazing thing with this bread is you can actually double the recipe and store the dough in the refrigerator after the first rise and pull chunks off of it for up to two weeks and follow directions for the 2nd rise from that. The longer the bread sits, it takes on a sourdough texture/taste. YUMMY!
I bought the book that this recipe comes from – lots of neato recipes!
You make it look easy! I just tried to make bread this weekend and failed miserably! 🙁
This is perfect! I have been needing a good recipe for this kind of bread. We love paninis at our house too. Thanks for all of the new panini ideas! I am going to print out your charts and put them in my cookbook binder.
Picture only shows one loaf in the oven. Do you bake them at the same time?
I’m not a panini lover, but I am obsessed with baking bread. There is something therapeutic about making a loaf of bread and something even more satisfying about enjoying the flavor and texture of each loaf. I love getting new bread recipes. I’m going to have to try this today!
LOVE your panini spreadsheet–we are a little obsessed ourselves so I totally get your addiction 🙂
Janet – thanks for the heads up! Yes, it is an error in my step-by-step which I will correct…but you let it rest for 2-5 hours for the first rise (in the bowl). Thanks!
Just got a panini press for my birthday – off to the kitchen to make this bread. Plan on making a Cuban Panini Sandwich tonight for dinner. Thanks for the recipe!!
You make it look soooo easy!! I’m going to have to try this like tomorrow! 🙂
My last bread making attempt was a dismal failure. I am going to try this today and hopefully it will work out as beautiful as yours. Since I don’t have a baking stone I will try it the way you suggest. Wish me luck!
Mel- you are my culinary hero! I have had this bread recipe bookmarked forever, and for some reason just haven’t made it. Your tutorials are the best, and you always make every recipe so doable! I love panini, and this is one perfect loaf of crusty perfect bread. Now that you have tested this recipe I have no excuse not to make it! Thanks! 🙂
Looks delicious, but there’s a difference in rise times. Your photo instructions give the first rise time as 40 minutes, but the written recipe above says 2-5 hours. I assume 2-5 hours is correct?
You make it look so easy! I’m going to have to try this one… and soon!