Easy Rustic Crusty Bread with Tutorial {No Mixer, No Kneading}
This homemade rustic crusty bread is the most delicious bread that will ever come out of your oven! No kneading or a stand mixer required!
This is the bread recipe that can change your life. I’m serious. Just scroll down and read through the comments and then you’ll believe me. Here are a couple comments among hundreds of rave reviews:
One of the best bread recipes I have ever made! A real favorite with my family and excellent for sandwiches. Super easy!
I made this recipe for the first time this past weekend and it turned out perfect! It truly was an incredibly easy recipe to follow.
This is the first bread recipe i’ve ever successfully made! It’s delicious and so easy I used active dry yeast, and the working with yeast tutorial was a huge help! great recipe, Mel.
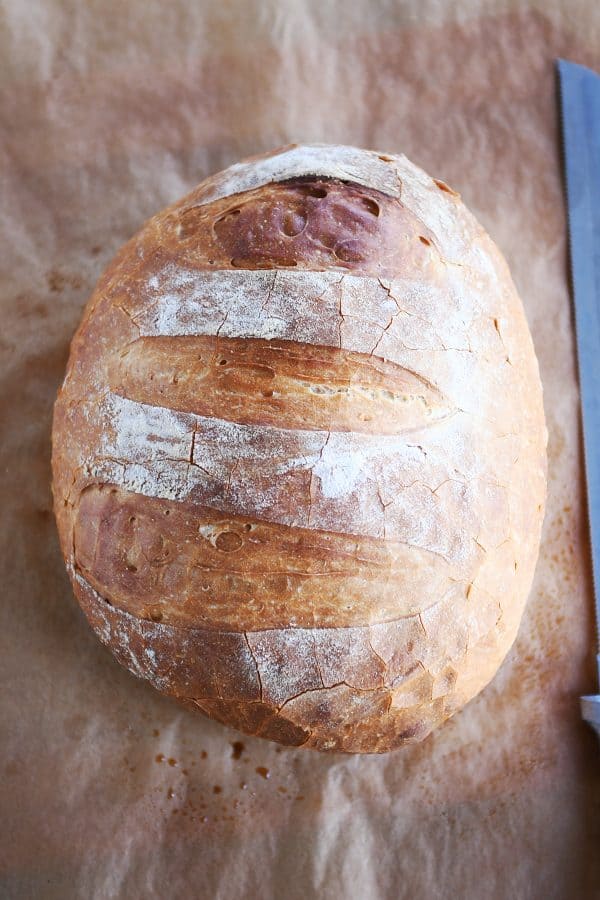
This rustic crusty bread recipe is perfect for beginning and expert bread makers alike. It’s like a perfect loaf you’d get right out of a bakery – for a fraction of the cost. Many artisan-type loaves of bread like this take days to make, but this bread recipe only takes a few hours!
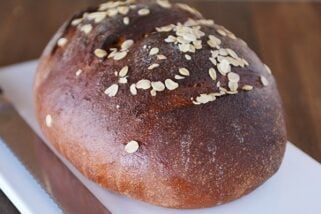
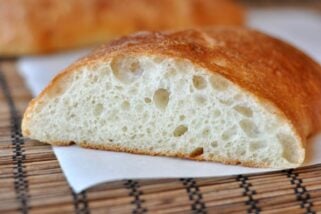
And you won’t believe how easy it is. Not only is it no-knead, but you don’t need a stand mixer, electric mixer or any kind of mixer to make it. Just a bowl and a spoon. From start to finish, it is ready to bake in about 2-3 hours. The crust is golden, thin and crunchy, and the crumb is tender and soft.
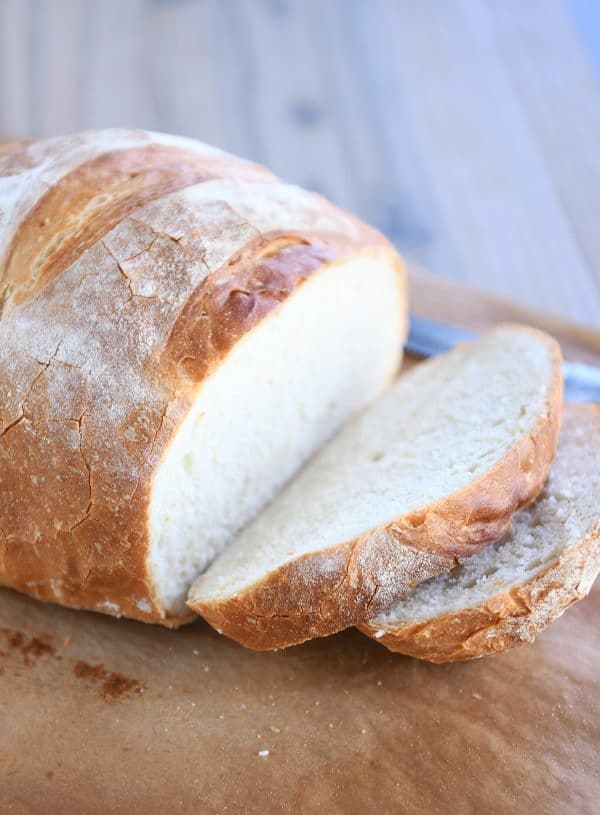
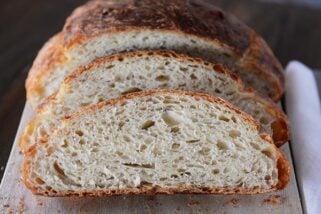
It doesn’t have the airy holes of a no-knead type bread, the crumb is tighter and slightly more dense, but it is glorious for paninis, garlic bread or just served plain (think: tear off chunks as you go!) with a wide variety of meals.
The recipe makes between two and four loaves, depending on how big you want to make them. I usually make two bigger loaves out of the batch, and I like to bake up both loaves the same day and pop one in the freezer for easy access next time we get the hankering for delicious, crusty bread.
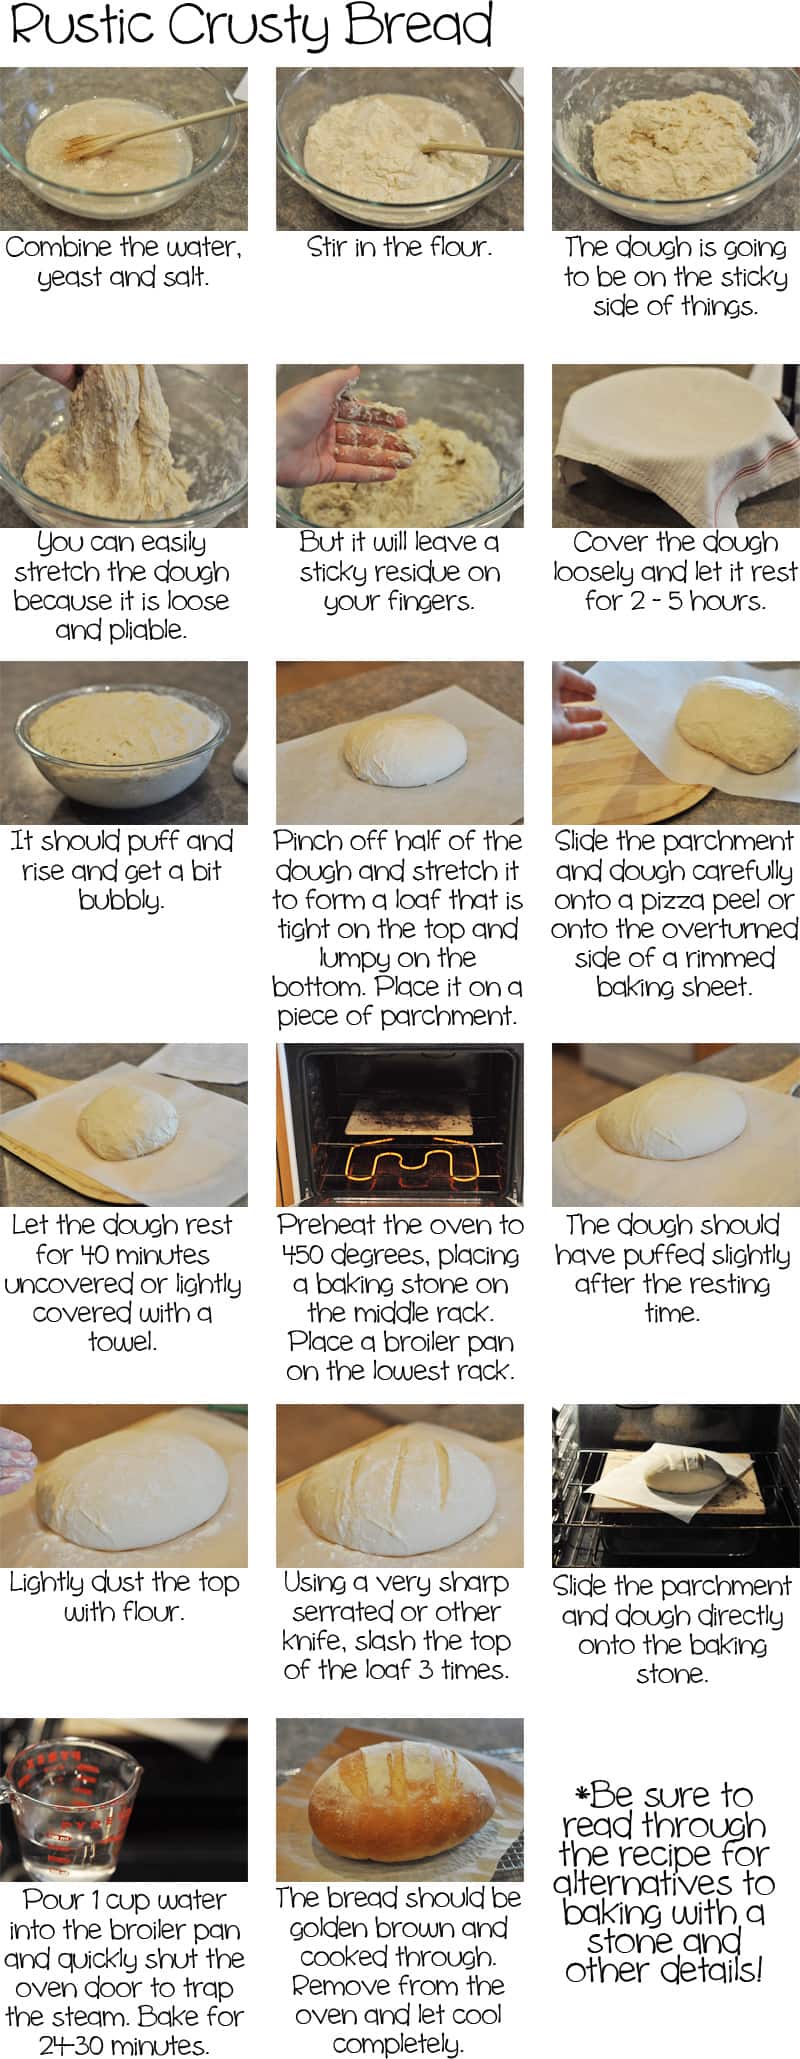
How to Make Rustic Crusty Bread
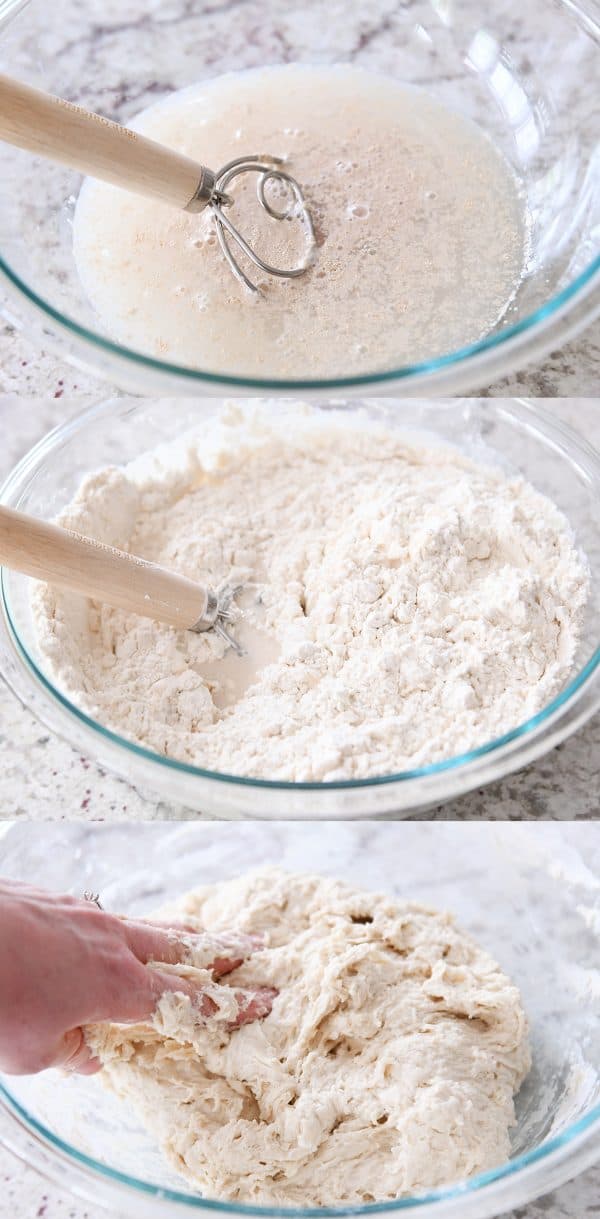
In a large bowl, combine the water, yeast and salt. Give it a little mix. And then add in the flour. Make sure to measure the flour with a light hand (or use the weight measure). You can mix with a spoon or spatula; I have been converted to the wonders of this Danish dough hook {aff. link}, but eventually with this dough, I get in there with my hands and mix it up the rest of the way.
The texture of the dough will be shaggy and much softer and stickier than a traditional kneaded bread dough. Make sure there are no pockets of flour and the dough is well mixed.
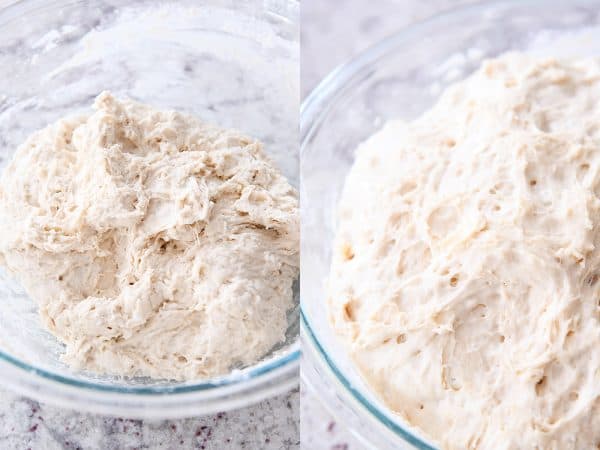
Cover the dough right in the bowl and let it rise until puffy and doubled.
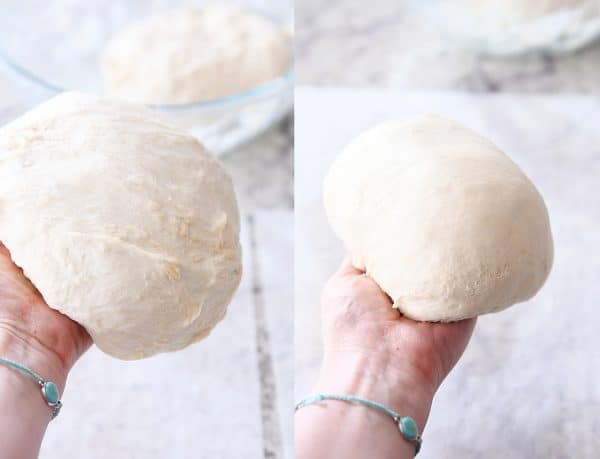
At this point, to shape into loaves, I grease my hands really well with cooking spray and split the dough into two pieces (you can make four smaller loaves out of the batch, if desired). Take one of the pieces and work it in your hands, turning the edges underneath until it’s a relatively tight, smooth loaf. Regrease your hands if the dough is super sticky.
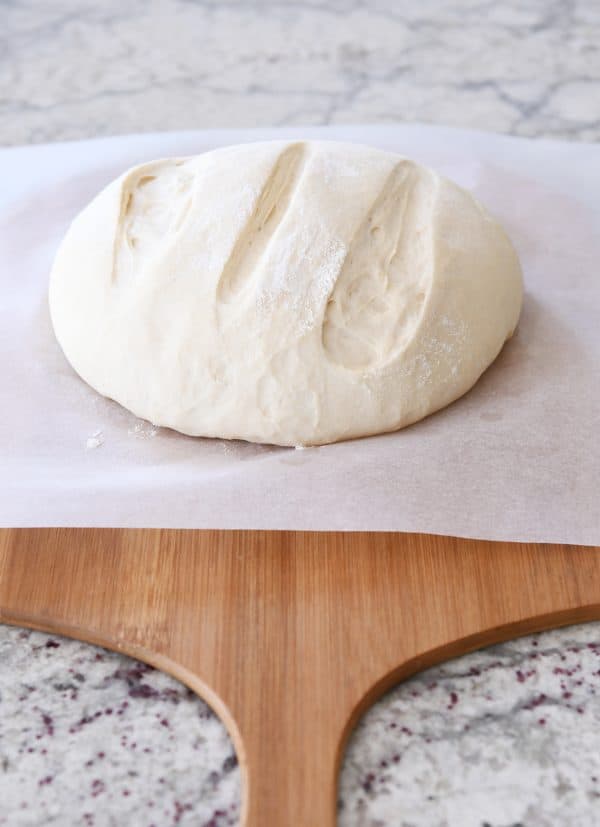
Place each loaf in the center of a piece of parchment paper and dust the top lightly with flour. Using a baker’s lame {aff. link}, razor, or really sharp knife, slash the dough 3-4 times on top, about 1/2-inch deep or so.
When I originally posted this recipe, I waited to slash the dough until after it had risen, but this sometimes causes the dough to deflate completely (especially if you don’t have a really sharp razor or knife), so I’ve started doing the slash action before it rises. Haven’t looked back. Works great and you still get the definitive, pretty “decoration” on top of the loaf as it bakes.
Cover the dough and let it rise until puffy (it won’t necessarily double in size).

Carefully slide the parchment with the loaf on top onto a baking/pizza peel {aff. link}. I suppose now is the time to mention that you want to preheat a baking stone {aff. link} in the oven to 450 degrees F and let it preheat at that temp for 20-30 minutes before baking the bread. If you don’t have a baking stone, you can try preheating an overturned aluminum baking sheet (although it may warp and bend out of shape a little at that temp, so be careful).
I highly recommend both a pizza peel and a baking stone for this recipe. Totally worth it for this bread alone.
Once the baking stone has preheated long enough, carefully slide the parchment and bread onto the baking stone. Note: I have never had parchment paper catch fire in the oven using this recipe (or homemade pizza), but take care that the parchment doesn’t touch the heating element or sides of the oven. Also, I think the thinner/cheaper the parchment paper, the more chance this could happen.
You can put a broiler pan on the bottom of the oven and add 1-2 cups hot water OR you can toss a few ice cubes onto the bottom of the oven right after sliding the bread onto the stone and then quickly (but gently) close the oven door. The steam from the water is going to help create that beautiful crust.

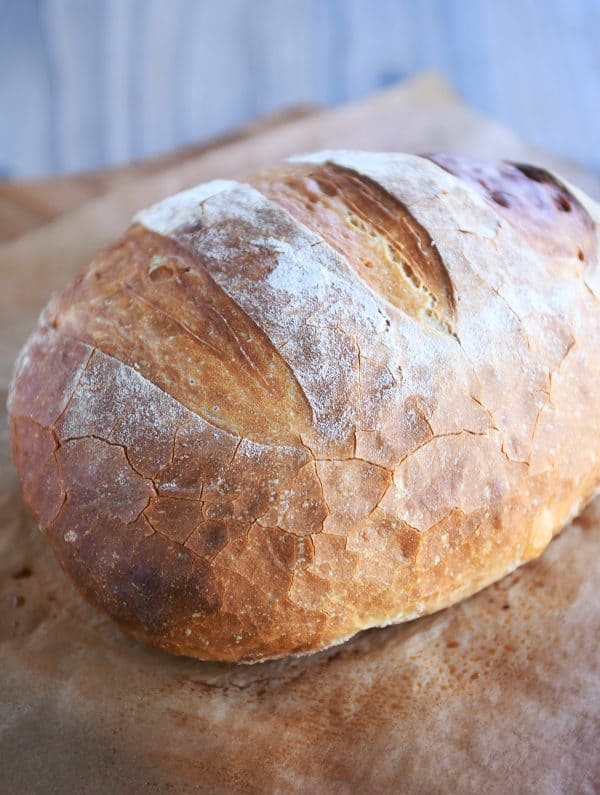
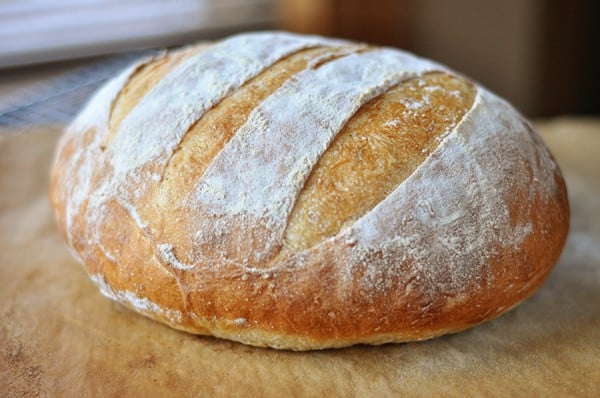
Bake the bread for about 25 minutes, give or take. It’ll puff even more in the oven. Look at that golden crust! Wowser.
This rustic crusty bread is my go-to bread to take to new neighbors, friends in need of a pick-me-up or when I am taking dinner into someone, and I make it several times a month just for our family to enjoy. It really is a life changing recipe.
I hope you’ve been able to see just how easy it is to make! I have no doubt you’ll feel like a total bread making rock start after you make this rustic crusty bread!
Equipment for Rustic Crusty Bread
While this bread doesn’t require a stand mixer, I’ve found the following to be helpful, especially if you want to ensure perfect crusty bread every time! Affiliate links for the products below.
- Baker’s lame (for slashing the bread)
- Parchment paper
- Pizza paddle/peel
- Baking stone
- Best inexpensive, bread knife ever
- Optional: Danish dough whisk
Easy Rustic Crusty Bread
Ingredients
- 3 cups warm water, about 100 degrees
- 1 ½ tablespoons instant yeast
- 1 tablespoon salt, I use coarse, kosher salt
- 6 ½ cups (923 g) unbleached, all-purpose flour, plus more for dusting dough (see note)
Instructions
- In a large bowl mix yeast and salt into 3 cups lukewarm water (about 100 degrees). Stir in flour, mixing until there are no dry patches. Dough will be quite loose. Cover lightly with a kitchen towel but don’t seal the bowl airtight. Let the dough rise at room temperature 2 hours (or up to 5 hours).
- Bake at this point or refrigerate, covered in an airtight container, for as long as two weeks. When ready to bake, cut off a grapefruit-size piece with serrated knife (I have only ever made two loaves out of the batch of dough so I just divide the dough in half to form my first loaf). Turn the dough in your hands to lightly stretch the surface, creating a rounded top and a lumpy bottom. Put the dough on a piece of parchment paper set on a pizza peel or a rimmed baking sheet turned upside down.
- Slashing: you can dust the top of the dough lightly with flour and slash now (before rising) or wait until after the loaf has risen. I’ve found waiting and slashing the dough after rising can sometimes cause the loaf to collapse, so after making this bread for years, my preferred method is to dust the top of the loaf lightly with flour at this step, before rising, and slash the top with a baker’s lame or sharp knife 3-4 times.
- Let the dough rest for 40 minutes for room temperature dough; if you have used the dough out of the refrigerator, let it rest for 1 1/2 hours. Repeat with remaining dough or refrigerate it.
- Place a broiler pan on the bottom rack of the oven (if you don’t have a broiler pan – no worries! Tossing 5-6 ice cubes in the bottom of the oven when you put in the bread works really well, too). Place a baking stone on the middle rack and preheat oven to 450 degrees. Heat the stone at that temperature for 20 minutes before baking.
- After the dough has rested and is ready to bake, if you haven’t already (see step #3), dust the dough lightly with flour, slash the top with serrated or very sharp knife three times.
- Slide the dough (with the parchment paper) onto the baking stone. Pour one cup of hot water into the broiler pan (or toss 5-6 ice cubes in the bottom of the oven) and shut the oven quickly but gently to trap the steam. Bake the bread until well browned, about 24-28 minutes. Cool completely.
Notes
Recommended Products

Recipe Source: adapted from The New York Times via Jeff Hertzberg’s Artisan Bread in Five Minute a Day
Recipe originally published February 2012; updated May 2019 with new pictures, recipe notes, commentary.

Hi Mel,
This bread is absolutely, unbelievably amazing. So good that I made it three times this holiday season. I just couldn’t believe that only four ingredients could produce such magic. Everyone loved it! We even joked that I should open a bakery, selling only this bread and we’d be rich, haha.
The first two times I made this, my loaves were much much flatter than yours. I think a few other have commented on this. The flavor and texture were still amazing, btw! The third time I used more flour until I felt that I had a dough that would hold together better, while still leaving the sticky residue on my fingers. Bingo! That was the key. Now I know how to make those perfect looking loaves like you have in the photo. Thanks for another great recipe!
Hi Mel,
I’m making these into rolls for our pulled pork sandwiches tonight and am excited to see how they turn out. The reason for my post, though, is to tell you how much I enjoy your blog. I’ve been reading it faithfully for 3.5 years. Yours is my favorite blog — for your sweet personality, great writing, down-to-earth style, and self-deprecating sense of humor. I’ve tried so many recipes, and several have become family favorites (angel food cake with chocolate whipped cream, sweet and sour meatballs, cornbread, and oven-baked chimichangas). Thanks so much for your efforts. You rock! Have a Happy New Year.
Hi Mel,
Just found your site, immediately made the bread and it was absolutely perfect! I was a little worried when it was so sticky but it came out amazing. Thank you for the great recipe, I baked the entire thing and am going to dry some of it out to make stuffing!
To Judy Lipofsky:
I am not sure what technically happens, but I do know that there is a window of time where the bread is ready to be baked and if you overshoot that, the yeast dies or something, and it will do exactly what your bread did.
If you want to make the dough and then bake it more than a couple of hours later, then you must refrigerate it. It’s the temperature that determines the speed the yeast develops its gas and lives it’s lifetime.
I have made this dough, baked one loaf and refrigerated (in a bowl with plastic wrap on top) the remaining dough and baked another loaf the next day (after letting the dough come to room temperature).
Successfully baking bread is based on time and temperature as you are using a living organism (the yeast) to produce the “lift” in the dough that gives you fluffy and tasty (also dependent on the yeast) bread.
Hope this helps and you will have a better experience next time!
I tried making the bread first time today. After 2 hours it had almost reached the top of the bowl, but I wasn’t ready to bake yet, so went away for 2 more hours. When I got home it had shrunk back to about half the height of the bowl and was like soup. I added about 1 1/2 cups more flour and still no way could I shape it. So I spooned it into a buttered pie pan and baked it. It was delicious but flat. Where did I go wrong? The temp in the house was about 75 degrees and we are at sea level (Florida)
Hi Judy – bread can be a fickle thing. If left to rise for too long, it will do exactly as you described and collapse. With this particular bread recipe, where the dough isn’t as stiff as other yeast bread doughs, I can see how it could get kind of soupy upon collapse. Just like the other advice, if you think you’ll be gone during the prime rising time, refrigerate the dough to slow down the rising.
I made this today and it was delicious! Thank you so much for sharing.
Mel, great recipe! I have been making all the bread we consume for my family for probably around 30 years, and I love this quick way to have homemade bread!
I do use bread flour, and kosher salt, just to answer the question a couple of people had.
I have also found that adding a tablespoon of medium rye flour to the flour mixture adds a touch of the french bread taste.
I also vary the ingredients so that it “looks right”. Sometimes I use more flour or more water or less of these, just depending on how it looks. The reason this varies is that the temperature and humidity in the kitchen at the time of making the bread will affect the requirements of the recipe.
This bread is fabulous!!! My husband was so impressed-he thought it looked like it came from the bakery. I can’t believe it is so easy but tastes like you worked on it all day! We have eaten it everyday since I made it last week. I am getting ready to make it again. Oh, and I made a panini with it yesterday for lunch-the best bread I’ve ever used for a panini. Thank you so much.
Beth – I haven’t used bread flour but I’m sure you can. Bread flour has more gluten so that may affect the consistency of the dough a bit but I think it should still work fine.
Hi Mel! This bread looks fab and from all the comments, it must taste just as good as it looks. Do you think I can sub bread flour for AP flour? Can’t wait to make it. Thanks for all the photos they are very helpful.
I’ve never tried to make bread without a machine before. At least not that I recall. This is so simple, yet so delicious!!! Made mine into 3 loaves to eat with home made potato soup. Everyone raved. Making more today.
the crusty bread recipe sounds great just got married am going to try my mom said to use kosher salt can I thank you
I love the Artisan Bread in 5 Minutes a Day recipe- I also love how you dusted with flour and sliced the top of the loaves to give them an extra special look. Nice photos, too!
A comment regarding those who are having their loaves turn out flat (or the dough puddle)- I’ve had this problem in the past, and it always seems to be a result of letting the loaf rest for too long after shaping. This seems to happen especially when it is very warm out. You can slice the loaves on an angle to get taller slices when this happens.
Also, regarding the dough that is too dry- I’ve also experienced that, and it always happens when I’m distracted while counting, so I assume I mis-count cups of flour. I just add a little water and mix it in.
I dump everything into my bowl before mixing and I’ve never had any problems with this method.
I’ve never used the pan of water underneath, so I shall have to give that a try next time I make it.
Thanks for the great panini tips!
I’ve used this recipe a few times and it’s my absolute favorite! I’ve also done it in a dutch oven, which makes it extra crispy – it’s in there for about 25 minutes with the lid on and then another 12-15 with it off. The last time I made this bread, I mixed in half a cup of chopped kalamata olives – so delicious. Thanks Mel!
Debbie – bless you for the care you are giving to your mother! Yes, I think you could freeze the unbaked loaves but because the dough is so tender and soft, it might be easier to freeze the baked loaves. Then you could pull them out and warm them in a 250 degree oven until they are warm and soft again. I’m guessing the extra water is due to humidity and other climate factors.
Thank you Mel for your wonderful blog. I have enjoyed many of you recipes in only the few weeks since I discovered it. I have been nursing my 87-year old mother and have been making this recipe as my therapy. I divided the recipe into 4 mini loaves and pass them out as thank-you’s for anyone who shows us kindness. Do you think I can freeze the unbaked loaves? It also seems that I have to consistently add an extra 1/2 cup of water. I don’t know if that is a humidity factor (we live at the beach in NC) or a reflection of how I am measuring the flour. Thanks again!
This recipe is absolutely delicious! What I like to do is cover the dough with a little bit of olive oil and let it sit for a bit. Bake it in that oil and it tastes great!
Julie – I’m not exactly sure if adding the flour all at once will make a difference but since it worked out when you added it gradually, I’d suggest doing that from now on. When I make it, I add it gradually just because it is easier to stir in. Also one thing to consider is to measure the flour lightly…I use the scoop and sweep method trying not to pack it in the cup. Good luck!
Love this recipe but have had some trouble! I am sure it’s my error. I have somehow been messing it up. The first time I made it, I added all the flour at one time. Is that bad? Should I stir it as I add it? It was so dry I had extra flour in the bottom of my bowl. I threw it out and started over. The second time I stirred it as I added the flour with perfect results. I tried again tonight and it had the dry issue again. I added the flour all at one time again because in my mind that shouldn’t matter. Does it? Maybe I am mis counting my cups of flour. Just wondering if you had any advice. I noticed no one else has had this issue, so I figured it was operator error. Thanks.
Hi Cat – I think you could cook it longer and it would develop a thicker, more crackly crust. I think the original recipe baked it for over 30 minutes but when I tried it, it was too dark for my taste; however, it’s worth a try if you want more of a crust.
Thanks so much for this recipe and photos! I made it today and it is really good. I followed the instructions exactly and it looked just like the photos. It is delicious, but I’m curious, is there a way to make it even more crusty? Mine had good crackle with each bite but not the thick crusty crunch I’ve been searching for. I cooked it 26 min and I couldn’t tell how crusty it would be until it cooled. Should I cook a little longer? Should I use a little more water than the 1 cup? It’s great as is and I will be making it again even if I can’t get a thicker crust. Thanks!
Kasia – I always store the cooled leftovers in a ziploc bag. When I want a crisp crust again, I reheat the bread (uncovered) in the oven at 250 degrees for 5-10 minutes. That might help the soggy crust issue!
Any tips on the storage of this bread? i made it and it turned out great i use it to make open face sandwiches in the morning and my kids love it, but when i cowered it with tin foil the next day the crust got soggy. Any suggestions?
Mel, this was so easy to make and was, hands down, the best bread I have ever made. Thank you for sharing this with us.
I made this bread yesterday and it came out great! It was my first time ever making bread! Thank you for the great recipe!!!
Mel..this bread is fantastic!! So easy to make. We live around the GB/Appleton area, so as I am sure you already know, good bakery bread is hard to come by. This rivals some of the best artisan breads I have found. Thanks for posting.
Could this bread be any easier? I honestly feel guilty when I serve it and get rave reviews. But I get over the guilt quickly. Thanks for making it even easier with your awesome step-by-step action.
And when is that baby coming? Or did I miss it and she’s here already? Either way congrats you inspirational momma!
Hi Mel,
I wanted to let you know I tried this recipe again today. This time, instead of increasing the flour, I made sure my hands were wet when I shaped the loaves (I read this somewhere). This made handling the dough so much easier! Now I have a loaf cooling for supper and it’s all I can do not to eat the whole thing myself! Yumm-o!
using unbleached flour DOES make a difference versus bleached flour.
We found the unbleached flour holds up better and gives a better texture of the bread. We especially like King Arthur’s flour (and yes, the brand makes a difference two).
I have two of Jeff and Zoe’s books. I starting making this bread several years ago when I developed a sensitivity to soy lecithin. (They put that stuff in everything.) My two cents would be – Don’t give up even if you don’t have perfect results keep at it. I have even baked it in an iron skillet. I have started using a scale and this helped me with consistency. And your warning about not cutting the bread too soon is so correct. The remaining loaf will be gummy. It is like cutting into meat without letting it rest – the first bite is good, but the rest will be bad.
I love your storyboard tutorial. Great photos.
Terri – yes, you can double the recipe and split it four ways.
Made these for dinner tonight…we boys loved them…both were gone in under 30 minutes!! And sooo easy!! This is now my go to recipe for home made bread!
Mel, can I double the recipe next time and just split it four ways? Or is it better to make two separate recipes?
I made this tonight with about half white whole wheat, half all-purpose flour. We loved it! I did not add any vital wheat gluten. This went great with your Tomato Basil Bisque we had tonight. Thank you!!
I made this into the 2 loaves for a group of hungry kids in our babysitting swap (always a good way to try recipes out right?) and it was a hit. Both loaves were gone really quickly. I used bread flour (just what I had more of)- which has the higher gluten – and it was delish. WARNING I also should have used a metal broiler pan…since I heated a GLASS pan up under my pizza stone. The hot glass pan cracked when I added the cool water. The steam still had it’s effect, the crust was thick and chewy and very golden brown. The second loaf (no steam) was lighter in color. It still tasted great, but I loved the steams outcome. I knew not to add water to a hot pan…ah well. The lengths we go to get our artisan bread. 🙂
Just made this yesterday and ate paninis with it. Fabulous, fabulous instructions! I would have added more flour, but your pictures and instructions reassured me and it turned out perfectly! I live in Germany and they charge a few euros or this simple type of bread! Now I know how to make it and can take it back to the US with me!! Thank you!
Made this last night. It took all my will power not eat that and nothing else for dinner!
Made this bread today and I’m loving it!!! Super easy!! I only used 6 cups of white flour and it was perfect (I live in Idaho; I don’t know if that is what makes a difference) the extra 1/2 c would have made it too dry. I also only cooked it for 20 minutes and it was perfect! I will definitely be making it again and again! As, always, I love your recipes! I can’t wait to experiment with 1/2 wheat flour! I’ll let you know!
Lisa – as far as I know, fast rise or rapid rise yeast is the same as instant yeast – which sounds like it worked after reading your last comment! Thanks for checking back in to let me know.
Lillie – I do not live in a dry climate. I live in the humid midwest (Wisconsin) so it sounds like we live in similar climates. It sounds like you are doing great – my recommendation for dense bread is to let the dough rise longer (which you are right, can take longe rin the cooler winter months) and take care not to add too much flour. Good luck!
I ended up trying it with the fast acting yeast and it was amazing! We ate half of the loaf for dinner and I froze the other half to enjoy later this week so it stays nice and fresh. And the other half of dough is in the fridge, and i will probably split that into 2 batches instead of one, so that we have 2 smaller loaves. Thank you so much for sharing this recipe and all of the tips. You have made a bread-makin’ believer out of me!
I was wondering if you live in a dry climate. My attempts at some of your bread recipes seem to need quite a bit more flour for the dough to look like yours. And then the finished result seems a little dense. It’s pretty humid where I live, so I thought that might be it. Or maybe the winter weather means my kitchen is cold so things need longer to rise. I am definitely not a bread expert, but I’m trying!
hi mel! i am just about to attempt this recipe. looks so good! i am just worried about the yeast. i have never used yeast before and i am not sure if i have the right thing. i bought the SAF Perfect Rise Yeast. It says fast rising active dry yeast, but doesn’t say instant yeast. Is this the same thing? thanks so much!
Mel-
I made this yesterday and it turned out fabulous! Crusty and chewy on the outside, soft on the inside. Thanks for another GREAT recipe!
Ok, I made this bread and didn’t read any of the comments on here (big mistake!) and cut into one loaf straight from the oven and we ate it with our dinner that night. Yeah, it was ok, but the texture was off. So I let the second loaf cool completely on a rack, then tossed it onto a ziploc and sliced it up the next day and used it to make a panini sandwich. Wow! You’re not kidding. Best. Panini Bread. EVER! I use my panini grill almost daily and this bread is simply perfect, and I love, love, love that I can make it myself. Awesome! I love the simplicity of the recipe, I love how delicious this bread is, and I love that I can whip up the dough and ram it in the fridge to use it at my convenience over the next few days. Heaven! Thank you a million times over for sharing this gem!
This is the easiest yeast bread I have ever made!!! It should be filed under quick breads. It’s crusty deliciousness made everyone in my house happy. It was great dipped in the Smoked Salmon Chowder. A yummy thank you!!
Hey Mel I just thought I would follow up after my previous comment. My elevation is 626 feet. I ended up needing to add over a cup of flour until I got the right consistency. It still wasn’t as tall or as dark brown as your loaf but it was very delicious with your broccoli cheese soup. I will definitely make this again and I’ll just add more flour next time!
Love your panini spreadsheet! We’ll be trying some of your combos very soon! I didn’t see it on your sheet, so I just thought I’d add that one of our favorite spreads is pesto!
Best. Bread. Ever. I love making bread and have tried many of your recipes but this one is the best yet! I love that it turned out so chewy. Like, sink-your-teeth-in-and-give-a-good-tug chewy. The recipe was so simple and the bread so delicious! Mel, thanks for another recipe I will use over, and over again.
Shaela – yikes! That is scary! I use regular parchment paper and slide my parchment paper right onto my baking stone. I’ve never had that happen but it sounds like you should definitely scrap that idea and perhaps try just baking it on a baking sheet or if you have a pizza peel of sorts, sliding the bread onto the stone sans parchment paper (using cornmeal to help it not stick). I’m sorry that happened and am so glad you were able to put out the fire! Is there any chance the parchment paper came into contact with the heating element?
I told my husband I made the bread and he tasted it and didn’t believe me, he said I thought you meant you “made it at the store” hahaha! Awesome recipe. And I didn’t have a stone or a broiler pan. I just used a regular cookie sheet with the parchment paper and another cookie sheet to act as the broiler in the bottom.
Mel-so I made the bread tonight and all went great until the baking part. My loaf looked beautiful. Then I went to transfer the loaf ontop of the parchment paper to the over and as I was setting the parchment on the stone in the oven it went up in flames! I quickly pulled it out and seriously had a flame a foot high. Very scary but I was luckily able to quickly grab some water to dump on it. Are you not suppose to put the parchment paper in the oven? And when you said parchment…that is parchment paper right?