Tutorial: Working With Yeast
While I am not an expert at yeast by any means, I do make my fair share of yeast breads and rolls – at least several times a week. I’ve received a lot of questions lately about yeast and so I want to share with you my method of doing things. It is a wonderful feeling to whip up a batch of rolls for dinner and know that you’ve done it for at least 1/10th of the cost than at the store (and done it with fantastically delicious results!).
Here we go.
First a quick note about the difference between active dry yeast and instant yeast. These are the two main forms of yeast called for in all of my bread/roll recipes.
Active dry yeast is a dormant form of yeast and needs to be rehydrated or proofed prior to using it in a recipe. This means that the yeast needs to be dissolved in warm water (a bit of sugar helps the yeast to activate more quickly since sugar acts as a food for the yeast) and left for a few minutes to activate before using in the recipe.
Instant yeast is different than active dry yeast in that it does not need to be rehydrated or proofed prior to using in a recipe. The granules of instant yeast are smaller than active dry yeast and you can add the yeast directly in with all the other dough ingredients without letting it activate in warm water first.
Here is a visual of what yeast should look like before and after proofing.
This yeast has just been added to the water and you can still see some of the granules sitting at the top.

After about 10 minutes, the yeast/water/sugar mixture now looks like this. See how the yeast has bubbled and foamed? This is the main indicator that the yeast has properly proofed and will work in the yeast dough you are making.

Some of the yeast bread and roll recipes I have on my site call for active dry yeast, others call for instant yeast. I used to only ever buy active dry yeast but about two years ago I converted over to solely using instant yeast. For me, it is a little more foolproof because I don’t have to worry about making sure it proofs first. I use it interchangeably in recipes that call for active dry yeast. Use whatever is your preference as long as you know whether or not it needs to proof before using it.
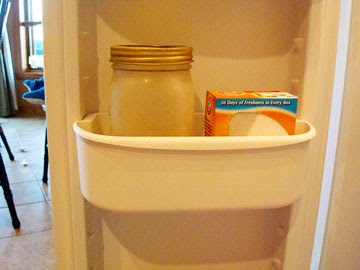
I buy my yeast in bulk (usually at Sam’s Club or I stock up if I find it at a grocery store on sale) and when I get it home, I open a package and pour the yeast into a quart-sized jar and store it covered in the freezer. The unopened packages can be stored in a cool, dry place up until the expiration date. I pull my yeast directly out of the freezer and use it in my recipes – no need to let it come to room temperature.
When making a yeast dough, the key is probably an obvious one – the softer the dough, the more tender the resulting baked bread. This doesn’t mean your dough should be the consistency of banana bread batter. After all, flour is an important part of a yeasted dough. Instead, the dough should have a slight tackiness to it but still be pliable and smooth.
Let me show you some pictures of the process. First, I should say that my main tool in making breads and rolls is my trusty Bosch mixer. I can honestly admit I wouldn’t make yeasted goods nearly as often if I didn’t have it, BUT, I used to do it by hand all the time and I know it can be done. I just wanted to warn you that in the following pictures, you will see my beloved Bosch in action. Electric mixers are a wonderful thing, but they haven’t been around forever and I know many of you make your dough by hand.
Let’s proceed.
Here is my dough RIGHT at the point after I have added all of the flour that I think I need to make a soft dough. Do you see how it still looks slightly shaggy and sticky?
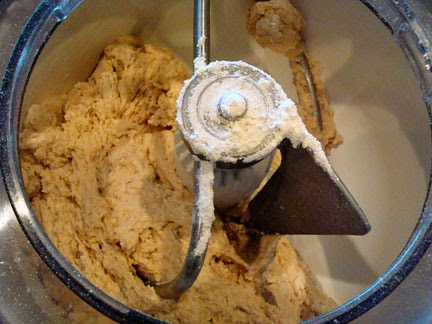
I only use the flour called for in a recipe as a guideline since so much depends on humidity, how you measure flour, etc. – so I judge my dough based on the feel and look more than on how much flour I’ve actually added. I add as much flour as I need to let the dough start pulling away from the sides of the bowl and I let it knead for a few minutes to judge whether or not I need to add more flour (I’ll also stop the mixer and pull a piece off with my fingers to judge the feel – pictures to show this are below.)
If you are making the dough by hand, add enough flour so that your dough forms a ball, even though it may be stickier than the finished product, since kneading helps to smooth things out. Also, during the kneading process the flour absorbs more of the liquid and the dough can become less sticky through kneading, which is why it is important not to overflour the dough at the beginning. You can always add more flour as you go! My dough always sticks a bit to my fingers, even once all the flour has been added.
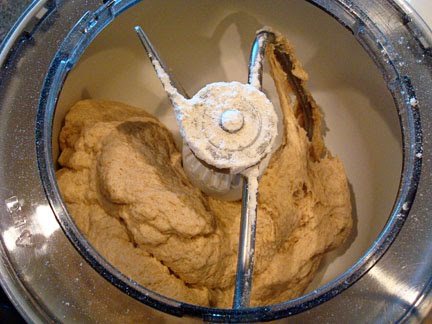
The dough continues to knead and you can see how it is starting to look a little less shaggy. This dough has been kneading for 2-3 minutes (the equivalent of about 5-7 minutes by hand).
Finally, the dough has kneaded for about 8 minutes in the electric mixer and is smooth and ready for the first rise. Remember that it is nearly impossible to ruin a dough by over-kneading but if it hasn’t been kneaded long enough, the gluten in the dough may not develop fully and the bread may not rise and bake properly.
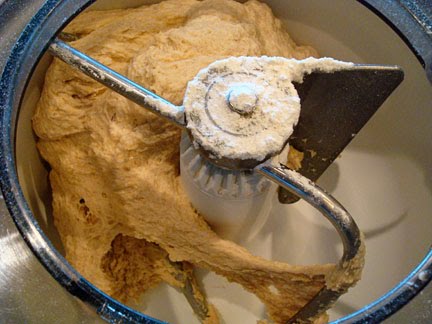
You’ll notice from the picture above that even though my dough has the proper amount of flour and has kneaded long enough, it is still slightly sticky – you can see it pulling on the dough hook. That is ok! I promise. The dough should still be soft and slightly tacky.
Here, I’ve pinched off a piece of the dough (this is about midway through kneading). The dough is sticking to my fingers…

But after quickly rolling it into a ball in the palm of my hand, it looks like this:
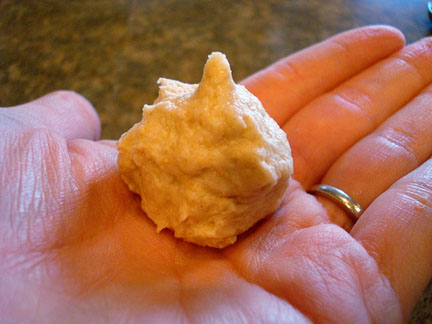
It may seem like in the first picture that the dough is way too sticky and needs more flour since it is leaving a residue on my fingers, but really, it is perfectly floured, as evidenced by the dough ball holding its shape in my hand.
After the dough has finished kneading, I scoop it into a large, greased bowl.

I cover it with greased plastic wrap and let it rise in a warm place until doubled. I never heed times on a recipe – like when a recipe says, “let dough rise for 45 minutes or until doubled.” I always judge the dough based on size not time, since every kitchen can be a different temperature.
Which brings me to another point, a warm rising spot is important. The ideal temperature for dough to rise properly is about 70 degrees or warmer. If my kitchen is a few degrees cooler than this (based on the thermostat in my house), I don’t fret too much and just assume it may take longer for the dough to rise. However, if my house is unusually cool – 66 degrees or lower, I will usually turn on my oven to about 350 degrees and let the dough rise on top of the warmed oven (I have a ceramic top stove that warms up when the oven is on).
Here is my dough at the beginning of the first rise.
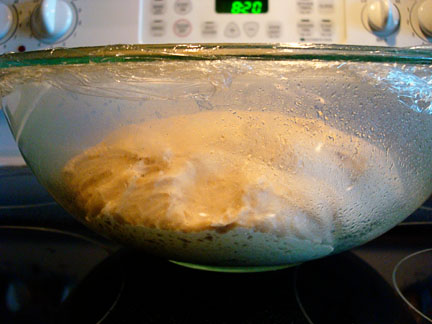
After about 30 minutes, (thanks to a fast rising roll recipe due to the amount of yeast), it has definitely doubled and is ready to be shaped into rolls (or bread if that is the type of recipe you are using).

And there you have it…that is a pretty basic overview of a yeasted dough in it’s first phase. Next week, I’ll be sharing with you a tutorial on shaping this big lump of dough into rolls, including my nifty technique to get a perfectly round dinner roll.
Please let me know if you have any questions about the above tutorial. Leave your question in the comments or email me at mykitchencafe at gmail dot com.
Now go make some bread!
I have just started cooking with yeast and I am so glad I have found this tutorial. Very helpful. Thank you
Thank you for a fabulous and informative tutorial. I never understood the various yeasts, and after reading your blog, I realize now why it was always a hit or miss with my past breadmaking experiences. Who knew there was a difference! Also, your tutorial helped me realize I could use either instant or active dry yeast (and I did read the comment about them not being interchangeable measure for measure), which really saved me today because I had purchased the wrong yeast for the recipe I wanted to try, and I didn’t feel like trekking back to the market. I will definitely link to your tutorial every time I post a bread recipe!
Thank you Melanie for your reply. Those sound like great tips, so I’ll keep trying. By the way, I definitely don’t have a problem making your Double Chocolate M&M cookies! My co-workers just LOVED them!
My daughters and mine favorite cookie of all time. YUM!
Hi Elizabeth – heavy rolls/bread could be do to several factors. One could be overflouring the dough. Another could be rising time, like you suggested. Generally, I disregard the time given in a recipe for rising if it also says to “double in size” – I look more for the doubled in size appearance because sometimes it takes longer than suggested. Finally, if the gluten isn’t developed enough (i.e. not enough kneading) the rolls/bread can be heavy, too. So it could be a combination. I hope that helps!
I haven’t been making bread for to long so I really appreciate your tutorial. I have a question tho, I made some yeast rolls a while back
and they were HEAVY. I heard that I should let them rise longer to make them more light and fluffy, is that true? The total rising time I did was
1 hour ( 30 min 1st rise and 30 min 2nd rise ) Thank you for your help,
love love love your site!
I just want to say THANK YOU!! I have been putting WAY too much flour in my dough for years. I thought there was something wrong with my mixer….the huge dough ball would just bang around and around in the bowl without kneading. I kept telling my husband I needed a more powerful mixer. The whole problem was me putting in an excessive amount of flour. So thanks for teaching me that sticky dough is good!! BTW….I love your blog…such great recipes!!
Nikki – I’m so glad that this tutorial helped you! I had the same problem as you forever and feel like my bread-making life revolutionized when I realized I didn’t need to add so much flour.
What an amazing post!
I unfortunately read through it AFTER I made your cinnamon rolls today. Actually I just read this post while waiting for the cinnamon rolls to do their second rise. Who knows if they’ll turn out now, because I definitely didn’t do the mixing/kneading correctly. Oops! Live and learn and keep reading your blog, right?! 🙂
Thanks, Erin, I’m glad this was helpful!
This tutorial was so helpful to me! In fact, I directed my readers here for your tutorial when I wrote about my love-hate relationship with yeast today!
I’m planning on giving my rudimentary bread skills a shining this weekend with your tutorail…I let you know how it goes.
So that last comment was for the Lion House rolls but I guess I answered my own question seeing that i commented on the wrong post. Thanks anyway!
I am making these tomorrow and I’m just hoping that I don’t screw up anything. I’ve never worked with dough before. I was wondering about how long would i knead the dough in my mixer???
apparently I’ve been making my rolls wrong since I first learned to make them! I followed this tutorial when I made them for Thanksgiving and they turned out so tender and yummy! I use your french bread rolls recipe a lot because it’s so easy to make by hand for those of us that are mixerless. Thanks so much for sharing your knowledge. I can’t even tell you how much my cooking has improved since I started reading your blog!
Thank you so much for the yeast tutorial. I have always been very intimidated with yeast. I think i’m ready to attempt it. Thank you for sharing recipes. I have made many and have never been disappointed. Thanks again for all your hard work and effort you put into your blog. It is very appreciated!
This was so helpful! Thanks Melanie! I use your recipes all the time!
Thanks everyone for all of your tips and advice on breadmaking. I love how breadmaking is an art – which means everyone does things a bit differently!
Please continue to share your input or ask any questions!
Frieda from Frieda Loves Bread emailed me this comment:
Great tutorial and step by step post!
If I can share my experience ~ Active dry yeast is not interchangeable measure for measure with instant yeast.
Instant yeast is more concentrated; therefore you need to use less.
1T ADY= 2 1/4 t. Instant (like SAF)
If you use is measure for measure, you run the risk of allowing your bread to rise too quickly. I agree with
Annie’s comment in this regard.
As to the second rise, I agree with you that you do get better flavor, aroma, and a more tender crumb with the subsequent rise.
Great post – I needed it! I think I overflour and underproof.
Good job! I know some people who really needed that and I will have to pass it on. Thanks 🙂
Looking forward to reading your post on how to form rolls. Love your blog.
This is just what I needed. And the fact that you have a Bosch is proof you take your bread making seriously. I love my KitchenAid, BUT real bread makers use a Bosch. My mom can make 4 loaves a bread in her Bosch. There is no way my KitchenAid could do that.
Nice work on this. Can’t wait for the next tutorial.
And hey, have a great Thanksgiving!
Very good tutorial. Have a great Thanksgiving!
Very well done. I can never find instant yeast, so am stuck proofing. Also, the times you’re given, like the amount of flour, seem so arbitrary at times. My house is cold and I usually end up putting the dough in the oven where it is a bit warmer.
look at you, teaching the yeast-phobes a thing or two! what a shame that yeast has such a bad reputation–it’s wonderful stuff!
Wow! Thanks for the heads up on the two different yeasts. I learned something new and I have been making rolls for years — always used the active dry yeast. I think I may have used the instant without realizing it was different and used it just like dry acive. Anyway thanks again. This site has been great!
A little tip – the unopened packages of yeast should last longer than the expiration date if they are still brick hard.
Brilliant. Thanks for this. I am constantly nervous whenever I’m making anything with yeast because I’m just crossing my fingers that it will turn out. It usually does, but I feel like it’s a guessing game. Now I actually KNOW what’s going on and what to do. Thanks–you’ve relieved me from a lot of anxiety! And just in time because I’m always in charge of rolls for Thanksgiving. 🙂 I love having smart friends.
Thanks for the great post! I feel like a pretty confident baker most of the time, and yet I’m still intimidated by yeast doughs. Your post reminded me that making breads isn’t as hard as it looks, and I should do it more often!
Veronica – I have never skipped the first rise even though I use instant yeast. I guess I’ve always prescribed to the theory that the rising imparts flavor (and texture) to the bread/rolls so I still stick with it, even though it sounds like from Kim’s comment above that many people do skip that first rise with instant yeast.
I use instant yeast and tried the single rise method. BIG mistake. The rolls had the density of meatballs. Just awful.
Courtenay – that is a good question and my advice is to actually pinch off a section of dough and see how it feels in your fingers – if it is so sticky you can’t form a ball with it, then you should probably add more flour. And usually if my dough is still sticking to the center of my bowl and not forming a clear ball to be kneaded then I add a bit more flour (about 1/4 cup at a time). Hope that helps!
Thanks for a great website, I read it everyday. I don’t think I could survive without my Bosch. Store bought bread just tastes nasty to our family now. One tip I wanted to add was DON’T FORGET THE SALT! Salt helps the texture, not just the flavor. Also, I learned at a Bosch class that you only need to let the bread rise once with the instant yeast.
Splendid Things – I usually put my Bosch on a 1 to start kneading and increase it to a 2 about halfway through and leave it there to finish kneading.
kjgray75 – I didn’t notice my baby’s stocking feet until I posted the picture and wondered if anyone else would! Glad you thought they were cute…I’m a little biased but they are pretty cute little feet.
i can’t NOT comment- thank you so, so, so much. I know I’ll refer to this post over and over again. I really struggle with breads and have started to think I am cursed. Maybe not! Thank you. I LOVE your blog and refer all my friends and family here.
I am a Bosch lovin’, bread making gal as well who only uses instant yeast. My favorite yeast is SAF-instant yeast. (Around $3 for a one pound package). Plus, unopened, vacuum-sealed SAF yeast stored in the freezer, stays potent for 10 years or more.
I came upon your blog recently and wanted you to know that I love it! I tried your latest roll recipe (the one with olive oil) and have made them twice in the last week or so. They are awesome! Thank you so much for sharing your talents and for keeping me out of a recipe rut!
-Natalie
Thank you, Mel. This will be my very first time making bread outside of a bread maker that I used years ago. Your tutorial is great and I think it’s going to help immensely.
What a great tutorial! I only wish your next one on how to shape a perfectly shaped roll were before Thanksgiving! I have tried two of your roll recipes so far and my family LOVES them, even though they’re misshsapen. I’ll be trying your new recipe with instant potato flakes on Thanksgiving day – thank you so much!
Good information! I was just at the store last night trying to figure out what type of yeast to get: instant or active dry!
Thanks for clarifying the 2 types of yeast! I’ve been scared of bread making in the past…but you are helping me! 🙂
What speed do you usually set the mixer on while kneading?
Thank you so much for this post. I have pretty good luck when making bread, but sometimes it just doesn’t work. Now things are making sense! Plus, I am off to the grocery store and now I know what kind of yeast to get. Thank you!
Thanks! I need all the help I can get when it comes to baking with yeast.
Thank you so much for this tutorial–it helps a lot, particularly the photos showing the consistency of the dough. I can make good bread, but with rolls, I didn’t know what I was doing and always left the dough either too wet or added too much flour. I also am an instant yeast convert b/c it’s so much easier to work with. Have you ever skipped the first rise when using instant yeast? I do that often when making bread and it hasn’t seemed to harm it, but I’m interested in your thoughts on this (pros/cons).
Thanks for a great tutorial. I have been reading your blog for over 5 months and I have LOVED each entry you post. Love all your recipes and techniques, you are truly an inspiration when I cook in the kitchen.
Thanks!
Thanks for the explanation on different kinds of yeast. I’ve never known the difference.
I always have a hard time figuring out how much flour to add. What if at first I add enough flour so the dough cleans the slide of the bowl, but as it has kneaded for a few minutes it starts to stick again. Should I add more flour?
Thanks for your blog. I love it! I have loved every recipe I’ve tried!
I’m sendind my sister-in law, who is scared of yeast over here! My favorite warm place to raise my dough: in my laundry room, door closed, with both the washer and dryer running. The washer puts of a little warm humidity and I place my bowl with the yeast on top of the dryer, the warmth from the dryer is perfect!
Hey – just wanted to give you a heads up – I gave you a big shout out on my food blog http://www.breakingthereciperut.blogspot.com for your awesome “Thanksgiving 101” posts!
Thanks for sharing!!
what a great tutorial!! thanks.
Thanks for explaining the differences between the yeasts. I’ve always used instant yeast and I always proofed that, but it never looked like the pictures said it should. Still rose good though. Then my husband did our shopping and bought me active dry yeast, and I wasn’t sure if I needed to do anything different. Good to know!
Thanks Melanie for a great explanation! I really need to try making more bread products at home because it really is much less expensive. I just had to tell you that my favorite picture on this post was the one with the yeast in the quart jar in the freezer. Not only is it a great suggestion on how to store yeast, but I also loved the little blue pajama baby feet poking out the side of the picture. So cute!
Just wanted to add that I, too, have a Bosch mixer and absolutely love it! I used to make bread in a KitchenAid, but burned out the motor in it doing that in less than two years; I’ve had my Bosch for about 6 years and it doesn’t even show signs of wear.
I also wanted to add my own experience with bread. If the rising spot is too warm and the dough rises too quickly (especially on second and subsequent rises) it will sometimes have an unpleasant, sour taste. I try to let my dough rise in temperatures between 70° and 100° so that it doesn’t rise too quickly.
Great tutorial! I remember being so confused about instant yeast vs. active dry yeast when I started reading the King Arthur Flour recipes/blog. I LOVE baking homemade bread. 🙂