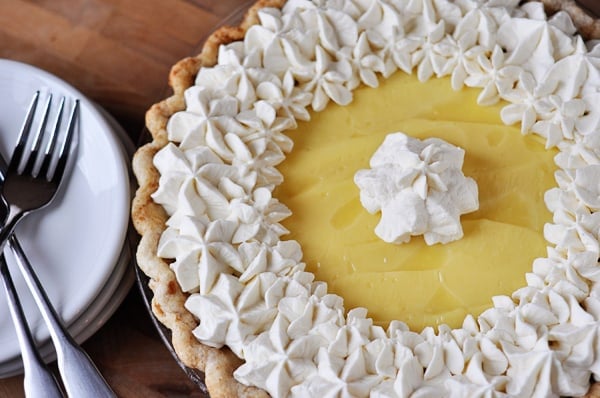
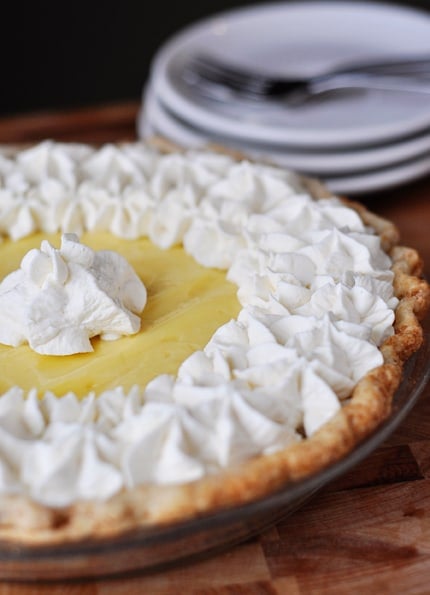
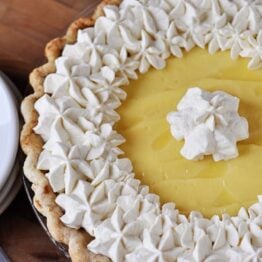
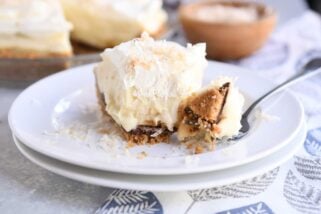
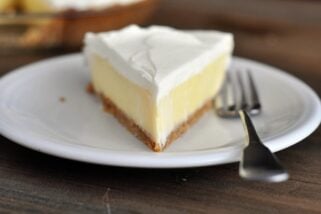
Old-Fashioned Banana Cream Pie
The end result of this homemade old-fashioned banana cream pie is beyond words. The banana lovers you bake it for will be in pie heaven.
Before waxing poetic about the deliciousness of this pie, I’m going to give you a few “outs” in case you are looking at this recipe saying “there’s no way I would make a pie crust from scratch” or “this is way too complicated and I’d rather stick with boxed banana pudding in a crust” or “the frilly piped whipped cream on top is unnecessary and fills me with loathing.”
Here are your outs:
1) While this graham cracker coated pie crust is one of the most delectable I’ve tasted, I also quite enjoy cream pies (like this one) in every day graham cracker crusts so if the thought of pie crust from scratch terrifies you, simplify your life and stick with a graham cracker crust (or follow this little tutorial on pie dough). I won’t judge you since I often do the same thing.
2) The homemade custard is integral to the classic, old-fashioned taste of this banana cream pie and although it may seem intimidating to make the pudding from scratch, let me assure you that if you can a) use a whisk and b) use a whisk quickly, you can conquer this. It’s really that easy and doesn’t take a whole lot of extra time.
3) For all you haters, no need to pipe the whipped cream on top. Just slather it on with a spatula and call it good. It will still taste fan-diddly-tastic.
That’s all the caveats for now. But rest assured that this is not a complicated process. However, the end result of homemade banana cream pie is swoon-worthy.
My Aunt Marilyn and I have a long-standing joke/laugh wondering what it is with men and banana cream pie. Has anyone else noticed this? It’s like Man’s Favorite Pie. I swear. I wonder if there have ever been any scientific studies about male feelings regarding banana cream pie. I want in on the research. And just so I don’t sound biased and gender prejudiced, women love this pie, too. And kids. And puppies, for all I know. But men, especially.
I tend to change loyalties to pie crust with the wind. I’m not a pie making expert by any means and so sometimes making pie crust terrifies me and fills me with angst but I’ve realized the only way I’ll conquer this fear is to keep making pies.
Generally I eschew the use of vegetable shortening in just about everything (and usually use this all-butter pie dough) but I followed Cook’s Illustrated recommendation this time and made their favorite pie crust for cream pies, which uses butter and shortening and then rolls the pie crust in graham cracker crumbs (brilliant!) to give a wonderful hint of crunchy sweetness to the crust.
Since the shortening didn’t cause us to all immediately grow an extra nose and the crust tasted phenomenal, I hereby declare loyalty to this method for all cream pies in the future. Unless I get lazy and just want a straight-up graham cracker crust. But until then…I’m loyal, baby. The crust would have been my favorite part except that I began really tasting the luxurious vanilla custard smothering the tender slices of banana and was lost forever.
This is a good pie, my friends.
Also, if you are wanting an extra boost in pie making confidence, check out my Pie Boot Camp Series HERE! The series includes:
All About Pie Making Equipment Essentials
How to Make Pie Crust (Foolproof Recipe, Rolling Out, Crimping + Video Tutorial)
All About Blind Baking + How to Do It and Why (Bonus: Chocolate Ganache Cream Pie Recipe)
Double Crust Pies and How to Make an Easy Lattice Crust (Bonus: Printable for Easy Reference to Sum Up Pie Boot Camp)
One Year Ago: Classic Chicken Noodle Soup
Two Years Ago: Tomato Bisque Soup
Three Years Ago: White Velvet Sugar Cookies
Old-Fashioned Banana Cream Pie
Ingredients
Graham Cracker Coated Pie Crust:
- 1 ¼ cups (178 g) all-purpose flour
- ¼ teaspoon table salt
- 1 tablespoon granulated sugar
- 3 tablespoons vegetable shortening, chilled
- 5 tablespoons (71 g) butter, cut into 1/4-inch pieces and well-chilled
- 4-6 tablespoons ice water
- ½ cup (50 g) graham cracker crumbs, about 3-4 whole graham crackers
Banana Cream Filling:
- ½ cup (131 g) plus 2 tablespoons granulated sugar
- ¼ cup cornstarch
- ⅛ teaspoon table salt
- ½ cup half-and-half or heavy cream
- 5 large egg yolks, lightly beaten
- 2 cups milk, anywhere from 1% to whole milk
- 2 teaspoons vanilla extract
- 2 tablespoons (28 g) butter
- 2 medium (about 226 g) bananas
Whipped Cream Topping:
- 1 cup heavy cream
- 2 tablespoons powdered sugar
- ½ teaspoon vanilla extract
Instructions
- For the crust, mix the flour, salt, and sugar in a food processor fitted with the steel blade or a medium bowl if doing this step by hand. Scatter chilled vegetable shortening over the flour mixture and process (or cut in by hand with a pastry blender or two knives) until the mixture resembles coarse crumbs. Scatter the chilled butter pieces over the flour mixture and pulse again (or cut in by hand) until the mixture resembles coarse crumbs. If using a food processor, dump the mixture into a medium bowl.
- Sprinkle 4 tablespoons of the ice water over the mixture. Stir and press the dough together, using a stiff rubber spatula, until the dough sticks together. If the dough does not come together, stir in remaining ice water, 1 tablespoon at a time, until it does. Spread a piece of plastic wrap on the counter and gently press the dough into a 4-inch flattened disk on top of the plastic wrap (the dough might still be a little shaggy, which is ok – it doesn’t need to be as smooth as, say, sugar cookie dough, it just needs to be able to stay mostly together in a lump). Wrap tightly in the plastic wrap and refrigerate for 30 minutes. Let it sit on the counter to soften slightly, about 10 minutes before rolling.
- Preheat the oven to 375 degrees. Generously sprinkle your counter top or other work area with some of the graham cracker crumbs. Place the chilled disk of dough in the center of the crumbs. Scatter a few more crumbs over the top of the dough. Using firm, quick strokes with the rolling pin, roll the dough into a 12 or 13-inch circle, taking care to continue sprinkling additional crumbs (feel free to be heavy-handed with the sprinkling since it is better than having the crust stick and tear) underneath and on top, as necessary, to heavily coat the dough.
- Loosely roll the dough around the rolling pin and gently unroll it onto a 9-inch pie plate. Instead of pulling and stretching the dough to fit, gently lift the edges with one hand while easing the dough into the bottom of the plate with the other. Trim the crust to about 1/2-inch beyond the edge of the pie plate. Fold the excess overhang under itself so the folded edge is flush with the edge of the plate. Crimp the crust with your fingers to create a scalloped pie edge.
- Refrigerate the pie shell until firm, about 30 minutes. Line the chilled pie shell with a double layer of aluminum foil, covering the edges so they don’t burn, and fill with dried beans, pie weights or other oven-safe weight. Bake until the pie crust looks dry and is light in color about 20-25 minutes. Remove the weights and foil carefully and continue to bake the crust until it is a golden brown, about 5-10 more minutes. Transfer the pie plate to a wire rack to cool completely while you make the pie filling.
- For the filling, whisk the sugar, cornstarch, and salt together in a medium saucepan. Whisk in the half-and-half or heavy cream, followed by the egg yolks and finally the milk until the mixture is smooth. Bring the mixture to a simmer over medium-low to medium heat, whisking constantly, until the mixture thickens and becomes smooth. This could take anywhere from 5-10 minutes from start to finish so be patient if it doesn’t thicken quickly. The finished texture and thickness should be that of a not-quite set pudding – very thick but not gelatinous. Remove the pan from the heat and if desired, strain the mixture through a fine-mesh strainer to get rid of any possible lumps or little bits of cooked egg; whisk in the butter and vanilla to the hot pudding (strained or not, it’s your choice). Let the mixture cool until just warm, stirring often, about 5 minutes.
- Pour half of the warm filling into the pre-baked pie shell. Peel and slice the bananas thinly on top of the filling and top with remaining filling. Lay a sheet of plastic wrap directly over filling surface. Refrigerate pie until it is completely chilled, at least 3 hours or up to 6 hours.
- For the topping, whip the cream, sugar and vanilla together until soft peaks form. Spread or pipe the whipped cream over the top of the pie. Refrigerate until ready to serve. The pie is best made and served the same day so the banana slices don’t get mushy and browned.
Recommended Products

Recipe Source: crust and filling adapted slightly from the Cook’s Illustrated Cookbook
This pie is amazing! I have tried many but this one is seriously worth the effort. The crust, i am a lard crust fan so i did my usual crust but did do the graham roll out which was my only change. So.so worth it!! DELICIOUS!!
Absolutely incredible. My first time ever making and having a banana cream pie. It was fantastic. So easy to make with the excellent directions. 10/10.
I just had to laugh about “the frilly piped whipped cream on top is unnecessary and fills me with loathing.” This pie is yummy, can’t wait to make it this week for Thanksgiving!
This recipe has been added to our “must haves” at Thanksgiving. This is an intimidating recipe for a German baker who’s a little unfamiliar with pie crusts and pie fillings. We are sold and will never try another recipe. This year we are adding the Chocolate caramel pecan pie.
Hi Mel, this recipe looks amazing.. My son is graduating highschool Friday and is begging me to make banana cream pie for his graduation. If I make this dessert today or Monday , wait to assemble it ( except whip cream i will make right when i serve it) will it keep that long ? i could hold off on the middle layer of bananas so it doesn’t turn grey and only slice fresh ones right before I serve under the whip cream that day ? what’s your suggestion?
Everyone I make this for loves it and always goes back for seconds! I have even modded it into a simpler sort of trifle, but at its core it is this recipe that makes it taste so great.
Can the cream pie filling be froze or refrigerated separately for a few days and still be good? How can I preserve it if I need to make it a few days in advance?
I wouldn’t suggest freezing it (it can turn grainy after being defrosted) but you can definitely make it several days ahead of time and refrigerate it.
Tasted amazing, but was no where near set 🙁 Maybe I didn’t cook it long enough? We scraped the whole thing in a bowl and had delicious banana pudding.
In crust and pudding is it salted or unsalted butter? Which do u prefer?
I use salted butter
I have always wondered why men live banana cream pie so much, all of them! Trying this today for Father’s Day.
Today is our 47th anniversary and my hubby asked for a banana cream pie. Came across several recipes and finally settled on this one and, oh boy, am I glad that I did. I followed the recipe exactly for the filling and ended up using a graham cracker crust and it tastes like it came straight from Heaven. It is so delicious that I actually left a couple of spoonfuls in the pan so I could eat it! Such a delicious recipe. I used 1% milk for the two cups and heavy cream for the one cup and it cooked up beautifully…took a full 10 minutes on medium heat to thicken, stirring constantly, but it is worth it. Thank you for sharing such a delicious recipe for one of my husband’s favorite pies!
So happy to hear that, Lonna! And happy anniversary!
I made this recipe today for the first time and it’s delicious. The filling is so rich and creamy I could eat it all by itself! I used a regular pre made organic pie crust but next time I’ll try it with a graham cracker crust. This is the only banana cream pie recipe I will ever need-thank you!
Really good filling my mom loved it and she doesn’t like anything, I think I made my crust to thick but it was yummy, this going on our thanks giving table
I am doing something a little bit different for Thanksgiving this year. I am wanting to make individual banana cream pies in small cups this year. I was thinking of using a graham cracker crust in the bottom and then I wondered about your pie filling.
My question is, if I assembled these the day before would they still be good or would it be better to maybe make the filling the day before and assemble the day of? I noticed you said the filling could be made the day before and held over.
Would you still put the bananas cut up layered in the cup and by the way, do they turn brown?
Hi Gina, I definitely think you could make most of this ahead of time but I would wait to assemble it until at least the morning of so the bananas don’t get overly browned. The filling can be made several days in advance.
Do you have a recipe for stabilized whipped cream?
I don’t; sorry! I’ve made it before with cornstarch and also with gelatin – but I haven’t posted an official recipe.
I often add a little vanilla pudding or dream whipp. Just a TBS or 2. It holds up very nicely in the bakery case.
Excellent! I made a half recipe for two mini 6 inch pies and they were wonderful. The pudding thickened up very nicely and was the perfect consistency.
Thank you
The flavor is excellent, but it didn’t set up all the way. A little soupy when cut to serve. How do I correct this for next time?
Hi Debbie – try cooking the pudding longer or increasing the cornstarch by 1-2 tablespoons.
Took a while to thicken and I began to think I had done something wrong. I was rereading the recipe and continuing to whisk all the while and all of the sudden, it thickened up beautifully. Everything is cooling right now. Just waiting to assemble. The hardest part? Waiting till after Sunday dinner tomorrow to eat it!!
https://www.facebook.com/photo.php?fbid=2088408737841721&set=a.199445353404745.68426.100000178461560&type=3
I’m loving your pie! I think it turned out really good…Thanks Mel
What do you do to prevent bananas from turning black?
Best pudding EVER!!
Mel, this pie is amazing. Regarding the crust- I totally agree it’s THE crust for cream pies. The filling was divine and my husband was inspired to make the pudding himself. This is a new Thanksgiving tradition
Yay!
This is the perfect traditional banana cream pie recipe. The vanilla custard is absolutely delicious. We love to use as filling in crepes as well.
Made this beauty for Father’s Day. Big Hit. Used a basic Nilla wafer crust recipe instead of the one provided because I was short on time. Worked really nicely. Will make it again!! Thanks Mel!
I have been making this pie for a few years now. It is one that is requested frequently by family and friends. I have tweaked the recipe by using a Nilla wafer crust. I also add a vanilla bean to the filling as it cooks. Once it is done, I remove the pod. I usually make the filling ahead of time. When I do put the pie together I put a layer of bananas on the bottom, then a layer of filling and I sprinkle crushed Nilla wafers on top. I continue to layer the pie until I use all of the filling and then top it with the whip cream.
I was planning on making this for Thanksgiving but I’m traveling so I wanted to make the custard ahead of time. Do you think if I was to do so that it would still turn out ok? Say make it today and assemble on Thanksgiving morning?
Yes, I think you could definitely make the filling ahead of time.
Does this slice well? Some cream pies set and slice well while some turn into a mess on the plate. It looks fantastic and I haven’t yet found my favorite recipe that tastes great and looks pretty sliced.
Yes, I think it slices really well. 🙂
Modified the recipe and made this with vanilla almond milk, 1 tsp of banana exrtract since vanilla flavoring all ready in almond milk and used 4 egg yolks instead of 5. Took a lot longer to thicken but the end product was still amazing.
This custard/pudding was DELICIOUS! I used to for a banana pudding. It was a bit sturdier than the Nilla Wafers pudding recipe…which, for me, is awesome. Thank you…you have a new fan. Glad I found your site. Looking forward to trying your other recipes.
This was a really tasty pie!! I made it for Easter and it was delish!
The only worry I had was if the vanilla filling would harden. Instead of 5-10 minutes, it took me 20 minutes. Still, it was soooo good! Thank you for the recipe!!
Hi Mel,
I’m doing a pre-thanksgiving run to make sure I do everything right the first time, so I’m not flustered the morning of (wishful thinking). Can pie dough be refrigerated as the disc shape and covered in the fridge for a couple of days? I know it takes all of 5 minutes to make, but it’s just one less thing. And I wanted to thank you for putting together your Thanksgiving recipes for us, you are now my Thanksgiving sponsor 🙂 I don’t know what I’d do without your site!!
Haha, thanks! Yes! You could definitely refrigerate the disc of pie dough for several days.
I made this pie yesterday. I love banana cream pie and am always searching for the best recipe. This was perfect although I did use a shortening based baked pie shell. I also added a 3rd banana which I minced / mashed and folded into half the custard to amp up the banana flavor.
PS. something’s wrong with the ad serving on the website. It has a loading problem that causes the scroll to stop working and makes it hard to write a review.
Thanks for the heads up, John – I’ll look into the ad issue (and I’m glad you liked the pie!).
Hi Mel, I made this pie and was so excited about it–even though I’m not really in to cream pies, pudding, or anything with that texture. The filling is super delicious, but even after refrigerating the pie overnight, it came out runny–would not hold it shape when sliced. We just had to scoop it out, so it was more like banana pudding. What would you say went wrong?? I’ve been reading and found some stuff that it could have to do with the egg yolks or the cornstarch…maybe both? I thought that I had gotten it to be “thick but not gelatinous” but I guess I was wrong…?? Do you have any further clarification on step #6 or tips about getting the filling to set properly?
I would love to make this pie again, but want to get it to come out right! 🙂
Thanks!!
Hi Carla, it seems like it’s probably related to not cooking the pudding filling long enough. I’m not sure what you mean about it being caused by the egg yolks or cornstarch, sorry. I think if you make it again and try cooking it longer (it should be pudding-like with large bubbles breaking across the surface as it boils) that should help. Good luck!
I made this with nilla waffers instead of graham crackers and it was delicious!
I made this pie. I am worried, it looks like its not setting. I am reading now what problem might be, I read that when made with corn starch you need to boil fully for 1 minute, or when you cool it sugar does something and it doesnt set. I cooked it till it was thick like recipe said. I put it in freezer but, read comment that cream pies dont freeze well so, I will take it out. I am so hoping it will set overnite. I hope!
Hi Mel. Wondering if you think your other “perfect pie crust” recipe works for the banana cream pie as well or if I should stick with the crust recipe you have here. I just love the recipe with the sour cream but don’t want to use it if it will somehow clash with the banana cream filling. Thanks!
The perfect pie crust would be awesome here (I’ve used it before) – but there’s something extra delicious about rolling the crust in graham crackers. 🙂
Hi Mel ~
Thank you so much for your recipe. I absolutely LOVE your Lemon Cream, and lost my tried and true Banana Cream, so definitely thought to come to you! I had never heard of straining the cream, what a great idea!
I just recently moved back to Lake Tahoe, and am at about 6,000 ft, so it’s almost as though I’ve had to learn some baking over again. With pies though, I seems to be okay. I had just made a Coconut Cream in a vanilla wafer crust, with a thin layer of chocolate ganache the previous week, so I thought this one would be similarly great.
I tried and the custard, while looking right and thick all the way through – once out (the next day) – seemed really light, airy, and delicate looking. It got lost under the whip cream? Taste and texture. I’m wondering if you happen to know of an adjustment I may have needed for high altitude? I can’t figure it out because the others – coconut cream, chocolate, and peanut butter cream were all okay? I did use vanilla bean paste too because I like the look, or maybe it was that filling and the ganache (which was cooled) Or maybe I should try again? Ha ha! I wrote you a book! Sorry…
Thank you!
Jen
P.S. I love your site!
Hi Jen – to be honest, I’m not sure. I don’t live at high altitude (and haven’t for a number of years) so I don’t really know the ins and outs of high altitude cooking and baking. I didn’t think that a custard would be affected adversely at high altitudes (I know cakes/cookies and other baked goods might need altering but never heard of adjusting for puddings and custards). Have you tried googling to see if there’s any info about high altitude adjustments for cream pies? Sorry it didn’t quite work out for you!
I see your recipe calls for 5 eggs. I have seen most others call for 3. Does it make a difference in the number of yolks? Texture? Flavor? Thanks!
The filling for this pie is rich and creamy probably because of the eggs.
Thank you for this great recipe! I made it recently (but substituted with a gluten free crust) and it was hit! 🙂
http://www.tartsandcrafts.ca/2015/01/banana-cream-pie-with-gluten-free-crust.html
This recipe looks and sounds delicious. I was just wondering what the estimated time it is to make it?
It totally depends on a variety of factors (how long the cream filling chills and such). You are probably looking at 6-7 hours from start to serving chilled from the fridge.
Woooah! How did I NOT spot this recipe on here before?! Husband is proof of the “man loves his banana cream pie” theory and I’ve been on the hunt for a good recipe. He’ll ask where I got it, and like every other time he asks, I’ll say, “I got it from Mel.” 🙂 Thanks!
Had to comment and thank you for this fantastic recipe. Love the crust. Soooo good It’s a keeper, thank you.
I was in a mood for a banana Pie.When through several recipes and yours was the simplest. I prepared it with my hubby,and to be honest we loved it. Thank you