Tutorial: Shaping Perfect Rolls
Get this step-by-step tutorial on how to shape perfect rolls. Your rolls will look so amazing you will feel like a professional bread baker!
Update: Here is a new and improved video tutorial on shaping these dinner rolls (with a section on shaping hamburger and hot dog buns, too). Happy roll rolling!
I promised in the tutorial on yeast that I would post about shaping perfect rolls.
Occasionally, I use a crescent shape for rolls, especially these Lion House rolls, but for almost every other roll recipe, I use the method below. It ensures perfectly round, beautiful rolls.
After my dough has gone through the first rise,

I take the dough out of the bowl and place it on the greased plastic wrap that was covering the bowl. Then, I take my handy-dandy bench scraper/cutter tool and slice off pieces of dough to shape into rolls.

If I am being really precise, I use my kitchen scale to make sure that each piece of dough is about the same size – for an average size dinner roll, I use pieces of dough that weigh about 2 ounces each.

Using my savvy technical knowledge (not! please don’t dwell on how the camera is unsteady), I videotaped my method for shaping the dough into round, smooth balls.
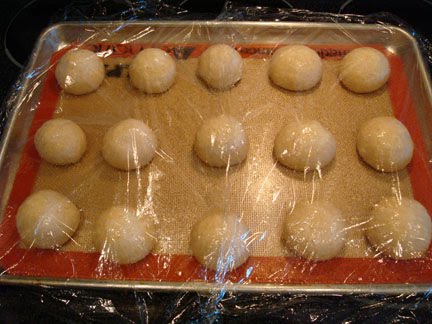
Once all the pieces have been shaped into rolls, I cover the baking sheet with greased plastic wrap. You’ll notice I have a silpat liner on my baking sheet. If you don’t have a silpat or prefer not to use one (the horror!), lightly grease the baking sheet or line with parchment paper.
Once the rolls have doubled in size and puffed beautifully, they are ready to be baked.

Here is the finished product. Golden, lovely, perfect rolls ready to be devoured.

Charity – I’m not sure why you are having trouble seeing the video since I can view it in the blog post (it’s a link from YouTube) but in any case, here is the direct link:
http://www.youtube.com/watch?v=66MYlq9EsXk
Hope that helps!
Hi, I love your website and for so long I have wanted to be able to shape beautiful rolls. For some reason the pictures all show up but not the video of you actually shaping the rolls. How can I see this video? Is it posted somewhere else?
Thanks for your help.
Mel,
I love your site! I have a question about making yeast doughs. I have a kitchen aide and I never know if I am adding the right amount of flour. The recipe says to add the flour until it pulls away from the sides of the mixer; I will add flour and it will pull away from the sides but once it has mixed/kneaded a few minutes it starts to stick to the sides again. Does this mean I need to add more flour again?
Hi Carrolee – I have never used a Kitchenaid to make bread so we’ll have to experiment a bit here…but yes, my inclination is that if the dough is still sticking, add more flour, just a tablespoon or two at a time, until the dough can knead successfully for several minutes without sticking. Let me know if that works!
Julie – yes, I would shape the rolls, place them on a greased or lined sheet pan, cover them with lightly greased plastic wrap and probably another layer of plastic wrap and then freeze them. Actually, after they have frozen completely, you could pull them off the baking pan and store them in a freezer bag. When you want to bake them, take the baking sheet out of the oven (or pull some frozen rolls out of the bag and place them on a prepared baking sheet) and keeping them covered with lightly greased plastic wrap, let them thaw to room temperature and rise (I’m guessing it would take about 8-9 hours, depending on the temperature of your kitchen). Once they have risen, bake like normal. I’ve never tried it with these rolls but I use the same technique with cinnamon rolls all the time.
I’ve always wondered about freezing roll dough for later convenience. I’d like to make a big batch then freeze some of it so it would just have to rise then bake. Would you suggest putting them in the freezer just after shaping them? Have you tried this before? How long would you need to let them rise before bake time?
Love this tutorial. I thought I knew how to make nicely shaped circles of dough until I watched and tried this. I just included a link on my blog. You are awesome. Thanks again for the wonderful blog!
Thank you so much for this tutorial! Perfect!
I love your website! My Easter menu was almost exclusively your recipes!
You are such a genius! I love love love your website and all your recipes! I have tried many of them and they have never failed me! Thanks for this tutorial! It will definitely come in handy!
Hey. Thank you for the tutorial, it made my first time making rolls (yours French Bread Rolls, by the way) so much easier! They were soo nice. Thanks again 🙂
P.S. I used a little greased bowl/plastic wrap and everything was good.
Just tried this yesterday and it was awesome! The rolls were a huge hit. Thank you so much!
Ah, you’ve let my secret out!!
You are amazing. period.
You’re not kidding! Those are perfect!
Do you brush the tops of the rolls with butter or egg? How do they get so golden brown without it? Mine never turn out like that unless I brush them with milk, butter, or egg wash.
Very helpful tutorial! Thanks for the video as well, it helps a lot to be able to actual see how to do it! I’m excited to try to make prettier rolls! 🙂
The Three Amigos – no, I usually don’t brush my rolls with anything prior to baking. I think the key to getting that golden color on the rolls is to bake the rolls hotter than 350 F. I usually bake mine at 375 or 400 F.
I really really love the pam on saran wrap tip! I made Tea Rings last night (only 2 dozen!) and I used that tip for the first time! Worked great! Thanks for the help!
Video taping while making a perfectly round roll…not that takes talent! You have turned me into a silpat fan. I love mine so much I am giving away 4 of them for Christmas presents. -Liz K.
Thanks for the tutorial! That was so great to see that video, it totally makes sense now! Thank you!
Now I can’t wait to make perfectly rounded rolls! Thanks for the video.
ah, perfection. must be nice to achieve it every once awhile, but i wouldn’t know. 🙂
thanks for the excellent and extremely useful pointers!
I have never made homemade rolls before (or anything with yeast) but am thinking about trying after drooling over all of your recipes! I am wondering, though, how hard it is to mix everything up without a stand mixer. I have an electric hand mixer, but it just has the regular whisk, egg-beater type attachments… would it be better to use those, or to do it by hand? Also, which recipe would you recommend starting with if you had to pick one? Oh, one more question – what’s the silpat liner? Is it just one of those silicone baking sheets they have at Wal-Mart and places like that, or is it something else?
Thanks so much!!! Just found your site recently and am looking forward to trying lots of your recipes 🙂
Thank you! I’m making them right now. Thanks for the tutorial! I’m going to try it without brushing them with anything this time! Thanks!
Thanks!! You know it’s all in the technique! I can’t tell you how many times I have failed miserably in bread making!
Hi. I’m going to try again. I have not yet confessed that I tried to make one of your roll recipes a few weeks ago and failed. Hockey pucks. I think I know what I did wrong. After seeing this tutorial I am trying again! Beautiful.
Thank you. Thank you.
Wow Melanie!
Thanks for your tip! I’ve always wondered how to shape rolls round and smooth! Now I know! I’m so trying your method the next time I make rolls. Thanks!
oh yum!
I have a couple of questions. What brand of silpat liner do your prefer? And what IS silpat? What’s the point of using it? Where is a good place to purchase one for a reasonable price? Thanks so much in advance! I love this blog so much, I am here every day! 🙂
Also, I had the same issue as the Peregos…I made your “perfect dinner rolls” for Thanksgiving, and I did a TERRIBLE job on them. It’s the only thing I’ve ever made from this website that wasn’t incredible. I have a hunch that it was because either my yeast was getting old (the expiration date was the day after Thanksgiving), or my kitchen was too cold, and they didn’t rise enough before I baked them. (I made them the night before and put them in the fridge like you suggested). Which leads me to a question I’ve had for you since I made them…How good is yeast beyond the “Use By” Date? Can you fudge it a little? Because I used the yeast from that very same package in some loaves of bread I made a few days after Thanksgiving, and the bread turned out perfect!! Weird, huh?
Thank you for sharing–this is better than my method. But what I really want to know is, how do you spray your plastic wrap with pam? This is an extremely hard tast for me and usually I end up holding it while my husband sprays and I get all greasy. 🙂
Thanks for the tutorial. I’ve been wondering how others’ rolls get so lovely, while mine wind up with cracks and just plain ugly. The secret’s out. No more “ugly duckling” rolls for me.
i have heard you talk about this silpat liners before to. do i dare ask as well… what are they??
Heather and Devin – I use the silpat brand of silicone liner. I’ve never used another brand so I’d have to say that I would recommend the actual silpat brand. I know if you google “silpat liner” you can usually find them online for less than $20. I’ve bought a few (for gifts) on Amazon.com and other random sites that pull up when I google search the lowest price.
Also, I’m sorry that the rolls didn’t turn out so hot. If a roll is dense like a “hockey puck” then I would definitely say it is the lack of rising time. Rising (and kneading in part) is what lends a roll/bread it’s lightness and fluffiness. Next time if your house is too cold try warming the oven to 200 degrees and then turning it off. Put the rolls in the warm oven and let them rise there. Also, I’m not sure if you can fudge the date on yeast. My guess is that yes, it is probably still good after the date, especially if you store it in the freezer and since your bread turned out a few days later, the issue with the rolls was probably rising time. Hope that helps!
Veronica – I’m sorry, you probably didn’t mean it this way, but your comment was very funny. I have this image of you getting all greasy with the pam instead of the plastic wrap and your husband having a great time being the cause of the problem. This is how I do it: I place plastic wrap over the rolls so they are covered just how I want them to be when they rise. Then, I spray the plastic wrap with pam and flip it over so the pam is the layer next to the rolls. Does that make sense?
Melissa – (hey there!) – a silpat liner is a nonstick silicone baking mat that in my opionin, is indispensable in the kitchen. I use mine for all of my cookies and rolls and love them. I use the actual silpat brand and they run about $20 per liner.
If only I can take a bit of the rolls through my computer monitor. They look heavenly.
Are you ever going to do a tutorial on how you shape the Parker House Rolls? They look so…..awesome rolled like that!
Bee-yoo-ti-ful!!! I can almost smell the yeast- I’ll get the butter.
What an awesome post!! I love your technique! Also, the Silpat is made by Demarle. Last January they had a special of silpats for $10. I will let you know if they do that again. They do make great gifts…especially at the price:)
Excellent! I have been waiting for that tutorial so thank you so much for getting it out to us!! Love it and am excited to test it out:).
Thanks for all you do Melanie!
Question:
Which of your bread recipes have you found work well with white wheat flour? And, do you have any that have worked well with whole wheat flour?
Mariann A.
Using this, the yeast tutorial, and your french bread rolls recipe, I think I have finally made the perfect roll! Thanks so much for posting these tutorials. I found the rolls very easy to shape using your technique. I also learned how to tell when the yeast is ready, how to let the dough rise properly, and how to tell when the dough is sticky, but not too sticky. Thanks so much!
Mariann – I feel funny responding to this comment since you are on your way to my house right now, but here’s the deal: I most always (at least 95% of the time) sub at least half white wheat flour for all my roll recipes so in my opinion any of them would work fine with that substitution. It’s a little tricky subbing all whole wheat flour and getting the texture light and fluffy so I usually sub half. And if you prefer the taste of red wheat, you could do the same – sub half red wheat flour. The texture may be a bit denser than with white wheat flour but if that doesn’t bother you, it would work just fine.
Greg and Carlin – yay for the perfect roll!! I am so happy the french bread rolls worked out for you. Thank you for letting me know!
Anonymous – are the potato pearls the pea-sized potatoes? If so, you definitely wouldn’t want to sub those without grinding them up in a blender and even then, it’s kind of a guess as to whether they would work the same. I know that potato buds and potato flakes can be used interchangeably, although the potato buds lend a stronger potato flavor to the roll. Good luck!
Oh my goodness, I’m having flashbacks to when I worked at Great Harvest and come Easter, Thanksgiving, and Christmas we made THOUSANDS of rolls for special orders and that was exactly how we rolled them! Just found your blog and am loving it!
Wow, the pictures of your rolls look scrumptious! Thanks for the tutor. I’ve been searching for perfect rolls that are non-traditionally sweeter, and your recipe and techniques have impressed me, but would adding a little more sugar affect anything like texture, consistency, moisture, or procedure in making your House Rolls? Thank you!
Thanks for your easy tutorial, I never make rolls like this because I was intimidated by manually making each ball (though the way you push it through your hand, etc). This looks easy! I will try it this way next time.
Anonymous – I’m not an expert when it comes to the chemistry of roll doughs, but from what I’ve heard, additional sugar might cause overbrowning in the rolls – so you would probably want to be careful when baking but other than that, I don’t think a little bit more sugar (perhaps 1/4 cup) would hurt. I’m not sure how sweet of a roll you are looking for but the Parker House Rolls on this blog are the sweetest roll recipe posted here and are delicious.
It seems like when I spray the plastic wrap, it always sticks to the rolls. I can’t tell you how many batches I ruined that way. What I do now is lightly damp a kitchen towel and lay it on top. Now I have not ruined a batch of rolls yet. I’ll have to tried to your method for shaping the rolls.