Tutorial: Working With Yeast
While I am not an expert at yeast by any means, I do make my fair share of yeast breads and rolls – at least several times a week. I’ve received a lot of questions lately about yeast and so I want to share with you my method of doing things. It is a wonderful feeling to whip up a batch of rolls for dinner and know that you’ve done it for at least 1/10th of the cost than at the store (and done it with fantastically delicious results!).
Here we go.
First a quick note about the difference between active dry yeast and instant yeast. These are the two main forms of yeast called for in all of my bread/roll recipes.
Active dry yeast is a dormant form of yeast and needs to be rehydrated or proofed prior to using it in a recipe. This means that the yeast needs to be dissolved in warm water (a bit of sugar helps the yeast to activate more quickly since sugar acts as a food for the yeast) and left for a few minutes to activate before using in the recipe.
Instant yeast is different than active dry yeast in that it does not need to be rehydrated or proofed prior to using in a recipe. The granules of instant yeast are smaller than active dry yeast and you can add the yeast directly in with all the other dough ingredients without letting it activate in warm water first.
Here is a visual of what yeast should look like before and after proofing.
This yeast has just been added to the water and you can still see some of the granules sitting at the top.

After about 10 minutes, the yeast/water/sugar mixture now looks like this. See how the yeast has bubbled and foamed? This is the main indicator that the yeast has properly proofed and will work in the yeast dough you are making.

Some of the yeast bread and roll recipes I have on my site call for active dry yeast, others call for instant yeast. I used to only ever buy active dry yeast but about two years ago I converted over to solely using instant yeast. For me, it is a little more foolproof because I don’t have to worry about making sure it proofs first. I use it interchangeably in recipes that call for active dry yeast. Use whatever is your preference as long as you know whether or not it needs to proof before using it.
I buy my yeast in bulk (usually at Sam’s Club or I stock up if I find it at a grocery store on sale) and when I get it home, I open a package and pour the yeast into a quart-sized jar and store it covered in the freezer. The unopened packages can be stored in a cool, dry place up until the expiration date. I pull my yeast directly out of the freezer and use it in my recipes – no need to let it come to room temperature.
When making a yeast dough, the key is probably an obvious one – the softer the dough, the more tender the resulting baked bread. This doesn’t mean your dough should be the consistency of banana bread batter. After all, flour is an important part of a yeasted dough. Instead, the dough should have a slight tackiness to it but still be pliable and smooth.
Let me show you some pictures of the process. First, I should say that my main tool in making breads and rolls is my trusty Bosch mixer. I can honestly admit I wouldn’t make yeasted goods nearly as often if I didn’t have it, BUT, I used to do it by hand all the time and I know it can be done. I just wanted to warn you that in the following pictures, you will see my beloved Bosch in action. Electric mixers are a wonderful thing, but they haven’t been around forever and I know many of you make your dough by hand.
Let’s proceed.
Here is my dough RIGHT at the point after I have added all of the flour that I think I need to make a soft dough. Do you see how it still looks slightly shaggy and sticky?
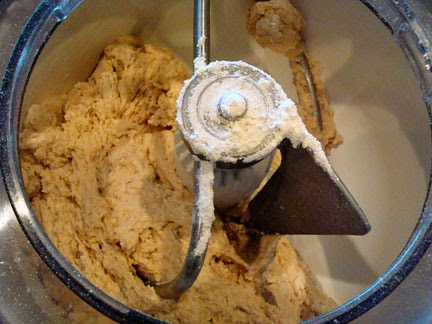
I only use the flour called for in a recipe as a guideline since so much depends on humidity, how you measure flour, etc. – so I judge my dough based on the feel and look more than on how much flour I’ve actually added. I add as much flour as I need to let the dough start pulling away from the sides of the bowl and I let it knead for a few minutes to judge whether or not I need to add more flour (I’ll also stop the mixer and pull a piece off with my fingers to judge the feel – pictures to show this are below.)
If you are making the dough by hand, add enough flour so that your dough forms a ball, even though it may be stickier than the finished product, since kneading helps to smooth things out. Also, during the kneading process the flour absorbs more of the liquid and the dough can become less sticky through kneading, which is why it is important not to overflour the dough at the beginning. You can always add more flour as you go! My dough always sticks a bit to my fingers, even once all the flour has been added.
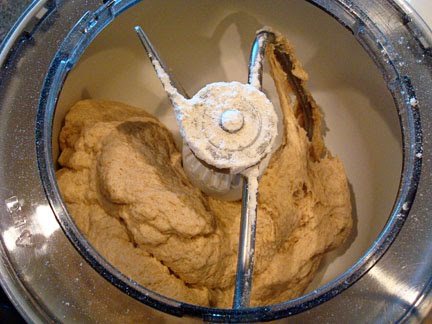
The dough continues to knead and you can see how it is starting to look a little less shaggy. This dough has been kneading for 2-3 minutes (the equivalent of about 5-7 minutes by hand).
Finally, the dough has kneaded for about 8 minutes in the electric mixer and is smooth and ready for the first rise. Remember that it is nearly impossible to ruin a dough by over-kneading but if it hasn’t been kneaded long enough, the gluten in the dough may not develop fully and the bread may not rise and bake properly.
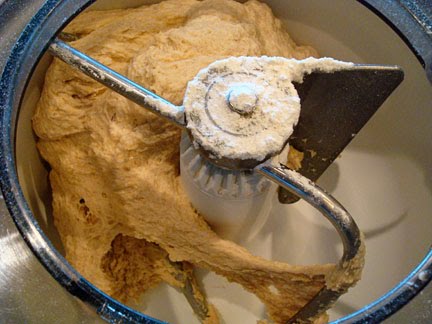
You’ll notice from the picture above that even though my dough has the proper amount of flour and has kneaded long enough, it is still slightly sticky – you can see it pulling on the dough hook. That is ok! I promise. The dough should still be soft and slightly tacky.
Here, I’ve pinched off a piece of the dough (this is about midway through kneading). The dough is sticking to my fingers…

But after quickly rolling it into a ball in the palm of my hand, it looks like this:
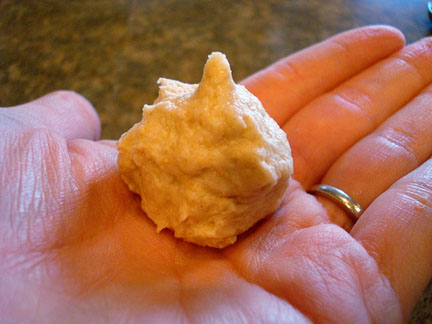
It may seem like in the first picture that the dough is way too sticky and needs more flour since it is leaving a residue on my fingers, but really, it is perfectly floured, as evidenced by the dough ball holding its shape in my hand.
After the dough has finished kneading, I scoop it into a large, greased bowl.

I cover it with greased plastic wrap and let it rise in a warm place until doubled. I never heed times on a recipe – like when a recipe says, “let dough rise for 45 minutes or until doubled.” I always judge the dough based on size not time, since every kitchen can be a different temperature.
Which brings me to another point, a warm rising spot is important. The ideal temperature for dough to rise properly is about 70 degrees or warmer. If my kitchen is a few degrees cooler than this (based on the thermostat in my house), I don’t fret too much and just assume it may take longer for the dough to rise. However, if my house is unusually cool – 66 degrees or lower, I will usually turn on my oven to about 350 degrees and let the dough rise on top of the warmed oven (I have a ceramic top stove that warms up when the oven is on).
Here is my dough at the beginning of the first rise.
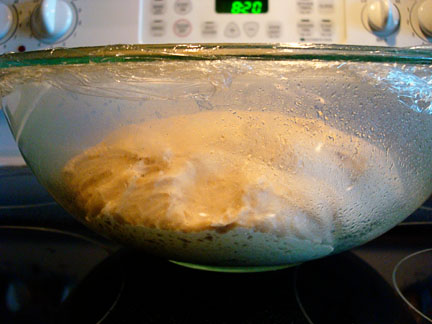
After about 30 minutes, (thanks to a fast rising roll recipe due to the amount of yeast), it has definitely doubled and is ready to be shaped into rolls (or bread if that is the type of recipe you are using).

And there you have it…that is a pretty basic overview of a yeasted dough in it’s first phase. Next week, I’ll be sharing with you a tutorial on shaping this big lump of dough into rolls, including my nifty technique to get a perfectly round dinner roll.
Please let me know if you have any questions about the above tutorial. Leave your question in the comments or email me at mykitchencafe at gmail dot com.
Now go make some bread!
Great tips plus having the visuals included.
Xxxx
I’m a newbie to your site. It’s only recently I’ve started to explore other avenues for baking and, although I haven’t tried anything yet, I have confidence in your recipes.
I love the way you explain about the yeast and the pictures help me enormously!
I’m here now, and I’m staying!
Thank you X
Thanks, Wendy! Glad you found your way here.
I had a cooking weekend and made these rolls on Saturday and Mel’s “Quick Weeknight Homemade Spaghetti Sauce” on Sunday. The sauce was wonderful, and so easy, and the rolls were AMAZING! It’s just my husband and I at home, and I had to give some away to keep from eating them all! I will definitely be making them again for when we have friends over or I need something for a church activity, etc. Thanks so much, Mel!
Hi! I have a Bosch mixer as well and have been having an issue with my dough riding up the center shaft. Do you know what might cause this? Have you encountered the problem? It’s aggravating since the dough will get under the attachment piece and stuck in those little crevices at the top of the shaft. I have done different types of dough and it doesn’t seem to make a difference. I primarily make your honey whole wheat bread. I would appreciate any insight!
Hi Baylee, that’s annoying for sure! Are you doing small batches or are they large batches? Sometimes small batches can be tricky in the Bosch. There’s an attachment you can get (the bowl scraper, I think it is called) that hooks on to the dough hook and helps clear that center column. Also, I highly recommend this dough hook. It’s pricey so may not be a possibility, but someone told me about it years ago and I got one and I can’t go back to the normal dough hook. I think this dough hook helps with mixing.
https://nutrimill.com/products/stainless-steel-dough-hook?_pos=4&_sid=2035febac&_ss=r
Thank you so much for your reply. To answer your question, the doughs I make most often are your honey whole wheat that yields two loaves, and a challah dough that uses about 7c of flour, and yields two loaves. I will look into the attachments!
I have made your French bread recipe twice now. I am so thankful for your tutorial on yeast and what perfectly floured bread dough looks like. I have always mixed too much flour into my dough hence my bread is always dense.
I’m anxious to make this again using the information I’ve received from your tutorial. I’m going to wait to add more flour until I have done several stir down 15 minute waite periods. I have noticed with additional kneading the dough becomes less sticky. I can’t make bread by hand because I can’t stand the dough being stuck all over my hands and table top.
I will post again in a couple days to let you know how things work out
Thanks, Fred. Glad it was helpful. I’ll look forward to an update!
In the Italian Bread Bowl recipe, it says active and instant in the recipe. Do you use both together or is it an either/or?
Thanks,
Dixie B
It can be either/or.
Thank you for this! What are your favorite bread pans? What elevation do you bake at?
Hi Emilee, I live around 2,500 feet and use USA bread pans.
Does it matter if the bowls are metal or glass when working with yeast?
No, it shouldn’t matter.
I made the French bread recipe. First time bread was excellent. Second time it didn’t raise much. I’m confused about kneading times. Says knead a few minutes but tutorial on yeast says 8 min or more. Maybe I under kneaded the second batch. How long should it knead after all the flour has been added? Thank you
Hi Darlene, are you kneading by hand or in a mixer? For whole wheat bread, I usually knead in a mixer for 6-8 minutes.
Many thanks Mel for this great recipe that never fails , why would
anyone want to buy bread Im addicted to this recipe
Mel, thank you so much for sharing this bread recipe, I will never buy bread again! My bread came out perfect, just like your picture and it’s delicious! I don’t own a mixer so I did everything manually, then I let the dough rise for one hour. This was the first time I tried to bake bread, best recipe for beginners. Thanks again!
Finally!! THE best bread recipe. I hand-knead every 10/min. Scoring lengthwise seems to make slicing easier.
I made these rolls for guest breakfast. They raved!
That was a great tutorial. Very good explanations of everything and great alternatives. I can’t wait to try your methods.
I love this recipe so much! I’ve recently been into baking because I’ve been stuck at home so long and I’ve made the recipe twice. I have ended up both times making garlic bread by adding oregano, basil, and garlic salt to the dough and doing a garlic butter rub after baking. Another tip I learned was for a crunchy outaide you can take a cup of boiling water and dissolve in 1 tablespoon of baking soda and soak/spread on your loaves. It’s a nice flavorful crunch with a soft inside.
I have never used instant yeast all my moms old recipes call for dry active yeast. My question is do you use the same measurements 1 tsp instant yeast = 1 tsp of dry active yeast?
Yes, I do for the most part.
Going to try my hand at making rolls. I have 2 questions. I have brad flour in the house.
Can I substitute the bread flour for the ap flour called for in the frenchbread roll recipe? If so, 1:1?
The recipe states warm water. What temp should I be using?
Thanks!
Yes, you can use bread flour for most bread/roll recipes that call for all-purpose flour. The water should be between 100 and 110 degrees.
Might sound dumb…do you stir the yeast sugar with the water or just let it sit.?
Yes, stir it together.
Glad you asked. I had the same “silly question.”
I have to tell you that I have tried, sporadically, for years to make bread. I could not get a loaf to rise to save my life! I had decided to conquer my fear of yeast during our “shelter-in-place” orders. A friend recommended this recipe! and “voila!” PERFECT BREAD! During this quarantine I have mastered yeast! No more fear! And all thanks to this recipe. I am very grateful. You’re the best!
If there’s no foam or bubbles on the top does that mean that the yeast never activated? It’s a year before its expiration date. A little bit of it clumped together and rose to the top and I let it sit for 20 minutes and then stirred it.
Usually it should foam and bubble – if it expanded and rose to the top, that probably means it still activated.
I use instant bread yeast.
I usually make a poolish the night before then measure out the ingredients for the main dough the night before.
To avoid forgetting to add the yeast the next morning. Can I add the yeast to the other ingredients the night before leaving it on the counter without diminishing the affectiveness of yeast?
I’m not entirely sure, Roger – mostly because a lot will depend on the recipe (the liquid to water ratio of the poolish or biga starter). You might try googling to find smarter sources than myself!
I’m a rank amateur baker. I make some fairly decent bread & I’ve made this recipe
with very good result. I proof my bread inside the oven because my kitchen is open,
no doors. I follow recipes to the letter but also have learned to adjust when needed.
I’m baking right now & instead of making two loaves I’ve decided on one. I do that with
other breads I’ve made with good outcomes. Cross your fingers for me.
If you test your yeast, and it blooms, how long do you have before you have to use it? Can I keep it a few hours at room temperature or should I refrigerate it?
Once it proofs and bubbles, it should be used right away.
Hi, love your site. Tomorrow i am going to try out the recipe for french loafs. If I may make a suggestion for your tutorial on yiest, it would help if you would show two pictures of the different types of yiest there is available. I live in the netherlands and here we can get two types, but they are called differently and i am not sure which types are active or not, but i do know how they look like. Thx a lot, happy baking
Thank you for posting this tutorial. I really learned a lot from this. I like the fact that you posted pictures to go along with what you are describing. You are confirming that cooking (or baking) is an art, not a science. When you get the feel of cooking, that’s when things come together. (bad pun… but very true.) Following strict instructions, doesn’t get the job done when it comes to baking bread, I’ve found. And your tutorial explains why.
Where will I find your tutorial on shaping this big lump of dough? I have made a similar recipe for your Cornmeal rolls. Your recipe is delicious. However I would like to let my dough rise in the refrigerator after the first rise and the dough always come out of my bowl. The dough is left in the refrigerator overnight and shaped early the next morning, shaped and left to rise again and usually the rolls fall in baking. I would love some instructions on how to make this method work for me. Thanks, Lucille
Maybe you’re letting it rise to often. Sometimes I put my dough in fridge and it’s before the first rise because I want to retard the rising till I need it. When I want it I take out of fridge and shape and let it rise then bake. Hope this helps. Wish he would answer questions
Trying recipe for the first time. Using kitchen aid mixer, hoping for good results. Using mix -rest method. Next time will do rise in greased bowl as this method keeps me close by, hard to get any thing else done.
The problem I sometimes run into is that I’ve proofed my yeast, have been mixing (kitchen aid), and been kneading for a few minutes. The dough pulls away from the sides and all of a sudden it seems to almost fall apart to the bottom of the bowl and be way to soft and tacky. Am I not adding enough flour? I thought I was…
Is the dough at the bottom of the bowl a totally different texture than the dough clinging to the dough hook? If so, it sounds like you might need a bit more flour for all the dough to hold together.
Hi I am milling my own wheat berries, but my bread is not coming out good, it’s too dry and falls apart, what am I doing wrong???
Hi, I mill wheat berries also. I used to do all WW bread now I incorporate some white flour too for better rise. Do you use dough enhancer and vital wheat gluten too? The lady that supplies the wheat berries sells the other products also.Its made a big difference in the rise and texture to add at least 1 cup regular flour.
I don’t use dough enhancer but in some bread recipes I use vital wheat gluten.
This is the second time. Im using this recipe..going for the first rise. And using my Wonderbag to let it doubke in sizr now
Thank you for posting this. The tackiness really helps me understand. I think I overfloured my pizza dough. Could you tell me if the dough has ever burnt your hands while mixing it? I am wondering if the yeast can do this or if I had a reaction to it. I got small welts on my fingers and it hurt terribly. Surprisingly, I can find no infornation relating to such a reaction on the internet.
Oh darn, I’ve never had that happen, Kristina! I’m sorry!
How about using gloves because it almost sounds like an allergic reaction to something you touched, possibly the yeast or the activation of it. Or it could be too hot and your skin is too sensitive to the temp or a combination of the yeast mix and temp. That’s really odd though. Hope it helps. Anybody could be sensitive or allergic to almost anything.
Great blog. When you say you put the yeast in the freezer do you mean the dry grains or is this proper/pure yeast?
Thanks, jen
I put the dry instant yeast in the freezer.
yeast tutorial was wonderful. thank you
I’ve been baking your bread for a while now, and just feel like it NEVER rises as beautifully as your does. And, it seems to have to rise forever– like and hour and half. Is that an insane amount of time? I usually have something warm going on over by the bread (oven on, tea kettle going etc). So, just trying to figure out why my bread wouldn’t rise. I typically stick with the water temp being about 110– is that correct? Maybe I need to knead it longer? I knead it in a bosch– usually for 7-8 minutes like you suggest. Just trying to figure out what my problem might be. My loafs also rise a little lopsided– the middle will be higher than the sides. Any ideas? I LOVE making bread, and want to be a pro! It tastes delish even when it’s not beautiful, but my dream is to make a beautiful loaf. =)
Hey Melanie, I actually think you are doing things just right! Sometimes my breads takes upwards of 2 hours to rise (sometimes less than that, depending on the day), so 1 1/2 hours isn’t too long. It sounds like you are kneading for the right amount of time and as for the rising – I think it’s pretty normal for the middle of the bread to rise higher than the sides otherwise it would be completely flat on top. However, if you want to minimize that, you might try shaping the loaf a bit differently so that it’s not as peaked in the middle.
Can yeast go bad? I have some active dry yeast in little sealed packets i bought a few years ago but they don’t have an expiration date on them. I have never used yeast or baked bread before so i have no clue if yeast will expire. Thanks!
Yes, yeast has an expiration timeframe so if it’s past that, it isn’t advised to use it in bread.
I heated up a heavy towel in my microwave to cover my rising bread dough for dill bread. I have a cold kitchen above a garage ❄️
My yeast bread dough is REALLY sticky. Can you add too much flour?
Yes, a yeast dough can definitely get overfloured, but if it’s really, really sticky, you’d be fine adding more flour until it is soft and tacky (but not leaving a ton of residue on your fingers).
Sure a helpful blog. So glad I found it. I tried yeast bread-making in my 20s but was unsuccessful. Then I tried sourdough with Herman which ran me ragged. Now I want to try again, and your article has already helped: using instant so no problems with proofing, the difference between tacky and sticky, rising in a warm spot. Thank you! I will look for more ideas on your site.
This is a great tutorial. And telling about difference between Active dry yeast and Instant yeast is a good plus. I usually use https://www.safinstantme.com/ Yeast as a brand. Do you have any suggestion brand?
I usually use SAF instant yeast as well. Either that brand or Red Star.
What is the difference between different brands of yeast? In the end they are all reliable, make your bread/rolls rise and I do not taste any difference between them. Some bakers do have preferences as to what brand they use. Personally I buy bulk (1 lb package) of whatever brand is available where I happen to be shopping, usually Sam’s club or BJ’S. Costco does not sell bulk pack yeast here near me (go figure). SAF can be had online not local (at least near me). Instant, Active whatever. I mix whatever brand/type of yeast I have right into the flour , add 120-130 degree water and i’m off and running, no problems.
What happens if you forget to let it rise and roll the dinner rolls, and then let it rest?
They might be a little more dense, but it should work in a pinch.
This was great! I used active yeast instead of instant without changing the ratio or proofing and they turned out wonderful! Best rolls I’ve ever made. I was worried the dough was too sticky, but again, no problems!
Thanks!
Thanks for the details tutorial , it is very helpful. May I ask what the dough need to transfer to a “greased bowl” can it stay in the mixer bowl or transfer it to a ” bowl that is not greased ” ?
Yes, you can probably do that – I find the dough is much easier to work with after it has risen in a greased bowl (less shaggy on the edges).
This is, by far, the most helpful “tutorial” on yeast and the general bread-making process I’ve seen! I am always at a loss with exactly what consistency my bread should be. This is as close to an in-person cooking lesson as you could get. Thank you!!
I scrolled through the comments and didn’t find my answer so I hope I am not repeating! I have a lot of active dry yeast I need to use up before buying some instant yeast. If I proof the yeast properly, for about 20 minutes till it is foamy and frothy, will it work the same as instant yeast from that point? Or do I still need the second rise? Thank you! I love your site and have made many of your recipes. Thanks for the suggestions on bread pans and bags, we bought both and are loving them!
Hi Christine – great question. How I understand it is that even proofed, if you use active dry yeast, you’ll definitely need two rises. Hope that helps!
Mel – I wasn’t sure where to ask this, so I thought I would post it here. I just ventured into bread making about a year ago (thanks to you!) Now I am feeling a bit adventurous and would like to try a fruit/nut bread. There is a vendor at our farmer’s market that makes a delicious cranberry/walnut bread I would love to create. Is it truly as easy as mixing the fruit/nuts into the dough mixture?? Just curious before I experiment and ruin a batch or two!
Hi Anna – I’m not entirely sure. I have a no-knead bread recipe on my site that’s really adaptable to add-ins (I often add asiago cheese cubes and cranberries) but the dough is very wet. There are cinnamon raisin breads where I believe the raisins are kneaded in at the end. So, I think it’s worth a try! Good luck!
Mel – Thank you so much for the quick reply. Asiago cheese and cranberries – that sounds delightful! It’s going on the “try” list. I keep eyeing your cinnamon swirl bread also and wondering if I can adapt that to what I am looking for. My list of breads to try just keeps growing! Thanks again!
King Arthur’s flour has a great article on yeast. It talks about how yeast is different today and that now you can use instant and active dry interchangeably, 1:1 and you no longer absolutely have to proof yeast. But it tells you how and when you should. It’s a great tutorial.
Here’s the link
http://www.kingarthurflour.com/learn/yeast.html
Thank you so much for showing in the picture how the yeast should look . Did not have any idea, I thought yeast shoud rise so high in th water.Today is the first time I am baking bread ,learnt from youtube. After mixing yeast and sugar in warm water I was wondering how would I know yeast had risen .By the grace of God I Googled and found the information. Now the dough is resting. Thanks so much.
I find your site so very useful,how to shape the hamburger buns etc.Thanks for taking the time to pass on your knowledge to people like me.Keep your good work up.Thanks.