Chocolate X’s and O’s {Perfect Ice Cream Toppings!}
Simple as simple can be, these chocolate X’s and O’s with sprinkles, are the perfect ice cream topper for Valentine’s Day.
This is hardly a recipe and definitely not rocket science but I’ve had this idea brewing in my little brain for a while and wanted to share.
Simple as simple can be, chocolate candy melts (of any color, really) are piped onto parchment paper in the shape of X’s and O’s, topped with sprinkles, left to set up and woila! You have a perfect ice cream topper for Valentine’s Day.

The fact that I made these before Valentine’s Day in order to spread the love hasn’t diluted my kid’s excitement to eat these with our favorite after-dinner treat; although you should have seen their expressions when I explained to them that X’s and O’s means kisses and hugs. Totally icky for a pack of 4 to 8 year old boys.
They have decided that in their world, X’s and O’s means Star and Wars. Huh? Whatever.

The glorious truth is that the X’s and O’s can be made up to a week in advance and you could use them for a variety of things: jammed into ice cream, topped on a frosted cupcake, or just nibbled by their lonesome.
Fun, fancy-free and totally festive. I am loving Valentine’s Day already!

Chocolate X’s and O’s {Perfect Ice Cream Toppings!}
Ingredients
- Candy melts or almond bark for melting, can use chocolate flavor or a variety of colors
- Valentine sprinkles, if desired
- Squeeze bottle or ziploc bag for piping
Instructions
- Place a sheet of parchment or wax paper on a large baking sheet. Set aside.
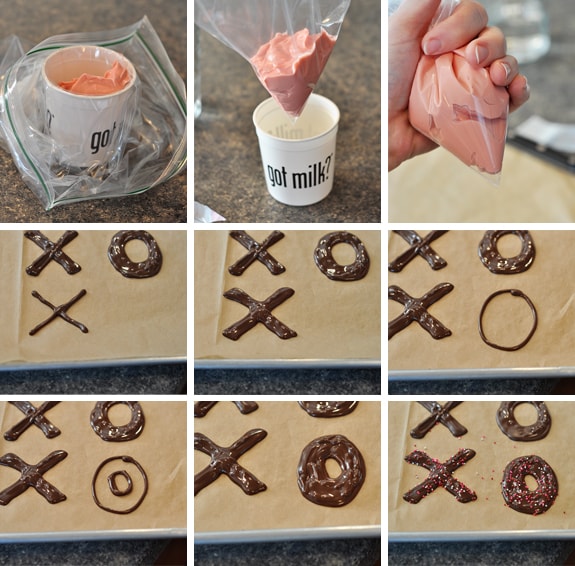
- Melt the desired amount of candy melts or almond bark according to package directions. About 2-3 cups of candy melts produced around 10 sets of X’s and O’s. Of course this will depend on how large you pipe the X’s and O’s. When melted, pour the chocolate into a squeeze bottle or into the corner of a ziploc bag. If using a ziploc bag, it’s super snazzy and easy to place the ziploc bag inside of a cup, folding the edges of the bag over the cup and pouring the melted chocolate inside the bag while it is held in the cup (see pictures below). Snip the corner of the bag, if using.
- Pipe the X’s and O’s onto the parchment paper (see pictures below). If you don’t feel comfortable free-handing the letters, trace the shapes onto the parchment paper and then flip the parchment paper over so you are piping on the side that isn’t drawn on. I found it easiest to pipe the outline of the O and fill it in and pipe the lines of the X and trace around them to make them thicker. Shake sprinkles on top of the X’s and O’s while they are still wet.
- Let the X’s and O’s set up and harden for about an hour (you can place them in the refrigerator to speed up this process). Finished X’s and O’s can be stored in the refrigerator in a covered container layered between sheets of waxed paper for up to a week.
Recommended Products
Recipe Source: Mel’s Kitchen Cafe

Haha! Love your boys’ explanation of the x’s and o’s!
pretty darn cute Mel!! I did some tiny hearts and XOs one time and put them on these
http://www.thesisterscafe.com/2011/02/brownie-bites-with-white-chococlate-frosting-and-decorative-chocolate-hearts
For a party. So fun!!
yummy too:)
what a sweet sweet idea…so so cute!
LOVE IT!
LOVE! I’m going to make treats for the staff at my kids’ school…so I think I’ll make mini-versions of these for mini-cupcakes 🙂
Boys are so funny! I wish I had more than one!
On sencond thought…I’ll pipe X’s & O’s onto the rice krispie treats!
How cute is this?? My kids would love this so much:) I just picked up some candy melts to dip rice krispie treats but I’ll be using some for X’s & O’s too!!
These are adorable! You are such a great Mom, Melanie! 🙂
Cute!
That is so fun! I’m actually thinking about renting some children so that I can serve this.
Those are so cute Mel! My kids would love making those. What a great idea! I think I even have some candy melts. Thanks Mel!