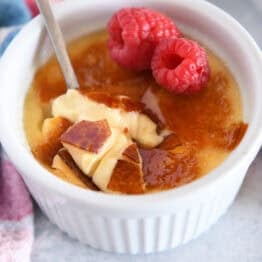
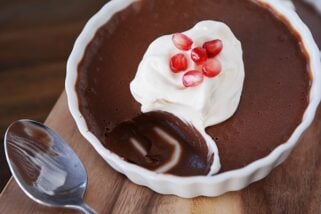
The Best Homemade Crème Brûlée
This 5-ingredient homemade crème brûlée is so easy to make! The recipe includes tips about ramekin size, how to caramelize the sugar, and more.
⭐️⭐️⭐️⭐️⭐️ This is my go to crème brûlée recipe-love it! It always has a smooth creamy texture. Thanks Mel! -Monica

Key Ingredients for Crème Brûlée
There are only five ingredients in this simple crème brûlée recipe!
- Heavy cream: Heavy cream or heavy whipping cream can be used (often cartons are labeled one or the other).
- Milk: It is best to use 2% or whole milk in this recipe (not skim milk).
- Vanilla bean paste: I prefer using vanilla bean paste because it packs a huge amount of vanilla flavor and is easy to use, but you can alternately use a whole vanilla bean pod and scrape out the seeds (see the note in the recipe). In place of the vanilla bean or vanilla bean paste, a tablespoon of pure vanilla extract can be used, as well.
- Egg yolks: Using just the egg yolks, rather than the crème brûlée.
- Granulated sugar: This is used to sweeten the crème brûlée and additional granulated sugar is used for the caramelized top.

How to Make Crème Brûlée at Home
I’ve been making this crème brûlée for over ten years. Before I ever made crème brûlée at home, I thought it would be way too hard. Turns out, it is a really easy dessert to make (especially the custard part!).
The trickiest parts are the water bath and the torching – we’ll talk about both – I promise it’s doable and so rewarding!
- Heat the cream and milk until simmering and stir in the vanilla bean paste.
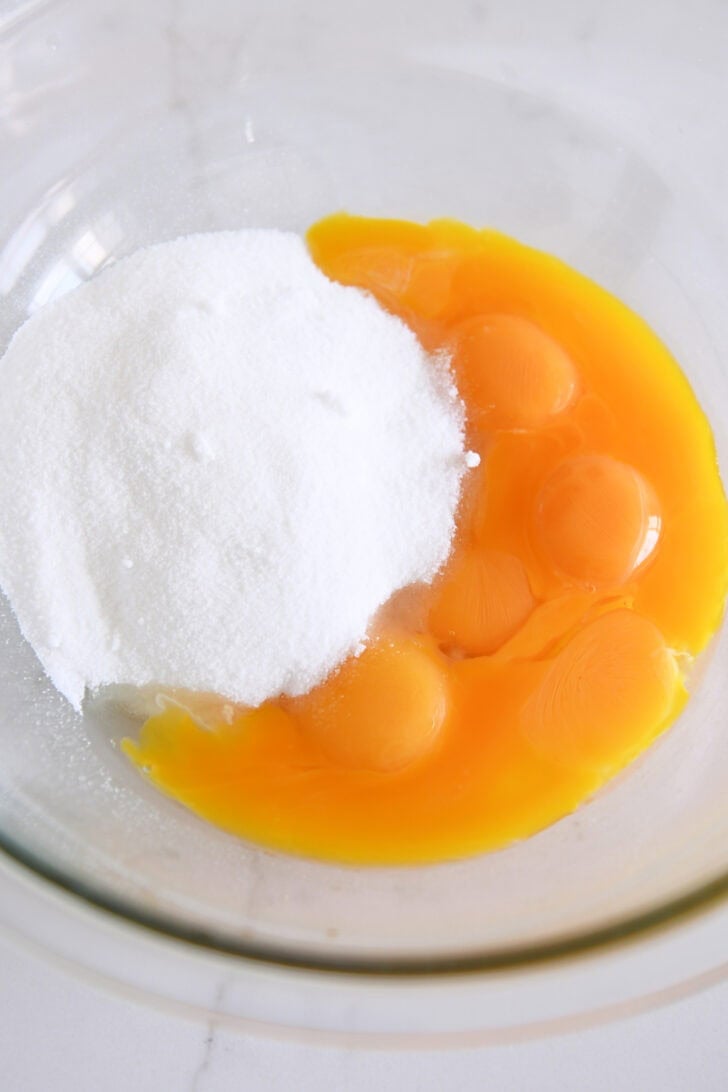
- Whisk together the eggs and sugar.
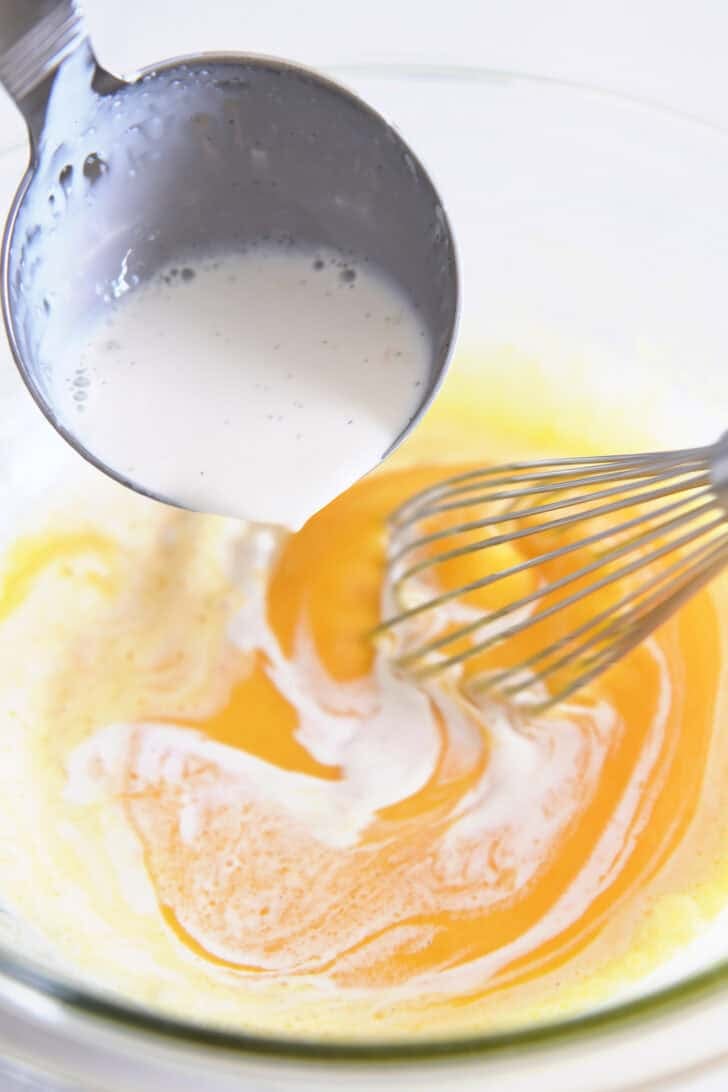
- Slowly ladle in the hot cream to the egg/sugar mixture, whisking vigorously. This tempers the egg yolks so they don’t scramble while baking in the oven.
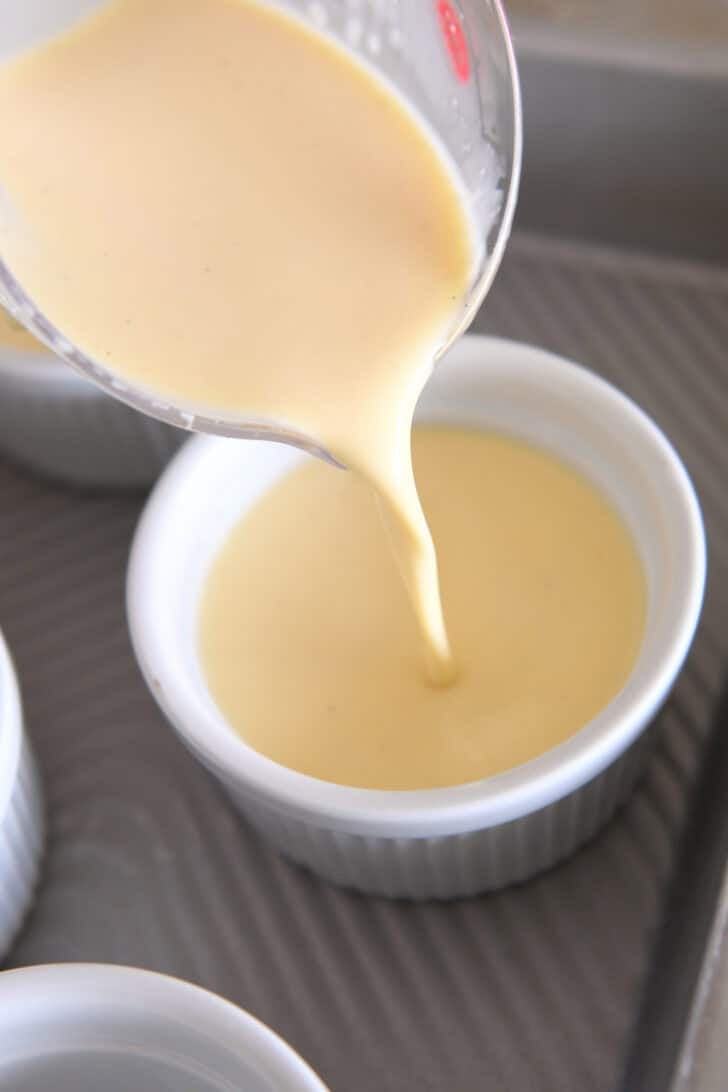
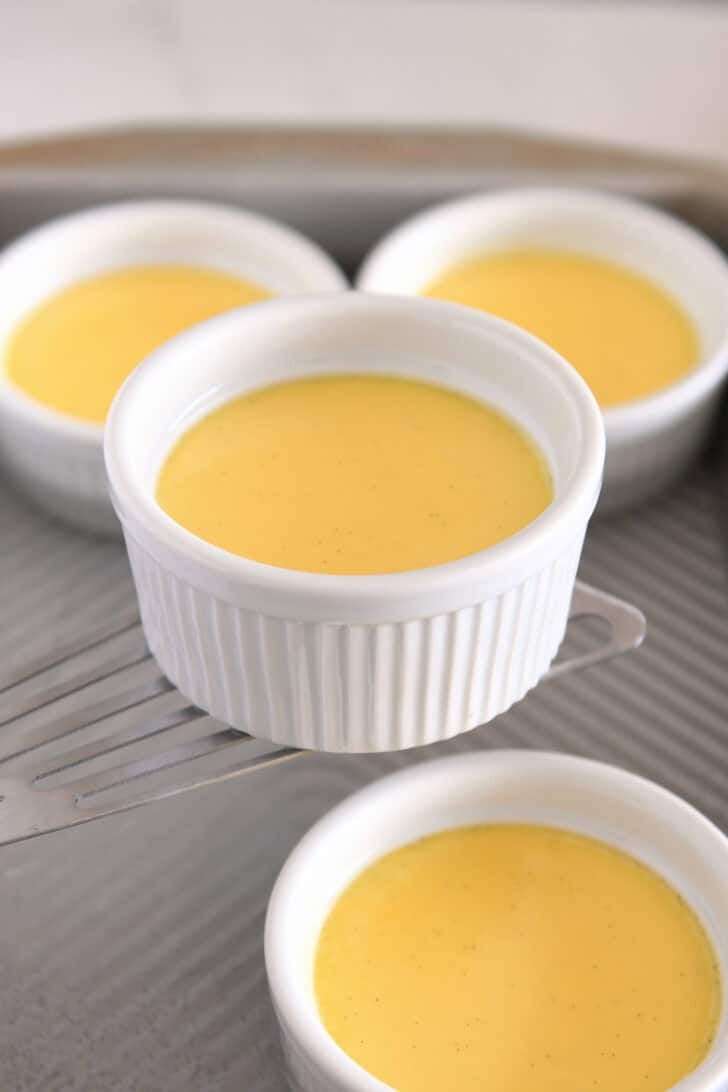
- Place ramekins (more info on sizes below!) in a pan and fill with the tempered custard mixture.
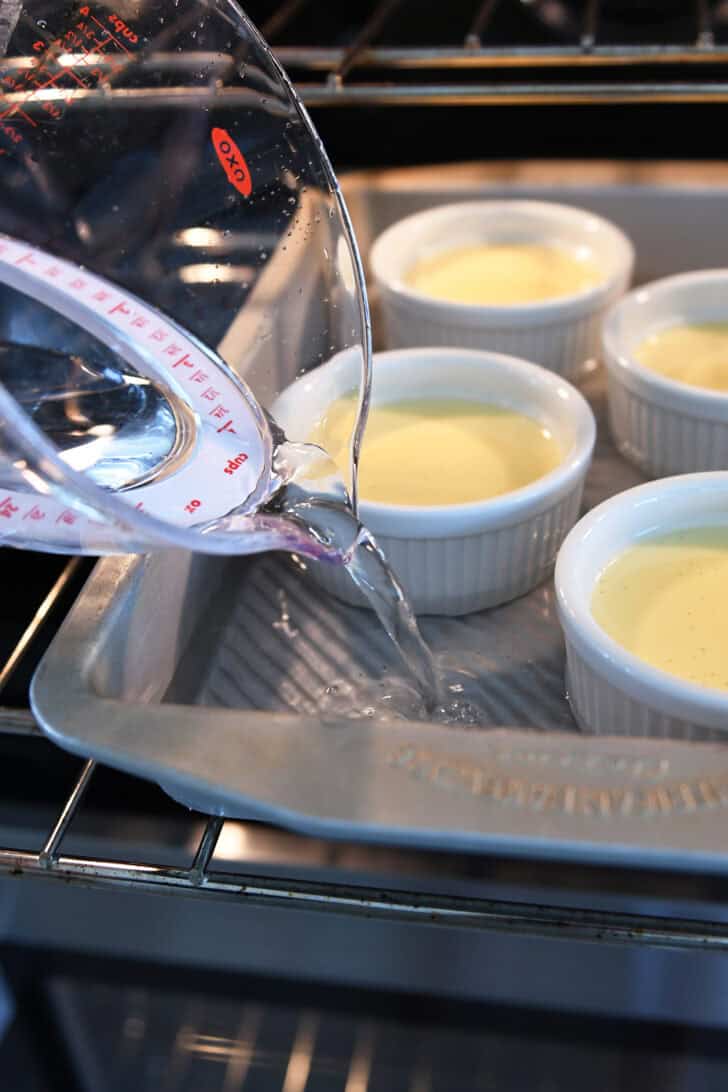
- Place the pan in the oven and fill with hot water until the water reaches halfway up the sides of the ramekins.
- Bake until the crème brûlée is set on the sides and slightly jiggly in the center.
How to Torch the Top and Caramelize the Sugar
Caramelizing the top of crème brûlée takes practice! You likely won’t get it perfect on your first or second try, but that’s ok! Say it with me: crème brûlée is a journey, not a destination. 😉
I’ve torched over a hundred ramekins of crème brûlée and I still have ones that turn out better than others! Let go of perfection and have fun with it.
BEST KITCHEN TORCH: I’ve had this brand of kitchen torch for over ten years; it works great and is going strong. This is a less expensive brand that gets really good reviews, as well.
Steps to Caramelizing the Top of Crème Brûlée:
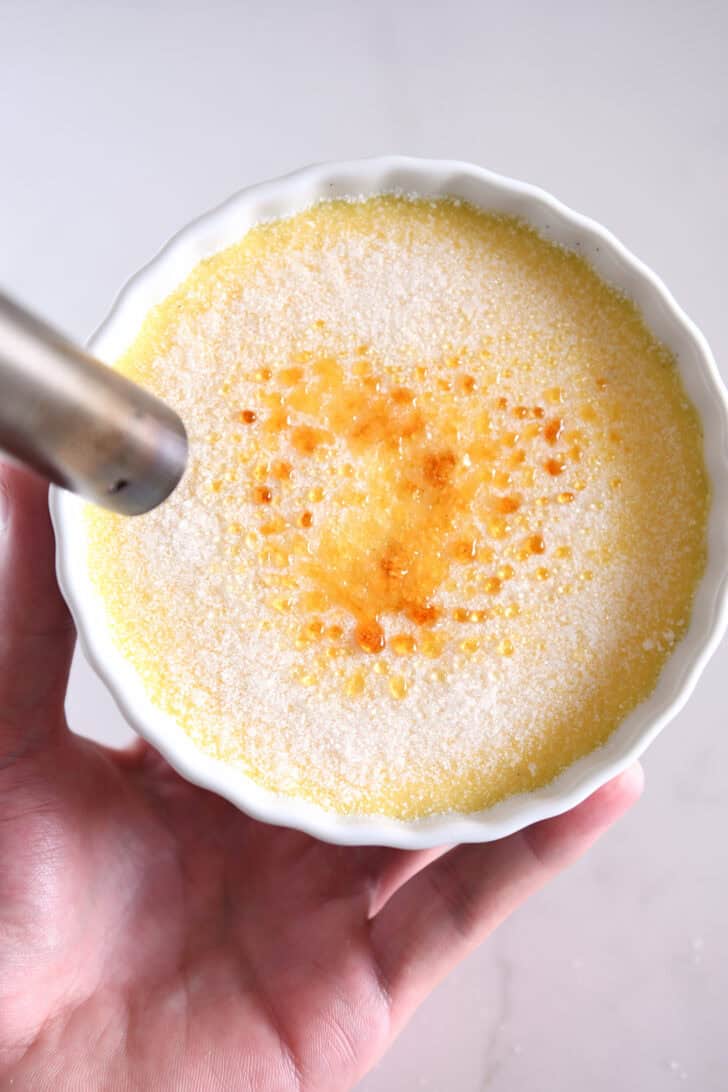
- Sprinkle granulated sugar evenly over the top of the baked and cooled crème brûlée. You want a thin, even layer.
- Using a kitchen torch on medium heat, run the torch slowly across the sugar.
- As the sugar melts, lift and turn the ramekin until all the sugar is melted and forms a caramelized, golden top. I like to hold the ramekin in my hand – if you do this, proceed with caution (!!) and keep the torch away from your fingers.
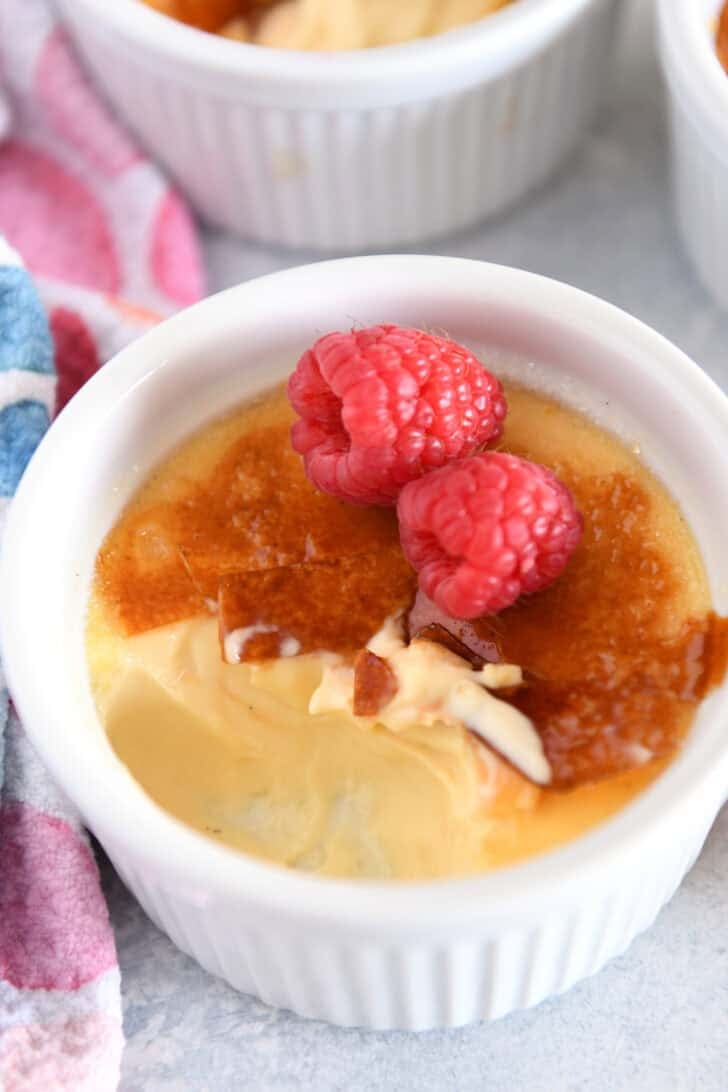
- Serve the crème brûlée immediately, or refrigerate (uncovered) 30 to 45 minutes until ready to serve (the caramelized top can soften a bit if it refrigerates longer than an hour or so).
The crème brûlée custard naturally warms a bit on the surface after the top is torched. It’s still delicious served this way, but if you want to avoid that, refrigerate the caramelized crème brûlée for a bit before serving.

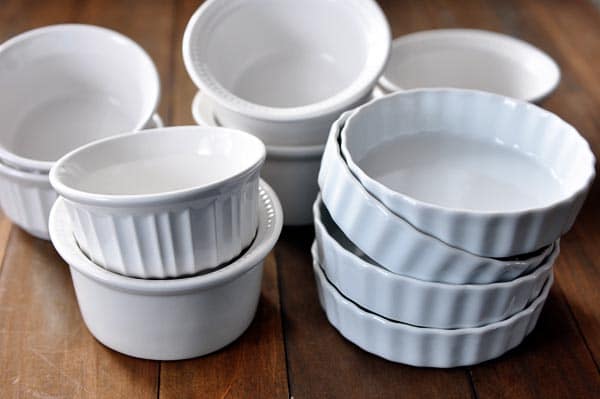
A Note About Ramekin Sizes
Crème brûlée can be made in a variety of ramekin sizes. The depth and size of ramekins is really a matter of preference depending on how thick you want the custard layer.
Below are my recommendations for the best ramekins for crème brûlée:
- 6- or 8-ounce deep ramekins: if using this style and size, the recipe will yield about six to eight ramekins of crème brûlée.
- 8-ounce shallow ramekins: if using this size of ramekins, the recipe will yield about seven to eight ramekins of crème brûlée.
I don’t have a preference between the two sizes. I like crème brûlée made in either size for different reasons! In the deeper ramekins, the custard is more dominant because it is thicker. In the shallow ramekins, you get a more even balance of custard-to-caramelized top. Delicious either way!
I used to order crème brûlée at every restaurant we’d eat at if it was on the menu – it is one of my favorite desserts! However, this homemade recipe has ruined me.
It is so much better than any crème brûlée I’ve ever had at any restaurant. I never order it anymore because I know I can make it at home (cheaper and so much more delicious)! The smooth, creamy texture is unparalleled. It really is the best crème brûlée ever.
Crème brûlée is an excellent make-ahead dessert because the custard can be made, baked, and cooled days in advance. All that’s left to do is to torch the tops before serving!
I promise that making crème brûlée is more than a one-time bucket list item! It will quickly become a staple dessert in your home, and you’ll feel like a rock star making and torching that crème brûlée like a pro. You’ve got this!
The Best Homemade Crème Brûlée
Ingredients
- 3 cups heavy cream
- 1 cup milk (NOT skim – preferable to use 2% or whole milk)
- 1 tablespoon vanilla bean paste (see note for using a whole vanilla bean)
- 8 egg yolks
- ½ cup plus 2 tablespoons granulated sugar
Topping:
- 1/3 cup granulated sugar
Instructions
- In a medium saucepan, heat the cream and milk until just barely simmering and immediately remove from the heat. Stir in the vanilla bean paste. (See note below to use a whole vanilla bean.)
- In a medium bowl, whisk the egg yolks and sugar together until well combined.
- Slowly ladle the hot cream mixture into the egg mixture while whisking constantly and quickly. This tempers the eggs so they don't scramble while baking in the oven. The key is to add the hot cream slowly so it doesn't "cook" the eggs and cause hard little bits of egg to form.
- Preheat the oven to 325 degrees F. Place an oven rack in the middle position. Heat about 4 quarts water until steaming.
- Place ramekins in a baking pan with at least 2-inch sides (for flat ramekins, I use a half sheet pan; for taller ramekins, I use a 9X13-inch pan). If you want to minimize the ramekins from sliding around, you can place a thin towel in the bottom of the pan under the ramekins.
- Ladle the cream mixture into 6 ramekins (about 7- to 8-ounce). If you are using flatter ramekins (4- to 5-ounce), you'll probably get about 8 ramekins-full out of this recipe.
- Place the pan of filled ramekins on the oven rack and use a liquid measuring cup or pitcher to carefully pour the hot water into the pan around the ramekins (taking care not to let water splash into the ramekins) until the water comes up halfway up the sides of the ramekins.
- Bake the crème brûlée for 40 to 45 minutes for deep ramekins and 30 to 35 minutes for shallow ramekins, until the custard is set but still slightly jiggly in the center (if the edges are still jiggling, bake it a few minutes longer). Add additional time, as needed.
- Carefully remove the pan from the oven so water doesn't splash into the baked crème brûlée.
- Using a large, flat spatula, immediately remove the ramekins from the hot water and place on a cooling rack to cool completely (you can line the cooling rack with a towel to catch any excess moisture from the bottom and sides of the ramekins).
- Once fully cooled, cover the ramekins and refrigerate until fully chilled, 6 hours or up to 3 days.
- About 30 minutes before serving, remove the ramekins from the refrigerator, blot the tops dry with a paper towel, if needed. Sprinkle a tablespoon, more or less, of granulated sugar over the top of each crème brûlée and lift the ramekin, tipping it from side to side to scatter the sugar evenly across the top.
- Using a kitchen torch on medium heat, run the torch slowly across the sugar. As the sugar melts, lift and turn the ramekin until all the sugar is melted and forms a caramelized, golden top.
- Serve immediately, or refrigerate (uncovered) 30 to 45 minutes until ready to serve (the caramelized top can soften a bit if it refrigerates longer than an hour or so).
Notes
- Gently slice through the skin of the vanilla bean and with the flat edge of the knife, scrape out the seeds.
- In a medium saucepan (about 2- or 3-quart), combine the vanilla bean seeds, scraped vanilla bean pods, heavy cream, and milk. Bring the mixture just to a simmer. Remove the pot from the heat, cover and let the mixture sit for 10-15 minutes. Remove the vanilla bean pods.
- Proceed with step #2 of the recipe.
Recommended Products
Recipe Source: from Mel’s Kitchen Cafe (after years of experimenting on classic recipes like Alton Brown’s, for one)
Recipe originally published February 2014; updated December 2025 with new photos, recipe notes, tips, and more.


Hi Mel! Can this recipe be doubled with good results?
Yes!
Fantastic! Rich, nostalgic flavor. Fun for the kids to make and hopefully will be a fond memory for them.
Side note- recipe says steam 4 quarts water… I’m assuming you meant 4 cups.
Ah, thanks for the catch!
This was so so delicious! I was nervous the whole time, but it turned out great. It’s creamy and the vanilla paste intensifies the flavor perfectly. I’m so glad I gave it a try. Can hardly wait to make it again and share it with friends. Thank you, Mel!
I forgot to say I dropped a few fresh raspberries in the bottom of each ramekin before pouring the egg mixture in. A favorite place in Texas does that with their creme brûlée tarts.
I’m so proud of you, Jay! Thanks for the report back. AND for the tip on the raspberries on the bottom of the dish. I can’t wait to try that!
I cooked my creme brûlées for at least 20 minutes longer than called for and they’re still runny and jiggly. What’d I do wrong?
Hi Aileen, were they still runny after cooling and chilling all the way?
We invited my sister in law over for a late Christmas celebration. My husband and I made this crème brûlée together, because I had shoulder surgery and could only use one arm. I sprinkled the sugar, he used the torch. It was so perfect. Rich, smooth custard with a wonderful vanilla flavor and the crispy burnt sugar top. Wow. Next year when you ask our favorite recipe of the year, I am pretty sure it will be this one.
Barb, I’m so happy and excited to read this! This recipe is so beloved by me and my family that it makes me thrilled to know when others love it as much as we do. Love that you and your husband worked as a team (wishing you speedy healing from your shoulder surgery!).
This was so good!! Perfect texture!
What kind of pan do you use? Metal, glass, ceramic? Does it matter?
I’ve used all different kinds of pans to bake the creme brulee – as long as the sides of the pan are high enough, any type of pan will work.
This recipe is amazing! So glad my husband got adventurous and gave it a try. My kids love it…it’s fool proof. Making it for Christmas Eve dinner!
Tell your husband way to go! So happy you guys loved it.
America’s Test Kitchen had a recommendation to put a kitchen towel in the bottom of the pan before ramekins and water so that the ramekins don’t slide in the pan when you move them in and out of the oven.
This looks so insanely good. Do you have a preferred brand of vanilla bean paste?
I have used both Nielsen-Massey and Heilala and love both.
I used Trader Joe’s and it worked great!
Love the updated recipe Mel! I’ve been making it for years because it’s my husband’s favorite. It’s always a showstopper and people think it’s so impressive- little do they know how easy it is!
Thanks, Faith! So thrilled to know you’ve loved this recipe for a long time!
This is my go to crème brûlée recipe-love it! It always has a smooth creamy texture. Thanks Mel!
I’m happy you love this recipe, Monica. Thank you!