Simple Homemade Haunted Halloween Houses
Simple Homemade Haunted Halloween Houses {Plus a Revolutionary New Way to Stick Them Together!}
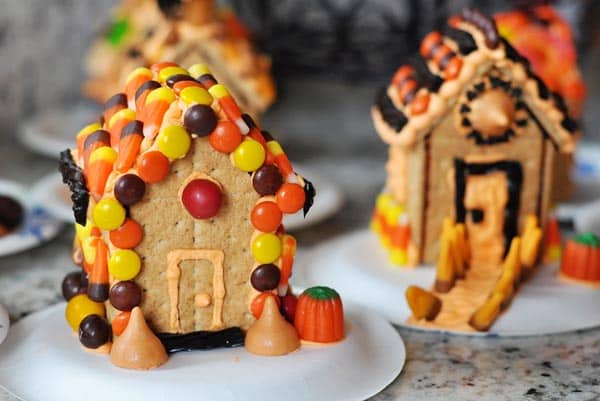
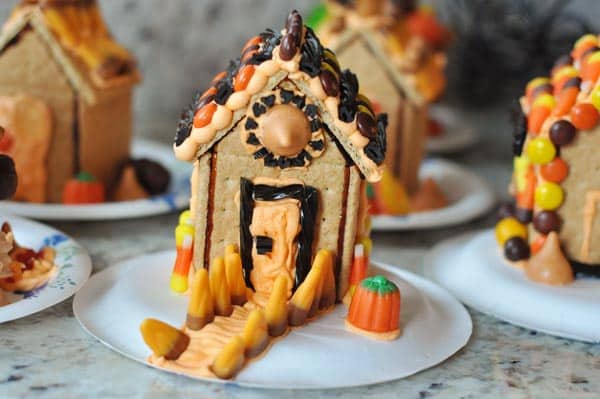
Are you in the Halloween spirit? If not, these little DIY haunted Halloween houses are sure to put you there. Plus, they are a cinch to put together and will keep the kids occupied for at least 8 minutes.
My friend, Kate (of the smothered pork burrito fame) told me that growing up her mom (who makes the best cinnamon pull-apart bread I’ve ever tasted in my entire life) always assembled their gingerbread/graham cracker houses with burnt sugar instead of icing. I was intrigued!
Do you know how many times I’ve assembled little houses like this with icing (both royal and regular) and had them falling apart before we even started decorating?
Hot glue is another popular choice for assembling these, but, um, I like a 100% edible house for my eating pleasure and I stopped eating hot glue, like, 12 years ago.
So I gave the burnt sugar method a go and let me tell you, it was amazing. Revolutionary. Life changing. I’m totally not kidding and I’m here to tell you (and show you) all about it.
You could definitely use this method with homemade gingerbread, too, which I plan to do with our annual Christmas sled tradition, but this time, I was making 15 houses for 15 wily little kids and homemade gingerbread did not even cross this momma’s mind. Graham crackers all the way, baby.
First, in a large skillet (preferably not non-stick so you can see the sugar changing color), pour in 1-2 cups sugar and set it over medium-low heat.
Don’t stir. Don’t move the pan. Nothing.
Just let the heat to do it’s magic. In about 15 or so minutes, you’ll have perfectly caramelized, melted sugar to use for “glue.” If, while the sugar is still melting, it smells like it is burning and/or it is smoking, turn the heat way down (you can see in the middle picture how it’s bubbling on the edges but there is still a fair amount to melt; I turned the heat down a bit here).
I know it’s called burnt sugar and all but it shouldn’t be setting off the smoke alarms. After it completely melts, keep the skillet over very low heat so the sugar doesn’t get too hard to work with.
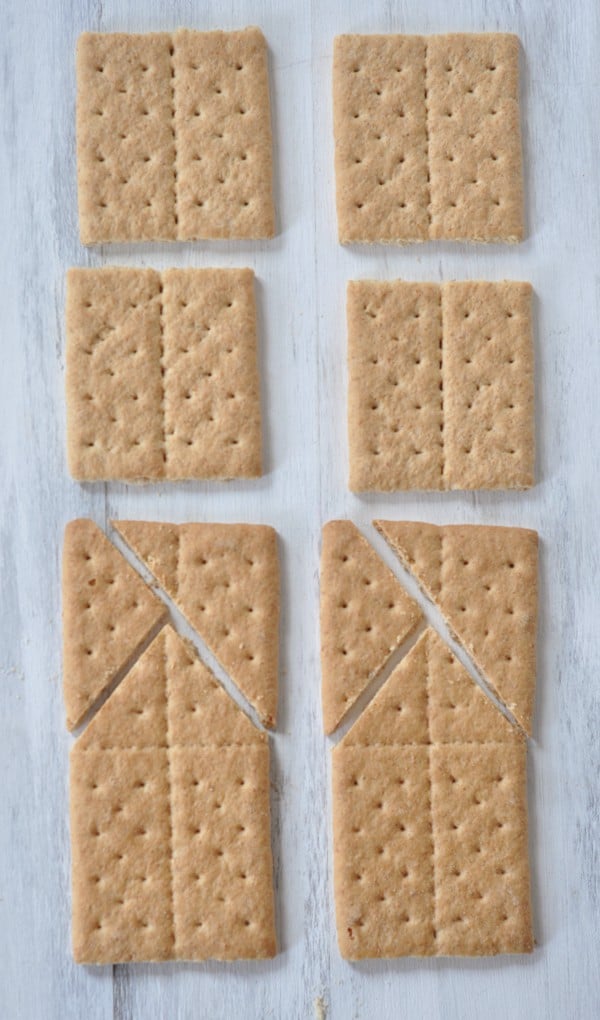
While the sugar melts, go ahead and start trimming up those graham crackers. You’ll need four rectangular graham crackers for each house. Break two of the grahams along the center seam so you have four squares. Trim the other two rectangles like you see below in the picture (read on further for some very essential and pertinent graham trimming techniques that will save you saying bad words during the process).
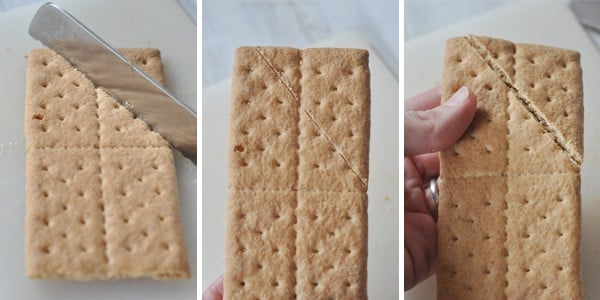
First tip: use a sharp serrated knife. Second tip: use a careful, gentle sawing motion as opposed to a horror movie hacking motion. Third tip: don’t cut all the way through the graham cracker; simply score a line about halfway through and then gently press on the cut pieces to break them apart. Perfect!
Now on to the assembly. Have all the components laid out and ready. You’ll notice my skillet is not sitting over low heat. I realized about 10 seconds after taking this picture that was a bad idea since the sugar was already starting to harden so don’t be me; keep the sugar over low heat pretty please. Also, keep in mind that this hot sugar is, well, hot. And it will burn your little fingies, so please, please be careful!
First, take one of the trimmed pieces and dip both edges in the sugar. Carefully attach a square side to each edge and press to adhere. It’s ok if the sugar sticks to the plate. It snaps off very easily.
Now, take a second trimmed piece, dip both edges in sugar and working quickly set it between the open end of the house and press the square sides gently to stick everything together.
At this point, I let the house sit for 1-2 minutes (and assemble the beginnings of another house). Once it is slightly set, pick up the entire house and dip the top triangular pieces and open edges in the sugar, shown below. The sugar doesn’t need to cover every inch of open edge, just do a quick dip on each side.
Working quickly so the sugar doesn’t harden, attach the two last squares to the top of the house, pressing lightly.
Within about 5 minutes, those houses are ready to decorate (alternately, they can be assembled days in advance). I always use royal icing (made from meringue powder and following the recipe on the can) for decorating.
We had some friends over to decorate our scary-slash-cute houses and all eight boys (and two girls) had a blast decorating and of course eating.
It goes without saying that these would be just as cute with Christmas decorations.
All I know is that I’m pretty sure I’ll never assemble any type of gingerbread contraption using anything but burnt sugar.
It hardens almost instantly so the houses can be decorated within minutes, dries tough as cement (much more sturdy than using icing), and doesn’t require rubberbands or anything else to help keep the houses together while drying. Brilliant, really!
Looking for more Halloween Food Ideas? I added a nifty little widget right over there —> in the sidebar. Click on it to see all the cute Halloween food ideas at your disposal!


Faaaaantastic! I was sweating it looking over the recipes and instructions for real gingerbread houses from scratch and anxiety set in 🙂 This seems a lot more manageable for sure – especially for a non-baker 🙂
I made these for my daughter’s little Halloween party. They were so fun and easy! I cut up all of the graham crackers in the morning (enough for 10 houses) and then put them together right before the party. The melted sugar sat in the pan and hardened (oops), but after lots of soaking, it dissolved. 🙂 This will be a new tradition at our house! Thanks Mel!
I have used your method, with graham crackers and burnt sugar every year since you posted it, for Christmas. Today I’m switching things up a bit and trying the same method, but with pop tarts! Should be fun. We only get four flavours here in Canada, went with strawberry, as those looked the most festive, but if your in the states the sky would be the limit from flavours (and colours!) to choose from.
What a great idea!
I just finished assembling houses for my children to decorate tonight. I used your method last year too, and I will never go back! Thanks Mel!
I made these many years ago for all of the primary kids to decorate as centerpieces for our ward party. I have been looking for directions, because a sister in our ward had given them to me and that is the only time I have used them. I am hosting a teenage party tomorrow and am so thrilled to find the directions and know that it really is as simple as I remembered. I LOVE your website! Your recipes are delicious, your instructions so easy to follow, I just love everything about your site! Thanks so much for sharing!!!
*angels humming in the background* This. Is. Awesome! My children and I thank you for this. No more “no! Wait until it dries” or “groan…it fell apart”. Genius 🙂
I bouthg the store bought for the first time and what a waste! The icing wouldn’t hold so I used your burnt sugar method and we’ll see if the white frosting sticks. Worst $9 spent!! Graham cracker houses forever
Ok, so I want to make gingerbread houses and I am super nervous! So these look simple enough. But what am I supposed to use to get candy to stick? Homemade buttercream frosting? Royal store bought icing? Silly to be nervous I know, just want it to turn out cute if I’m going to all the effort…:) thanks!
You can do it, Nicole! 🙂 I usually use a really super simple royal icing for sticking on the decorations. I have a really simple homemade one here we use for gingerbread sleds and for these types of decorated houses. You can use the Wilton meringue powder in place of the egg whites if you don’t want to use raw eggs. If you can find store-bought royal icing, that would work great, too.
Age 63 my first attempt making any kind of houses so I had nothing to unlearn. Made them at 11:30 at night & then made some buttercream to decorate with in the morning. Hardest part was finding candy corn, pumpkins etc in small amounts. Made these for my 5 year old grandtwins and it was a good thing I made one for the 17-month-old at the last minute. Fun fun fun – thank you!
Way to go, Amy! Your sweet little grandchildren are awfully lucky!
Used this method tonight to assemble 10 graham cracker houses for decorating tomorrow. The first house was a little rough, but once I got the hang of it, the assembly went so quickly! Honestly, them most time consuming part of the whole thing was cutting the graham crackers!! Great tip!! THANKS!
Thank you so much for such a wonderful tutorial! I made 24 haunted houses for a classroom party in about an hour and thankfully none of them fell apart while transporting them to school! The third-graders had a blast and the adults we’re impressed with how sturdy, edible, and cute the houses were. Thank you!
This is complete genius! I just made these with my kids for Christmas and they were a hit. I only burned two fingers in the process, so I count myself lucky. I will now tell all my friends that this is the only way to make gingerbread houses! Thanks Mel!
You are amazing!!!! I tried this tonight, and it worked fabulously!! Thanks so much! My kids are so excited to have a gingerbread village to decorate in the morning. We used the left over cracker scraps for chimneys, fences, and windows. So cute! You are truly a kitchen rock star! Can you move next door? We would be BFFs in no time! Merry Christmas, and God bless you and your beautiful family!
This worked perfectly with my gingerbread houses today. I will use this again, sooner rather than later since my dog decided to snack on one of the houses when I went out to the store and I have had to do a house repair. It is extremely hot so use with care.
You rock my world once again Mel! Kids and I did these today for Gingerbread Houses and it was awesome. My little girl even dropped her pre-icing house on the floor and it didn’t fall apart. Wish I had seen your comment about cleaning it up though. I wasn’t thinking and let it cool in the skillet……lots of hot water and a little elbow grease and it is all good.
We’re going to a gingerbread house building contest party this weekend, and I was wondering if I make this and then put it in a crock pot, would that keep it liquid for me to decorate at the party?
Oh boy, Ashlee, I’m not sure. You’d definitely want to test it out first. The sugar gets thick quite easily if not kept over warm heat. I’m assuming the slow cooker heat would work…but too much heat and it will burn, too. Good luck if you try it!
This burnt sugar method is life changing! We just made some “gingerbread houses” following your recipe and wow! I will make these every year now. I couldn’t stand to do them before because the houses never really stayed together with the icing. This was amazing and worked like a charm! My boys loved it! Thanks Mel for another great recipe!!
ps–the yellow rubber gloves, not the latex variety
Just and fyi–in chocolate making (ie butterfinger centers) they tell us to use rubber gloves when pouring the boiling sugar onto the marble slab. I bet this would work to protect fingers in this process, as well!
I made these with my kids and they turned out soooo cute! The burned sugar is life-changing! I will use that for my Christmas ones too 🙂 And for the record, not hard to clean up from the pan…..just soak in water for an hour and it washes right out. I was a little concerned about that part. And I only made 3 houses and used 1 c of sugar to “burn” and I could have used much less……now I know for next time…..Thanks mel!
I just finished making nine of these for a little Halloween house decorating party that we’re having tomorrow, thanks to your idea! Yes, I burned the mess out of several of my fingers, but it was so worth it. And my first one looked like the house built on sand, but after a couple more, they started looking better. Thank you for this idea! And thank you for all of your other recipes. You are a lifesaver!
This method is life changing. I’m seeing a lot more gingerbread house building in our future which is good because our houses didn’t turn out nearly as cute as yours! Bless you for simplifying my life! I haven’t commented in way too long but am still a faithful follower of your blog.
How long to these houses stay firm? Or, after several days do they soften? Wondered how far in advance one can make these without falling apart.
bj – in a humid climate, the houses will probably soften if left out for more than a day. If you can store them in a cool, dry spot, they should be fine for a couple days.
Had a great time making these this past weekend. The burnt sugar holds like edible glue, which is so much better than the frosting “glue.” I did cheat and buy a kit from Target to make life easier (and cheaper) because it had 5 houses and decorations. Thanks for this fun tip.
I found your blog very recently but I’m already in love! I’m eager to go through all the delicious recipes you have uploaded. 🙂 This one was an interesting read because for me, a Finn, the “sugar glue” is the only way to assemble gingerbread houses! That’s why my mom never agreed to make them when we were kids, she told us we’d burn ourselves. And it’s a nice idea to make these for halloween instead of christmas, because who doesn’t love little houses covered in candy!
Ok, I’m sure everyone is smarter than I am, but it took me a while to realize I didn’t need the triangles you cut off the graham crackers. My kids (and I, lets be honest) didn’t mind taking care of those though.
Mel, these look so fun. The kids in my life would have a great time making them! Thanks for idea of putting them on the backs of paper plates. Plus, thanks for the instructions about “how to cut a graham cracker”.
My mom always put her gingerbread houses together with burnt sugar before decorating the edges with frosting. I remember her pouring leftover hot sugar into a homemade foil bowl to cool and harden before she threw it away.
My favorite thing as a kid was when she’d fill the windows with a basic homemade lollipop syrup (with a sheet of foil under the cookie of course!) and let them harden into translucent windows. She would then light the interior with a nightlight so the windows glowed.
You will want to be super careful with the burnt sugar method. My cousin got 3rd degree burns while doing it that way and had to get skin grafts. My family has decided to go even the easier method and do it with a hot glue gun. It’s not the authentic way of doing it but who really cares. It works wonderfully that way and sticks very permanently.
This is such a perfect solution to my history of crumbling houses! Thanks for sharing!
Ok, this may be a stupid question but how did you dispose of all the extra burnt sugar? I was worried it would stick in my pipes if I washed it all down the drain.
Kim – that’s actually a good question and one I meant to put in the post! Thanks for reminding me. I poured enough boiling water into the skillet to fill it almost all the way and let it sit for 15-20 minutes. After that amount of time, the sugar dissolves into the water and you can pour it all out.
I love this, Mel! Happy Halloween to you and your precious family!
Awesome idea! Thank you! We’re going to try the burnt sugar. I get much too frustrated with the other options, so my kids miss out.
Also, I just want you to know that I love reading your posts…just to read them! They make me laugh out loud. You’re so witty. And hilarious!
Yay! I’ve been waiting for a Halloween post:) darling darling. This looks a little advanced for my toddler ( non of the m&m’s would make it past his little fast fingers) but not too advanced for a fun night with friends. Thanks for the step by step
LOVING the sugar idea!! Just brilliant! So cute too!
When I saw this post this morning, I knew what our Friday afternoon activity after school was going to be. As I type this – with two burned finger so do be careful with the hot sugar! – I have four very happy kids decorating their Halloween houses. Thanks, Mel!
Another great method for keeping your graham cracker or gingerbread houses together is to use melted candy dip wafers or melted almond bark. The candy hardens quickly and is quite sturdy.
My family has made graham cracker and gingerbread houses for generations using good old royal icing (with real egg whites, gasp!) and I’ve never had a problem keeping them together. That said, this does look like a good alternative. A fun idea for Halloween houses is to use chocolate graham crackers. They are extra spooky! Orange (royal) icing is fun too!
Wow! So cool. Thanks for sharing. I can’t wait to try this with my kiddos. I hate making those things with the silly rubberbands, etc!
Kate will never know she’s famous….again. Maybe I should text her. I’m kind of feeling bad I didn’t give you any life changing, revolutionary ideas on our girl trip. I’ll keep thinking. I’m sure there is something I know that you don’t. Maybe.
These are absolutely adorable! I’ve always wanted to do something like this. I will definitely have to try the burnt sugar method of “glue”. It looks simple enough. Thanks for a great idea!
I used this method last year and it was so EASY! Also another tip for cutting your crackers is to wrap them in a damp paper towel and microwave for about 20-30 seconds. The will soften them up a bit and you can cut right through them without the breakage.
Oh my gosh! These are the cutest. I never thought of doing houses for Halloween but it’s a great idea! It’ll keep my little brother and sister occupied and it way less dangerous then having them wiggle knives into rock hard pumpkins! Thanks Mel 😀 xx The Gift of Gaby
I pretty much gave up on gingerbread houses. They turn me into this raving lunatic! Would love to try this concept though. Houses are adorable!
I am intrigued. Love this idea! I’ve never liked making houses because I hated how hard it was to keep them together. I think my kids would appreciate me trying this for them. We’ll have to give it a whirl.
The houses are super cute! The burnt sugar method is life changing! I’ve spent hours trying to get walls to stay up. I cant wait to try it!
I am 30 something 🙂 and my mom makes gingerbread houses every Christmas since I was little, and she has always used the ‘sugar glue’ as we call it. It is wonderful, but super hot, so be extra careful. We had have several burns over the many years we have done it.
I love the little Halloween houses! Adorable!
Using burnt sugar is the most common way to assemble ginger bread houses over here, in Sweden. It sure does have a lot of perks, the biggest one being the stability of the construction. Personally I also love the smell of the burnt sugar! Keep in mind that the sugar is super hot though. I’ve had my fingertips scorched a couple of times and it really hurts, let me tell ya. Kids should probably be kept at a safe distance.
Gotta try this!
How fun, Mel! I can’t wait to try this. Making Halloween fun aside from the actual trick-or-treat is something I’ve tried to do, and this is the best idea yet! I’ve been a loyal reader for years, yet you continue to amaze me!
Awesome…and with the leftover burned sugar you can make carmel pudding. That is how they taught us to make carmel pudding in dietitian school…say what…well, they taught us to make real food for a normal diet first 🙂