Hard-Boiled Eggs: A No-Fail Method
Updated {perfect} hard-boiled egg method HERE. Works for fresh eggs, too!
This is how I’ve been boiling eggs for years and I’m sorry it’s taken until now to share the method with you. Please forgive me. That’s what happens when chocolate cake takes over your life. No time to share practical things like eggs.
Hard-boiled eggs are easy-peasy but there are a few tricks of the trade when it comes to peeling.
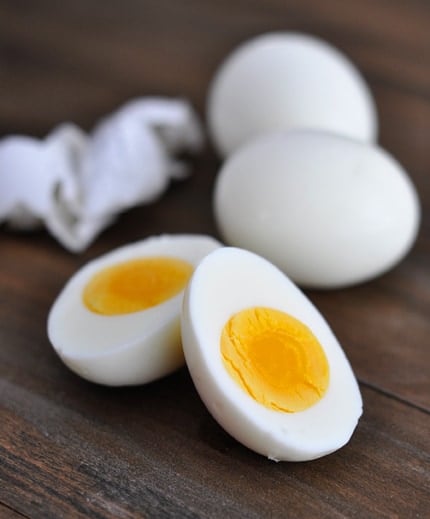
If you want easier-to-peel eggs, don’t use fresh eggs. The older the egg, the better it will peel so buy your eggs a week or two in advance and let them sit in your fridge until ready to boil.
Also, adding a bit of salt to the water while boiling supposedly helps and I’ve always employed this method, but be aware, there are lots of “I swear this works” out there when it comes to boiling/peeling eggs and I’ve learned my lesson that, really, 99% depends on the age of the eggs and the other 1% is salt, lots of cracking, and peeling them under warm water.
We make hard-boiled eggs at least once a week with our breakfast rotation and this is our tried-and-true method.
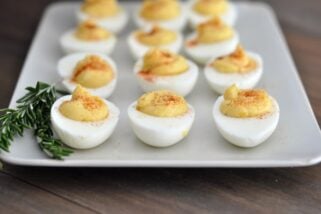
No better time to share since the season of egg dyeing and deviled eggs is upon us!
One Year Ago: DIY Dulce de Leche
Two Years Ago: Chocolate Blizzard Bars {Avalanche Bars, Too!}
Three Years Ago: Bean Curry
Hard-Boiled Eggs: A No-Fail Method
Ingredients
- Eggs
- Salt
- Cold Water
Instructions
- Place the eggs in the bottom of a saucepan and cover with cold water by at least an inch and add the salt (about 1 teaspoon salt for every 6-8 eggs). Heat the eggs uncovered over medium-high heat until the water comes to a rolling boil.
- Immediately take the pan off the heat. Cover and let sit for 15-17 minutes (the exact time will depend on how firm you like the egg yolk and the size of your eggs). I let large eggs sit for 16 minutes on the dot and they are perfect.
- While the eggs boil, make an ice water bath in a large bowl. When the eggs are done, scoop them out one by one with a slotted spoon and place them in the ice water bath to shock the eggs and shrink the membranes (discard the hot water in the pot). Leave them in the ice water bath for a few minutes. They can be stored in the refrigerator at this point or cracked and peeled.
- A few tips on peeling: crack the egg all over and start peeling at the base (the wider end) of the egg, getting your fingers underneath the membrane of the egg. Peeling them under a stream of slightly warm water seems to help too.
Notes
Recommended Products
Recipe Source: Mel’s Kitchen Cafe

Mel! Firstly, LOVE your site and your recipes. It is my go to place! I recommend your site to anyone who will listen! Thank you for your efforts to post!
Secondly, I love hardboiled eggs ! However, the peeling has been the absolute bane of my existence. I try literally any tip any one posts. Sometimes I have some success, but mostly just a lot of shame filled failure.
Two weeks ago I tried something new and, I don’t speak lightly when I say, it changed my life! Hard boiled eggs in the pressure cooker! And the PEELING of them was magical. I’ve done it with both fresh and older eggs. TRY IT TODAY!
I use my cuisinart electric pressure cooker.
1. Put “basket” (aka metal rack) in bottom of pressure cooker
2. 1/2 cup water
3. Put as many eggs as will fit in single layer. You can stack, but sometimes some will crack.
4. 5 mins on High
5. 5 min natural pressure release/ then quick release
6. Place eggs in ice bath.
7. EASILY PEEL and ENJOY!!
LIFE. CHANGING.
XOX
Hi Mel,
Another trick i use is to add a little baking soda to the water while boiling. This will help in easy peeling. I learned it from http://www.cheenachatti.com/recipe/hard-boil-eggs/
You can also try it next time.
Just got finished boiling eggs for Easter. Would love to see a “15 recipes to use up hard boiled (Easter) eggs” sometime soon 🙂
Betty Crocker and Martha Stewart use your basic technique of bringing to a boil, cover and remove from heat for 15 minutes, then into an ice bath to stop the cooking. Overcooking is what causes the gray/green tinge around the edges of the yolk. For such a simple item, an egg is probably one of the most complex to cook properly. The white has three sets of proteins that react at different temps, and the yolk has others that harden at other temps. Too high of a temp and too long will turn the egg whites into rubber. A tip for peeling: keep the cooked eggs in the pan, drain the water and put the lid back on. Hold the lid on while you shake the the pan of eggs which will bounce them around a few times to crack the eggs all over. If they aren’t cracked enough just shake them around a few more times. Peel under cold water.
I learned a great tip from a housemate once- once the eggs are boiled, crack them with the back of a spoon then soak them in water for a minute or so. the water seeps under the shell and makes it super easy to peel! haven’t tried this with very fresh eggs before so if anyone does, let me know how it goes 🙂
Thank you so much for your blog! Your recipes have been a regular part of our menus for the past few months since I learned about your site. It’s even become the go-to place for my son. Today he wanted to cook some eggs and came to your blog first. He followed the directions, and his eggs came out beautifully! Thank you for sharing! We can’t wait to try more of the recipes!
I have heard that this method works great, but for some reason, even though I follow the directions to a tee, I never get the eggs cooked just right. Maybe I’ll have to try again some time.
The method that I have found that works the absolute best for our preferred finished product is basically the same except once the eggs/water come to a rolling boil I set my timer for exactly 12 minutes and then once the time is up I take the eggs off the heat and put the eggs into the ice cold water. I always peel under water or under running water, and it definitely makes the process easier regardless of using the salt.
I love your blog by the way =D
I think this is the best method for perfect hard boiled eggs. I’ve never heard the age of the egg tip but you must be onto something. Thanks for the tip!
I don’t know that salt really makes a difference. I think the age of the eggs is the factor in whether they’re easier to peel. Also, I’ve read that a bit of baking soda in the water changes the pH so that they’re easier to peel, but haven’t tested it yet.
I love this method for boiling eggs. Here is a peeling tip I learned from my 8-year old: use a normal spoon to wedge between the shell and the egg, and lift the shell away (sort of like a lever), and it will peel much easier. If you can get the spoon under the membrane, it is magical. We use pastured eggs that are pretty fresh, and have never had issues peeling. I did try the oven method once and got some green yolks out of the deal, but I was probably doing something wrong.
Thanks for posting, this technique worked perfectly for us. I’ve used it five times already and every time was just right! I’ve used the 10 minute recipes before with lots of variances in results. (they require you to KEEP it at the hard boiling stage for a minute before turning the stove off and covering.) ALSO- Honey Lime Tilapia is SO loved by my family. Three happy fish eating kids say “thanks”.
Just to clarify it isn’t putting a few lines on the first page. It is the large font size forcing what appears to be just one page into 2 pgs with the 2nd page only having 3 lines. (not a really long recipe, either) Yes, I can copy and past as we had to a month ago, but as you say a bit more work. But for one of your yummy meals, it’s worth it! Thanks again, hope it can go back to the old way of click, print, fit on a page.
Hi Mel- just love you to death. It’s like you read my mind. This is the 2nd post where I was thinking about a better way to do something, and bam! Your post is the answer! I have had boiled eggs on my mind all week!
I also would love to see your breakfast rotation. Please share 🙂
Yes! Please DO share!
OK Mel: I went thru my binder of your recipe’s which I just put together last week! It seems the first large type one appeared Feb 21 on the Fabulous Orange Chicken, also Sweet & spicy slow cooker chicken printed 3/4, How to cook perfect brown rice printed 3/16 and 3/18 Ultimate Beef Stroganoff. Which I made last night by the way and it was very delish and a bit hit at our home. Looking back in my notebook the things I printed in Feb. like BBQ pulled port sandwichs printed 2/1 didn’t come out large, nor the Chewy pretzel bites (which are sooo good, love them, decadent) Looks like everything before mid-Feb. worked out to one page . To print I just hit the print button on the far right and it then jumps to a large type when the next screen comes up so when I hit ok to print it’s big!
Sound Beacher – yep, it sounds like the printing corresponds to when I started updating all my recipes to the new print format. They shouldn’t be printing just a few lines on one page, though – that’s what concerns me. They should consolidate to one page and only break to 2 or more pages if the recipe is really long. I know the font size is larger with this format but hopefully that will be changed soon. I’m waiting for the programmers to increase functionality for me to change the design of the print layout and believe me, it will be done as soon as the functionality is available so that the printing format aligns with the online style. Until then, you can always copy and paste the recipe into a word document and format the way you want, although I know that is a bit more work. Let me know if you continue to have issues with the recipes only printing one or two lines on one page (the first page).
I have to agree with the age-factor of eggs. We’ve had chickens for years and when I first tried to boil a freshly-laid egg it was horrible! It’s nearly impossible to peel! Yes, wait at least a week or two for very fresh eggs. The upside is that you get awesome colors when your eggs are already brown, tan, green & blue before you dye them! 🙂
Thanks for the great recipes, Mel!
Hi Mel!
Love your recipes – your website is my “go to cookbook” and my family and I are grateful. You’ve saved me so much time with your great recipe testing and advice. I noticed that your new print format for the recipes doesn’t include the photo like it used to. I really miss the photos! I’m very visual, so when I flip through my binder with a recipe in mind, the pictures come in so handy. (especially with cookies and desserts) Any chance you might be able to include them again? From a die-hard Mel’s kitchen cafe fan…. 🙂 Thanks!
Mel: I wanted to ask or point out that when I hit print your recipe goes to a larger size type and it does not fit on one page, keeps breaking with just 3 – 5 lines on the 2nd page. I’ve been following you and printing for a long time and this seems to have started just earlier this month. Maybe after you had that trouble and were asking readers to copy to a word doc. Anyway how can I shrink the font so it all fits on one page as it appears??? I don’t the jumbo type face. Thanks
Sound Beacher – Can you give me an example of a recipe that is doing this? I’ve changed all my recipes over from google docs to the newer feature (where there is a
blue Save Recipe button next to the Print button). However, when I print the newer format, it all prints on one page (unless the recipe is really long and it flows to a 2nd page). If you could give me a specific recipe example, I’ll look into it. Thanks!
I make hard boiled eggs in the oven! 325 degrees for 26-27 minutes. Then I put them in the fridge for a bit until peeling. They come out perfect! And so much easier. Takes the guesswork out of making them on the stove.
Thanks! Mine always look green on the inside. Loved seeing you quoted in the Desert News national edition. It comes with our Church News. My husband said, “You should read this article about blogs, it has the cooking one you like–Mel’s.” Awesome!
Thanks for the tips! My son really likes hard boiled eggs for breakfast but doesn’t like the yolks because they taste funny, he says. It’s probably because I’ve been cooking them wrong all these years!
My favorite is to cook them in 325 oven for 25 min and then put them in ice bath. Put them in a muffin tin so they don’t roll around. Easy!
I think you posted this just for me. Thank you.
I’ve been hard-boiling eggs my whole life and never heard of this method! I always thought that the eggs needed to be at a hard boil for 5 minutes before adding cold water in order to be a hard-boiled egg. I will try this next time. That’s why I love a good food blog – I learn new things all the time!
I just want to know more about “the breakfast rotation”, I think I missed something.
While I do agree that older eggs *usually* are easier…I buy farm fresh eggs from a neighbor, i.e. nearly right out of the chicken!! – and I do the 15 minute boil (add the eggs at the beginning) and plunge into the ice water bath until cool and they peel fine. My own experience is that it is the ice water bath. I don’t use nothin’ in the water at all, BUT I am using my own well water so maybe whatever minerals are in it… I’ve never had it tested. It is the best water I’ve ever had as far as taste. I drink it plain, I carbonate it, I make tea and coffee with it.
So many variables 🙂 !
I didn’t know there were so many ways to hard-boil eggs! :). Thanks for posting this. I don’t make them often enough to not look up how to do it. My kids wouldn’t ever try them. Your awesome pictures must’ve changed their minds because when they saw me looking at your blog this morning, all three boys wanted this! And they love them. I had to make another batch for tomorrow. ;). Incidentally, I followed your instructions perfectly the first time, but when I turned around to do it again, I forgot the salt! No biggie I’m sure, but two eggs were cracked when I pulled them out of the hot water. I don’t know if that’s the reason. Just thought I’d point it out since it was almost a side by side comparison in cooking them. 🙂
Thanks for this post. I’m allergic to eggs, so I honestly don’t know how to boil them. But my little girls are getting older and I want them to be able to enjoy decorating them for Easter. Plus my husband gorges on deviled eggs whenever they appear at a party since he never gets them at home–maybe now I could attempt it.
Mel, I have been using the method you laid out in the above for a long time, it works well.
Here’s one more tip for the perfect hard-boiled egg: Store your eggs in their carton, with the carton on its side (I wrap the carton in a rubberband to make sure it stays closed)…Doing this will help to ensure that the yolk stays in the middle of the egg during cooking.
Thanks for the tips!! I love adding hard boiled eggs to salads
I generally steam my eggs (no it does not improve the peeling but I do get an awesome egg) but there are times I don’t want to drag that out of the cabinet. This is good to know. I do think it’s the age of the egg that aids in ease of peeling.
*** whoever said- “… no farty smell.” just made me giggle like an 8 year old…
Share your breakfast rotation? Pretty Please!!! 🙂
And I thank you for all your work, your blog is fabulous!!
Hands down the best / easiest way to boil eggs is in an electric pressure cooker. It takes 6 mins on LOW pressure and the egg shell almost falls off! I tried this for the first time a couple of months ago and have never looked back. If you search YouTube ,there is a great video on this method. Love your blog 🙂
I see an elementry school science project here. Start with 4 dozen fresh eggs. Boil 6 per day for 8 days using the above boiling/cooling technique. Cool 3 of the 6 daily eggs using the ice water and let the other 3 just gradually come to room temperature.
Peel the eggs. You will then have 16 data points with three eggs per data point. Your elementry school child should then be able to demonstrate the influence of the age of the egg and the influence of the cooling process on the ability of the shell to easily be removed for eating.
The project could be expanded to include salt/baking soda and/or where you start to peel the egg if you really want to be complete.
A bit much for a cooking blog but inquiring minds want to know. Plus, kids are always looking for a meaningful science project!
I’ve done this for years and my eggs have always been thoroughly cooked–with greenish yolks. A couple of months ago I started looking for how to make soft-cooked eggs. I still haven’t found that, but I kept coming across recipes for hard-cooked eggs that specified that the egg should sit in the boiled water for only 8 minutes. I was skeptical, but I tried it, and my eggs have been perfectly cooked each time. (I, too, use large eggs.)
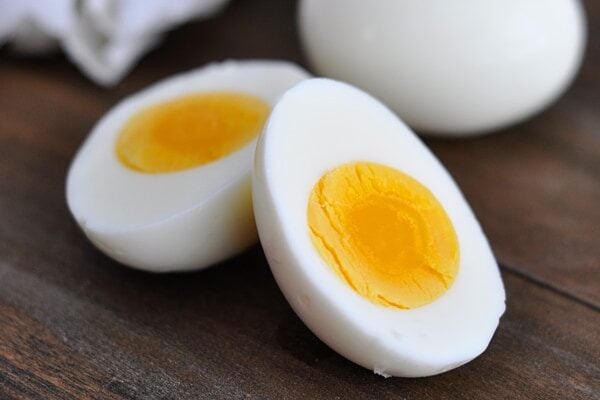
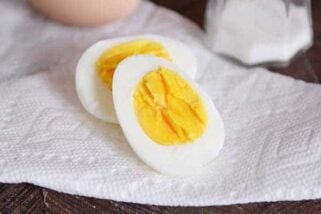
Thanks for everyone’s tips! Joelle, the eggs in the photo actually sat for 15 minutes in the pot. Any shorter for us and the yolks are a bit too uncooked but it really boils down to personal preference.
Hi Mel, Take it from the Egg Lady,(that’s what everyone in my community calls me). I raise chickens & sell the eggs. They are fresh daily, organic & free ranged. It is virtually impossible to peel a fresh hard-boiled-egg. That’s because you never boil them. Steam them for 20 mins.(put eggs in after the water begins to boil) in a double boiler then directly into ice cold water & you will get the most perfectly done & easy to peel egg. Fact: Did you know that a store bought egg is at least 3-6 weeks old on up to 9-12 weeks old. That’s why they are mostly water & taste terrible. Once you try a farm fresh egg you will never go back to store bought. P.S. No need to salt the water either. P.SS. The egg turns green only because it is over cooked. Steam it & you will get a perfect egg every time! If you need my permission to publish my hard-boiled-egg recipe on your site, you may do so. Thanks much, Shelly…The Egg Lady
Thanks for the tips, Shelly. We are getting chickens this spring and I’m excited for fresh eggs!
I use a couple tablespoons of vinegar (white cheap stuff) in the water to help with the peeling factor – it seems to assist with membrane un-suctioning from the egg white. Maybe a pH thing? Also, to get gorgeous eggs like in the photo, it would only be 10 minutes in the pot, covered and waiting. Finally, the quicker they cool (i.e. ice bath) the less nasty gray/green and stinkiness you get!
Thanks for a great tips, Mel!
For years I always peeled boiled eggs from the bottom, but I now find that they peel best it peeled from the top.
I think that it’s the salt and the ICE WATER bath that makes boiled easy to peel…just my 2 cents worth.
I’ve heard of this method of boiling eggs for a long time and it works. What I’ve also found that works is I was told about a year ago to add a teaspoon of baking soda to the pan instead of the salt before adding the water (that way it mixes up good), then once the cold water comes to a boil, cook for 5 minutes then take the pan and run it under cold water until the hot water is gone and the pan is cool, then let sit for about 15 minutes. Seems to work, too, but everyone has their own method.
Heather, I like your idea about pouring the hot water, after it’s cooled, into the garden. That would be a good fertilizer for tomatoes. Thanks for that tip as well.
Just made them, not a hint of green halo, and no farty smell. Sorry, it must be said. My eggs probably could have been a bit older, but I like the technique of starting the peel from the bottom by the air space.
Those eggs are gorgeous – no green in sight!
If you skip adding the salt, the hot water can be cooled and poured on a garden. The calcium that leaches out of the shells is particularly good for tomatoes.
Mel-add all the salt you want. <3
Ok, guys, I’ve already gotten several emails from readers calling me out on the salt factor. It’s clear that many don’t believe salt works so use your own judgment whether or not you want to try adding a bit of salt to the water while boiling. I’ll have to start doing side-by-side tests…either way, my little heart feels better adding a bit of salt.
Yep, your technique is spot on. I learned years ago that the ice water bath is superfluous. I put my pot under cold water faucet and let the hot spill out and the cold spill in. Then the eggs sit there for a few minutes. Cracking and peeling is then a breeze.
Hi Stephen – I’ll do that too, on occasion, but since the pot retains so much heat from cooking, the eggs cool down a lot faster in an ice water bath so it’s still my preferred method.