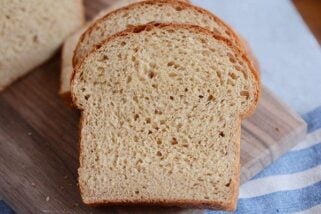
The Best White Sandwich Bread
This is the best white sandwich bread ever! It is surprisingly easy to make and is perfect for sandwiches and toast (French toast, too!)!
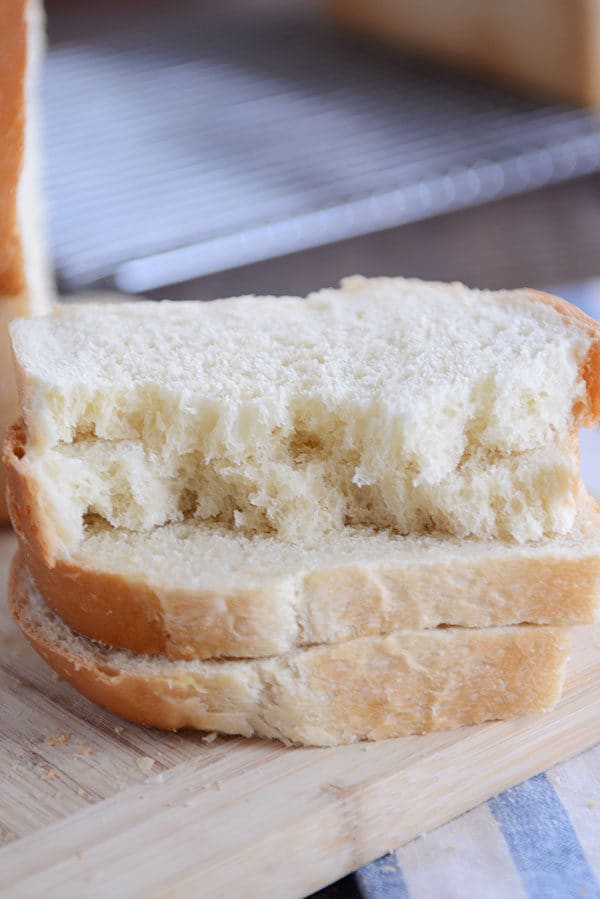
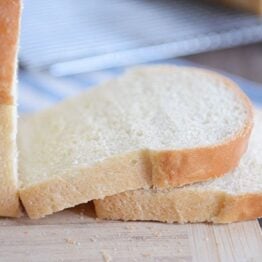
Nothing compares to this soft, fluffy, PERFECT white sandwich bread.
It is amazing! And really easy to make. No fancy ingredients. No time consuming method. It’s straightforward and simple!

My Mom’s Famous Bread Recipe
This amazing, tried-and-true recipe is my mom’s famous and spectacular white bread recipe. She made it all the time when I was growing up.
I have fond memories of her mixing the dough together in a huge blue bowl with a wooden spoon (she didn’t – and still doesn’t – own an electric stand mixer).
The dough is forgiving enough that it is the perfect bread recipe for beginning and expert bread makers alike.
How I Make It
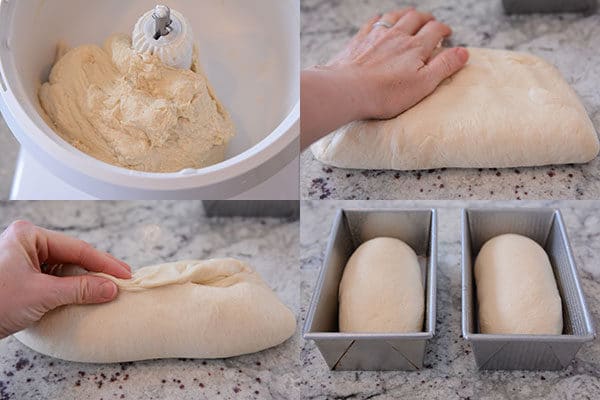
I am not as hardy and definitely more lazy than my mom, so I always opt to make this bread dough in my mixer. I have a Bosch stand mixer but the recipe should work just as well in a Kitchenaid or other type of stand mixer that has a dough hook.
The dough is soft and smooth and a dream to work with.
I divide the dough in half and then press each half into a rectangle and then roll up into a log (pinch the seam!) to place in the bread pan.
Perfect Homemade Bread
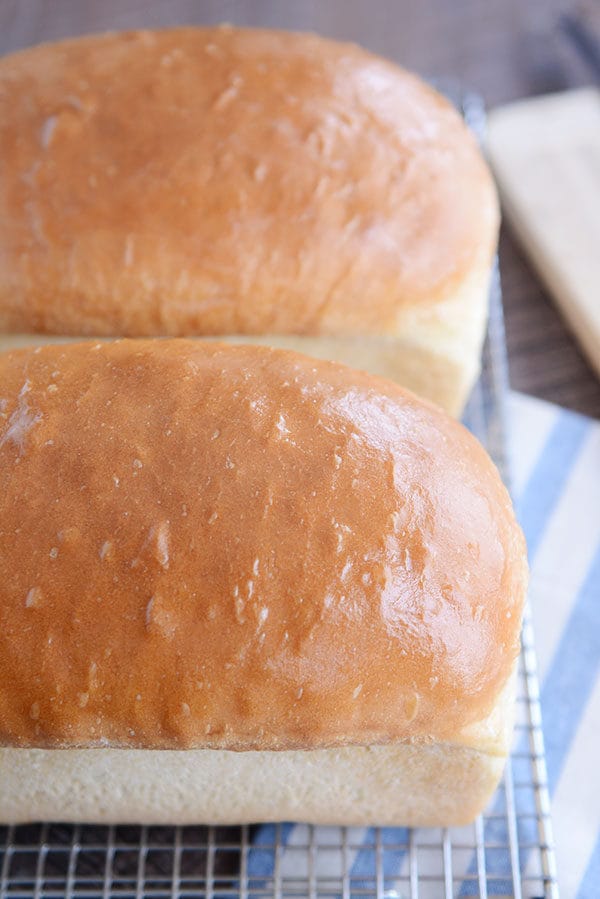
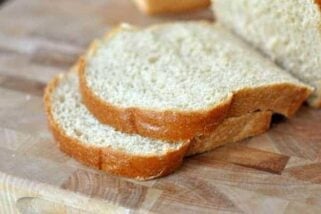
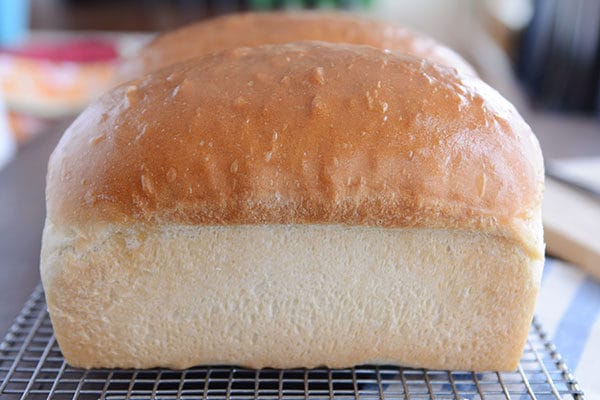
The baked loaves are tall and sturdy. The crumb is soft but tight, so it makes the perfect bread for sandwiches.
Just in case you care, the bread also makes the most fantastic grilled cheese sandwiches and French toast you’ll ever have.
Good thing this recipe doubles well! It doesn’t last long in our house. (I usually double the batch and then freeze two of the loaves for later…I like to call it freezer self-control.)

Here’s the equipment I use for homemade bread:
- Stand Mixer
I use my Bosch stand mixer for this (and all breads). I also have a KitchenAid mixer but usually say very bad words when I use it to make bread; I know many of you have better luck using your KA mixer for bread, but I’m a creature of habit, and the Bosch is unparalleled for bread making. This recipe makes two loaves which is doable in a KitchenAid; I usually double the recipe in my Bosch so I can get four loaves out of the deal. Having said all of that, you can definitely make this bread by hand, too. - Bread Pans
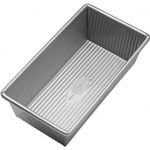
I always bake our everyday sandwich bread in 8 1/2-inch by 4 1/2-inch bread pans (vs 9X5-inch pans). I have a mix of Chicago Metallic pans and USA Bread pans. I love both brands, truly. If I had to choose, though, I’d probably opt just slightly more in favor of the USA bread pans (nothing sticks!). As a sidenote, I never wash my bread pans when making homemade sandwich bread (banana bread and other quick breads are a different matter). Sounds icky, but after a decade plus of homemade bread making and pan cleaning, I haven’t had an issue. Instead of washing and submerging in water, I get a clean dishrag and run it under very hot water. I wipe out each pan, paying particular attention to the crevices, let them air dry, and call it good. This has helped avoid rust in the edges of the pans. I’ve had a few of my bread pans for almost 10 years and they are going strong. - Scale
I use my trusty kitchen scale to weigh out the dough when dividing into loaves. You certainly don’t have to, but I like the loaves to be as similar in weight as possible so they bake evenly. - Bench Scraper
Another optional but super handy tool, this bench scraper/cutter is the perfect thing to use when dividing bread into loaves (plus, it’s one of the most-used items in my kitchen since it has a million different purposes). - Flour Sack Towels
A great alternative to using greased plastic wrap, I throw these lightweight towels over my bread while it is rising in the pans. - Unbleached All-purpose Flour
When using white flour, I always use unbleached all-purpose flour vs bleached all-purpose flour. I’m sure you could use bleached white flour in this recipe, too; I just haven’t tried it (but I’m 99.9% certain that’s what my mom used for decades when I was growing up). - Bread Bags
A few years ago, I bought a case of 1,000 bread bags. Yes, that’s right: 1,000. I’m still working through them (obviously), but it’s cemented the preference that real, live bread bags (instead of stuffing that loaf into an ill-fitting ziploc bag) is the way to go. This is the case of bread bags I have, but I bought these bread bags for a friend and she loves them (bonus: you don’t have to buy a gazillion at once). I always use plastic clips like these (I snag them at IKEA when I’m there once a year) to close the bags. - Bread Knife
This is my favorite bread knife. So inexpensive, and the long blade design makes for very even, neat slices!
If you’ve been looking for the perfect, white sandwich bread, this tried-and-true recipe should end your search! Simple, delicious, and so fluffy!
One Year Ago: Soft Baked Skillet Chocolate Chip Cookie {Egg-Free}
Two Years Ago: Fudgy Coconut Oil Brownie Bites
Three Years Ago: Incredible Chocolate Pudding {Dairy, Egg and Gluten Free}
The Best White Sandwich Bread
Ingredients
- 6 ½ to 7 ½ cups (923-1065 g) unbleached all-purpose flour
- 2 ½ teaspoons salt
- 1 ½ tablespoons instant yeast
- ¼ cup sugar or honey
- 2 ¾ cups very warm water
- ¼ cup neutral-flavored oil, like grapeseed, canola, vegetable, avocado
- Butter for top of loaves, optional
Instructions
- In the bowl of an electric stand mixer fitted with the dough hook (or in a large bowl, if making the dough by hand), combine THREE cups of the flour, salt, yeast and sugar.
- Add the water and oil and mix until combined. The mixture will be thinner than bread dough.
- Cover the bowl and let the batter rest for 10 minutes; it will be slightly bubbly at the end.
- With the mixer running (or stirring by hand), gradually add another 3 to 4 cups of flour, until the dough comes together in a cohesive ball that clears the bottom and sides of the bowl and doesn’t leave a lot of doughy residue on your fingers when touched while still being just slightly tacky (not overfloured and dense).
- Knead for about 2 minutes until the dough is smooth and supple.
- Lightly grease a large bowl. Transfer the dough to the prepared bowl, cover with greased plastic wrap or a light kitchen towel, and let rise until doubled, about an hour or so, depending on the warmth of your kitchen.
- Lightly punch down the dough and divide it into two equal pieces.
- Grease two 8 1/2-inch by 4 1/2-inch bread pans.
- Press each piece of dough into a thick rectangle about 8-inches long; roll it up, pressing on the seams, and pinching the final seam together.
- Place the dough loaves into the prepared pans.
- Cover with lightly greased plastic wrap or thin kitchen towels and let rise until doubled and the dough has risen about 1-inch above the top rim of the pan, about an hour or so, depending on the warmth of your kitchen.
- While the dough rises, preheat the oven to 350 degrees F.
- Bake the bread for 30-32 minutes until golden and baked through.
- Remove from the oven and turn the bread out onto a wire rack. Immediately brush the tops of the loaves with melted butter (or use a stick of butter, peeling the paper back and rubbing it on the top of the hot bread).
- Let the bread cool completely.
- The bread can be stored at room temperature, covered in a bread bag, for a couple days, or frozen for up to a month or so.
Notes
Recommended Products


Best white bread! Making this again right now after it was a huge hit last week with my family. We made toasted BLT’s with it and YUM. Easy and delicious!
Ok, the toasted BLTs sound amazing with this bread…
Could the dough be made in a bread machine?
I don’t own a bread machine, so I don’t know how the quantity of dough works in different brands of bread machines but as long as the amount of dough fits, it should work fine. The dough ingredients can be cut in half if needed.
Hi there!
I love this recipe and I’ve been making it for years. I’ve actually commented before with a different issue but I don’t find I have the problem anymore but I do have a question for you. Is it necessary to let the first mixture sit for 10 minutes? Why are we doing this? It’s instant yeast it doesn’t need to proof. I’ve been doing it but wondering if I can get away with not.thanks!
Hi Karen, yes, you can probably eliminate that step – I find it adds a better depth of flavor and helps the texture of the bread – but it may not be noticeable to everyone.
When you freeze them—whole or sliced? Love this recipe!
I always freeze unsliced – I find the bread tends to dry out a bit more if frozen sliced.
My family loves this recipe!!! I am trying to make it in a bread machine. Would this recipe be considered 2, 2.5 or 3lb recipe?
I can’t say with 100% surety because I’m just estimating based on the gram weight of flour, but I’d say it’s around 2.75 pounds.
Can I substitute bread flour for the all purpose flour for this recipe?
Yes! All bread flour will produce a slightly different bread crumb texture, but it works fine in this recipe.
Love this bread!! Nothing better than homemade bread.
Where do you buy your yeast?
Thank you!
Ashlee
Hi Ashlee, I usually buy it on Amazon.
AMAZING! Consistent, delicious, and an absolutely easy and rewarding recipe! I make this every Sunday morning, and my home smells heavenly. Thank you Mel! I’ve made this recipe dozens of times and it turns out consistently perfect. I love it!
I have never left a review on a recipe before. My picky kids have not liked ANY recipes I’ve tried for bread. I swapped Monk Fruit sugar for white sugar to make these a little healthier (1:1 ratio) and they were FANTASTIC! I’m a novice in bread making and this was a breeze. Gorgeous looking and oh-so-good! Absolute favorite in my household and now I’ve got yummy and healthier sandwich bread for my family. Many many thanks!
How do you double bread/yeast recipes to make four loaves at once?
You can just double the ingredients straight across (or double all ingredients but 1 1/2 the yeast for a less yeasty flavor).
I also did two loaves with 1/2 all purpose and 1/2 ground fine whole wheat. A little crumbly for my liking but tasted awesome. My husband loved it.
This is fantastic, I am going to try to make hamburger rolls with it. I use 3 cups all purpose and 3+ cups All Trump High Gluten. I also use 1/2 milk and 1/2 water. I made raisin bread that turned out fantastic and I am presently making habanero cheddar bread. This is the best for a soft crust!
This is my favorite bread recipe!! I make it weekly and everyone loves it!! Thank you for sharing your goodness!!
My loaves exploded in the oven and got huge!! What could have went wrong? I followed directions exactly.
Hi Cristina, did the bread rise too long before going in the oven? This recipe does make fairly tall loaves…if you want them smaller, you can put less bread dough into each bread pan (and bake a mini loaf or two with the extra dough).
This is my go-to when I want to make Texas toast. The kids have moved out and we don’t do a lot of white bread eating – toast etc. So I made a mini-loaf out of the recipe and did roughly 1/6 of the recipe. Came out to 290 gms bake. Perfect for the two of us with enough leftover to add to husband’s lunch.
Can you use a bread machine to make and knead the dough and have the same results if you still bake it in the loaf pan?
I haven’t tried using a bread machine since I don’t own one, but you could experiment. Just make sure the quantity of dough fits in your bread machine.
Absolutely delicious!!! Thank you so much for this recipe! It is very easy to make. The first time I made this I used all purpose flour and it turned out great. The second time I used bread flour (4 1/2 cups) and whole wheat flour (2 cups). It is so delicious, I eat it every day. My husband loves it and we do not buy bread in the grocery store at all. Once again, thank you!!
Oh, and I do understand the frustration using the KitchenAid stand mixer, lol. I thought about making one loaf at a time but the bread doesn’t last long in our house, so, two it is!!
I like this recipe I’ve used it a numerous times over the years. I make it into loaves and I’ve made it into a loaf and buns. My question is why does it not brown for me? I have to take it out towards the end and brush the buns and the loaf top with butter and put it back in for five minutes and crank the oven up.I am an avid baker. I do a lot of baking. I don’t have any issues usually I don’t understand because there’s sweetener in it. Yet they remain white.I’m at a loss.
Hi Karen, sometimes it depends on the exact temperature of the oven (does your oven bake on the cool side?) or where the oven rack is placed. In my oven, I have to move my oven rack one level for my rolls and bread to brown nicely. I’d also recommend baking it at 25 degrees higher.
Very nice bread! It has an excellent texture and held up when I made my husband a sandwich (he eats a lot of stuff on his sandwiches). Also, it all comes together very quickly. My first rise only took 30 minutes!
That said, there is a tradeoff to speed. Using lots of yeast means a quick rise and a less flavorful loaf. I think for most people who lead busy lives, however, this is a worthy tradeoff. My kids gobbled it up without complaint.
I am keeping this one on hand for when I am in dire need of a nice loaf of bread fast. Thank you!
I have been baking this bread recipe for years and years and I just wanted to share a slight variation I have come to love. I have been experimenting with different flours, and I’ve discovered if you use 1.5 C of fresh ground Kamut (khorasan) and 1 C fresh ground oat flour it really gives the bread a fantastic flavor. I also use Central Milling’s Artisan Baker’s Craft blend for the rest of the flour. I get so many compliments on this bread and really love to share it with my neighbors!
Thanks for those recommendations on flour variations, Jen!
I’m struggling with the shaping of the dough. The rolling into a log. Anyone have a video or tips? Thanks!
Hi Maria, you can shape the dough another way…it’s just important to shape it into a taut loaf, but if the rolling is hard to figure out, you can use your hands to fold and shape the dough into a loaf.
Excellent Recipe! I have made it a few times now- comes out good every time. Thank you very much for sharing!
Hi i have a question. your pan is 8.5″x4.5″x2.75″. Can i use the pan thats higher? like 8.5″x4″x4 etc. i was wondering if the pan size is diffetent (bigger) than yours, should the ingrident measurement different?
Thank you.
Yes, that pan size should work just fine – the sides of your bread will likely be taller than mine given that your pan is taller, but that should be fine.
Beginner Bread Maker- I am going to make the white bread receipe. When I get finished putting the first loaf of bread into bread pan and baking it I would like to freeze the second loaf in freezer. Does this loaf need to be fully baked or can I freeze it as a raw dough
Hi Linda, the loaf can definitely be frozen after baking and cooling. The dough should also freeze well, too.
I love the recipe for several reasons- it tastes really good, the ingredients are economical ( no butter, eggs, or milk needed), rises really well, toasts wonderfully, and my husband loves it ,so now I have stopped buying store bought bread- thank you for sharing!
Hi there! This question may be silly, but after the second rise, do you punch it down again and reform the loaf before baking or just slide it into the oven?
After the bread rises in the pan, don’t punch it down, just gently place the pans in the oven. The only time the dough should be punched down is when it rises in bulk before forming into loaves.
If I want to freeze the dough, should I freeze it before or after the first or second rise? Thank you.
I would freeze it before the second rise.
Hi Mel,
I’m wondering if I can substitute milk for the water in this recipe, would it make an already delicious bread even more tender/soft?
I haven’t tried that, but you could experiment. It might be best to scald the milk and let it cool before using.
My daughter has only a toaster oven so I can only do one of the two loaves at a time even though they are already at once. How do you do this to get the best result?
You can cover and refrigerate the other loaf of dough to help it rise more slowly while the first loaf bakes (or you can halve the recipe and bake one at a time).
I come back to this recipe again and again
Of course I am ready to make this and all I have are glass bread pans, going to do it but not sure of bake time etc.
I’ve made this twice with excellent results! Great texture and such great flavor. Comfort food at it’s very best! I made this instead of my go to from the Betty Crocker cookbook because I was out of milk and bread lol. It’s a great recipe!
I have a 13″ pullman pan. Do you think I could use it and just put all the dough in it or would all of the dough be too much or too little?
If anything, it might be too much dough…you’d have to experiment as I haven’t tried it in a Pullman pan, though.
I have been looking for a tasty bread recipe that is perfectly soft and pillowy and this is it!
My only issue is that 2 loaves is one too many! I don’t eat a lot of bread and I also don’t like putting bread in the freezer or refrigerator. So my question is, does this dough freeze well?
Absolutely delicious and the dough is so forgiving.
Yes, it freezes well!
My new favorite recipe!
I’ve made it as cinnamon bread and it was even better as French toast! So many variations of flavor. It will give you all the love back that you put into the kneading!
Thanks for sharing this recipe!
Tanya
Question;
I’ve made this bread several times and absolutely love it, but the crumb of the final product is not as fine as pictured in your blog. (As a note, I do use honey instead of sugar and mix it with the water.) Is the knead time really only 2 minutes (with a kitchenaid). When I made another recipe by hand (also with honey) I had to knead it 15 minutes. And your cinnamon bread recipe calls for a 6 minute knead with an electric mixer and the final crumb is very fine and tender. I’m wondering what I can do to get a finer crumb for this white bread recipe. I would love your advice as this bread recipe is fantastic.
If you want a finer crumb, you can knead for more time – that should help! Try 6 to 8 minutes.
I have loved this recipe for many years, and today I turned it into a hybrid sourdough recipe, and it turned out great!! I took out 100g of flour and 100g of water, and substituted in 200g of ripe sourdough starter. Then I cut the amount of instant yeast in half. I let it rise for about 3 hours til doubled (my kitchen was kind of cold), then shaped into the loaf pans and put them in the fridge overnight. Baked the next morning according to the recipe, and they turned out perfect! Very happy 🙂