Homemade Chocolate Dessert Cups
These homemade chocolate dessert cups are the perfect Valentine’s Day treat and there are about a thousand yummy things that could fill the elegant cups!
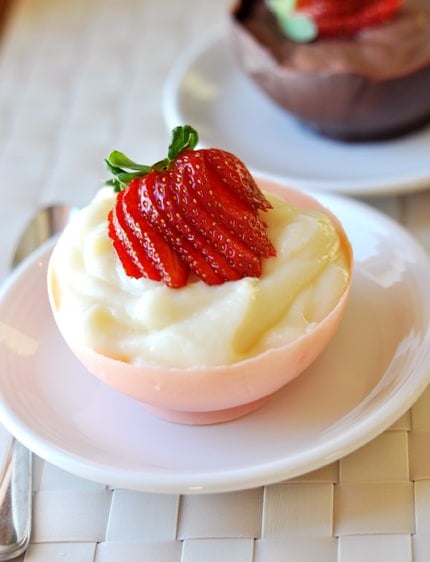
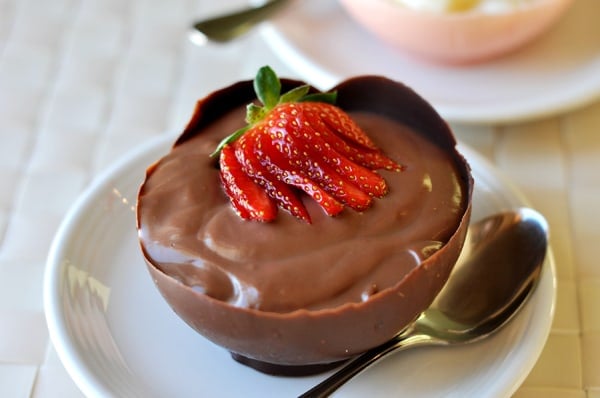
What better avenue for the pudding of yesterday to be slurped up than in homemade chocolate dessert cups.
Pudding is only one of a thousand yummy things that could fill these elegant cups – I’m thinking ice cream, fresh fruit, custard, cake…the options are endless.
A perfect, gourmet Valentine (or any-tine) treat that will leave your family and guests oohing and aahing at your creativity and culinary genius, these little cups are surprisingly easy, especially if you bring along a little patience.
Making use of every day balloons, the cups take shape in little time. I’ll confess, I had a few shattered casualties my first go-round, but no worries, my kids made short work of the chocolate shards.
I can’t wait to hear what your imagination dreams up for these little beauties! (Check out the step-by-step instructions below the recipe.)
FAQs for Homemade Chocolate Dessert Cups
I like to use Ghirardelli chocolate but melting chocolate wafers (or chocolate bark) works great too.
You can store them covered at room temperature (as long as your room isn’t too hot; if it is, store them in the fridge). You could easily make them up to three or so days in advance.
I don’t taste any balloon after-taste because I wash and gently dry them after they’ve been inflated- that is important so it gets rid of the balloon-y residue.
One Year Ago: Chicken and Vegetable Dumpling Soup
Two Years Ago: Lemon and Garlic Grilled Chicken
Three Years Ago: Gourmet Buttermilk Cookies

Homemade Chocolate Dessert Cups
Ingredients
- 9 ounces (255 g) white chocolate
- 12 ounces (340 g) semisweet chocolate
- Food coloring, if needed
- 12 standard-size, 7 in/17.8 cm balloons
Instructions
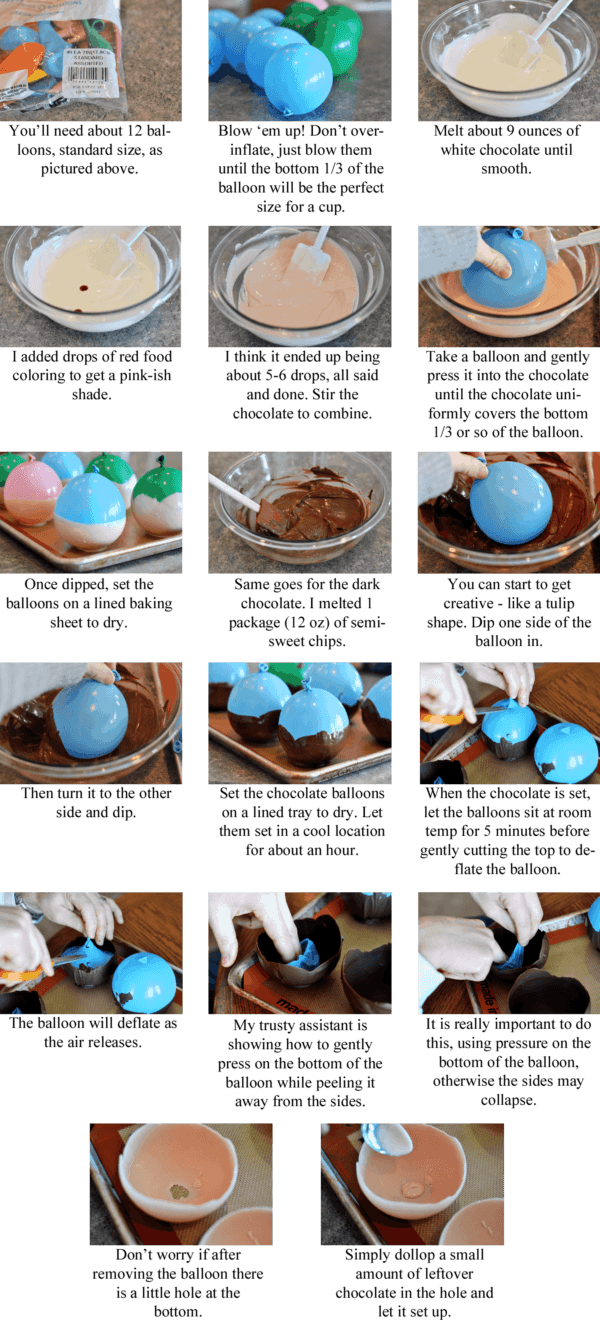
- Blow up 12 balloons, inflating them only to the point that the bottom 1/3 of the balloon will be the perfect size for a chocolate cup. You definitely won’t inflate the balloon to it’s full capacity. Gently wash the balloons with warm water and let them dry completely (to avoid seizing the chocolate with little drops of water). Set the balloons aside.
- Melt the chocolate in a heatproof bowl in the microwave, taking care not to overheat the chocolate or it will seize and harden. If you want to avoid the white “blooming” lines that can appear in dried chocolate, reserve about 2 tablespoons of unmelted chocolate and stir it into the warm, melted chocolate until all the chocolate bits are melted and smooth. This is a quick and dirty way to temper chocolate.
- Take a balloon and press it into the chocolate so the chocolate comes about 1/3 of the way up the balloon. Set the balloon on a lined baking sheet to dry. Once all the balloons have been dipped, allow the chocolate to set in a cool location (like the refrigerator or a cool storage room or non-fumy garage). Don’t discard the chocolate until you have removed the balloons from the cups, in case there is any breakage that can be repaired. Once the chocolate has set, bring the trays of balloons to room temperature and let them sit for 5 minutes or so. You don’t want the chocolate to soften too much, but you want to take the chill off a little bit.
- Carefully snip a tiny cut in the top of the balloon, holding on to the balloon, and avoiding a huge cut (this could cause the chocolate to shatter). The goal is slow and easy here. Let the balloon gently deflate. When it has released all the air, gently press the bottom of the balloon while peeling the balloon away from the chocolate. Again slow and easy. If you use your fingers to press down on the balloon while peeling it away from the edge, it will help the process.
- Once the balloon is completely removed, store the chocolate cups in a cool location until ready to use. If a chocolate cup (or ten) ends up with a hole in the bottom, never fear. Simply dollop a small spoonful of leftover chocolate over the hole and let it set.
Notes
Recommended Products
Recipe Source: Mel’s Kitchen Cafe


These are adorable, but, be sure your diners don’t have a latex allergy before serving! Balloon latex can be dangerous to those who are – me included, unfortunately. 🙁
What can you use to make the bowls if you do have a latex allergy ( I do) ??
Could you use latex-free balloons?
What type of chocolate do you use so it is thick enough not to slide off the balloons but will still hold its shape if left at room temp before serving?
I like to use Ghirardelli chocolate but melting chocolate wafers (or chocolate bark) works great here, too.
after making the cups how long can you store them for before using and what is the best way to store them?
thank you
Cerrie – you can store them covered at room temperature (as long as your room isn’t too hot; if it is, store them in the fridge) and I’m guessing you could easily make them up to three or so days in advance.
I was making mini ones for a wine maker’s dinner (pistachio semi freddo) and the first 5 popped. I waited and kept whisking the chocolate to cool enough and they stopped popping. They did stick to the inside so I put them in the freezer for and hour and then poured a little hot water (faucet temp) and the residue came right out. Just swirl and dump.
Did you have a problem at all with the balloon reside sticking to the sides of the chocolate? The insides of my white chocolate cups are the color of the balloon, so I’m trying to scrape off all the color. Any suggestions on how to fix this?
Deanna – no, I didn’t have that problem. Sorry you are having to deal with that!
I love this so much, I am thinking perfect for Easter because they remind me of egg shells. Thanks for the tutorial!
I made these for dessert last night. They were a hit! I can’t believe how well they turned out. Thank you so much for the step by step instructions and pictures!
Ok, I posted earlier about my explosive experience last Valentine’s Day. I’m pretty sure I used water balloons (or at least small ones) last year, which I would obviously not recommend – ha! Anyway, I just finished making them without incident using larger balloons only partially inflated. This seemed to do the trick (I had covered surrounding areas just in case since, as others mentioned, the mess of exploding chocolate was unimaginable. My sister said my apron looked like “death by chocolate!”).
i too, have tried this. and my balloons have also EXPLODED! your chocolate must be cooled before dipping the balloons to prevent the explosion. and just take my word – chocolates flies further than you can imagine!!!
All the balloon exploders out there: I haven’t tried this myself, so my advice is purely hypothetical, but it seems like your balloons are too inflated. The warmth of the chocolate would cause the air inside of the balloon to expand. So, if they were full to capacity, then heated, it wouldn’t surprise me if they broke.
Again, just a theory, but could very possibly be true. Leave some room in your balloon!
Looks so cute to eat it~~ Your so creative!! Great idea to make little cups for puddings 🙂 It means “NO DISHES TO WASH”… hahaha…
I made these a few years ago and had the exploding balloon experience too! One suggestion I’ve heard is to use water balloons because they tend to be thicker and may resist bursting a little better. We even found chocolate on the wall behind the refrigerator when we moved it!
Your site has been on my favorites bar for a year now & I really appreciate everything on here b/c I love the basics that I always use. Even tonight we’re having your sweet & spicy chicken for tacos 🙂
Thanks for doing so much work on our behalf!
I have always wanted to try this!
That is absolutely amazing. I never would have thought about doing something like that. Sure to impress guests…
I tried making these last year for my son’s birthay party & it was a balloon & chocolate explosion MESS! I thought the chocolate might have been too hot, so I waited a few minutes but they all ended up exploding. I’m not brave enough to try it ever again, there was chocolate EVERYWHERE!!!
gorgious !!! wonderful idea !!!
I love chocolate dessert cups – what could be better than an edible serving dish? The pink version is gorgeous!
Woohoo! just saw you on foodgawker. You rock!!
Love,
Your nibley friend. (since there are so many Kellys commenting, I wanted you to know who’s spreading the love.)
ooooh I love this. =) I’ve used wax to coat the outside of balloons like this and set tea candles in them and placed them around the patio for a BBQ last summer. Everyone ooh’d and ahh’d them; I hardly had the heart to tell them how simple they were to make. Balloons and chocolate is a great idea!!! I knew I saved the rest of those balloons for a reason …
What a fun treat to make and it looks just beautiful….definitely a show stopper. 😉
What a decadent treat I’m sure, and so gorgeous! As for a twist on it, I’d maybe add a swirl of melted peanut butter instead of the strawberry.
super cute 🙂
I have to second J’s experience about exploding balloons. I tried this last year and it was an absolute mess with chocolate splattered on the ceiling, under the cabinets and all over me (I kept trying even after a few explosions=silly me). However, with your detailed tutorial, I think I’m going to try this again. I don’t remember the details of last year’s fiasco, but I think I used small balloons that were fully-blown, so I’ll try your method. It’s such a pretty presentation that it’s worth another chance!
these are lovely, mel, and so fun! way to take your pudding up a notch. 🙂
Adorable! I love this idea.
Denise – I couldn’t taste any balloon after-taste but that’s a lot of the reason I put in the instructions to wash and gently dry the balloons after they have been inflated. It will get rid of the balloon-y residue and help with that.
J – I’m not completely sure why your balloons would have exploded like that but one guess is that if the balloons are inflated completely, it makes their edges thinner and I can see that fully inflated balloons might have issues. If that wasn’t the case for you…then I guess, I’m not sure! I know that using the size of balloons indicated in the recipe and not blowing them up all the way – I didn’t have any issues with exploding balloons. I hope if you are brave enough to try it again that you have better luck (and your guess on the warm chocolate would have been what I thought, too!)
These are so cute! Can’t wait to try them.
just curious if you can taste any “balloon flavor or after taste” because of smells and flavor that a balloon has….
do I need to buy “special” balloons if so?
well, now you’ve got me. guess i’ll be doing this on saturday *sigh*
LOVE it…i cannot wait to try!!!
I tried these once upon a time…just about the time I would have the balloon all dipped and ready to place on a tray to dry, the balloon (along with the chocolate) would explode! I’ve never had a mess quite like that before. The was chocolate everywhere! I thought maybe my chocolate was too hot, but it did it again when I tried it a few minutes later. What did I do wrong?
Awesome idea! So creative, I love it and like you said it will be perfect for that delicious pudding from yesterday.
CUTE!!!!! this is perfect for valentine’s!!! You are so creative!
Opps! Just read the other messages and someone else had the same idea! 🙂
Can’t wait to make these! I know the kids will think this is so fun! By the way, another way to slowly let air out of a balloon without “popping” it is to stick a piece of transparent tape (like gift wrapping tape) on it and cut with scissors or poke a needle through the tape. It will never pop that way. Thanks, Melanie! Love all your ideas!
These are the kind of thing I would expect to see in a restaurant but not in real life weekday cooking. I love how easy they are!
So adorable and the photo tutorial is wonderful. Thank you! I can’t wait to try your pudding recipes soon.
Ok…can I just say that those are the cutest pudding cups ever? What an amazing idea, Melanie! Your tutorial is awesome, too! I bet your children had fun helping you!
Such a pretty dessert! Another way to get the air out slowly is put a piece of scotch tape on the balloon and stick a pin in it where the tape is! It is a very slow leak. Can’t wait to try these 🙂
You are a genius! I love this idea. My kids would have a blast doing this for FHE.
Wow!! I can’t say I’ve ever heard of using balloons to make chocolate cups, but hey, it’s worth a try after seeing how great yours turned out! Super creative!