Classic Crème Brulee
Get this recipe for classic crème brulee – a stunning and surprisingly easy dessert that is sure to please everyone in your family!
If I can ensure that one other person (just one!) living on the face of this earth doesn’t wait as long as I did before making crème brulee, my life will be complete.
I spent years being completely intimidated by this dessert.

I don’t know, maybe it was the torching.
Or the special dishes.
Or the fact that the name is super-duper shmancy-pants fancy (not that I would ever pronounce it creem brooleee, no, not me).
After finally making it, I spent the next five years ashamed I didn’t recognize how truly simple it really was. I felt I had cheated myself.
Hence the reason we enjoy crème brulee at least once a month and I’m not even kidding. I have to make up for lost time. And if I’m being completely honest, even my chocolate loving soul would ditch chocolate any day for a dish of this. It’s definitely in my top 5 favorite desserts of all time.
The good news is that there’s nothing to be afraid of: crème brulee is simply a tempered cream and egg mixture that is baked in a water bath (kind of like some cheesecake recipes), cooled and then torched.
The resulting baked cream is so ethereally rich and silky that it is irresistible. Plus, my favorite aspect of this dessert is that it can be prepared up to three days in advance.
Here’s the totally rad thing, though, it completely justifies getting a kitchen torch, which
a) will make you feel like a total rock star in the kitchen and
b) is just plain fun (think: s’mores in seconds). And if you are opposed to buying more kitchen gadgets, go talk to your neighbor/favorite foodie friend and split the cost, dividing custody of the torch between your two houses. Just don’t hog it, ok? You gotta share the love when it comes to torching things.
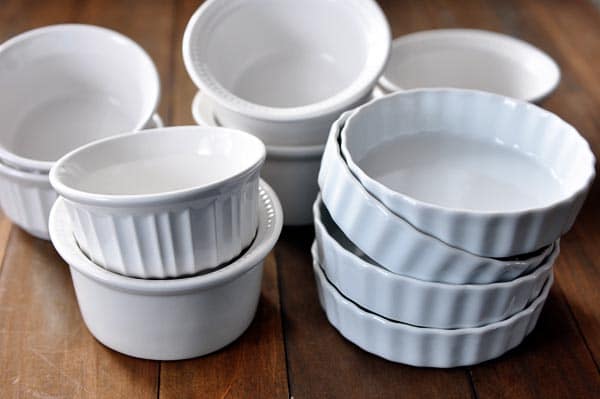
Let’s talk dishes for a second. Like I mentioned above, crème brulee is classically made in ramekins for individual servings.
I have a conglomeration of mismatched ramekins as you can see below. Any of these types of ramkeins will work great.
The flatter, wider dishes are my favorite for crème brulee – I like a bit more caramelized sugar to cream ratio but my kids far prefer the deeper ramekins because the luscious, thick cream is their favorite part (and Brian, he’s just in it for some crème brulee and could care less how it shows up in front of him).
So I usually use a combination of sizes, which works wonderfully because I don’t have enough of one style for the whole batch, even though each of these ramekins came in sets of six to being with.
I’m sure that has nothing to do with children who unload the dishwasher and try to win the world record for balancing the most number of plates on top of each other, or ramekins in this case, whilst dodging their brother’s elbow on the way to the cabinet.
The biggest concern I had years ago about crème brulee was the torching. Ay-yay-yay. Kind of scary! Except not.
It takes a bit of practice (more reason to make crème brulee daily until you perfect it) but once you get the hang of it, it’s the easiest part of the whole process.
I have had several kitchen torches (this is one) but the one I love best and which I own now is the Iwatani. Downfalls? You can only use the Iwatani brand of butane with the torch. Slightly annoying.
High points? It works amazingly better than the other two torches I’ve had and a canister of the fuel lasts quite a while. It burns hotter and faster and my crème brulee has turned out picture perfect after buying this baby.
I highly, highly recommend (PS: I’m not getting paid to say so). My brother has one, too, and alerted me to its merits.
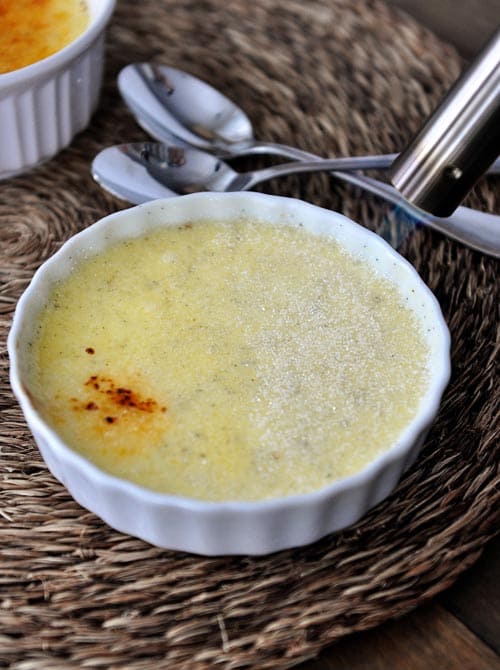
I use regular granulated sugar for caramelizing the tops.
I’ve tried brown sugar, superfine sugar, turbinado/raw sugar and a combination of all three and always come back to plain ol’ granulated. As long as it is spread in an even layer, not too thick, it crisps beautifully.
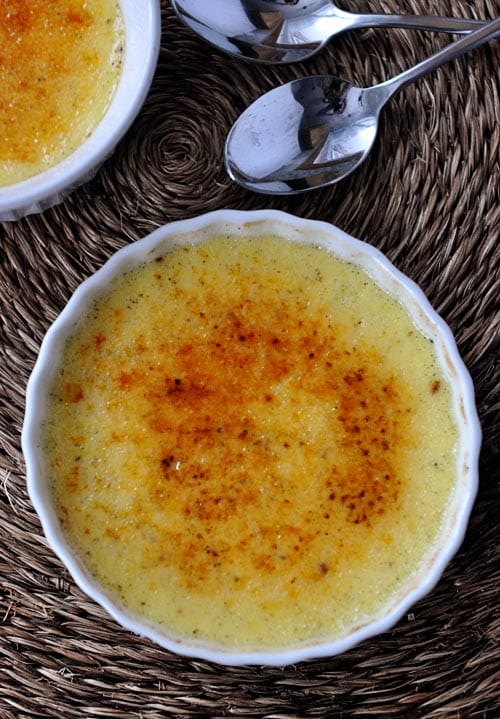
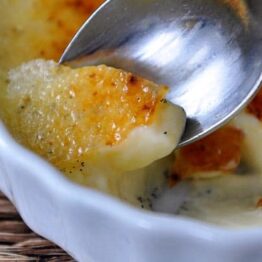
You can see in the picture below how the torch first lightly melts the sugar and then as the liquified sugar gets more heat, it begins to turn golden and caramelized.
The goal is to get an even layer of glassy, browned sugar that literally cracks (complete with a real, live cracking sound), plunging the spoon into the depths of the rich cream.
The level of burning, so to speak, is up to you. I don’t like it overly dark. Burnt sugar is delicious in small doses but not when it overwhelms the entire dish with a charred flavor. So I tend to go a bit light on the torching.
Update: Here’s a quick video tip on caramelizing the top of the crème brulee!
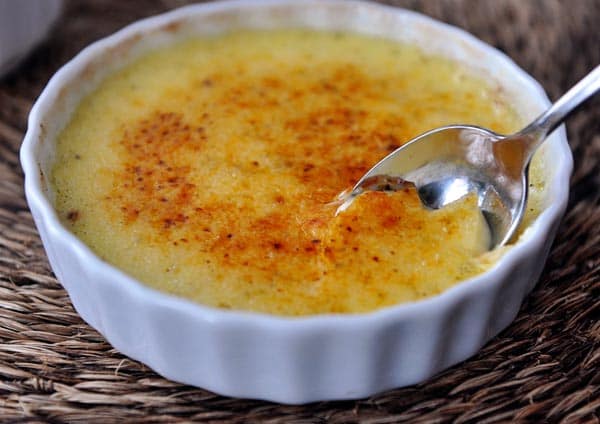
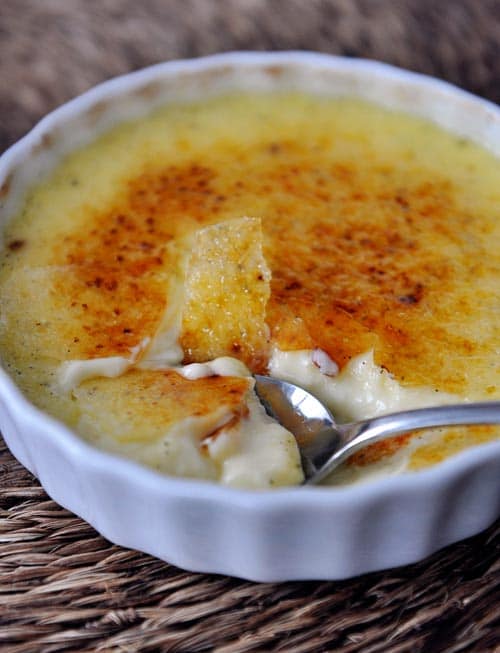
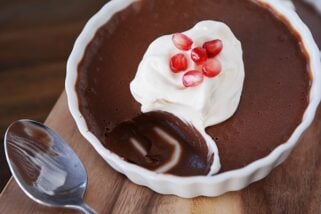
That shard of browned sugar sticking up right there? Down there. In that picture below?
That shard of torched sugar spooned with a cloud of vanilla-infused, decadent cream is absolutely the most heavenly thing on the face of the planet.
So go. Make some crème brulee! If you are an experienced crème brulee-maker, may the force continue to be with you.
If you are a novice, ride on the coattails of my experience and don’t wait a second longer before making this. You’ll feel like a total rock star but probably won’t have time to let me know because you’ll be too busy cranking out crème brulee to make up for lost time. Been there, done that.
Update: Sorry I didn’t include this information earlier; I’ve had a lot of questions about where I buy my vanilla beans. I touched on it in my Vanilla Bean Mousse Cheesecake but here’s a recap: I love the ones from Penzey’s spices. But they are much pricier than buying them in bulk and there isn’t a Penzey’s anywhere near me (and their shipping costs are pretty high). So the other place I’ve bought them with great success is Amazon. I’ve bought this brand and they are fresh, plump and keep very well stored in a cool, dark spot. In the comments section of the cheesecake post, readers suggested these resources (I have not bought from these places; they come recommended from other people): Olive Nation, Costco, beanilla.com.
Oh, PS: I put together a little 2-minute video on scraping the seeds from the vanilla bean. Not rocket science, but I have heard from a few of you that vanilla beans are intimidating, so here you go.
One Year Ago: Cheesecake Stuffed Strawberries
Two Years Ago: Red Velvet Sheet Cake {& Other Valentine Food Ideas!}
Three Years Ago: Caprese Skewers
Classic Crème Brulee
Ingredients
- 1 vanilla bean
- 3 cups heavy cream
- 1 cup milk, 1%, 2% or whole
- 8 egg yolks
- ½ cup granulated sugar plus 2 tablespoons
Topping:
- About 6 tablespoons sugar
Instructions
- Gently slice through the skin of the vanilla bean and with the flat edge of the knife, scrape out the seeds (see how-to video below).
- In a medium saucepan (about 2- or 3-quart), combine the vanilla bean seeds, scraped vanilla bean pods, heavy cream, and milk. Bring the mixture just to a simmer. Remove the pot from the heat, cover and let the mixture sit for 10-15 minutes. Remove the vanilla bean pods.
- In a medium bowl, whisk the egg yolks and sugar together until well combined.
- Slowly ladle the hot cream mixture into the egg mixture while whisking constantly and quickly so the eggs don’t cook and form hard little bits. Adding it slowly tempers the eggs so they don’t cook too quickly.
- Pour the mixture into 6 ramekins (about 7- to 8-ounce). If you are using flatter ramekins (4- to 5-ounce), you’ll probably get about 8 ramekins-full out of this recipe.
- Preheat the oven to 325 degrees F. Warm about 3-4 quarts hot water (depends on how big your roasting pan is) until hot but not boiling.
- Place a kitchen towel in the bottom of a large roasting pan. Place the filled ramekins on top of the towel and set the roasting pan on an oven rack in the center of the oven.
- Carefully pour the hot water into the roasting pan, avoiding splashing any water into the ramekins. Bake the creme brulee for 40-45 minutes until set but still slightly jiggly in the center (if the edges are still jiggling, bake it a few minutes longer).
- Using a large, flat spatula, immediately and carefully remove the ramekins from the hot water. Let them cool completely and cover with plastic wrap. Refrigerate until completely cold, 6 hours or up to 3 days.
- About 30 minutes before serving, remove the ramekins from the refrigerator, blot the tops dry with a paper towel. Lightly sprinkle about 2 teaspoons or so of granulated sugar evenly across the top of the creme brulee (lifting the ramekin and tipping it from side to side will help the sugar spread evenly).
- Using a kitchen torch, quickly melt the sugar until it forms a golden, crispy top. Refrigerate until ready to serve (no longer than 30 minutes once the top is caramelized or it can turn a bit mushy). The creme brulee inevitably warms up a bit after the top gets browned so refrigerating for at least 10 minutes will allow it to chill slightly again.
Notes
Recommended Products
Recipe Source: from Mel’s Kitchen Cafe (after years of experimenting on classic recipes like Alton Brown’s, for one)


So I need to make creme brulee for 48 people…is it possible to do it in those little metal pie tin size containers? If so, would I just quadruple the recipe or make like 3 double batches? I have never made creme brulee, but my son plays a character in highschool musical that says he wants to make the perfect creme brulee. So all his cast mates made him promise he would bring them all creme brulee . So trying to figure out how to do it with out buying 48 ramekins and using something disposable. So any advice would be great! Thank you!
You are a nice momma! I haven’t tried making the creme brulee in metal dishes – I’m not sure if a metallic taste would impart into the cream mixture? It’s probably worth a trial run. If the taste is fine, I think it should bake and set in those types of dishes. You could also use small jars – but those aren’t disposable, so that might not work.
Okay! I will give it a trial run and see what happens . I may be nice, but I am for sure having him help me! But if the disposable dishes don’t work, I might just tell him the kids will have to settle for a piece of creme brulee French toast casserole!
I’ve tried half a dozen recipes for Crème Brule and I never found one with the perfect sweetness and perfect smoothness until now. This one is silky, not too sweet and simply pure heaven. I love it with a few berries and sometimes whipped cream or just plain. This one beats most found in restaurant’s and matches those in the very best restaurants. I’m kind of of a Crème Brule connoisseur.
I’ve tried half a dozen recipes for Crème Brule and I never found one with the perfect sweetness and perfect smoothness until now. This one is silky, not too sweet and simply pure heaven. I love it with a few berries and sometimes whipped cream or just plain. This one beats most found in restaurant’s and matches those in the very best restaurants. I’m kind of of a Crème Brule connoisseur.
First time making it, and it was beyond amazing. I amazed myself as well as my friends and family (maybe not them so much as I cook and bake all the time) but I couldn’t shut up about how great, easy and delicious this whole process was from start to finished! I did halve the recipe as I needed to use up 4 yolks and they came out beautifully!
I feel like the world needs to know you can make this in the instant pot! I do half the recipe for my size of ramekins (I still fill 6, which is best for the instant pot). Once they are in ramekins, cover each one with tin foil. Put steamer rack and one cup of water in instant pot. I stack four ramekins on the bottom and two on top of the other four. I’ve found low pressure for 18 minutes and natural release for 15 does the trick for my size of ramekins! But check one at the end, it should jiggle slightly in the middle but not the edges. If it does, do low pressure for 3 more minutes and natural release again. It doesn’t take as long to get to pressure the second time. Magic! And no oven water bath to stress me out haha
Thanks so much for this info, Shannon! I was really wanting to make this but didn’t want the hassle of the water bath. This method was so easy!!! I followed your directions, using six 6-Ounce ramekins in my 6 qt pressure cooker. I did have to give it a couple more minutes but it was no big deal, like you said. Great recipe and I love this adaptation for the instant pot!
Very smooth and creamy! Love it!
This was a fail proof method of making the most delicious creme brulee! Thanks Mel!
I have seen creme brûlée in sheet pans in restaurants. Do you have any tips on how to do it this way?
Oh boy, I’ve never seen it done that way – but I’m guessing you could fill up a pan with the creme brulee mixture and set it inside a larger pan with water and bake it that way?
Hi,
Wondered if this recipe could be cut in half?
Thanks.
Jan
Yes!
I did and it was great, made 4 perfectly filled ramekins!
As I don’t do sugar and milk, I substituted almond milk and swerve. Swerve measures the same as sugar and the custard came out excellent. Swerve doesnt carmelize like sugar but still makes a nice crust.
If I half the recipe and use shallow ramekins, how much time would it take to bake in the oven.
Cindy Thibault
The same amount of time as in the recipe (but if your oven tends to cook hot, I’d check it a few minutes earlier).
Absolutely love this ! Love your web site keep up the good work!
I love your website Mel!!! I have been making this creme brûlée for the last 4 Valentine dinners. It has become a really fun tradition and something we all look forward to. Thanks so much for all of your hard work.
That makes me so happy to hear, Heidi. Thank you!
If you take sugar and a little water, cook on med. high heat till a golden straw color, then pour out parchment paper to hardened. Then break up to fine crumbs, put on custard, put under broiler till melted ( watch closely ). Perfect and no torch.
Oh…that’s a cool trick; I’ll have to try it!
How many parts sugar to water? I’m wondering about trying this trick out.
Thanks for the video tutorials that go along with this recipe. It turned out divine! I learned from ATK that I can use a Silpat instead of a towel on the bottom.
Hi,
I wanted to buy the flatter ramekins because I want less creme to crust ratio as well, Ive searched for ramekins and the price varies broadly. From $2 to 15$+ per ramekin….we’re talking World Market vs Williams Sonoma. Do you think there’s a difference in the quality? The fact that the price is so different makes me think there could be.
Hey Maria – that’s a good question. I like the flatter ramekins best also for the same reason. The ones I have are not high-end. I got them a while ago from a kitchen store that had tons of options and I think they were around $4 per ramekin. They work great. I would just double check they are oven proof – if so, I wouldn’t personally spend a fortune on them.
Just curious….why do you use one part milk and not make it all heavy cream? Is the texture of the custard more smooth with the addition of milk. It looks awesome and I will have to give it a try.
I just happen to like the texture and creaminess from the milk and cream, I guess.
Hello.
So about step 4, we just ladle the milk in the egg mixture and fill ramekins? we don’t have to get the mixture to boil it for couple of minutes before filling the ramekins?.
Thank you.
Hala – Correct. You don’t have to cook the custard before it goes into the ramekins.
I have been wanting to try making creme brûlée for some time and haven’t had a recipe I knew would be good. So glad you posted this! I have made this twice since you posted this recipe. Once with 4 c cream, and once with 3 c cream and 1 c milk. I honestly couldn’t tell a difference. So I think I’ll stick with the 3 c cream version! Thanks for a great recipe. I know I can come to your site and always find something amazing!
One of my favorite desserts…again, something I’ve wanted to make for a looong time but have been intimidated. Super easy and really delicious! My only problem was that they were a little soft after almost 24 hours in the fridge. They were more jiggly than I thought they should be but after 50 minutes in the oven I took them out because I was afraid I’d ruin them. I followed the recipe exactly…should I have just let them continue to cook? Maybe cover with foil?
Katie – If they were too soft, you should probably just try another 5-10 minutes in the oven. As long as they aren’t overly brown on top, extra time shouldn’t hurt them especially if they are still really liquid in the center. Next time they will be perfect!
Okay, I made this for Valentine’s Day dinner also, and MAN, it was great! Thanks for making it sound easy so I had the confidence to dive it and try it. I love the end result, and the boys in my house loved the torching 🙂 Win, win, I’d say!
Had friends over for a fancy Valentine’s Day dinner and this was our dessert. It was amazing! And I was so surprised how easy they were to make. Loved the hard shell. Will definitely make again when I want to pamper someone (or myself :)).
I made this for valentines dessert. Sadly my girls didn’t like it so we have to sacrifice and eat their helpings. One question I did have is how full should the water be in the pan? Are we talking halfway up the ramekin, just covering the towel, or what? Now I have more guts to try a chocolate one I pinned from martha Stewart….after I get a kitchen torch!:)
Ashlee – The water should go about halfway up the sides of the ramekins. Good luck with your new kitchen torch!
There are two different sizes of propane bottles, a squatty one and a taller thinner bottle about a foot long without the torch assembly. the taller one is easier to handle with smaller hands.
I used a few of the wimpy kichen store torches and did not like them. So, now use a regular hardware store propane torch, flame as small as you want or big enough to solder your water pipes. Have also seen them used by the TV chefs.
I’ve got 8 of these babies in the oven right now! I am beyond excited for my Valentine’s day dessert splurge. So worth it, and the vanilla bean smells amazing. The mixture was a little bubbly at the top, maybe I whisked the egg and sugar too much? I’m sure it won’t be seen once the sugar is melted on top.
Confession: I have never made creme brûlée! Scandal!! I am excited to try making it, but need some ramekins first. I love that you use an Iwatani torch, it is my favorite. I have owned it for almost 3 years, and have used lots of gas canister brands in that time. I go through a canister every few months because I use the torch several times a day (melting cheese on scrambled eggs, browning bacon, charring homemade marshmallows, blackening mushrooms, etc.). I buy my canisters in a 4-pack at our local international market for $6. Look for them near the pots at kitchen utensils and chopsticks and whatnot. I know Amazon sells them too, and have purchased the Gas-one brand 12-pack before, which fits the torch great. When my baby isn’t sleeping on my lap I will go see which brand I have stockpiled.
Anne! I should have known you’d come through with great resources. Glad to know other canisters work with the almighty Iwatani! Thank you!
I love creme brûlée! Your recipes are always foolproof, so I know this will be amazing. Great job on the video tutorial…you are adorable, Mel! The song is my favorite song from the musical Wicked!
If you ever visit William Sonoma be sure and get Vanilla Bean Paste for about 10 bucks. Ida Garten had it on her show and it really is all that she made it out to be! (By the way, I am so glad I found your blog! You are delightful.)
Thank you so much for the recipe I watched your video yesterday on getting the seeds from the vanilla bean and really wanted to learn to make this for Valentine’s Day. Thank you for listening and for teaching me to love and not be afraid of cooking.
Hira, I am sure Mel will address this, but the towel in the glass or metal pan is to prevent the ramekins from moving around and buffer the slight boil of the water as it cooks. Not a stupid question whatsoever !
Omg i cant wait to try this! Maybe i took a stupid pill this morning, but im confused abt placing a towel in the roasting pan? U said to pour the water in but wont the towel soak it up? And when u use a 9 x 13 pan, do u mean a nonstick pan or a glass one? And do u put the towel in there too? SORRY for the dumb towel questions. X_X
Hi Hira – like Denise said, definitely not a dumb question! I can see how it would be confusing. The towel makes it so the ramekins don’t slide and slosh around in the pan and helps them stay in place. The towel will soak up all the water but I wait for the water to cool after the pan is out of the oven and then wring out the towel and wash it. I use a towel no matter what pan I bake the creme brulee in (nonstick, glass, etc.). Good luck!
These look perfect, I can almost hear the top crack. I have an unreasonable fear of making creme brulee. There’s something so disappointing about a mushy-topped creme brulee but when they’re done right they’re amazing.
P.S Pavlovas are super easy to make and great for using up left over egg whites.
Great post! Quick question, do you have any go-to recipes in which you use the leftover egg whites?
Hi Nichole – to be quite honest, usually I save them in a bowl and make my kids scrambled egg whites for breakfast the next morning. There are a lot of cake recipes out there that call for whipping egg whites and folding them into the batter so that is an option to if you wanted to google recipes (and make lots of cakes. 🙂
Nichole–
I like this recipe because I like to make angel food cake. I’m left with a dozen egg yolks that I hate to waste. Creme Brûlée uses eight yolks leaving four for breakfast omelets. Perfect!
Yum! This is my husbands all time favorite dessert. I would love to be able to make it for him. I definitely think you should make a video of torching the creme brûlée. Also, I need more info on vanilla beans/ paste! Where can I get them? Do you prefer the beans over the paste?
Hey Missy (and others) – I just updated the post with info on where I buy my vanilla beans. I’ll work on a torching video tutorial. 🙂 Meanwhile Alton Brown has a great one if you google.
I have been waiting FOREVER for you to do a creme brûlée recipe!!! I love creme brûlée!!! I am so excited to try this one!! Thanks Mel!!
I have always wanted to make creme brulee but have never had a reliable recipe. THANK YOU. Now to work out the fact that I don’t have a torch. . .
Maybe I missed it, but I was wondering what kind of vanilla beans you order. There are quite a few types (Madagascan, Indian, etc.). When I bought some before, they were a more ‘flowery’ tasting than I expected, so I was curious which ones you like! Thanks a bunch.
This sounds wonderful! I will be trying it out this weekend (or sooner). I do not have a kitchen torch but my husband has 2 small torches in his garage that he uses for….. Could this type of propane torch be used as a substitute until I can get a kitchen torch?
Jessica – yes, I think any torch could work, just take care as some of those industrial torches put off quite a bit more heat than the wussy little kitchen torches. 🙂 Proceed with caution!
I am set on trying this ! I have always been afraid of curdling the eggs or under/over cooking the mixture. So, along those lines, does it matter what size egg yolks you use ? I only ever buy extra large eggs and also, I am assuming that you don’t mix the ramekin sizes when baking ? flatter and taller ones? cook at longer/different times? Please let me know asap ! I must try this again. Last time (10 yrs ago) was much too eggy and I had a bit of cottage cheese going on. ugh.and ick.
Denise – good questions. I always use large eggs/egg yolks. And baking for the right amount of time is key – I’ve overcooked many a time and ended up with a curdled mixture. The best test is to gently shake the ramekin (carefully since it is hot). The edges should be set but the middle should be slightly jiggly. When I bake different sizes of ramekins, I put the same size ramekins in a water bath together (so I usually have one 9X13-inch pan with the flatter ramekins and another pan with the taller ones) and I take out the flatter ones earlier since the bake more quickly.
Mel, You mentioned in your post of vanilla bean white chocolate mouse cheesecake to make vanilla sugar with the leftover bean pods and use the vanilla sugar in creme brulee. Do you use that for the top to be carmalized or in the creme? The cake was amazing and I made vanilla sugar just waiting to make creme brulee. THANK YOU!!!
Holli – YES! You are exactly right. I’ll edit the recipe with that little detail. If I happen to have vanilla sugar around, I always use it for the creme brulee (both in the creme brulee “batter” and also in the topping). Takes it to a whole new level!
I love creme brulee! We always eat it warm instead of chilling it.
Just a tip for those who want to make this but don’t have a torch: Place the ramekins back in the roasting pan, surround them with ice cubes and broil until the sugar gets crisp.
Great tip, Lindsey – thanks for sharing! Keep in mind if you want to try broiling the tops that if your broiler is anything like mine with uneven hot spots, it can be really tricky to caramelize the tops evenly. I’ve tried and failed the broiler method many a time. 🙂
I used to not be a huge creme brulee fan, but turned on to it recently. I love its delicate flavor – and then the caramelized top!!! I don’t know what I was thinking all those anti-creme-brulee years!
Best dessert EVER!! I am afraid of real live vanilla beans (I’m such a wuss) but I do keep a gigantic jug of vanilla bean paste on hand at ALL TIMES!! I have vanilla bean paste stocked more often than toilet paper! Priorities!!
Definitely one of my favorite desserts! Lovely recipe!
This is one of my favorite desserts of all time and I almost always order it on the menu when I see it at a restaurant. I don’t own a single ramikin but have always secretly wished I could have a fun little stack of them. I’ve never justified buying them since I did not know how to make creme brûlée. Now I have no excuse! You always give me courage to try out recipes. Maybe I will forgo chocolates, flowers or a dinner out and ask for a torch for Valentine’s day. How romantic, huh? 🙂 Thanks, Mel!
Yum!! Would love to see a torching of the brulee video.
I wish you would stop being so awesome. Creme brûlée is my ALL TIME fave…I had me a chocolate creme brûlée at a restaurant recently…you may want to try your hand at that. I would consider selling one of my lovely children for a heaping ramekin of creme brûlée (ok, not really. But I do love it just a little less than I love them.)
Mel, I don’t think I’ve ever even considered making this ,,, but … Today…. Right now …. I’m thinking I will gird up my loins and do it …. Just as soon as I get my hands on a kitchen torch …. Which I have also never considered owning…. You really have taught me to think outside the box … I’m becoming a ‘rockstar’ …. Not as cool as you … But a ‘rockstar’ nonetheless …. YOU TOTALLY ROCK!!! Happy Monday 🙂