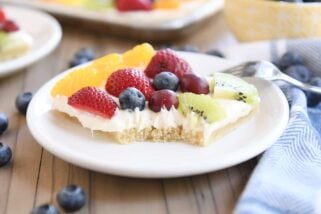
Classic Fresh Fruit Tart
This classic fresh fruit tart is a perfect example of a stunning dessert that takes a bit more effort than cookies, but is worth every step.
Do you ever have times when you want a classic, elegant dessert but don’t really know what to make? You know, a step-up from a traditional brownie or cake? Something more. Something impressive and a teensy weensy bit over-the-top.
This classic fresh fruit tart is a perfect example of a stunning, light dessert that takes a bit more effort than whipping up a batch of cookies, but is worth every step.
Not only is it gorgeous but it is perhaps one of the most delectable desserts I have had in a long time.
The buttery pastry shell is sweeter than a normal pie crust and even though I’m terrible at pie crusts, this didn’t prove to be too challenging (let’s pretend I didn’t have to reroll it twice due to bad pastry making skills!).
The ultimate deliciousness in this tart is the silky, decadent pastry cream that nestles inside the crust. Hidden by all of the juicy, ripe fruit, it makes it’s presence known with each bite.
I knew it was going to be tasty when I couldn’t stop licking the remnants out of the saucepan. Creamy and rich, it is perfectly complimented by the tart sweetness of the fruit.
Although this tart requires 1) a bit more time, 2) possibly a few more pennies to get the best fruit, and 3) a bit more self-control to not curse while rolling out the pastry (oh wait, that’s probably just me), I promise the results pay off big time.
One selling point is that the delicious pastry cream can be made up to two days in advance and the pastry dough for the tart shell can be made in advance, also. It was a breeze to assemble everything right before dinner.
Although this definitely isn’t an everyday treat, it has definitely been added to my repertoire of “impress my guests…or just my kids” type of dessert.
Even my toddling kids, who can be easily impressed when the ketchup makes a curvy design on their hot dog, were oohing and aahing at this spectacular presentation.
One Year Ago: Black and White Cheesecake Squares
Two Years Ago: The Ultimate Beef Stroganoff
Classic Fresh Fruit Tart
Ingredients
Pastry Cream:
- 2 cups whole milk or half-and-half
- ½ cup (106 g) granulated sugar
- Pinch table salt
- 5 large egg yolks, chalazae removed (see note)
- 3 tablespoons cornstarch
- 4 tablespoons (56 g) unsalted cold butter, cut into 4 pieces
- 1 ½ teaspoons vanilla extract
Tart Pastry:
- 1 large egg yolk
- 1 tablespoon heavy cream, with 1-2 tablespoons additional, as needed
- ½ teaspoon vanilla extract
- 1 ¼ cups (178 g) all-purpose flour
- ⅔ cup (76 g) confectioners’ sugar
- ¼ teaspoon salt
- ½ cup (113 g) very cold butter, cut into 1/2-inch cubes
Fruit and Glaze:
- 2 large kiwis, peeled, halved and cut into half-moon slices
- 1 pint raspberries, blemished berries discarded
- ½ pint blueberries, sorted, discarding any stems or blemished berries
- ½ cup apple jelly
Instructions
- For the Pastry Cream: Heat the whole milk or half-and-half, 6 tablespoons sugar, and salt in medium heavy-bottomed saucepan over medium heat until simmering, stirring occasionally to dissolve sugar. Meanwhile, whisk the egg yolks in a medium bowl until they are thoroughly combined. Whisk in the remaining 2 tablespoons sugar and whisk until the sugar has begun to dissolve and the mixture is creamy, about 15 seconds. Whisk in the cornstarch until combined and the mixture is pale yellow and thick, about 30 seconds.
- When the milk mixture reaches a full simmer, gradually whisk the simmering milk into the yolk mixture to temper. Return the mixture to the saucepan, scraping the bowl with a rubber spatula to make sure every bit makes it into the saucepan. Return the mixture to a simmer over medium heat, whisking constantly (this is important, don’t stop stirring!), until 3 or 4 bubbles burst on surface and the mixture is thickened and glossy, about 30 seconds to one minute. Off the heat, whisk in the butter and vanilla. Transfer the mixture to medium bowl, press plastic wrap directly on the surface, and refrigerate until the pastry cream is cold and set, at least 3 hours or up to 48 hours.
- For the Tart Pastry: While the pastry cream is chilling, whisk together the yolk, 1 tablespoon cream, and vanilla in a small bowl; set aside. In another bowl, combine the flour, sugar and salt. Scatter the cold butter pieces over the dry ingredients and cut in the butter using two knives or a pastry blender (this can also be done in a food processor). The mixture should resemble coarse meal when the butter has been cut in completely. Add the egg mixture and using your fingers or a wooden spoon, gently mix the ingredients together until they just come together. If the dough is overly dry, add 1/2 tablespoon cream at a time to moisten the dough. Turn the dough onto a sheet of plastic wrap and press into 6-inch disk. Wrap completely and refrigerate at least 1 hour or up to 48 hours.
- Remove the dough from the refrigerator (if refrigerated longer than 1 hour, let stand at room temperature until it softens a bit). Unwrap the dough and roll it out between lightly floured large sheets of parchment paper or plastic wrap until it is 13-inches in diameter. Transfer the dough to a tart pan by rolling dough loosely around a rolling pin and unrolling over a 9- to 9 1/2-inch tart pan with removable bottom. Working around the edges of the pan, ease the dough into the pan corners by gently lifting the dough with one hand while pressing the dough into the corners with other hand. Press the dough into the fluted sides of pan. (If some edges are too thin, reinforce sides by folding excess dough back on itself.) Run the rolling pin over the top of the tart pan to remove excess dough. Set dough-lined tart pan on a large plate and freeze for 30 minutes (can be sealed in gallon-sized zipper-lock plastic bag and frozen for up to 1 month).
- Meanwhile, adjust an oven rack to middle position and heat the oven to 375 degrees. Set the dough-lined tart pan on a baking sheet. Press a large piece of tin foil inside the frozen shell and over the edges (use two overlapping pieces of foil if needed) and fill with pie weights or dry beans (which is what I use). Bake the shell until it is golden brown, about 30 minutes. Remove it from the oven and carefully remove the foil and weights by gathering the edges of the foil and pulling up and out. Return the crust to the oven and continue to bake until light and golden brown, 3-5 minutes longer. Set the baking sheet with the tart shell on a wire rack to cool to room temperature, about 30 minutes.
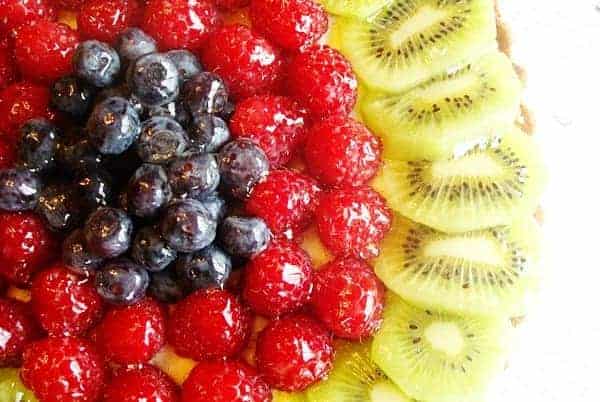
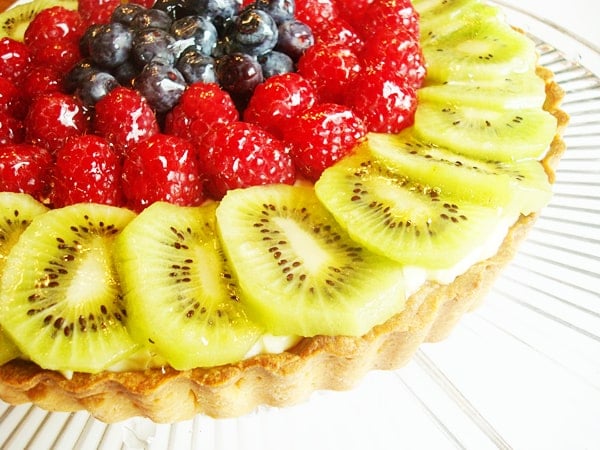
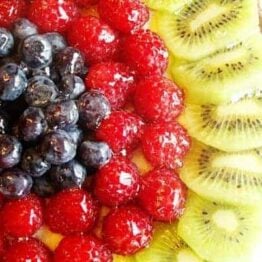
- To Assemble and Glaze the Tart: When the tart shell is completely cool, spread cold pastry cream over the bottom, using an offset spatula or large spoon. At this point, you can press plastic wrap directly on the surface of the pastry cream and refrigerate the filled shell for up to 30 minutes. Arrange the fruit on top of pastry cream. Arrange the kiwis in an overlapping circle on the outside edge of the pastry. Arrange the raspberries in two tight rings just inside of the kiwis, using the taller berries to form the inner ring. Finally, pile the blueberries in the center of the tart.
- Bring the jelly to a boil in a small saucepan over medium-high heat, stirring occasionally to smooth out lumps. When boiling and completely melted, apply the jelly to the tart by dabbing and flicking it onto the fruit with a pastry brush; add 1 teaspoon water and return the jelly to a boil if it becomes too thick to drizzle. (The tart can be refrigerated, uncovered, up to 30 minutes.)
- To serve, remove the outer metal ring of the tart pan, slide a thin metal spatula between bottom of crust and tart pan bottom to release, then slip tart onto cardboard round or serving platter; cut into pieces and serve.
Notes
Recommended Products

Recipe Source: adapted from Cook’s Illustrated Entertaining Spring 2010
I am thinking about making this for an event that I am catering. Do you think that this would work to make it in individual mini tart pans?
Yes, absolutely!
This was absolute heaven and was worth the effort! Rolled out the dough between two floured silicone mats, used a springform pan and for the weights, I used an old pie tin (with the edges bent up so it would fit in the pan) and filled with coins– it made it really easy to lift out and not spill out.
If you ever get the chance, I’d love a knock-off version of Kneaders shortbread & mousse mini fruit tarts 😉
I really want to try my hand at a fruit tart, but I take all desserts I bake/make to work and share. But comments above lead me to believe I can’t make it on a Sunday and take it to work on a Monday. Why?
The crust might get a little soft if made overnight, but I think you probably could still try it,
I think this is the same as the Cooks Illustrated recipe. I made it yesterday and it turned out great. Thanks for sharing the recipe! We served this to a group of 8 and the portions were perfect. Per the one observation, I don’t think I’d make this for a church party as I think it needs to go from kitchen to table pretty quickly. Love your web site. I’ve made many of your recipes and appreciate all your contributions.
Hi, I just wanted you to know I made this tart just a few days ago, using your website for the recipe. I struggled making the crust (my kitchen is tiny, and with the oven at 375 the dough just wouldn’t stay cold enough to work properly), but eventually I broke it into pieces in a well buttered push pan and just pressed the warm dough into the pan. I’ve never made a tart before so the edge is a little higher than needs to be, but the end result was an impressively gorgeous fruit tart (sans glaze) with a rustic look, and I think the pastry cream was my best batch yet. It was the talk of the party, I can tell you – I just wish I could post a picture! Thanks for sharing this wonderful recipe!
I made this for Easter and loved the pastry cream! I used a pat in crust to save some time, and it worked great.
How would I go about adapting this to fit an 11″ pan? I’ve been searching forever to buy a tart pan, and that’s the only size I’ve been able to find.
Audrey – have you looked for tart pans on amazon.com? I bought both my 9-inch and 10-inch tart pans there. If you can’t get one, I would probably 1 1/2 the pastry cream, fruit and pie shell to fit in an 11″ dish.
Okay Mel! Someone ordered a fruit tart and I’ve never made one! I’ll tell you all about it!! I didn’t read through all the directions before I started it, and i wish I would have! Next time I’ll definitely make it in 2 days or more. There is so much waiting and freezer and fridge and cooling time! It was…exhausting. But I was smart and I made two at the same time, one for my fam and one for my client. I’m glad I did, I was able to experiment with the first and the second turned out a lot better. I did make my crust in a spring form pan it turned out perfect! I also cooked the pastry cream a little too long and scrambled the eggs, so I had to put the whole batch through a seeve! Anyway, after all was said and done, it was sooo worth it. Time well spent. It was soooo fantastic in taste! and presentation! The crust was perfect, so yummy and the cream was to die for. Now that I’ve made it once, I know what to expect and I’ll do it in steps next time, spread out into a couple of days.
Thanks for sharing, it was a great recipe!!!
Becky – thanks for your detailed comment! I’m glad this ended up working out ok for you (despite all the time involved!).
Okay, I made this for dinner tonight and it tasted AMAZING. It wasn’t even hard! The crust is absolutely delicious. But my pastry cream, which was in the fridge for at least 6 hours after I made it–and it seemed to be totally set up–turned to mush immediately after I started putting the fruit on it. So we ended up with a very tasty, but sorta sloppy, fruit tart. Any suggestions on what I did wrong? I used whole milk and cooked it until thickened, as per the recipe. Hmmm.
Love your website, by the way!
Roslyn – I’m glad you liked this but am bummed the pastry cream kind of fell apart. I’m not a pastry cream expert, but I’m guessing that even though it cooked until thickened, you might still need to add another minute onto the cooking part.
Absolutely, positively, beautiful!
Do you think a spring form pan would work for this?
Danielle – hmmm, I don’t know about that. I’m not sure how the crust would bake up in it. I’d almost rather go with a pie pan because the shape is similar to a tart pan.
SO PRETTY! what a fantastic dessert!
What a beautiful dessert! I am huge fan of your blog and recipes! I have even given you an award over at my own cooking blog!
http://www.heatherskitchenconcoctions.com
I love the bright colors of this dessert, looks so good! The pastry cream is calling my name right now yum. 🙂
Beautiful dessert; I love fruit desserts like this as it always seems healthier than cake. Of course I eat more of it, so that cancels out the healthy aspect!
Yum–a winner for sure! I really love how pretty it is and that there’s fresh fruit so you don’t have to feel THAT guilty about eating it. 🙂
That looks so beautifully delicious!
gor. geous. i always make a beeline for the fruit tart at potlucks and the like, but rarely are they as classy, elegant, and luscious as the one you’ve prepared here. ’tis a cut above, melanie–bravo!
Your tart looks stunning. I love the look of fruit tarts.
I was just patiently reading and waiting to see if you put a pastry cream under that lovely fruit. I LOVE pastry cream and as far as I’m concerned a fruit tart is nothing without it!
Beautiful recipe, Mel. Perfect for summer!
What a beauitful dessert! My son would love this, he’s my little fruit lover.
Oh, I love fruit tarts so much! It’s sad that I usually only make on on the 4th of July. Well, maybe not so sad because I seriously could eat the whole thing myself!
Mmmm! I have a church banquet coming up, and this may be the *perfect* dessert to bring! 🙂 Thanks, as always, for sharing your awesome recipes & ideas!
I’m getting so excited for the fresh fruit to be in season here… This looks so delicious!!
You’ve got my mouth watering, this looks SOOOOO good!!! I love fruit and I definitely love to impress my guests!! 😛 It is fun getting the ooos and aahhhs!
Wow…this tart looks absolutely gorgeous! Great photo (as always), Mel!
I love fresh fruit tarts, and they are time consuming, so I don’t make them very often. Your recipe uses real pastry cream (the recipe I use cheats and uses a cheesecake like filling)…I bet it is spectacular! I will try your recipe the next time I need a “Wow” dessert! 🙂 Thanks for sharing!