Bittersweet Chocolate Pudding Pie
It is hard to put into words how decadent and delicious this bittersweet chocolate pudding pie is. If you are looking for a wow factor give this pie a try.
It’s hard to adequately give some desserts their just due description. This is one of those desserts.
I don’t know how to put into words how decadent and delicious this pudding pie is. If I tell you it was voted as Best Dessert of the Year would you believe me?
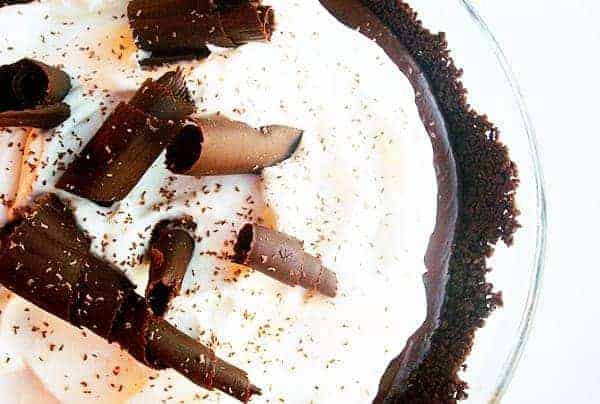
Rich, chocolate crust, topped with more delicious melted chocolate, topped with velvety, decadent pudding, topped with silky, creamy topping, topped with gorgeous, sweet chocolate curls…seriously, what’s not to love?
Let me go through a few notes on this recipe.
Note #1: This is a pretty gourmet dessert, in my opinion. As in, you probably won’t be making this to top off a Tuesday night dinner of Chili Mac, but when you want a stunning dessert with a real wow factor, this will not fail you.
Note #2: The recipe calls for crème fraîche, which is simply a tangy, thinner version of sour cream and is used in a lot of elite French dishes. Worried? Don’t be. While crème fraîche is exorbitantly priced, it is extremely easy to make yourself (see my notes at the bottom of the recipe) and I can guarantee to you that I have never tasted anything as silky and creamy as the crème fraîche when it was whipped with the cream. Seriously. Nothing like it. It takes succulent creaminess to a whole new level and is well worth the extra step to make it yourself.
Note #3: This pie is called a *bittersweet* chocolate pie because it is rich and deeply dark and chocolatey. I read all the reviews on this recipe and made some changes that suited me and my tastes. While I am a huge lover of dark chocolate (as in I know where my stash is hidden so I can save it first in case of a fire), I don’t like it so bitterly dark that it is acrid tasting. I increased the sugar in the pudding part of the pie to compensate for the dark chocolate – and I used chocolate with a 56% cocoa content (just as a reference, most semisweet chocolates are between 52 and 54%, while bittersweet chocolates are upwards of 64%).
Note #4: The crust can be made ahead, as well as the pudding (which can be made two days ahead of time). The entire pie can be assembled and refrigerated 6-8 hours before serving. So what I’m saying is that even though it may look intimidating with a lot of steps…they can transform into baby steps that can be done over the course of a few days.
Note #5: I’m done. Just trust me that this definitely lived up to the hype and quite possibly may be my favorite dessert of all time. (The other dessert giving this fabulous pie a run for it’s money will be posted next week – sorry in advance for all the calories flying about. Every single one of them is worth it, my thighs can assure you of that.)
One Year Ago: Classic Baked Ziti
Bittersweet Chocolate Pudding Pie
Ingredients
Crust:
- 1 ½ cups chocolate wafer cookie crumbs, (I used about 3/4 of a 9-ounce box of chocolate Teddy Grahams)
- 2 tablespoons sugar
- 5 tablespoons (71 g) butter, melted
- 2 ounces (57 g) bittersweet or semisweet chocolate, finely chopped
Filling:
- ⅔ cup (141 g) sugar
- ⅓ cup (28 g) unsweetened cocoa powder
- 2 tablespoons cornstarch
- ⅛ teaspoon salt
- 1 ¾ cups whole milk, divided
- ¼ cup heavy whipping cream
- 4 ounces (113 g) bittersweet or semisweet chocolate, finely chopped
- 1 teaspoon vanilla extract
Topping:
- ¾ cup chilled crème fraîche (see note)
- ¾ cup chilled heavy whipping cream
- ½ cup (57 g) powdered sugar
- 1 teaspoon vanilla extract
Instructions
Crust: (can be made one day ahead of time, lightly covered with plastic wrap and refrigerated)
- Position rack in center of oven; preheat to 350°F. In a food processor (or by hand in a ziploc bag with a rolling pin), blend cookie crumbs and sugar. If using a food processor, add melted butter (if using a bag, pour the crumbs into a bowl and mix in the butter); process until crumbs are evenly moistened.
- Press crumb mixture onto bottom and up sides (not rim) of 9-inch glass pie dish. Bake until crust begins to set and no longer looks moist, pressing gently with back of fork if crust puffs, about 10 minutes.
- Remove crust from oven, then sprinkle chopped chocolate over bottom of crust. Let stand until chocolate softens, 1 to 2 minutes. Using offset spatula or small rubber spatula, spread chocolate over bottom and up sides of crust to cover. Chill crust until chocolate sets, about 30 minutes.
Filling: (can be made 2 days ahead of time – keep covered in the refrigerator until ready to use)
- Whisk sugar, cocoa, cornstarch, and salt to blend in heavy medium saucepan. Gradually add 1/3 cup milk, whisking until smooth paste forms. Whisk in remaining milk, then 1/4 cup cream.
- Using flat-bottom wooden spoon or heatproof spatula, stir mixture constantly over medium heat, scraping bottom and sides of pan until pudding thickens and begins to bubble at edges, about 5 minutes.
- Add chocolate; stir until mixture is smooth. Remove from heat; stir in vanilla. Pour hot pudding into crust and spread evenly.
- Cool 1 hour at room temperature. Cover with a cake dome or other covering that doesn’t lay directly on the pudding; chill overnight.
Topping: (Assembled pie can be made 6-8 hours ahead of time – cover with a cake dome or tall pot and refrigerate)
- Using electric mixer, beat crème fraîche (see note), whipping cream, sugar, and vanilla in medium bowl just until stiff peaks form and mixture is thick enough to spread (do not overbeat or mixture may curdle).
- Spread topping decoratively over top of pie, swirling to create peaks, if desired. Sprinkle chocolate shavings decoratively on the top of the pie, if desired. Cut pie into wedges and serve.
Notes
Recommended Products
Recipe Source: adapted from epicurious.com



Thank you Mel for sharing all of your brilliance in the art of making such yummy treats! We as a family thank you! 🙂 I had one question concerning your creme fraiche, how long after making your own creme fraiche (how long should it sit out) before using it to make the pie? I know that you mentioned that after 24 hours it can be refrigerated, but I’m wondering if I should wait 24 hours to also use it to make this delectable pie? Thank you again…truly! 🙂
Yes, it’s best if it’s left out 24 hours to fully culture. 🙂
Hi Melanie! Looking forward to making this pie and your coconut cream for Christmas. Wondering if you have ever tried this one with a traditional pie crust and/or if you would recommend it? Happy Holidays!
Hi Holly – I haven’t but I think it would work great!
I had a feeling you were going to say that. Man! Now I have to come up with an excuse to make this! My kids are already excited about the cheesecake pie…thanks again!
I am torn. Putting my Thanksgiving menu together and want a chocolate pie of some sort. I can’t decide between this one and your chocolate mousse cheesecake pie. I’m sure they are both delicious but Thanksgiving this year is just my family of 7 so I’m trying not to over do it 🙂 Which would you recommend…if I had to twist your arm? Is there one your kids like more since my kiddos make up most of my guest list? Thanks as always!!
Hi Katie! I love the bittersweet chocolate pie so, so much but my kids would far prefer the chocolate mousse cheesecake pie (the bittersweet pie is very rich and decadent and a little much for their young palates) so if you are feeding your family, I’d say the cheesecake pie is a safer bet (although you have to promise to make that bittersweet pie sometime because it’s divine).
I made this for Thanksgiving. I followed the recipe exactly, except I used semisweet chocolate for the pudding. My guests and I still thought it wasn’t sweet enough! I’d make it again but increase the sugar or use milk chocolate. Also I made the homemade creme fraishe and I wasn’t blown away. I think next time I would just do normal whipped cream and save the time!
Ok I am new to your blog… so far I have made your Sugar Cookies (which are now my FAVORITE!!) and I have also made this pie for tonight… which I’m sure it is going to be wonderful as well:) So, I just have to know, what is the dessert that is giving this one a run for its money, because I’m going to have to try it next! (You refer to it in this post, saying you were going to post it next week, but I know you posted this a couple of years ago)
Hi Jamy – the only thing I can think about the crust is that perhaps it overbaked a bit? I’m not sure! But I’m glad you loved the end result of the pie. Thanks!
So I made this for Thanksgiving and I about died! It was sooooo fantastically wonderful! My only issue is that my crust wasn’t very crusty! It was super crumbly. Any idea what I did wrong? Still delicious though! Cannot WAIT to try your robert redford dessert!
I think I have a love-hate relationship with this site. In that I love your food too much so I hate that I’ll never lose the baby weight! I saw this recipe right after my husband’s birthday, and had to wait for Thanksgiving to have a good enough reason to want to cook. It was so worth it though!!!
Ashlee – I guess I should say sorry, but really, I’m glad that the pie worked out for you! If it makes you feel better, I still haven’t lost my baby weight and my “baby” is almost two. Big sigh.
So…..you live in Wisc. and you weigh 800 pounds; is that what you are telling us??? I know I would be if I could bake like you! I’m going to have to make this for my 60th birthday next week! And then hide it…..right?
Just made this for Father’s Day and my husband couldn’t have been any more impressed. His response was literally “this is the best pie I’ve ever had….in my whole life!” Really it was. It was SO CREAMY AND SMOOTH and rich and delicious, almost cheesecake like. I did have some trouble trying to spread the melted chocolate on my crust, it just kept crumbling and rolling into cookie crumb balls, but after a few choice words and smooshing it back into place it turned out ok. And with the pudding on top you couldn’t even notice the mess I made. The end result was still just perfection. Even after three days in the fridge the creme fraiche topping looked just as good as day one. That whipped topping could be dessert by itself you know. I don’t normally write such novel-length reviews, but for the chocolate obsessed this dessert has quickly become a favorite. Thanks again!
Darcy – loved the “novel-length” review, thanks for taking the time to type in your thoughts. I’m so, so happy this was such a success (despite the chocolate on the crust, perhaps) and am glad someone else loved it just as much, if not more, than I did! Thanks for letting me know.
I made this to celebrate my husband’s last final of graduate school. It was definitely worthy of the occasion. I never thought to spread melted chocolate over a crust to create that extra layer of hardened chocolate. Brilliant! I might have to try that with cheesecakes someday too.
Lucy – I agree, the melted chocolate adds a fantastic dimension to this. Doing that with cheesecake is a great idea…I might have to try it, too!
I made this for the family, and it was great! I made my own Creme Fraiche using homemade buttermilk and it worked just fine. It really adds something special to it for sure! As always–it’s a winner!
Reyna – thanks for the review! I’m so excited you made your own creme fraiche and that you agree – it just is special and delicious. So glad you liked this!
I found your website today as I was looking for SOMETHING to use with leftover BBQ chicken I had in the fridge and found your BBQ Chicken pasta, which my husband loved by the way. I’ll be visiting again and will be trying this delish-looking pudding pie next time I’m craving some decadent dark chocolate desert!
Welcome, Priscilla! I’m glad the BBQ Chicken Pasta was a hit with your husband. I hope you have good luck with any other recipes you try!
Serious chocolate overload, just the way I like it!
Thanks for the tip on the creme fraiche! My standard operating procedure is to sub sour cream, but I don’t think that would work when you actually have to whip it. I’ll have to keep this in mind!
So we made it it yesterday/today and it was really good. Thanks!
Thanks, Candace – I’m glad you liked it!
Do you know what makes your blog awesome? The pictures. I’m a picky food-picture person and every one of yours makes me want to take a bite straight from my monitor.
You are so nice, Michelle – thank you!
This looks very fun to try. Quick question though, in your directions on how to make creme fraiche, you say to use buttermilk. Can you use homemade buttermilk (regular milk with vinegar or lemon juice added to sour it)? Thanks for your expertise!
Emily – everywhere I looked online to make your own creme fraiche stated specifically to use store bought buttermilk. That doesn’t mean you couldn’t try the homemade soured version but I never saw it tested that way.
That is so beautiful, Melanie! Looks yummy!
What a heavenly sounding pie! Sinfully delicious and totally irresistible! This would not last long in my house.
You are a wicked woman to post this purely decadent chocolate pie….but I have been looking for the perfect chocolate pudding pie forever and now you have answered my prayers. I think I should be blessing you. Bookmarked, printed, and added to my stash of most sacred recipes.
lol, i love what you said about keeping your dark chocolate in the freezer, you crack me up. i.want.this.pie!
I would blame you for posting such tempting and very UN-health conscious recipes, but I just made mint brownies last night, apple crisp pie last week and your carrot cake the week before and had a very hard time not eating all of them by myself. So I’ll blame the fact that I am pregnant… This pie will probably find it’s way into my stomach next week. 🙂
Beth – definitely blame the pregnancy. It’s the only time where that justification works and I used it all the time (four times over!). No wonder I gained so much during my pregnancies!
What a stunning pie! I chuckled inside when I read “you probably won’t be making this to top off a Tuesday night dinner of Chili Mac.” Hah!
Where do you find the 56% cocoa chocolate? Also, there was no link to PW choclate shaving instructions. You are amazing!!!!
Barbie – I have found the 56% chocolate bar at Trader Joe’s (their dark chocolate baking bar). And thanks for pointing out the missing link – it’s fixed!
and i’m sold. elegant, rich, and delicious–those are my criteria for splurge-worthy desserts. 🙂
OMG. That looks DIVINE!!! All that dark chocolate..I much prefer that kind too. And I love that you made a chocolate wafer crust! Double the chocolate! Usually chocolate pies have a regular crust. Going to have to make this for my next dinner party! I have chocoholic friends!
Wicked. Right before swimsuit season too. I actually started salivating reading this recipe. Thanks for breaking the recipe down, it seems more manageable that way, but when I can’t fit into skinny jeans I will be holding you personaly responsible 😉
We take turns picking something to make for Sweet Treat Sunday and this week is my son’s turn. This morning he decided he wanted to make…chocolate pie! Yay for a good reason to make this one!
Oh geez, I don’t dare make this one! It’s the kind of pie I could make and then hide somewhere and eat the whole thing myself!
WOW…this looks incredible, Mel! My thighs are still trying to recover from your carrot cake with whipped cream frosting! That frosting is the best cream cheese frosting I have ever had! 🙂