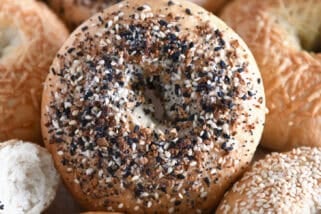
Fantastic (and Easy!) Homemade Bagels
Looking for the perfect from-scratch homemade bagel recipe? Here it is! Chewy and delicious, they’ll wow all of the bagel lovers everywhere.
For years now, I have experimented with making my own bagels, mostly because I cannot stand the bagels that come prepackaged in the bread aisle (are those things really bagels?) and I constantly crave the chewy, dense bagels I’ve had a time or two in larger cities (New York and Chicago) that are absolutely phenomenal.
A few years ago, I found a bagel recipe from Emeril that I have used and loved (and converted my sister-in-law, Erin, too) but I am here to say that it pales in comparison to these bagels I made yesterday.
This new and improved recipe comes from King Arthur Flour and there are step-by-step instructions on their blog that make it even easier. A couple of things are different from my old, much-loved recipe.
First, a starter is made the night before which I think greatly enhances the flavor, and bread flour is used instead of all-purpose flour. The result is an extremely chewy, delicious bagel that I could eat at least ten of.
Oh wait…I did.
I don’t think I will ever be able to make anything that quite compares to the bagels I have had in New York, but these are definitely worthy of home-baking and have convinced me yet again to make my own instead of shopping the bread aisle for bagels.
I’m on my way to eat another one right now! (And I can’t wait to try making them topped with Asiago cheese…oh my!)
FAQs for Homemade Bagels
The overnight rest helps to add flavor to the dough. If you are in a pinch, you could skip it but I’d definitely recommend it for best results.
I usually slice the cooled bagels and freeze them. Then I just pull them out as I want them and toast them up or microwave them for a minute or two to freshen them up.
I’d add in extra ingredients with the last of the flour so that it all gets incorporated and kneaded together. If you are adding an ingredient like chocolate chips that may melt because of the warm dough, fold/knead them in at the very last.
Fantastic (and Easy!) Homemade Bagels
Ingredients
Starter:
- ½ cup (71 g) unbleached bread flour
- ¼ cup cool water
- Pinch of instant yeast, I used active-dry yeast and it worked great
Dough:
- 4 cups (568 g) unbleached bread flour
- 1 ¼ cups cool water
- 1 ¾ teaspoons salt
- 1 ½ teaspoons instant yeast, again, I used active-dry yeast and it worked great
Water Bath:
- Water to fill a 10"-diameter pan about 1" deep
- 1 tablespoon non-diastatic malt powder or brown sugar, I used brown sugar
Instructions
- Combine the starter ingredients in a medium-sized bowl, cover, and let rest at room temperature overnight.
- Next day, combine the puffy starter with all of the dough ingredients and knead—by hand, electric mixer, or bread machine—to form a stiff but not dry dough. Since we’re using a high-protein bread flour here, you might notice it takes a bit more effort and time to develop the gluten. Place the dough in a lightly greased bowl or large (at least 8-cup) measuring cup, cover, and set it aside to rise for 1 hour. Gently deflate the dough, and let it rise for another 30 minutes.
- Transfer the dough to a work surface, and divide it into 12 pieces. (I divided the dough into 10 pieces since I like my bagels a tad big larger.) Roll each piece into a smooth, round ball. Cover the balls with plastic wrap, and let them rest for 30 minutes. They’ll puff up very slightly.
- While the dough is resting, prepare the water bath by heating the water and malt (or sugar) to a very gentle boil in a wide-diameter (about 10″) pan. A 10″ electric frying pan works well here. Preheat your oven to 425°F.
- Use your index finger to poke a hole through the center of each ball, then twirl the dough on your finger to stretch the hole till it’s about 2 inches in diameter (the entire bagel will be about 3 ½” across). (Again, mine were a bit larger than this.) Place each bagel on a lightly greased or parchment-lined baking sheet, and repeat with the remaining pieces of dough.
- Transfer the bagels, four at a time if possible, to the simmering water. Increase the heat under the pan to bring the water back up to a gently simmering boil, if necessary. Cook the bagels for 2 minutes, flip them over, and cook 1 minute more. Using a skimmer or strainer, or the end of a wooden spoon, remove the bagels from the water and place them back on the baking sheet. Repeat with the remaining bagels.
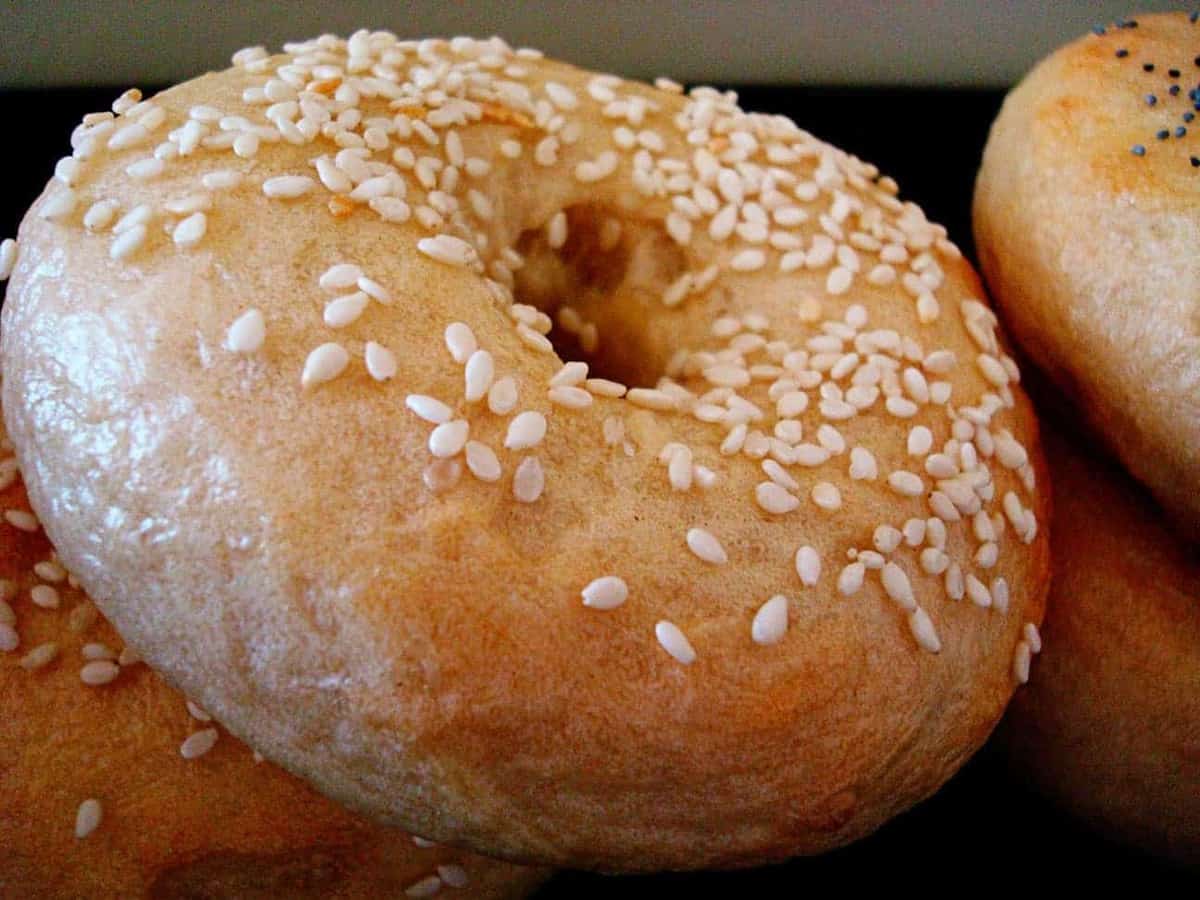
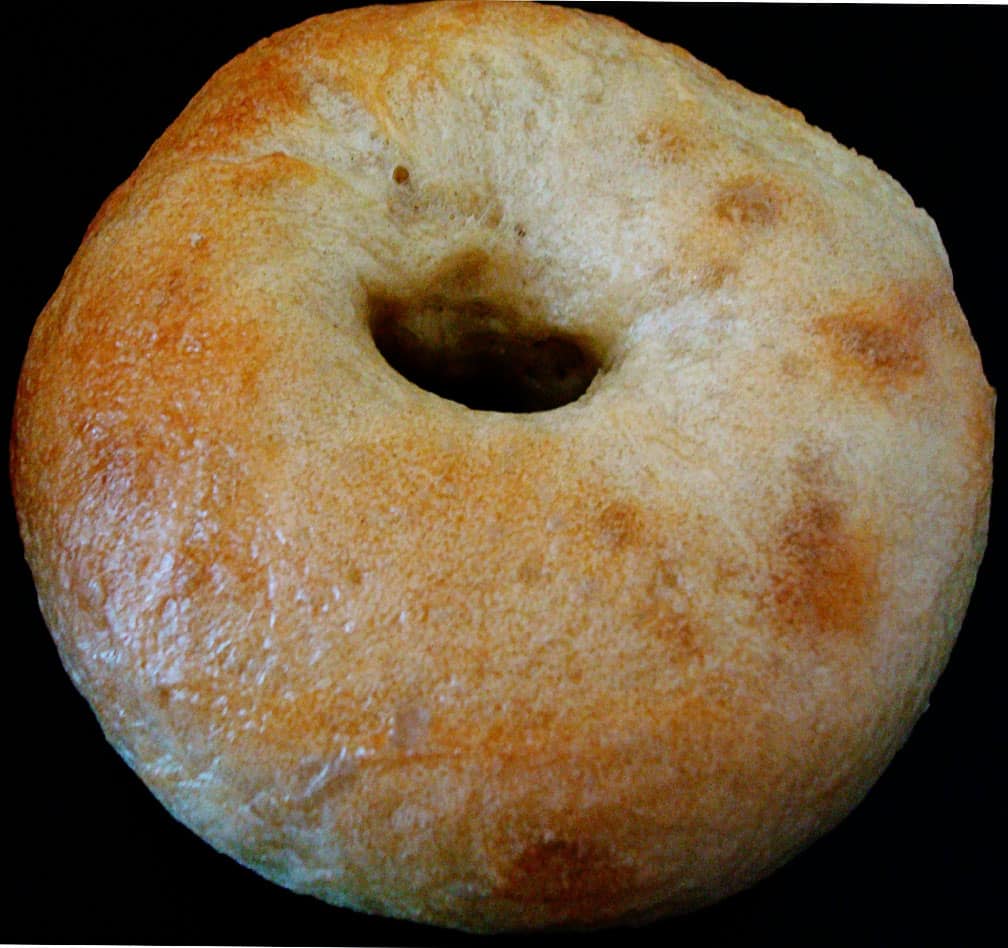
- Bake the bagels for about 25 minutes, or until they’re as deep brown as you like. To top with seeds, remove them from the oven after about 15 minutes, spray with water, and sprinkle with seeds. Return to the oven to finish baking. Remove the bagels from the oven, and cool completely on a rack.
Notes
Recommended Products


Recipe Source: from King Arthur Flour
Hi Mel,
Just made your Bagels. They are delicious. We topped them with sesame and poppy seeds. However, I did find the top and bottom crust to be too chewy. What can I do to make them less chewy? I went the full 10 minutes in my stand mixer. The dough was not tacky. Perhaps I overkneaded the dough and should have checked it at 7 or 8 minutes.
Doug
Hi Doug, try boiling them for slightly less time and/or lowering the baking temperature by 25 degrees.
Loved them!! We made smaller ones, 18 out of the batch, and baked them for 20 minutes. They are delicious, and it was a great activity with my 15-year-old daughter!! ❤️
Thanks for this recipe! May I ask how you figured you cups to grams conversion. I looked at different tables and some say 1 cup bread flour is 127 grams, another 125 grams, another 130.12 grams, but your conversion is at 142 grams. Just want to use the measurements. Thanks
Hi Kara, I use 142 grams of flour per cup for all-purpose flour and bread flour. That’s how I test all my recipes. Other sources may use different amounts based on how they test their recipes…I recommend using the weight given in a specific recipe since it’s likely been tested with the amount given.
Made these today and they were awesome! I don’t think we can go back to store bought bagels now! So good!!
Making these for the first time tonight, but I’m afraid I did the starter wrong. I weighed the flour and measured the water (I thought)… but the starter doesn’t look at all like I expected. It’s more like sticky bread dough than a sourdough starter. Am I doing it right?? Hope so!!!
It should be fine!
We’ve lived in Sicily Italy for 5yrs thus far, and bagels are nonexistent! When we went into lockdown 2020 I started teaching myself how to make different breads including sourdough. I’d tried different bagel recipes, but found them not great. I saw some of your other recipes, and when I found your bagel recipe I went for it. I’ve made these 3 times and have shared with my east coast friends that also live here and their minds were blown! The only thing I do different is 1 teaspoon baking soda and 2 tablespoons of molasses for the bath. Grazie Mille for the recipe!
Hi Mel,
I saw the recipe when Jennifer Garner did it on her Pretend Cooking Show and I did it. They turned out great. Two questions please (1) my friends asked me for whole wheat bagels, what’s your recommendation to adjust the recipe; and (2) I used a 425F oven, still the outside wasn’t crispy. Any idea why? Thank you for a great recipe!
Hi Randa, for whole wheat bagels, I’d suggest using 50% whole wheat flour and 50% all-purpose flour and then after that batch see how the texture and result are and increase the whole wheat flour from there. The most I’d suggest in this recipe is 75% whole wheat flour and 25% all-purpose flour. What was the texture of the outside of the bagel? What about color? Were they golden brown?
Hi Mel,
I saw the recipe when Jennifer Garner did it on her Pretend Cooking Show and I did it. They turned out great. Two questions please (1) my friends asked me for whole wheat bagels, what’s your recommendation to adjust the recipe; and (2) I used a 425F oven, still the outside wasn’t crispy. Any idea why? Thank you
Just made these for the first time and can’t stop eating them! My husband, who is not a fan of bagels because they are too tough LOVES these! We love all your recipes, thanks for this one!
Good morning, I’m anxious to try this recipe. I have active sourdough starter and wondered how to adapt this to that. Thanks so much for your help and grateful to have found your website!! Ann
Hi Ann, usually for every cup of sourdough starter I add to “regular” bread recipes, I decrease the flour and water in the original recipe by 1/2 cup each.
Mel, you are my favorite source for recipes. I love your website. I hadn’t seen the recipe for the bagels until I saw Jennifer Garner making your bagels on her Facebook page! So cool!! Can’t wait to try this recipe. It looks delicious!
Hi – made these a few weeks ago and they came out awesome. Tips for turning these into cinnamon raisin or blueberry bagels? With the kids home so much, we fly through bagels thank you!
Hi Julie – you can add any add-in ingredients in during the kneading process right at the end. Should work great!
These were delicious! Have you ever made them ahead and let them rise overnight in the fridge? Thanks!
I haven’t, but I think that should work!
This was great! I cooked it for 25 minutes at 425 and my bagels were CRISP lol. Next time I have to check at 15-20 minutes. Taste was good though. I want to add flavor into the dough itself… any suggestions?
What kind of flavor do you want to add?
Help — I know warm water added to yeast should be between 120-130. However, what temperature should the “cool water” be. Thank you so much!!!
I don’t know the exact temperature – just cool to the touch. Not cold, just cool room temperature.
I made these today and they turned out wonderfully! I added some light spelt flour into the mix in an attempt to be healthy. I kept them plain today, but next time I will definitely add some flavours and toppings! Thank you!
LOVE IT! Making bagels can seem terrifying but this recipe was easy to follow and turned out great! Thanks Mel!
My 12 year old made these by himself from start to finish. They turned out pretty tastey. If he can do it, just about anyone can. I’d like to help him next time with the kneading and forming the bagels. Great recipe, like usual.
Hi! I’m a bit lost, could you help me know which are the starter ingredients, please !!!!
It looks like this recipe got messed up a bit, let me track down the right one and update the post!
I fixed the recipe, should be more clear now!
Have you ever tried using whole wheat flour? I have flour that I grind myself that I wanted to try. It is white whole wheat so it is a bit lighter than the red wheat.
Thanks!
Yes, I have used white whole wheat flour. The bagels are more dense but still pretty tasty. I like to add a little vital wheat gluten if I’m using 100% whole wheat flour. My favorite blend is 50% white flour, 50% whole wheat.
Hi Mel!
I tried making these this weekend and they turned out better than I thought they would! I am a BIG fan of your website and use it ALL the time! Just a couple of questions for you that maybe you could help me out with…
First of all, I followed the recipe using my kitchen scale, but the dough was still too sticky – so I just added more flour – I am not sure why mine was still sticky when I used my kitchen scale to measure the flour. I am thinking maybe it was because of the active yeast – I put it in water and let it sit for ten minutes, but then also added the amount of water called for in the recipe…could that be why?
Also – after my bagels were completely finshed they looked a bit “wrinkly” on the outside – not as smooth as yours in the pictures. Any idea why?
Thanks – and keep the recipes coming! My husband and 2 year old love everything I make from your site!!!!
Hi Christine – glad you liked the bagels! I think you are right on with the flour issue if you used active dry yeast – even that small amount of water will require more flour in the recipe so as long as you keep an eye on that, it should be a problem to use active dry yeast. I’ve noticed that some batches of my bagels turn out a bit wrinkly, too, and I think it’s either boiling too long in the water or letting them puff too much before baking (then they kind of deflate a bit and get wrinkly). Does that help?
Breanne – the overnight rest helps to add flavor to the dough. If you are in a pinch, you could skip it but I’d definitely recommend it for best results.
I have been searching for a worthy recipe for bagels for quite sometime! I actually started with a bread machine and perfected them, tastefully. Then the machine died. On machine number three and could never get bagels to work out well. I have tried hands on before several times without consistent results. Thiis looks like a winner. However I really am trying to make them now, lol. Must I wait for overnight ferment or can I rest the yest a bit and then get to busness?
FINALLY giving these a try, can’t wait! Thanks for all your wonderful recipes 🙂
Brittany – hmmm, if they were overly crunchy then yes, you might want to consider baking them a few minutes less.
Hi ! I tried these today and i wanted to say that they taste good but they were really really hard to chew and way to crunchy on the out sides ?? I am assuming that maybe i cooked them to long ? What do you think
Just made these bagels today – so yummy!!
Quick question: How do you store your bagels? And if you were going to make cinnamon raisin or another combination – at what point would you add the extra ingredients?
Thank you so much for sharing your tried and true recipes! Love ’em!
Jessica – I usually slice the cooled bagels and freeze them. Then I just pull them out as I want them and toast them up or microwave them for a minute or two to freshen them up. I’d add in extra ingredients with the last of the flour so that it all gets incorporated and kneaded together. If you are adding an ingredient like chocolate chips that may melt because of the warm dough, fold/knead them in at the very last.
Made these today and they are so good. I did a few things I would change next time. First of all, I would make 10 larger ones instead of 12, as suggested. Secondly, after I put the toppings on I cooked them for 10 more minutes. They smelled like they were burning, but I just figured it was the toppings that had fallen on the tray. Well, some of the bottoms did get quite dark, so next time I would watch them closely towards the end. The last thing is I made an everything bagel mix and added too much salt. Next time I would do little or no salt in my everything bagel topping. These were excellent and I can’t wait for my husband to try them. They did take a bit of time, but were pretty easy. I just tire easily since I’m 31 weeks pregnant!
Stacy – Thanks for your tips and review on this recipe. I’m thrilled you liked them and way to go on being so ambitious in the kitchen this far in your pregnancy!
I made these last weekend and they turned out really well. (My husband thinks he’s getting bagels every weekend for all eternity. We’ll see…) I’ve been trying to learn how to make yeast breads lately (using your tutorials mainly) with mixed success. I finally bought a kitchen scale, and this dough came together perfectly. Usually it’s a little too sticky and I have to add more flour, but with weighing the flour, it was perfect! Thanks for the final nudge toward buying a kitchen scale. It was definitely worth it.
Debbie – I’m so glad that weighing the ingredients seemed to help! I’m happy that the bagels were such a success…now get to working…eternity is a long time!
How long should I knead it if I use my stand mixer?
Debbie – if using a stand mixer, knead the dough for at least 5-6 minutes.
Colleen P – okay, I have NEVER heard of a bialy but it looks like I’ll have to learn more about it and try it!
Oh my goodness those sound divine! I’m with you on the packaged bagels-those are bread flavored cake, those are NOT bagels!
I like using a starter for many of my heartier breads, they need the extra boost of flavor that an overnight ferment produces.
If you like bagels, you should give bialy a try-it’s a cross between a bagel and a ciabatta!
They look just like what you find at the grocery store, but I bet they taste a million times better! I better try these, I love bagels, but I’m not a fan of bagels you buy at the store…
Good advice about weighing the flour! These bagels look really good! I am a bagel girl! I just love them and will ahve to try this recipe ou! Thanks!
thanks for sharing this recipe..now i can make my own bagels !!
i believe you have bagel-making down pat, because those look as perfect as anything i’ve ever seen in any cafe. i should probably invest in a kitchen scale…
I’ve been wanting to try making bagels again for quite a while – I’ll definitely have to try this recipe – they look so perfect!
Thank you. I will give it a try!
Melanie- I am going to be brave and try your yummy bagels! You have inspired me to stretch my cooking skills and my family loves you for it! Judy (I will let you know how they come out!)
Linda – to be honest, I’ve never eaten at Panera, but when I googled your question I found a couple places where they recommended to cut the asiago cheese into chunks and knead it into the dough during the kneading process and then use the remaining cheese for the top. Let me know if you try it!
Mel, these are beautiful! Seriously, they look so good and perfect. Way. to. go.
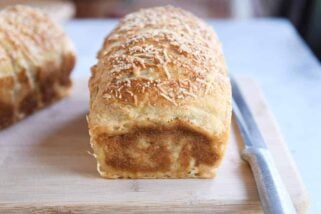
Hi, Do you have any idea how to make asiago cheese bagels like those Panera Bread makes? They are the BEST! The cheese is added to the dough before baking. Thanks, Linda
I’m looking forward to trying these! I’m considering using my sourdough starter in place of your starter and see how it goes! May just take a longer proof!
WHAT?!! I can’t believe that you found a better recipe than the one I’ve been using for years that you introduced me to! That recipe is oh-so-good, I just don’t think I can believe you found a better one until I give this recipe a try. 🙂 I’m going to make these right away!
Jenn – so glad you liked this recipe. I love homemade bagels and your comment has reminded me I want to make them soon!
Oh dear… I just made these tonight with asiago cheese on top. Unbelievable. My husband also made a batch and put “everything” in them. Absolutely delectable! I have to be honest – I’ve gained a few pounds since I’ve found your blog, but you just have such perfect recipes!!!Thanks for the bagels, Britta
Nice looking bagels!
Britta – first of all, I am very, very impressed that your husband made a batch of bagels. I think I’d faint if I saw my husband whipping them up! Secondly, asiago bagels are my absolute favorite and I’m so glad you liked these. Finally, it makes me feel better I’m not the only one putting on pounds (although I doubt it is true for you!) – thanks for your comment, you are always so kind!
Made these a few days ago and they were awesome but the exterior was a little too tough (we usually get Thomas brand store bagels). Did some googling and tried again today but reduced tyre boiling time dramatically. My and I were pretty thrilled with the end result but my mom (who is lacking a lot of teeth) still struggled.
Any recommendations for making them more like the store ones? Much as we like these I figure I could make more that she could enjoy as well.
I think if you want them super soft like the store ones, you might try not boiling them at all?
Thomas’s bagels are not bagels. They’re just bread shaped into a round. If that’s what you like, you’re better off just continuing to buy them instead of trying a recipe for actual bagels.
Made these today with the kids. They are <>really<> good! And much easier than I thought making bagels would be. I did a few with asiago (my favorite with veggie cream cheese), sesame seeds, and poppy seeds. The kids enjoyed them too! Will definitely make these again.
I’m so impressed! I’ve been wanting to do them myself too for a long time.