Homemade Bagels {New and Improved}
Make perfect homemade bagels at home with this easy step-by-step recipe. The bagels are easily customizable with your favorite toppings!
I originally published this recipe in 2011 and have since added new photos and additional recipes notes, as well as a few recipe enhancements, to make this recipe better than ever!

One reader, Nancy, commented: Thanks so much for this absolutely delicious recipe! Followed your recipe exactly, (used sesame seeds as the topping), and they are every bit as good as any bagel shop we’ve ever been to, and oh-so-much better than any grocery store brand. ⭐️⭐️⭐️⭐️⭐️
Why You’ll Love This Bagel Recipe
- The bagels are straightforward and easy to make at home – the recipe doesn’t require any overnight starters or lengthy instructions.
- The bagels are incredibly delicious with a perfect fluffy-chewy texture.
- It is very easy to customize the bagel toppings to your tastes.
- The baked bagels freeze extremely well, so you can make large batches and freeze for later breakfasts, snacks, or bagel cravings.
- This is the perfect recipe for beginner bread makers. SO MANY people have commented that they struggle making yeast doughs or they are brand new to breads or they are scared to make homemade bagels…but they tried this recipe and the bagels turned out amazing!

How to Shape Homemade Bagels
- Turn the dough out onto a lightly greased work surface and divide the dough into eight equal pieces, about 115 g/4 ounces each.
- Roll each piece of dough into a smooth, taut ball. Let the balls of dough rest for 30 minutes. This helps relax the gluten so that when they are shaped, the dough holds its shape without stubbornly springing back.
- Use your thumb to poke a hole through the very center of each ball then use both thumbs together to twirl and stretch the dough until the hole is 1 to 2 inches in diameter (the bagel will be around 4 inches across).
The most important thing you can remember when shaping homemade bagels is to let go of perfection! Not all of them will look the same, and some of them may have thin/thick spots. It’s ok! It gives the bagels personality…and they all taste delicious regardless of how they look.


Why are Bagels Boiled Before Baking?
There are several reasons why bagels need the necessary boiling step.
- Boiling the bagels helps develop the signature chewy texture. The steaming hot water cooks the very outside layer of the bagel allowing it to rise in the oven but not as much as it would without the water bath. This is what helps create the classic dense, chewy texture.
- The sweetener in the water (either sugar or honey) also helps the bagels develop a beautifully golden crust while baking.
Bagels that aren’t boiled prior to baking end up just simply posing as a quirky dinner roll with a hole in the center instead of the gloriously chewy, delicious bagel they were meant to be.


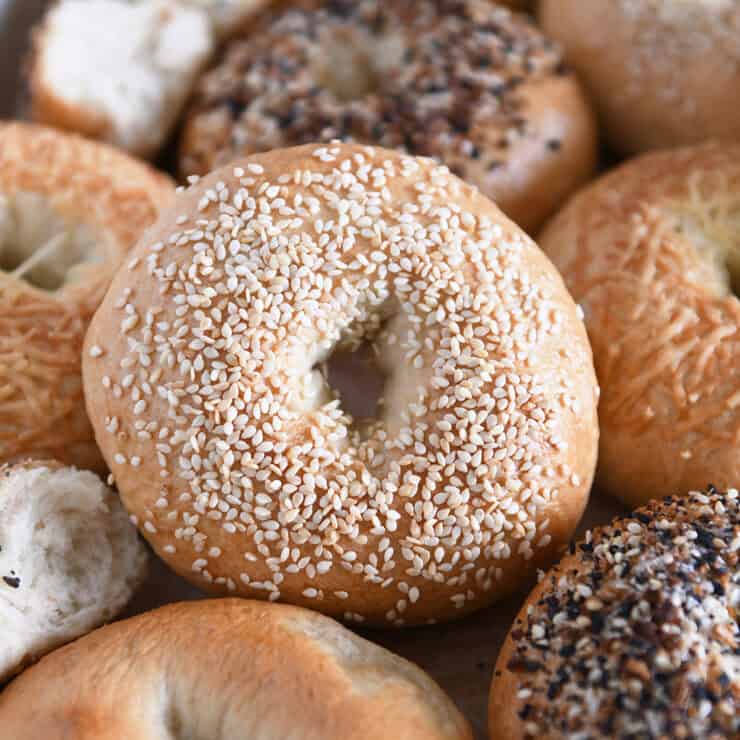
Best Bagel Toppings
To get bagel toppings to stick, brush the tops and the sides of each bagel with a simple egg wash (1 egg white + 1 tablespoon water). For maximum coverage, place the toppings in a shallow bowl and dip the bagels, turning to coat the top and sides. Or simply sprinkle them on top.
Our favorite bagel toppings are:
- Sesame seeds
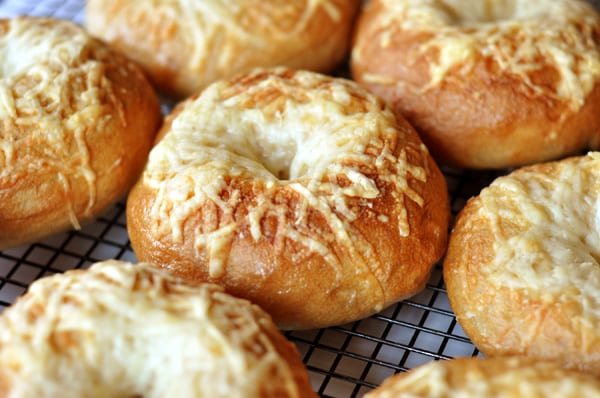
- Finely grated Asiago or Parmesan cheese
- Sesame seeds
- Coarse salt
- Cinnamon and sugar
Of course, you can also leave the bagels plain. If doing so, the egg wash is optional (but adding it will further help the golden brown crust to develop).


A Few Additional Tips
Making bagels at home is not hard, but it can be helpful to keep the following tips in mind:
- The dough for homemade bagels is stiffer than a dinner roll or sandwich bread dough. This is by intention. Because the bagels are boiled before baking, a lower hydration dough, like bagel dough, holds up to the boiling water bath without disintegrating and the result is a perfectly chewy bagel.
- I highly recommend investing in a kitchen scale {aff. link} and weighing ingredients, particularly dry ingredients like flour. If you measure your flour in cups, lightly fluff the flour, scoop in the cup and then level off.
- If you live in an excessively dry climate, you may want to start with 1/4 cup less flour and add remaining flour only if the dough is sticking to the sides and bottom of the bowl.
- Keep a timer going during the boiling step – it may seem counter intuitive, but boiling the bagels longer won’t result in a better bagel. They just need a minute or so per side, max.
Most of all, have fun with this recipe! This has been a favorite recipe of ours for over ten years. My kids love to help with shaping the bagels, choosing the toppings, and of course, devouring the bagels after they’ve baked and (barely) cooled.


Perfect Homemade Bagels
Ingredients
Dough:
- 1 tablespoon instant or rapid-rise yeast
- 4 cups (568 g) bread flour (see note)
- 2 teaspoons salt
- 1 tablespoon brown sugar
- 1 ½ cups warm water
Water Bath:
- 2 to 3 quarts water
- 2 tablespoons brown sugar
- 1 tablespoon granulated sugar (see note for honey option)
Egg Wash:
- 1 large egg white
- 1 tablespoon water
Optional Toppings:
- Sesame seeds, Everything Bagel seasoning, grated Parmesan or Asiago cheese, coarse salt, cinnamon and sugar, etc.
Instructions
- In the bowl of a stand mixer fitted with the dough hook, combine all of the dough ingredients and mix on low speed until the dough comes together. The dough will be fairly stiff (but shouldn't be dry).
- Increase the speed to medium and knead the dough for 10 minutes. This is a high-gluten dough and the long kneading time is necessary to develop the gluten.
- Place the dough in a lightly greased bowl and cover with lightly greased plastic wrap. Let the dough rise for 1 to 1 1/2 hours until noticeably puffy.
- Turn the dough out onto a lightly greased work surface and divide the dough into eight equal pieces, about 115 g/4 ounces each. Roll each piece of dough into a smooth, taut ball. Let the balls of dough rest for 30 minutes.
- Line two half sheet pans with parchment paper and lightly grease with cooking spray.
- Use your thumb to poke a hole through the very center of each ball then use both thumbs together to twirl and stretch the dough until the hole is 1 to 2 inches in diameter (the bagel will be around 4 inches across). Place the shaped bagels on one of the prepared baking sheets.
- For the water bath, add the water and sugars (or honey – see note) to a large, wide pan or pot and bring to a boil.
- Preheat oven to 425°F.
- Transfer the bagels, three or four at a time, to the simmering water. I like to gently re-stretch the center of the bagel if it has closed up while the bagels have rested. This is optional; if you do the same, make sure to stretch gently so as not to deflate and compress the bagel.
- Cook the bagels for 1 minute. Flip and cook for another minute. Use a wide spatula to lift each bagel up, letting the excess water drain back into the pot. Place the boiled bagels onto the prepared baking sheet, spacing them several inches apart. I bake six bagels per half sheet pan.
- Repeat with the remaining bagels.
- For the egg wash, whisk together the egg and water. Brush the top and sides of each bagel and then sprinkle with desired toppings: sesame seeds, everything bagel seasoning, cinnamon and sugar, coarse salt, grated Asiago or Parmesan cheese, or other toppings of choice. If leaving the bagels plain, the egg wash is optional.
- Bake the bagels for 20 to 25 minutes until golden brown. Remove the bagels from the oven, and transfer to a cooling rack to cool completely (don't let them cool completely on the baking sheet as they have a tendency to stick due to the sugar/water bath).
Notes
6 cups bread flour
1 tablespoon salt
1 tablespoon grown sugar
2 1/4 cups warm water
Recommended Products

Recipe Source: adapted slightly and expounded upon from King Arthur Flour
Recipe originally published April 2011; updated September 2025 with new photos, recipe notes, etc


We love these bagels and make them often.
Can I let the dough rise in the fridge overnight? And then proceed? I have young children who can’t be patient for breakfast and I don’t wake up before them (pregnant with our fourth and so tired haha).
Yes, this recipe does fine with a slow rise in the fridge.
These are delicious and easy to make. I love making them on Sundays for the week ahead
So good! Easy and very tasty. my yeast was expired and they still worked out great!
Well, apparently I worked the dough too much to make the holes larger, because they hardly rose at all in the oven. So they look pretty sad. HOWEVER, I sprinkled them with Asiago cheese before baking and they taste divine! Next time I’ll try not to stretch them so much when making the holes.
I made put attempted to be a quadruple batch of the dough in my Bosch mixer but the last time I made it my honey said they weren’t quite big enough so I measured them all out at 6 ounces apiece and they’re really fabulous. You got a great recipe and I have out of the main recipe. Topped with everything seasoning. Some are with Parmesan cheese some have bacon bits, sharp cheddar cheese, and jalapeño some have sharp cheddar cheese, and pepper, jack cheese, and some have sesame seeds and some are plain. He’ll be taking these to work on Monday and the last time he did everybody loved him so I’m super excited even though we’re completely full grown adults it’s kind of like being a room mom again my kids are 30 and 25. it’s been a while but thank you for the fabulous recipe. I also love your bread recipe to make the five loaves of whole wheat at the same time we got to the point where now I make that I keep two loaves and three go to work, his coworkers beg for them. Thanks Mel for everything.
Anytime I look for a recipe, I always turn to MCK first!! I was wanting to make bagels for a backpacking trip this weekend and I searched for Mel’s bagel recipe. Holy Cow!! Suffice it to say, these little babies did NOT disappoint! And they were EASY!
After the water bath I sprinkled with TJ’s Everything, pizza, and ranch seasonings along with a little cheese prior to baking. The whole house smells DElicious and the bagel was a million times better than anything you can buy at the store. You must make these ASAP.
Note- the seasonings were not combined onto one bagel. Each had its own separate seasoning.
I was feeling sad and needed carbs. Thank heaven I chose this recipe to improve my mood! Fun to make and so ABSURDLY delicious!!
So mine came out a bit lumpy, but I’m sure I messed up somewhere.
I didn’t activate my yeast and I usually have to- so maybe that was it?
But I let my kitchen aid go to town for 10 minutes and when I came back to it there was nothing but crumbled balls of dough. I tried to add more water and kneaded it some more with the machine and by hand; I just couldn’t get it to come together. I let the lumpy dough ball rise and the bagels didn’t shape well.
I’m wondering if the problem was just the inactivated yeast? Or did I knead too short or too long?
Definitely going to have to try again- your bread recipes have never done me wrong!
Hi Holly, it actually sounds like maybe the dough had a bit too much flour – try about 1/4 to 1/2 cup less flour and maybe also cut the kneading time down to 6-8 minutes and see how that works out.
Amazing! Like all of your recipes. I just discovered that Jennifer Garner uses this recipe too!
My family LOVES these bagels and requests them frequently. They claim that my bagels are better than any they’ve ever had and it’s all thanks to you, Mel!
Made these yesterday. This morning I had an awesome breakfast. I did go a little overboard on the poppy seeds. This is an easy recipe that didn’t take all day to do. When I separated the dough into 8 pieces I weighed them and tried to stick to 4.5 ounces. Ended up with a little leftover, so I made a tiny bagel. Hubby and I taste tested that one last night. He was excited. Said I’m going to be making these on a regular basis. Seeing it’s just the two of us I was glad to find a recipe that didn’t make a dozen or more.
We make these bagels almost weekly and love them so much!
I am trying to find a bagel recipe that works well with fresh ground whole wheat flour. Have you tried this recipe with fresh ground flour? Or do you have a suggestion? Thanks!
I have used half freshly ground whole wheat in this recipe and it worked great!
I made these and used 1 cup of my sourdough start instead of yeast and they turned out AMAZING! Thank you for always having the best recipes!
Hi 🙂 could I use active dry, and proof it first, vs instant yeast? I don’t typically have instant on hand
Update: I made them with active dry yeast, I just proofed it with the water + sugar for 10 mins or so. They turned out great!
Thanks for the update, Aspen! Sorry I didn’t get to your other question in time.
That’s alright! I peeked at your other bagel recipe and saw that it was similar, and saw your notes about using active dry, and figured it couldn’t make too big a difference for this recipe either.
That’s alright! I peeked at your other bagel recipe, also calling for instant yeast, but saw your notes saying you used active dry. Since the recipes were similar, I figured it’d work out okay. I made my second batch today…
Can you use all purpose flour without the gluten or do I need the gluten?
The gluten is important for this particular recipe.
If you double the recipe, do you have to do double the yeast? What if I used 1 1/2 tablespoons instead?
Also, we go through these so fast. Can the recipe be easily tripled? If so, how much yeast would I use?
For a double recipe, I use double the yeast. For a triple recipe, I’d stick with the 2 tablespoons.
When you double the recipe, do you double the water and the sugars in the water to boil?
No, I don’t.
Awesome recipe 🙂 So easy to follow. My bagels turned out delicious!
I just made these bagels this morning . I used all purpose flour without the gluten, and they came out outstanding! I just needed a little more flour( as I usually do here in the south). I only needed about 45 minutes for the first rise. I started at 9:15 a.m. and had a bagel for lunch at 12;30 p.m. After I boiled the bagels I let them sit for 30 minutes before baking. I did bake 2 sheets together, swapping and rotating half way through baking. Most delicious Mel, thanks! I love your pretzel rolls too, plus many other recipes.
This is my time writing you however I have wanted to so much to thank you for your delicious food I honestly use your site daily.
How do you store bagels? How do you reheat?
Thanks
Hi Michaela – I usually store them in a bag at room temperature and we toast them for reheating.
There is no oil or fat of any kind in this recipe, whereas other bagel recipes have this.
What is the reason for this omission?
It’s just the way this recipe was created and tested. It works, I promise! 🙂
I made one and a half times this recipe and got 12 bagels. Great directions! Very happy with how they turned out. Will make often I’m sure. Thanks Mel
I came across your site about a month ago and I have to say I love your recipes! I do have a question though, would I be able to use instant yeast? And if so, do I have to let it proof or do I just add everything in together?
If you are using instant yeast, you normally don’t have to let it proof first.
My bagels were very light and didn’t hold there shape. They came out very flat. What could I have done wrong?
It sounds as though they may have needed a bit more flour to hold their shape/structure.
I’m going to be attempting this recipe soon but was wondering how I would go about making them blueberry bagels? My kids prefer the fruit kind of bagels and wasn’t sure if you had ever attempted it. Any suggestions?
Hi Anna, I haven’t tried adding blueberries so I don’t have a super great recommendation. You might try googling homemade blueberry bagels to see if you can get some ideas on how others are incorporating blueberries into bagel dough.
My advice – don’t let them sit out overnight with a towel over them. I shaped them and then put a towel over them overnight. They flattened, dried out and got super crusty in a bad way. If you’re going to let it sit overnight and finish the next morning, put the proofed bowl in the fridge while still covered and shape them out the next morning, let sit for 30 minutes to come to room temp and proceed.
Can you get the all ready to boil then have them sit in the fridge overnight so in the morning all you have to do is boil and bake?
That’s a great question, and I’m not sure – I haven’t tried it and I’m not sure if doing that would affect the texture after they are baked. Sorry I’m not more help!
Hi Mel! Trying this recipe for the first time. I just finished kneading it and it is much more dense that you specify. I cannot easily stretch the couch, rather, it pulls apart and doesn’t stretch. I used bread flour (white) and kneaded for 15 minutes by hand. Any sugggestions? It’s going to rise now…
Hi Erin, sounds like the dough might be slightly over floured. You can try kneading in a few tablespoons of warm water to see if that helps.
Mel, love your recipes and found out today that so does Jennifer Gardner! She made bagels this morning and said in her video she uses YOUR bagel recipe!!! Love that!!!
I saw that, too. What a fun clip and great endorsement!
https://www.facebook.com/share/v/vW25qVkw7ePMfj9p/?mibextid=KsPBc6
I am making these right now and weighed the dough but am having to use more to have the dough come together and not be super sticky I hope it works out.
I’m going to attempt this recipe this weekend and I’m super excited! My only question is what type of baking mat do you use? I always use parchment paper but it seems like baking mats would be a good investment. A lot of the ones I read reviews on said the mats burned over 400F though. Thanks in advance!
Hi Britti – since publishing this post, I almost exclusively use parchment paper.
How do you freeze the bagels? Before or after baked?
I freeze them after they are baked and cooled.
How to I freeze the bagels? Before or after baked?
Okay, I just tried this recipe and I used all purpose flour without adding gluten (which may be my problem) but i just pulled my first batch out of the oven (20 minutes of baking) and they are flat, slightly raw in the middle, but the tops are golden brown to the point that they might have burnt if I left them in any longer. The dough was quite sticky and not very firm, so did I not mix it long enough? I used my kitchen aide in low for at least 10 minutes. Was it the flour? Haaaalllllpppppp haha
But they do have an amazing flavor, now I’m obsessed until I get it right.
Hey Chelsea – it almost certainly sounds like your dough needs more flour. That will ensure the dough isn’t so sticky – and it will help them rise up instead of flattening out.
Okay, you are the greatest for sharing your recipes. My whole family LOVES bagels…and who knew I could just plop in the kitchen at home and make these. THANKS to you we’ve had them 3 times in the last week! They could actually be dangerous around here. Hhhahaha
Thanks, Staci!
I love to weigh flour instead of measuring it. I don’t understand the weights listed under notes. Original recipe calls for 17 oz flour. But, the doubled version of flour amounts in the notes totals 50 ounces, not 34oz (a fact I didn’t notice at first—I’m trying to add more water to save the dough). Just wanted to mention it so you can double check and correct if needed. Thanks.
I just re-read the note. This was my mistake—I misunderstood the note. Maybe the note could be written more clearly—saying “”add 18 ounces all purpose flour to make up the 34oz total.” Feel free to delete these comments if you’d like. Wishing I’d double checked the note before saying anything. 😉
I added a few clarifications to make it more clear.
Did you know that Jennifer Garner used your recipe! I just happened across the video and heard which recipe she used! Check it out!
https://www.facebook.com/126533764056580/posts/2325151717528096/
Crazy, huh? I couldn’t believe it myself. 🙂
Mel, I found your website a few months ago and have made many of your recipes, all of which have been great. But what I really love are the bread recipes. I no longer buy white, wheat or French bread! Today I made these bagels, and honestly could not believe that when I took them out of the oven, they looked, and more importantly, tasted the best bagels we have had in years..no more store bought for us. You are a great chef, thanks for sharing.
Thank you so much, Pauline!
Hi Mel,
I made these bagels and the flavor was amazing! However, mine came out all wrinkled. What do I need to do to make them smooth and pretty like your pictures?
Sometimes that happens if the bagels were boiled too long so decreasing that time might help. Also, letting them rest too long before baking can also be a factor (as well as underflouring the dough – this is a fairly stiff but soft dough so that the bagels hold their shape).
With so many great raves for this recipe, I thought I would give it a try. Since moving to the country I’ve been trying to be more self reliant in baking breads rather than purchasing at the store. My hubby loves bagels so, it was the next thing for me to try and make. Huge success!! Perfect taste…Perfect chewiness! I flavored some with everything seasoning, some with cheddar cheese, and then some plain. All so yummy delicious! The only thing I will change is to not boil until I’m ready to bake. Two of them shriveled up into wads of dough while waiting their turn for the oven.
Thanks for sharing! (I just might have to peruse through some of your other recipes.)
I messed this recipe up bad! I weighed the dough and added little pieces of dough on each one until they were all uniform in size. I used the rolling technique and they looked good on top, but on the bottom were a mess where all the little pieces were trying not to stick together. Perhaps the dough was too dry? They rose with caverns all over the bottom and got pools of water trapped in them which remained soggy after baking on a baking sheet and silpat. Oh boy I need to try this recipe again and make them better! At least they wernt wasted. I cut them in half and made pizzas out of them and they were really good! I’m not sure how i messed it up so bad. It’s not you or your recipe, it’s me.
I am curious as to the mixer used in this recipe. the recipe is lovely!
It’s a Bosch Universal stand mixer!
I’ve made this recipe over 5 times now, I just keep coming back for more! LOVE these, thanks Mel! They are so yummy fresh from the oven, and I like to put everything bagel seasoning on!
Silly question can I make the dough and do the boiling and baking the next day?
Yep!
Great recipe! I usually use whole wheat flour and they turn out great.
I’ve been wanting to try making bagels for awhile. These look amazing. Your step by step photos are fantastic! Thank you. As for your goals, they totally made me laugh!!!
Once you have the holes in the bagels, do you let them sit while bringing water to a boil, or do they go on the boiling water right away?
I’ve done it both ways; they’ll be a little puffier if they rest while the water boils.
First time I made bagels I tried a different recipe and they didn’t turn out very well, however this recipe is amazing. They are SO GOOD and beautiful. Thank you so much for this. I love these so frickin’ much!
Hi! I am debating trying this recipe vs your older recipe. Besides being simpler, is there any disadvantage to the quality by not using a starter?
Also, if I were to make the dough ahead of time for the next day (to transport) would you recommend forming the balls or fully make the bagel shape for transporting? Thanks!!
I don’t think there’s any disadvantage to not using a starter – but the flavor might be a little better with the starter. I would probably make them into bagel shape and refrigerate them overnight.
I want to make these but have a question. I always thought the boiling water was water and baking soda. Am I mistaken on that. If so I will use your described method.
I think there are several different methods for that! This is just the one I use.
You use baking soda when making pretzels.