Easy No-Knead Peasant Bread
This easy no-knead peasant bread is a game changer! Incredibly simple to make, it is soft, fluffy, and so delicious. We can’t stop making it!
I have been so excited to get this bread recipe in front of you. I’m not even exaggerating, not one little bit, when I say it has revolutionized homemade bread around here.
I’ve made it (easily) at least ten times in the last month. I’ve served it to company. Brought it to friends. Made it just because I wanted to eat homemade bread at 1:28 p.m. It is amazing.
No-Knead Bread is Not New
The no-knead bread trend is not new by any means. Wet, loose doughs formed into shaggy loaves and baked (most often) in a Dutch oven have been around a long time.
I have several recipes like that on my website already, like this artisan no-knead bread and this fantastic rustic crusty bread.
But this peasant bread is different and amazing enough to occupy its own spot here on the blog. For starters:
- it’s easier and a bit more straightforward than other no-knead bread recipes
- you don’t need a Dutch oven or baking stone for baking
- it can be baked in a variety of every day baking pans
- it doesn’t need long rising times
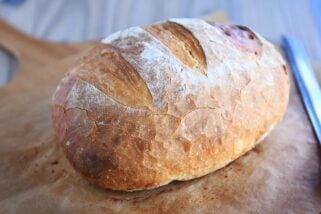
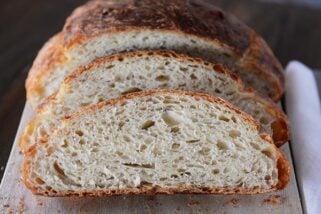
The crumb is soft and fluffy, and the crust is golden with just the perfect amount of bite and crustiness without cutting up the roof of your mouth.
How to Make Peasant Bread
In a large bowl, whisk together the flour, sugar, salt, and yeast. Add the water, and stir until no dry streaks remain.
It’s going to form a shaggy mass, and it’s going to be sticky. That’s exactly how you want it! Resist the urge to add more flour.
Grabbing a pinch of dough will leave a fair amount of sticky dough residue on your fingers.
Keeping the dough on the wet side of things is what allows us to skip any kneading and still end up with soft, fluffy bread.
Leave the dough right there in the bowl, cover the bowl, and let rise until doubled.
Once it is super puffy, grab a rubber spatula and start scraping the risen dough away from the sides of the bowl to form a messy ball in the center of the bowl.
How to Shape Soft Sticky Dough
Now for the fun part.
It can be a bit messy trying to shape soft, sticky dough like this into a loaf shape. A few tips:
- remember that it’s supposed to be kind of rustic, so ditch the idea of a perfectly shaped loaf
- grease your hands (cooking spray or oil); it makes a world of difference
- handle the dough quickly and efficiently – manhandling the dough will result in an epic dough bomb and lots of frustration
Here’s a quick video of how I shape this dough into a circle. I’m just lifting, rolling, and tucking a few times until it forms a pretty decent round shape.
Notice that my hands still end up with a bit of dough on them at the end. Feel free to use more cooking spray or oil, if needed. But don’t stress! It’s all part of the journey.
Best Pans to Use for Peasant Bread
The original peasant bread recipe calls for baking in oven-safe bowls (like Pyrex or others). Based on a traumatic experience in my past when my Pyrex bowls shattered coming out of the oven, I was determined to find a non-bowl solution for baking this bread.
I’m not saying you shouldn’t use a bowl for baking, I’m just letting you know I’ve come up with several fantastic alternatives that you probably already have in your kitchen.
After baking this bread in a Dutch oven, on a baking stone, in a round cake pan, and several other pan types, I’ve settled on the baking pan that works amazingly well and produces a loaf that is PERFECT.
A 9-inch pie plate.
The sides of the pie plate help stabilize the shape of the loaf as it rises and helps prevent the dough from spreading out and flattening.
The peasant bread bakes up beautifully in a 9-inch pie plate! It’s what I use 99% of the time when I bake this bread. And in case I haven’t made it abundantly clear: I have made this bread so.many.times. Like, you can really trust me on this one.
A metal pie plate works just fine, too. In fact, it actually gives a crustier exterior to the bread than a glass pie plate.
And, this bread bakes very well in a loaf pan, too. When shaping, go for more of a rectangle shape (but don’t over think it). Plop the loaf in a greased loaf pan, and get ready for some of the best bread of your life.
Best Bread Ever
I cannot overstate how amazing this easy, no knead peasant bread is. I want to beg, plead, bribe, force you to make it right this minute!
You’ll get all the rock star points for homemade bread with hardly any work. And you aren’t sacrificing anything in the name of it being an ultra-easy recipe. It is straight up some of the most delicious homemade bread ever.
I find myself turning to this bread recipe constantly now that I know it exists. It’s become our go-to bread for just about everything. Perfect for beginner and expert bread makers alike, please promise me you’ll make it soon!
One Year Ago: Mel’s Holiday Gift Guide: His + Hers
Two Years Ago: Perfect Homemade Caramel Apples
Three Years Ago: Perfect Small Batch Cinnamon Rolls
Four Years Ago: Easy Homemade French Bread
Five Years Ago: Harvest Pasta Sauce {Trader Joe’s Copycat}
Six Years Ago: Peanut Butter Cup Cheesecake with Chocolate Cookie Crust
Seven Years Ago: Gourmet Caramel Apples + Free Printable Handout
Eight Years Ago: Black Bean and Butternut Enchilada Skillet
Nine Years Ago: Peanut Butter Oatmeal Chocolate Chip Cookies
Ten Years Ago: Pumpkin Cookies with Caramel Frosting
Easy No-Knead Peasant Bread
Ingredients
- 4 cups (568 g) all-purpose flour (see note)
- 1 ½ teaspoons salt (see note)
- 2 teaspoons granulated sugar
- 1 tablespoon instant yeast (see note)
- 2 cups warm water
Instructions
- In a large bowl, add the flour, salt, sugar, and yeast. Whisk to combine. Add the water and mix with a rubber spatula or wooden spoon until the ingredients form a shaggy, sticky ball and no dry streaks remain.
- Cover the bowl and let the dough rise until doubled, about 1 to 1 1/2 hours.
- Place an oven rack in the center position. Preheat the oven to 425 degrees F. Generously grease a 9-inch pie plate or 8 1/2-by-4 1/2-inch loaf pan with cooking spray. (See note for other pan sizes/options.)
- Scrape the dough away from the sides of the bowl with a rubber spatula, forming a rough ball in the center of the bowl. Lightly grease your hands with cooking spray or oil and shape the dough into a circle loaf shape (or a rectangle loaf shape if using a loaf pan), tucking edges under. Place in the prepared pan. The loaf will not be completely smooth and may look a bit rough in shape, that's ok!
- Let the dough rest, uncovered, for 15-20 minutes until slightly puffy.
- Bake for 15 minutes. Reduce the heat to 375 degrees F and continue to bake for 15-20 minutes until golden.
Notes
Recommended Products
Recipe Source: adapted slightly from a recipe, Katherine B., a longtime reader sent me (thanks, Kat!) – originally from this recipe at Food52 and adding a link to Alexandra Stafford’s blog with lots of variations (I adapted it to use a pie plate or loaf pan for baking, and increased the flour and yeast amounts slightly)
375 Comments on “Easy No-Knead Peasant Bread”
I LOVE this bread! I saw Alex’s video on tiktok last year and I’ve been making it since. I opened Google tonight and here was your blog…I just put another together! This time I decreased the flour and water and added sourdough starter. So mine goes into the fridge overnight to get that wonderful sourdough twang. I haven’t bothered with any other yeast bread since I started making this. We love it that much! I do mine in loaf pans. With this recipe I can get 2 of the 8×4. Alex also converted the recipe down to a single loaf. That makes the larger 9×5 loaf pan. It’s definitely a keeper and should be made by more people!
I’ve made this four times in the past week since discovering the recipe! I’ve always wanted to bake homemade bread but I’ve been intimidated by it. But I read this recipe and thought, I can totally do that! It’s turned out so yummy every time! Thank you thank you!
Way to go, Lindy!
My go to bread is Mel’s “Easy French Bread” recipe. I make it often.
Today I was looking for a recipe using less flour, and found the above recipe. I plan on using it for French toast this weekend.
I love your recipes.
Wow! That’s all I can say! I’ve been baking bread since I was a kid since I love homemade bread so much. But I never knew such a great loaf could be made so simply and quickly. I threw the ingredients together this morning and was able to bake the loaf before leaving for work today. We ate it with dinner after I got home and we were all so impressed that I whipped up another batch before finishing my dinner so I could get another loaf in the oven before bed tonight! I already have the recipe memorized and I know this will definitely be on my regular bread baking schedule from now on! THANK YOU!!!
I thought what a sticky mess, but only adding 30 grams more flour ,it came out gorgeous! You are my new hero.
I had to laugh at myself when getting this bread into the pie plate. It was very wet and sticky, but I just plugged right along.
Got it into the plate, let it rest, and popped it in the oven. I had a thought to put the plate on baking sheet, and then said, nah, it will be fine. It rose beautifully, and then spilled over the sides; but it still was consistent with your picture of it, Mel.
I read over the recipe again and discovered my mistake.
I had left out a whole cup of flour! Lol, was my face red! And I thought, oh this will taste terrible.
Not one to shy away from my kitchen mistakes, I pulled it out of the oven, let sit a few minutes. Then I had a well buttered piece of it.
I have to tell you, i WILL make this again, because the mistake was absolutely heavenly! I really love crusty bread that is soft inside. It was delicious.
So, all you bread bakers out there, it will still be ok minus a cup of flour. Just bake in dish with higher sides, or put a cookie sheet unde it! I wouldn’t recommend leaving out 2 cups of flour, however!
I made this with active dry yeast and it worked very well. Thank you!
HELP , HIGH ALTITUDE adjustment. I love this bread sooooo easy & delicious to make & I have made many times. I have just moved to Colorado Springs. Do yo have any suggestions on changes that need to be made to the recipe?
I’m wanting to add ingredients to make jalapeño cheddar bread and pepperoni cheese bread. Do you feel I would have to make any adjustments to your recipe if I add these additional i ingredients?
I haven’t tried add-ins but it should work just fine to fold them in prior to rising and baking.
Why didn’t you set this recipe up to accept one packet of yeast? I didn’t realize until after the fact that 1 packet of yeast would not be enough for this recipe. You could have at least made a notation that a second packet would need to be opened. Every baking recipe I use indicates the number of packets of yeast that would be required, or it always matches what is already prepackaged. I don’t do enough backing to keep a jar of yeast in my house. Your recipe requires one full packet and part of another – you should have mentioned that in your notes.
This is pretty unnecessarily combative. When we select recipes to make, it’s incumbent on us to ensure that we understand what the recipe is asking of us, including double checking whether we have the ingredients. You can always scale down if you don’t have the right amount of yeast. It’s impossible to address every potential issue within a single blog post.
Hi Martha, sorry for the frustration regarding the yeast issue! I don’t keep packets of yeast on hand and so I don’t calibrate yeast measurements that way. It’s almost impossible for me to know if someone making one of my recipes is using yeast packets or a container of yeast. The good news is that if you are familiar with the amount of yeast in a packet, it should be able to quickly and easily tell if the amount of yeast called for in a recipe is more or less than what is in a packet. I apologize for any confusion and frustration this may have caused you!
Martha — this recipe doesn’t call for packets of yeast. You must not have read the entire recipe before starting. It is very snotty and rude of you to blame the author for your own mess up.
Martha, it must have been so frustrating to realize you didn’t have the correct amount of yeast in the midst of making the recipe. I just wanted to share something that has been a game changer for me: you can FREEZE the jar of yeast! It lasts a long, long time (like a year, or more). I just pull the jar out of the freezer, spoon out the amount I need, then pop the jar right back in the freezer. The small granules of yeast thaw almost immediately, especially when immersed in the warm water. Hope this helps.
The good news, Martha, is that the original recipe calls for 2 1/4 tsp yeast, with the other ingredients the same. So feel free to make it with only 1 package, it’ll still be delicious!
Forgot to rate this recipe as I was busy guarding the rest of the loaf from my husband. Would give it more stars if I could.
Mel! You are a rock star and now I am a rock star after baking this amazing bread! My husband said he would take a small piece before lunch. Then, he wanted a bigger piece for lunch. Said he wanted some for dinner. Not sure if there will be any left for dinner as I had to pry the remaining loaf out of his hands after I caught him sneaking more before dinner! This bread is a Must Bake! Love all your recipes! Thanks for all your time you put into your website. You are appreciated!
I just made it again, the 3rd time in 2 weeks… This bread is BOSS! 🙂
WHERE has this bread been all my life. For real. So easy and SO YUMMY. Will make anyone feel like a rockstar.
You were right to be so emphatic about MUST. TRY. THIS. BREAD! Could not have been easier. One thing that’s kind of funny–I used active dry yeast, and based on this conversion table I regularly use (https://www.theartisan.net/convert_yeast_two.htm), based on your 1 tbs instant, the conversion is 3.75-4 tsp active. So when you said to wait for it to double, about 1.5-2 hrs, I settled in for the wait, and it doubled in 30 mins!!! So that plus cooking made this recipe take up only about an hour and a half TOTAL! And it tastes great, smells great, and looks just like your picture! Easy peasy! (I’ll just tell everyone I worked on this all day!)
Love this recipe so easy to make
I’ve been making a lot of bread to find just the right basic white sandwich bread. THIS IS IT!! Exactly what I wanted. So easy and ready so quickly. I am thrilled to find this! Thank you!!
This is amazing! Our ten-year old makes this on his own at least once a week for us! Thank you!
Love this bread! Did not want to go to the store just for bread so I looked for an easy recipe and this was it! I made it in a 9-in pie plate and when I pulled it out of the oven I swear I had a Martha Stewart moment it was so pretty. Perfect with soup, and makes good sandwich bread, too. From now on when I want bread I will go to the market and get the big bag of flour and make this bread. Thanks for such a great recipe!
There is no temperature listed for baking peasant bread
It’s in step #3: 425 degrees F.
Maybe she was asking about the internal temp? I was wondering that too. 🙂
Love it! So easy and delicious!
I have never made bread in MY LIFE, which is why this easy recipe was so appealing to me. And the bread was PERFECT on my first try. Two days later, and my boys will still cut off a slice and eat it – un-toasted, no butter. It’s that good. Although, trust me, you’ll love this bread toasted with butter. This particular recipe is so labor un-intensive, I think we are going to be replacing our store bought loaves with this for a while.
A couple of things… when I decided to make this bread on a whim at 10pm one night, I didn’t have any of the suggested baking bowls/pans. So I just used a low oval shaped baking dish I had, and it worked just fine. So definitely don’t worry about not having the “right dish.” You’ll most like have something in the house that will work. Also, I’ve been lining the baking dishes with parchment paper. And that worked really well for me. ENJOY!
I make this bread all the time now. We are full time RVers and I use my Ninja flip oven and it comes out beautiful every time!
I am a bread maker! Repeat… I am a bread maker! And not just any old bread maker, but one that pulls fluffy and delicious artisan bread out of her oven! I cannot believe how easy this was to make, how little time it took (I mean, I could make a loaf every night!), and truly how delicious it was. Thank you, Mel!
I’ve made this countless times and it is delicious. I just throw the dough into an oven safe medium sized mixing bowl i have (it’s a beautiful Polish pottery bowl) and it’s perfect every time. Thank you Mel for never letting me down.
Plus my two year old loves to help me make it! It’s a delight.
I had been looking at this recipe for a while and just got around to making it last week. It is amazing – make it! So easy to mix up and bake. I baked mine in a pie pan like Mel. It was gorgeous when it came out of the oven and both the taste and crumb are awesome. This will be a staple in my kitchen.
I hate baking but love fresh bread. This one is so easy I find myself looking forward to making it. And the bread is excellent!
I make this bread all the time. It is so easy! I had a super busy day today, so I mixed the dough at 7 am, covered it and stuck it in the fridge, took it out at 5:30 pm and put it in the pie plate and let it rise while the oven preheated. It baked up beautifully.
Very easy and my family loves it
Good morning,
I enjoyed your message, I made for the first time for Thanksgiving dinner 4 loaves of peasant bread, I have baked bread, rolls, pies, cookies, made candy for 53 years, but it’s the last several months I have been following Instagram, particularly Ali, Hannah, and Lizzy, also now Martha. my bread turned out fantastic, I used KA bread flour, baked the bread in Longaberger 1 Qt. Dish, 1 loaf in an old aluminum round pan, 2 in my old 1 Qt crock dishes., I also made sour dough starter last summer gave it to my grandaughter, and she made bread yesterday, and she shares the starter with her friends at work. We are enjoying bread baking together. Im apologize for long comment. I will add you to my contacts to follow. Regards,
I used 50% fresh ground whole wheat and 50% bread flour, but my dough was not wet. In fact, it is pretty dry. Should I add more water or is this because of the wheat?
It may be due to the wheat – how did you measure the flour? Take care that there isn’t too much flour packed into a cup.
I doubled the recipe and my two loaves were not quite evenly split. Then, my timer accidentally got turned off, so I was totally guessing on time. I thought the larger loaf might not be cooked all the way through, but turns out both loaves were perfect! Foolproof bread- guests loved it too. Thanks Mel! Served it with your beef stew recipe (we leave out the tomato paste and make a couple adjustments, but love it!)
This was so good and so very easy! I make a lot of yeast bread and I will definitely keep making this one. Can’t get any easier than this.
This bread was life changing!! One question though – what temperature would you say you get the water to when using instant yeast? My yeast jar had 3 different options so I kind of just guessed but luckily it worked!
I don’t really ever take the temperature but I just get the water like really warm bath water (not super helpful, I know, but it hasn’t failed me yet!)
Love this bread! So easy to make and delicious too!
Question—what would be the result of using cake flour or self-rising flour, if that were all you had around?
Cake flour would make for a finer crumb (possibly less structure to the bread). I’m not sure about self-rising, but if you had to choose between the two, I’d try self-rising first.
Love this recipe! Just made it tonight for the first time. I am NOT a baker but was able to make this and it was delicious. My whole family loved it. I doubled the recipe but otherwise followed the instructions to a “T”. The dough is certainly wet and sticky but don’t fret, it bakes up to perfection! I baked one loaf in a regular loaf pan and the other in a square glass baking dish. The bread will take the shape of whatever dish you bake it in, so don’t bother shaping your dough. Just plop it in to your baking dish and smooth the top. Did I say it was delicious? Such a pleasant and easy recipe, especially for us non-bakers. It’s fun to have a homemade loaf of bread with dinner! Had it with beef stew tonight. Thank you for sharing this recipe with us!
Love this recipe. I just made it tonight for the first time. Followed recipe exactly and it worked perfectly. I did double it. Baked one loaf in a loaf pan and another in a square glass baking dish. The bread will become whatever shape your baking dish is so don’t worry about shaping your dough. Yes, it is a wet, sticky dough and yes it will still bake into a nice loaf of bread! My entire family loved it. I have bookmarked this recipe and plan to make it all the time. Thank you for sharing!
I made this to go with beef stew! This was my second time making this recipe and I really loved it. I am on a low sodium diet, so I ditched the salt and added herbs instead! It was delicious!
This truly is an amazing, simple recipe. Easiest bread recipe I’ve ever made. I got up early Sunday morning and made 4 loaves. Gifted 3 to friends. I’ll be making this again.
This has become my go-to bread recipe. I bake it once or twice a week. Sometimes I switch out one cup white flour for one cup whole wheat flour. and use honey as the sweetener. Delicious and still easy. After 3months of this bread i asked my family if they wanted me switch to some other of their favorite recipes. The answer was a resounding NO!
Hi Mel!
I am so excited to taste this bread! I have a double batch rising now. I have a question- I added extra flour and really resisted adding more to keep the dough sticky. Now that I am trying to shape the dough for the pans it doesn’t hold a shape and is extremely soft and sticky. Should it hold a slight shape? It is humid here so maybe that factored in….. When you make yours how much can you work with the dough to shape it? Mine just dropped and spread and theres no way I could shape it at all. I’ve made many of your other bread recipes so I just need to find the trick for this one! Thanks 🙂
Hi April – the humidity may make a difference. I live in a dry climate. But the dough is meant to be quite sticky. Lots of people say they kind of plopped the dough into the pan and didn’t worry about shaping it. I like to grease my hands with cooking spray and quickly shape it into a rough ball shape. If it’s very humid where you live, you can try adding a bit more flour, too.
I have tried a few no knead bread recipes and all of them was quite dense. I want to try this one but was yours dense ? What was the feel of yiur dough? Thanks!
The dough is very sticky. It’s not dense if it has time to rest and rise.
We LOVE this bread… I make it all of the time. I was wondering about add-ins like cheddar and jalapeno. When would you add those… When I am mixing up the dough? Do you think that I would need to adjust anything else in the recipe? Thank you for great recipes!
I add shredded sharp cheddar cheese all the time! I mix it in with the dry ingredients before pouring in the water. Works great. I don’t adjust the other ingredients.
I’ve made sourdough bread for years. Made this and W.O.W. — no words! Came out perfectly. I never even touched it with my hands just dumped it in the pie pan and did a little smoothing with the spatula. A thousand thanks for sharing this! Easily memorized.
I have made this 3 times in the past 2 weeks. It deserves the high ratings, a very pleasant loaf, pretty appearance but the flavor is not quite a normal homemade bread. But that is the trade off for not spending a lot of time babysitting the dough. The texture is great and people I served it too like it more than a typical no knead bread. Want to try the sourdough bread next. Thanks for some help in the kitchen.
absolutely love this recipe – my go to ! quick question tho – I’m out off AP flour – got lots of bread flour …. Yes? Good to go ?
Thanks
Bread flour should work just fine! Although the bread might be slightly more dense and/or chewy due to the bread flour being much higher in protein and gluten.
Hi! I want to try your recipe, looks fab!
Oven at 425 degrees F. Is that with oven fan on?
Does it make a difference, with or without fan? No need to mist the inside of the oven or have a dish of water in?
This week I did this bread twice! Wow I am impressed on how easy (no kneading nightmare!) and tasty it is. Thank you. It is the first time that a no‐knead recipe I tried worked well. So thank you really, I do think all the water makes all the difference!
I baked them with oven fan on. The 2nd time, I split the dough in 4 in smaller pans and with baking paper at the bottom (to avoid sticking).
If you are using the fan (convection), I’d suggest reducing the oven temperature to 400 degrees.
I’ve made this recipe several times and it always works out great! One big loaf is just too much for our little family but I have found that splitting it in two and baking them in 6” metal cake pans has been perfect! Makes a great little loaf and then I have another to freeze for later!
So easy and good!
I used Cup4Cup GF flour and it came out great! It was my first time making plain bread too. It’s almost impossible to find good GF bread for me so your recipe was a savior!
That’s great news that it worked out well with gluten free flour!
Mine was also too wet! I’ve tried it twice. Can’t seem to figure out what I’m doing wrong.
Hey Rachel – the dough was too wet? Or the baked loaf had a wet texture inside? Either way, try adding 1/2 cup additional flour and see if that helps.
I read if you add 3 T. of oil to the dough it will make a fluffier crumb. Is this feasible?
Hi Terry, you can definitely try adding oil if you’d like to experiment. You might need a bit more flour to compensate.
I love this recipe! However someone else made it and they said this was the recipe they used, and their bread was light and airy but when my bread comes out it’s super doughy and dense. I followed the recipe exactly I just don’t know what to do to fix my bread?
Can this dough be frozen before being baked or after being baked? Thanks! I’ve made it one already and it was a HUGE hit and I would live to be able to make it in batches that I can just pull out of the freezer.
I have only ever frozen after it has been baked and cooled – works great!
Mine was a disaster. I followed your advice to not add more flour, when I probably should have. Dough was way too wet. I might try again, though.
Hi. How could I adapt this recipe to make it overnight? Or should I use your overnight recipe and bake it in a pie pan? Thank you.
I think you could let the dough rise in the pie pan overnight, take it out in the morning, let it come to room temp and then bake?
Made this for the first time today and it is amazing. I do have one question about the rise time, I make a lot of your bread recipes and they always turn out delicious, but it seems that my dough always rises in half the time, and the loaves bake up so tall above the bread pans, they look like mushroom tops. I measure everything to the gram (I have issues ) I do live at a high elevation, but was wondering if I need to use less yeast at a higher elevation? Even if I cut the rise time, when it’s in the oven it bakes up really high.
(I apologize if you have already answered this, I tried looking through comments to find the answer)
Thank you for all the delicious recipes, I love your site.
Hi Ashley! The rise time could be affected by the temperature of our houses, and high elevation can definitely make a difference (and sometimes wreak havoc on bread recipes!). You can try cutting the yeast back a bit…or just watching the rising and bake the bread when it’s risen fully (even if it’s half the time then what is stated in the recipe).
Absolutely divine and so easy. My new go-to for white bread. I used a loaf pan and made one large loaf.
Can’t wait to make it
Hi, does this recipe work as well without the sugar. I can not have sugar, first time making a loaf of bread.
Thank you
Juanita
The sugar helps activate the yeast and helps with overall flavor but you could probably leave it out.
The Easy Rustic Crusty bread dose not have any sugar in the recipe.
Hi, does this recipe work as well without the sugar. I can not have sugar
Thank you
Just waiting for it to rise. It looks like it is to moist. But my son loves to bake bread. Can you add flavor into the dough?
Hi Kim – what kind of flavors are you wanting to add?
OMG! This bread was so easy to make that I kind of wondered how it would taste. This bread was wonderful—moist, tasty, and a wonderful addition to dinner . Mel, this almost has made me think I could make bread more often. Lol! Thanks for this very quick dinner addition.
Is this a good bread for sandwiches?
Yes, we use it for sandwiches!
I love this recipe! I make it with Kamut flour, add Italian seasoning and garlic powder, and bake it in my cast iron pot
Hey Mel,
A few years ago, I made bread all the time, so I was eager to make this, and I did, but each time I tried this, the middle was uncooked and just extremely doughy. What am I doing wrong?
Hi Rita, I think if you added more time onto baking that should do the trick. Every oven is a bit different in terms of temperature – so baking for 5-15 minutes longer could help!
My loaves has risen perfect but after a little on the oven they collapsed and I took them out early cause they looked like they were just baking way faster then the time given. Can’t put soft and tasty but what made them collapse after few min in oven
How long did the bread rise before going in the oven? If the loaves collapsed, it could be they rose too much before going in? Or if your oven bakes hot, that might have contributed…so perhaps try putting the loaves in the oven sooner and/or reducing the oven temp by 25 degrees.
My family love this. I do 3 stretch and folds every 30mins during step 2.
Has anyone tried adding pineapple juice to it to make it more Hawaiian flavored?
Came out very dense what am I doing wrong? Under proofed?
Could be that it needs to rise longer – what type of pan are you baking it in?
Delicious! Followed the recipe & it turned out just like my moms homemade bread, without the kneading!
This is a great recipe for beginners and the end result is a great homemade loaf of bread.
I’m using half light while wheat and half bread flour today. It’s about the fifth time I’ve made it
*half light WHOLE wheat
Going to try this right now. Love your thoughts and directions.
This was easy and delicious! Have made it quite a few times now!!! Thank you!
This sounds so good. I have just found out that I have allergies to many foods, wheat being the number one! Has anyone tried using gluten free AP flour to make this bread? I wonder if it would work as well as regular flour. Any ideas?
Hi Mel! I have made this wonderful & very easy bread recipe multiple times, always with stellar results. I usually follow exactly as written, but have also used 1 cup bread flour, & today I used a cup of whole wheat flour. I always weigh the flour to your specifications. I often brush melted butter on top before baking.
This is just the quickest route to homemade bread ever. It rises beautifully & has a lovely crumb to it. I initially made it in the pie plate but now usually use a loaf tin, mainly because it is easier to slice that way.
Thank you for another WINNER!
My husband is on a salt free diet. Would bread still rise without salt?
Hi Wendy, unfortunately, eliminating the salt from bread can really wreak havoc on the result. I’ve left it out accidentally before and the bread doesn’t rise well and is dense and bland.
I subscribed 1 cup of buckwheat flour for 1 cup of white.
It make the most incredible toast.
Just butter and maybe a little honey.
i haven’t tried making this bread , but my daughter has. it is my husbands favorite. I’m going to try and make it Gluten Free.
This bread was easy to make and the taste and texture are good. I have a question. The little packet of yeast said it contained 2 1/4 teaspoons. I just used that packet instead of using the full 1 Tablespoon called for. It seemed to work out fine. Would the bread have risen higher if I used the full amount?
It’s likely that using the full tablespoon of yeast will result in a slightly fluffier bread (because it will rise more quickly and create more air bubbles).
Just baked this bread….aroma in the house is wonderful.. Can’t wait for it to cool to try a piece. Just have one question….does the bread cool whatever it was baked in or does it gets taken out and put on a rack to cool? Thanks for the recipe & the answer.
I usually pop it out of the pan a few minutes after it comes out of the oven and let it cool on a rack so the bottom doesn’t get soft/soggy.
Mind. Blown. I have made bread SO MANY TIMES and it always is like lead. This??? This is the PERFECT bread. I actually made bread!!!!
Thanks for the recipe. I tried it but something doesn’t seem right. Followed all the directions and the bread is quite doughy- like it didn’t bake long enough (I baked for 20 minutes) Not a lot of air holes either. I did 1.5 hours or rise time, followed by 20 minutes of rise time. Should I have have done more rise time? Going to try again… Just want to know what
you think I could adjust. Thank you, Dana
Hi Dana, the bake time is 15 minutes at 425 degrees and 20 minutes at 375 degrees. You can definitely add time if the bread needs it.
I love this recipe. I make it every 5-6 days. It’s just me to cook for. I use a large pyrex bowl (that’s all I have at the moment) and it makes a beautiful high loaf. It slices well and I use it for toast, sandwiches, egg on toast, sopping up gravy… MMmmm.
I haven’t made bread in years and the being able to make a loaf I can be proud of feels like a bug accomplishment!
Mel!! I made this bread yesterday and while it didn’t look quite like yours it tasted amazing! We shared our loaf with a friend who’s going through her second round of breast cancer. They were thrilled with getting a homemade dinner that included this bread. Thank you, once again for an amazing recipe!
Hi Mel! I just took my delicious smelling and almost-as-nice-looking as yours bread out of the oven. I wanted to make it today for a lunch with some special friends tomorrow but would like any suggestions how to store it til then? I appreciate any advice you can give me. I followed your recipe to a T and it is SO EASY to make!!! The only addition I did was to melt some butter, add some garlic powder and dried dill and brushed lightly over dough after it rose and while waiting for the 15-20 rest period. Do you think you can brush melted butter over it again once it’s baked? MANY THANKS FOR ANOTHER GREAT RECIPE!!!
Susan
Hi Susan, yes, you can definitely brush butter on the bread after it comes out of the oven. If you let it cool completely and store it in a sealed bag, that should be fine!
MANY THANKS MEL!! I can’t wait to cut into it! I’ll let you know what my friends say.
This bread is amazing and so easy! My family loved it. Thank you!!
Has anyone here tried this bread with the variation of getting it to resemble Mel’s Sweet Molasses Bread (Outback Knockoff)?
It would mean using 1/3 cup molasses and 1/3 cup honey and I’d probably use half whole wheat flour. The little bit of cocoa in the molasses bread is no issue right?
I don’t want to mess up a batch of this amazing bread by adding that much extra sweetener!
Wouldn’t that be a completely different recipe?
What an incredibly easy bread to make! Excited to show how lovely it looks! Wish I could share how beautiful it smells!!!!
And now I see… no way to post pic
Thanks for the recipe! A new “go to”
Made this bread, but was very dense. Followed instruction to a tee. Used a loaf pan. I think the next time I make this I will divide the dough. Otherwise it taste pretty good.
Excellent bread .i used 2 cups bread flour, one cup wheat flour and one cup ap flour .i never even had to get my hands messy- just stirred it with rubber spatula -shaped it and flipped it into pie pan. A Tip though- don’t grease pan with olive oil the bread just absorbed it and it was very difficult to get out.I’ll use vegetable oil next time
Hi Mel,
I just made this for the third time. Easy and works for a challenged bread baker for me! Knowing I shouldn’t mess with what isn’t broken I still have a question.
You link to the recipe on food 52 which links to the original recipe on Alex Stoddard blog.
You use 4 cups of flour which you have at 568 g. You also use 1 tablespoon of yeast.
Alex Stoddard uses 4 cups of flour which she weighs at 512 g and uses 2 teaspoons of yeast. Everything else is the same.
(I know flour doesn’t have a universal weight per cup. Drives me nuts)
***Why did you use 568 g instead of the original 512 g of flour? Did you reach that 568 number by experimenting what works best in one pan vs two pans?
I’m very curious about this as I’m deciphering the mysteries, for me, of bread.
Anne O.
Replying to my own post haaaa!
I see farther down from reading the comments that you used 568 g because you experience better results that way.
In what way were your results better? Was the dough too wet with 512 grams which did something to make it not bake well?
I’m curious how one decides to increase or decrease flour based on experience.
Hi Anne. Great questions! Yes, I used 568 grams for my flour weight after multiple test batches. Because I wanted to be able to bake this in a pie plate instead of the glass bowls that the original recipe is baked in, I found I needed a bit more flour for structure since the bread doesn’t have the sides of the bowl to rise up against. So that, and the fact that I use 142 grams per cup of flour, landed me on the 568 grams of flour for this recipe. I found that using 1 tablespoon yeast produced a slightly lighter crumb.
Mel,
Thank you for this specific information!
I get your reason now. And because of this explanation I will know how to do this myself if I need to.
I know readers have asked about high elevations and your recipes. And by a couple of experiments I have found that there used call for lower elevations makes my bread rise really, really fast here at 3,000.
I’ve discovered trial and error that using a bit less yeast makes the rising behave as it does when we were at about 200 feet elevation in Washington.
For example for this recipe I use between 2 1/4 and 2 1/2 teaspoons of instant yeast. If I use one tablespoon of instant yeast the dough rises to the double mark about 30% faster than the recipe time.
I’ve looked this up in different places and it seems like less air pressure can equal faster yeast growth. I wouldn’t bet money on this but it is true for me up here in Montana.
I also lower baking powder and baking soda in cookies by a little bit and I think it’s (like around 10 to 15% but I don’t measure it I just take a couple finger pinches out.)
But it makes sense to me that anything needed to be adjusted for elevation doesn’t magically switch on at the 4000 feet but that it’s a continuum that gradually changes the higher you go. It makes a difference in my personal experience anyway.
I make all your bread recipes, when we’re in Washington, just as they’re written and they work wonderfully at that low elevation. Thank you so much for answering this!!
Wow Anne this is exactly what I have been looking for. I have made this recipe many times but have just moved from CA to Colorado Springs & have been looking for adjustments for high altitude . THANK YOU!
How is this bread real?? I make a lot of bread and this was by far the EASIEST, FASTEST bread with the YUMMIEST results! I don’t know why I’d ever use another recipe again! Thank you!
Great easy bread! Perfect for when you haen’t planned ahead to allow for lengthy rising lol. My family loves having a sliced loaf of this bread in the freezer at all times for breakfast toast or quick garlic toast!
Hello Mel,
I have made this one time. I goofed up the recipe by warming water and not paying attention to how much was actually in the measuring cup. Dumped it all in and had a soupy mixture. Realized what I had done. Added flour until it seemed “right”. It rose and baked okay.
I plan to do it correctly, next time, but also wondered about using milk in place of some or all of the water, on my third go round, : ).
Love your site and I appreciate everyone’s hints and comments too.
Thank you!
Wonder and so easy to make!
I made this bread on Sunday. The next day my non baking-cooking husband wanted to make it again. I directed him but did not do any actual work. It turned out beautifully both times. We LOVE this easy to make bread. We used the pie pan both times. Next time, I think I will try it in the loaf pan. Thanks for the recipe.
I don’t know why I waited so long to try this one. So easy and so delicious!!
Made this to go along with soup and salad. My only regret is that I didn’t double it. As soon as my kids and husband started eating it, they complimented me on it. I think I will be teaching my 12 year old how to make it.
Can’t say I’ll be making this again – followed recipe to a T and the inside was still raw with the outside being a pale underbaked mess. Tasted fine, but I’ll be using a different recipe to be sure.
Was your oven working, Emma? I made this for the first time today, and the outside of the loaf was golden brown after the first 15 minutes at 425 degrees. I had one batch in a 9 inch metal pie plate, and another batch in a metal 4 x 13 inch Pullman loaf pan. I tried pulling the rectangular loaf out after 10 minutes at 375 degrees, but it still looked pale. So I left both loaves in for the full 20 minutes at 375, and they’re done. Thanks for the recipe, Mel! My teenager was asking when I was going to make more bread like I did in March of 2020, and this recipe was quick!
Hi Emma, sorry this didn’t work out for you. I think baking for longer and/or increasing your oven temperature should really help the outcome
Made this recipe the other day, added about 3-4 tablespoons of Herbs de Provence seasoning. It was absolutely amazing. Can’t wait to make it again. Super easy to make, ended up making it in a Dutch Oven, as I already had it out. Going to try cooking it in the pie pan next time.
Make this weekly, so good and so easy!
Love your recipes! I have a question. I haven’t made this yet but was wondering if I could put it in the fridge overnight to rise? Then in the morning take out and would I bake from cold or let it come to room temp first…. hoping you can help. Thanks
Hi Juliette, sorry for the delay…I haven’t tried an overnight rise for this bread, but it’s definitely worth a try. I would probably take it out of the fridge and let it rest for 20-30 minutes before baking.
The crust looked just like yours but the inside was completely raw and rose about 2”
from the pie plate. Internal temperature was 200°F which is normally what I bake my bread to, but this one leaves me wondering what happened? I think it just really needs kneading to develop gluten structure? So sad I was really looking forward to having an easy recipe in my repertoire.
Hi Jen, sorry this didn’t work out great for you. Because the dough is much wetter than typical bread dough, you may need to bake it longer and not rely on the internal temperature for doneness. Also, try adding 1/4-1/3 cup extra flour if it didn’t rise well.
After reading all the comments and not seeing anything on making this bread into rolls; I divided it up into 16 muffin cups and baked it at 425 for 5 minutes and then 375 for 10 minutes. Although it was still very good they were fairly dense and not airy like when I make into a loaf of bread. Probably won’t do it again as I prefer the lighter bread. Still love this recipe and I make a loaf or 2 every week. Thanks Mel
I made this recipe 2 days ago and it came out just as advertised. Thanks! I’m sending a loaf made this morning to my sister, who is sick, along with a hearty pot of chicken soup.
HI- I’m making this for the first time. My oven has a convection setting- which I rarely use. Do you have an opinion of baking this on regular or convection setting? and if it affects the texture, etc.? Thanks in advance!
Hi Michele, I’ve baked this on regular bake and convect bake and I don’t see a noticeable difference, so I’d suggest using the feature you’re most comfortable with!
I finally tried this tonight to go with soup. I didn’t think it would be much different from the rustic crusty bread, but you’re right, it is different enough to have its own post. I made it in a load pan, which made for easy cutting. It worked perfectly for me and the whole loaf was gone in one sitting. I told my kids it was called peasant bread and they joked it was fit for a king so the name was misleading. We loved it and will definitely be making this again.
Super Easy and what a great way to have homemade bread with Soup for dinner. Highly Recommend
Made this, followed the directions exactly and it turned out perfectly. Even watching the video several times didn’t help me– it was kind of a plop into the greased glass pie plate. But no matter! It’s delicious! And, yes, made the most wonderful toast! Thanks for this recipe–I had stopped at my local bakery for bread and they were closed for New Year’s Eve…I had just read the post showing this recipe as a reader favorite and Mel’s favorite!!
This is my new go-to bread recipe! I love that it doesn’t take all day to rise so I don’t need to think about it until the afternoon. I have used all white flour, and 1/2 white, 1/2 white whole wheat – bother delicious! I have made it in a pie pan and a loaf pan. And I just scrape it from the bowl into the pan – no mess; it shapes itself based on the shape of the pan. You can’t go wrong with this bread!
We finally tried this recipe and loved it! It was so simple and delicious! My teen daughter made it and the rest of the family was very impressed!
I have had such terrible results with most bread that I hesitated to try this. If it sounds too good to be true . . . But this was seriously the easiest and tastiest bread I have ever made. Life changing is not a stretch. Thank you
I have made this with different instructions:mix the water, yeast and sugar, set it aside for 10 to 16 minutes. Stir together the salt and flour. You can reduce salt to a low as half a tsp. if you prefer low sodium. When the yeast is foamy, stir it into the flour. cover an let it rise. From here the directions are the same. I’ve baked this in a variety of pyrex bowls with no problems. Metal loaf pans do a good job too.
P.S. I used a 2 quart bowl or 2 one quart bowls. The same for loaf pans. If the bottom isn’t brown enough, take that loaf out of the pan/bowl and place it direct on the oven rack and bake 5 more minutes.
We LOVE this bread! Have used the pie pan and a regular loaf pan. It’s a little messy, but so worth it!
Love all your recipes, Mel! I’ve tried this one twice now and each time the bread turns out dense and heavy. What could be causing this?
Hi Abby – is the bread noticeably rising (getting puffy) before you shape it?
I had the same experience. I used some whole wheat flour, less than half. Bread has good flavor, but very dense, no be holes. It did raise up puffy.
Hi, I used bread flour and came out very weak. I added 1/2 cup of flour and it improved a little. 🙁
I have made this bread for about 10 years i found it on my 1st pintrest. You can also melt some butter with minced garlic and coat the bread with it. It is delicious. Also we have used it as a bread bowl for chowders
Do you coat it with butter before or after baking. Thx.
First time making this bread, I was so amazed just how easy it was for me to make, as I have nerve damage in my hands, so kneading bread is hard for me. Both loaves came out so wonderful that I bought a 10 kg/22 lb bag of flour. Making more today and will be giving some away as winter holiday gifts. Thinking of adding some dried herbs to the dough and will see what mix works best. Thanks again.
Lois, try brushing the loaf with beaten egg, then sprinkle it with sesame seeds or Poppy seeds. I think everything but the bagel seasoning would by tasty too.( Do this after the second rise.)
This is the easiest and best tasting bread I have ever made. I find myself making a fresh loaf every week> Thanks
Hi Mel
I have been baking bread for some time now… mostly sourdough. Since trying out this recipe for the first time my sourdough started has been standing abandoned in the fridge. This is the easiest, best, most delicious bread recipe ever…. I will never look at another bread recipe again. We can’t wait for it to get out of the oven… nor can we get enough… it normally disappears within a day. Thank you so much for a true winner of a bread.
Mel, this bread is wonderful! My husband has made it twice and I love it!!! Thanks for such an easy recipe.
Merry Christmas
I’m so excited to try this bread! Does it freeze well? My apologies if I missed that info somewhere.
Yes, the baked bread freezes great.
“Is it Mel’s?!” my 8 year old asks, and to which I nod. “Ohhhh, she’s SO good!”
Thanks for another great recipe. We made this two days in a row, added garlic and Parmesan the tonight and it was delectable (even with me undercooking it )!
Haha, you two are the cutest!
I’ve made this bread twice this week and it is so good and so easy!!! Thanks for another great recipe!!
Hello! I am trying to find a bread recipe for french toast and wondered if you would recommend this one? I was trying to avoid long rise times but wasn’t sure if the bread was sweet enough. If I did try this recipe for french toast would it work to add some kind of cinnamon swirl mixture to it before baking?
Yes! This bread makes delicious french toast. The dough might be a bit too loose for a cinnamon swirl, but you could experiment!
Have made it twice once part wheat flour, once white all bread flour adding brown sugar raisins and cinnamon. I love it fresh and also toasted. I can eat nearly a whole loaf on my own and I weigh just 100 lbs.on a heavy day! Thanks for sharing! My brother shared with me!
My first truly successful yeast bread! So simple and easy to follow instructions, and even better my family loved every crumb!! Thanks Mel for another winner!
Sooooooo good and incredibly easy!!!! Thanks Mel! Another winner!! Thank you for insisting I try it! It really is delicious!
Sooooooo good and incredibly easy!!!! Thanks Mel! Another winner!!
For those of you questioning whether the amount of flour is correct…..IT IS! I’ve made this recipe with 568 grams of flour at least 20 times since Mel posted it and it comes out perfect every time! Do not question MEL! haha but seriously!
What are the weights for the other ingredients besides flour?
This bread is so easy and delicious. I like to make it during my kids quiet time. We’ve used it for toast, breakfast sandwiches, a grilled ham and cheese and for Thanksgiving for leftover turkey sandwiches which were so yummy!
I almost didn’t leave a comment…simply, it’s everything you already said. I must have made 6 loaves in the last week. It’s a winner, no fail recipe. Thank you for sharing and insisting we try it.
This bread was perfect for a pre-Thanksgiving family soup night. I doubled the recipe and sub’d half of the AP flour for whole wheat… made it perfectly hearty. Crowd loved it.
Wonderful! I oiled the outside of the bread just before baking. Gave it a nice rich color & crust.
First time made this bread and it was easy and delicious .will make it again .
So, so good and easy! I even served this to guests and they, of course, wanted the recipe. This bread also makes the best toast you’ll ever have!!
I’ve had fantastic results using the recipe as stated with 568 grams of flour. It turns out perfectly every time. A foolproof recipe.
Yikes – unless this is a tweak on the recipe, the amount of flour by weight is incorrect. The source recipe -Alexandra’s Kitchen-states 512 grams. This recipe says 568 grams, not an insignificant amount. My dough didn’t seem overly wet so that may be the reason.
Dough is currently on its first rise. I’ll complete the process and see what results I get.
I just used the original recipe as a starting point, but yes, I increase the flour a little bit because I had the best results that way.
Sorry. The flour amount is correct in cups but the amount in grams is incorrect….I should have checked.
I test all my recipes using 142 grams per cup of flour so the gram amount is correct based on how I create/test recipes. 🙂
Are you sure that the flour amount is correct? I don’t think so.
This is the easiest and best bread recipe that works every time. I made it with bread dough and it worked as well as the 50/50 white/wheat flour. I make at least 1 loaf a week. Thx
I made it with all purpose flour. It is good but not as sturdy as bread make with bread flour
I’m in trouble…my family now wants it daily!!! So great!
This bread checks all the boxes – fast, easy, very few dishes, and DELICIOUS!!
Amazing! I mixed it up this morning and let it rise while I was working. Put it in the oven and it came out perfect. I may or may not be the only thing I ate for lunch. Thank you for another wonderful recipe!
5 STARS from family if 7!!!!
Hello! I made your recipe with active dry yeast and bread flour. The bread came out perfectly. It was delicious!
This bread is delicious and easy to make. Dinner time is chaos at my house. This bread is so simple to make. So it made dinner time much less chaotic. Thanks so much!!!
I am terrible at returning to write a review, but I had to on this one! I’ve make this bread more in the last two weeks than I have any other recipe in my life It is seriously amazing, and I can’t believe how quick and simple it is. I’m convinced my 8 year old could do it!
This was so delicious and so simple! I got a little nervous when I put it in the pie plate and it looked pretty shaggy and sticky. But I trusted Mel, and resisted adding more flour, and it came out perfectly! This will be a go-to recipe for weeknight dinners. Thank you!
This bread was very tasty and super simple to make. I did have a problem with it sticking to the pan though. Next time I’ll line the pan with parchment paper. I’ll also probably up the salt a bit.
I just pulled this out of the oven, and it looks delicious, but am curious if you cool it in the pan or remove from the pan to cool? I didn’t see it mentioned in the recipe. Thanks!
Good question, Emily – I usually pop it onto a cooling rack to cool completely.
I will be making this on repeat. So good and so easy!
Make this bread!! It is the best! Use a cast iron skillet greased with bacon grease. Baste with melted butter 10 min before end of baking time. You won’t be sorry!!!
OMG. Best quick bread recipe. My tweek was to slather a 9” cast iron skillet with bacon grease. Not too much mind you, and add dough tuck under then flip over for a nice smooth top. Rest as recipe indicated. Tried to make cross slit, but dough so wet didn’t work, but no worries didn’t make a difference. 10 min to final bake finish time basted with 2 tbsp melted butter. BEST FRIKIN EASY BREAD EVER!! Thanks for a great recipe. Might try adding honey for part of sugar content next time. Yummy
The hard crust was the highlight of this bread. It cuts beautifully and was delicious dripping in butter. My husband thought it was too bland but I don’t know how to boost the flavor. Any suggestions?
Thanks for your great directions and the easy recipe.
I made the bread and thought it just needed a bit of tweaking on salt and sugar (although the bread itself is amazing!!). This is the third time I’ve made it in 2 weeks, which says a lot as a low-carb eater! So I did a Tbsp of salt and a tsp sugar….thought it made the flavor perfect!
I can’t believe how easy to make and DELICIOUS this bread is! I’m not a bread maker. I even have a good bread machine but I find it’s a hassle to use it.
I am so happy I found this recipe. I made the first loaf ( I like using a loaf pan for more traditional slices) a couple of days ago. My husband and I devoured it. Last night I whipped up another loaf after dinner so we could have toast this morning. The loaf is already half gone! Truly…everyone has to try it because it will end up at the top of their bread recipes. Thank you!!!
I haven’t baked bread in 45 years. After seeing this recipe I just had to try it. It came out pretty darn good for a first try. I think I’ll be sure to measure the yeast next time. I just used one packet of yeast which isn’t actually a tablespoon. I just ate a piece and really liked the taste. I used a loaf pan and it didn’t rise quite as much as your picture but almost. I’ll definitely make this again. Thanks so much for this recipe. I used to bake bread when I could get Elams flour. That recipe had mashed potatoes in it. And was so good I gained 10 lbs. lol. This was alot easier and I wish I knew how to post a picture because it looks almost like yours. I will definitely make again but maybe with wheat flour. Hope you have a great Holiday and love your posts.
SO GOOD THE BEST BREAD LOVE IT THANK
SO, so, so, so easy and SO good! Made it last night and we ate the whole loaf. Wonderful!
This is the first time I ever made a yeast bread. It is fantastic. I used a packet of Fleishmans active dry yeast in 1/4 cup water. (The packet is a bit less than 1 Tbs but it worked perfectly.) For activating the yeast I watched temperature precisely, (100 degrees) followed the recipe instructions exactly and used a 9″ pie pan for the bake. Ended up with an amazing golden, crunchy rustic boule with perfect chewy interior texture. Wish I could post a picture. Sliced, toasted and buttered is delicious and also makes great sandwiches. I just ordered and received baguette forms as I believe this recipe will make incredible baguettes. Making this this will become a habit replacing store bought boules and baguettes and even sandwich breads for now on.
I just baked and tried this bread for the first time. I hate to say it like this, but this bread is way better than I thought it would be! The crust is perfectly crunchy and chewy. The bread is light, soft and pillowy. It has really good flavor and texture. This recipe will definitely be on repeat in my house. I just need to make them in roll size so I can get that delicious crunchy, chewy crust in every bite! Thanks again Mel! Your recipes never disappoint 🙂
I forgot to mention, if you just use water to keep your hands and counter wet while shaping the dough, you won’t have messy, sticky hands. If the dough starts to stick, just run your hands under water, or dip them in a bowl of water. I have seen this method used by Chad Robertson of Tartine in San Francisco when working with hydration doughs such as this one. Works every time!
I finally got down to making this today and it did not disappoint. Awesome flavor and texture. Loved that I did not have to lug out my stand mixer and could do it by hand. I used cake flour and a loaf pan. Baked it on 220°C for 10 mins and 180°C for 25-30 mins. It came out wonderfully. Thanks for the recipe <3
My husband is from Pocatello, but right now retired and living in FL. That being said, we really enjoy this site and this bread recipe is so easy and delicious. I’m making a second loaf right now. All I can say is WOW, try it, you won’t be sorry’ I promise.
So easy, so fast and so delicious! I made it in a pie plate came out beautiful! Thanks Mel.
This is the first loaf of bread my daughter has made without the use of a bread machine. She thinks that it is real easy. No fuss, no muss. Thanks
Hi Mel!! First time looking at one of your recipes. I began making bread shortly after the pandemic began last year. I’ve only made artisan bread because the recipes I follow ARE no knead recipes. This is very important for me due to having rheumatoid arthritis and kneading by hand isn’t really an option for me.
What I’d like to know is…can you mix the bread dough using a stand mixer such as a KitchenAid mixer? Due to my RA, thisbis such a helpful tool for me in the kitchen.
I am really looking forward to trying your recipe. I love that it’ll take so much less time than the others I’ve made.
Hi Lisa, yes, I think you could mix this in a stand mixer using the paddle attachment. Just make sure not to overmix. It really just needs to be mixed until all the flour is incorporated.
I used the paddle attachment on my kitchenaid to mix briefly, just until all flour was incorporated. It took less than a minute.
I can’t believe how quickly this came together! Fresh bread, from mixing to slicing, in less than two and a half hours?! This knowledge could be very dangerous! My family raved about it tonight at dinner and I know we will be making many, many more loaves in the future. (P.S. For anyone interested, it makes a perfect pairing with Mel’s Lemon Chicken Orzo Soup!)
This bread is easy to make and delicious! I could eat the whole thing. We had it with the lemon orzo soup. Perfection!!!!
This is really good! I used the amount of flour called for, and for whatever reason it was more of a batter. It still baked up OK and It was devoured in no time. I will make it again this week and use more flour. Thanks for the recipe!
OMG! This was incredible. I am a working mom, and I thought that baking homemade bread was out of my reach because I just don’t have time. But I made this yesterday, and it was so easy and my husband and daughter and I gathered around the counter and ate a lot of it still warm because it was SO good. Extra bonus: my house smelled incredible for hours. <3
So delicious! Even better on the second day.
This is genius! I can’t believe how easy it was to make. I’m not sure I’ll ever go to the trouble of making the Dutch oven artisan bread again. Thanks lots, Mel!
Hi Mel; I am a bread enthusiast, saw your post and started right away making the peasant bread!! I did fine with the making and baking per recipe; but when I take out of oven and let cool, it collapses somewhat and the middle when I cut it when it has cooled down is dense and gummy, no airy holes or light crumbs! Do you have any suggestions? Followed temps and time , increased time and bread got very brown! Please help me with what I am doing wrong! Loved how fast it came together and love the delicious recipes you post!! Thank you! God Bless!
Hi Linda, how long are you baking it for? 15 minutes at 425 degrees and then another 15-20 minutes at 375 degrees? If it’s still gummy in the center, I’d increase the baking time (at 375 degrees) for another 8-10 minutes. If the bread is getting too brown, try baking for only 10 minutes at 425 degrees and then 30 minutes at 375 degrees. Also, placing the oven rack as close to the center of the oven as possible can help, too. Let me know if you have other issues or questions. I’m confident we can troubleshoot together and get this worked out!
This bread was so easy and it tastes so good! I thought i messed it up because it was a little flat looking in the pan but it puffed up when baking. I ate it with your vegetable beef noodle soup. Perfect for a cool night.
Mel, you’ve done it again! I trusted you on this one and I was so pleased with this bread! So easy, so quick, so delicious!
Thank you for sharing this peasant bread! Will definitely be repeating this one!
I’ve been making this from Alexandra Stoffard’s blog for quite awhile, and it’s now the only bread I’ve made in a long time. I use the Pyrex bowls she recommends and double it. Two of the bowls are the rounded bottom bowls and the other two hold the same amount but have straight sides. They both work out beautifully. I believe this is a foolproof recipe that anyone should have success with.
AMAZING BREAD!!
I’m so excited to have a no fail, easy bread recipe for everyday use. Great for soups! We have 13 in our immediate family and whipping up 2 of these is so easy! THANK YOU MEL!
I’m not surprised…I’ve read your blog for years and years, and everything I’ve ever made has been wonderful.
I wish you had listed the ingredients by weight, or at least specified whether you used the dip and scoop method or the spoon and level method. I did the spoon and level method thinking that was the standard, and the dough ended up practically liquid even after an hour and a half rise time. I didn’t get nearly the oven spring your pictures showed. No, my yeast wasn’t old, I’d just bought it. Nor am I new to bread baking or high hydration doughs. This was disappointing.
Hi Julia, I’m sorry this didn’t work out for you. Weight measures are listed in the recipe if it would be more helpful to use the gram amount for flour.
This recipe would be great for a mix-in-a-jar gift. Just mix up all but the water and put it in a quart jar. Attach instructions and make it pretty with a ribbon!
This bread is f.a.b.u.l.o.u.s! I nearly ate the entire loaf in one day. I was skeptical at first, too easy to make, few ingredients, but holy crap, it’s the best no knead bread out there!
You need to make this today, and tomorrow too!
First bread I made! And it was a success! Love this bread, will be my go to. Now I won’t shy away from trying other recipes. Thank you so much for this recipe!
This.is.dangerous. And absolutely delicious. Made a loaf of this incredible bread in 3 hours, start to finish. I just put the remaining half loaf in a Ziploc bag in hopes of having leftovers tomorrow. I am glad it turned out so well, but also not sure I needed to know I could make a loaf of bread mid-afternoon that would be ready before dinner. I took advice from another reviewer’s comment and didn’t even get my hands messy. I sprayed the pie plate, ran the spatula around the edge of the bowl, and then just dumped the dough into the pie plate. We dug in 10 minutes after it came out of the oven and nobody has been able to walk by without having some. Thanks, Mel!
This bread was super easy and super delicious. I struggled with the shaping part, lol. I think Mel has some magic hands, or at least a lot more experience than I do! Even though I didn’t shape it the best, it still puffed up nicely and tasted excellent.
Can I make the dough the night before and bake it in the morning?
Yes! I’ve done that and it works great. It rises quite a bit in the refrigerator overnight.
Love this bread! I’ve made it 4 times since you posted it. My family all agrees it is delicious and I love that it is so easy to make.
This bread is amazing! 100 stars!!
I am try in it in the morning
This was Amazing!!! We have made this twice since you posted the recipe! I was worried at first because there is no oil or butter. I thought it would be stiff and how happy I was to be wrong!! So soft and delicious!! Thank you for sharing such wonderful recipes!!
You’re literally the best! My kids loved the bread yesterday and I’m making a second loaf today because the first is almost gone. I used active dry yeast and just let it rise a bit longer, seemed to bake up just fine. Thank you for always giving us the yummiest recipes!
Hello!! I’m definitely going to make this bread. I’ve got different things I’d like to sprinkle on top, like everything bagel or poppy seeds. Have you tried any toppings?
I haven’t tried that, but it should work well!
I LOVE this bread! I’m teaching each of my daughters how to make it independently, too!
I just made this bread. My crumb does not look like yours. In fact, the loaf, while good, is so very dense. I had it in shape in less than 1 minute. Every steps looks just like your pictures except the finished product. Where do you think I may have gone wrong. This is the yeast I used: Red Star Platinum premium instant yeast. Could this be my problem.
Hi Lynda, that’s the yeast I use, so I don’t think that’s the problem (unless your yeast is expired or old). Did the bread rise ok? If it over rose in the pan, it could flatten in the oven while baking and become more dense.
Hi, The bread rose ok but not overly so. It didn’t flatten as it did have a nice rounded shape on top. I will try again and see what happens. The bread is great, just dense. Was going to make today BUT has been pouring all day, too much humidity from the rain. Try tomorrow.
Well I took your pleading/bribing/begging to make right this minute to heart! I went ahead and made 2 batches because well, you know, it’s from YOUR site so I knew it would be good! It did not disappoint! I can’t believe how incredibly easy and quick (my part in it I mean) it was either! I’ve made a little homemade bread before but not a ton so I’m a beginner. Everyone agreed it was FANTASTIC! I even got the comments of it being the best bread my sons friend ever had and from another that it tasted like Schlotzsky’s bread to them. There were no leftovers to worry about storing Thanks for another win at my house!
This bread recipe is so easy! I made this yesterday and it was Soooooo good! My dog approved of it as well. Lol. Thank you, for the recipe. This is definitely a keeper at our house! Yummy!!
I tried this recipe for the first time yesterday. I loved the ease and outcome
I also forwarded it to my friends who swear they too would try it.
Thanks for sharing
I just made this tonight and my family really liked it! I used the pie dish and I didn’t have a problem with the stickiness bc I buttered my hands and watched your vid on how to handle it. I wasn’t sure how to store the leftovers so I put in a gallon baggie with a paper towel and sealed it on the counter. It’s a great bread recipe I’ll be using again, thanks!
Yum! Better (and easier) than the no-knead artisan bread. Thank you!!!
I agree, Laurie – thanks for taking the time to let me know!
My husband thought this was the best bread he ever ate. It was so easy!
Glad to hear that, Beverly! Thanks for letting me know!
Yes I was very impressed with how easy making this loaf was.
I have deep dish pie plates .Do u think these would be better. or the same using regular. Pie plates.
Hi Sally, you could definitely use a deep pie plate for this bread.
Delicious! Any advice for making smaller loaves out of this, like ideas for pans to use and baking time? Also, how do you recommend storing this bread so the crust stays crusty? Thank you!
I’ve found the crust inevitably softens over time. It’s hard to keep it quite as crusty as when it comes out of the oven. For smaller loaves, you could try a 1 or 1.5-quart baking dish of any size (even small loaf pans would work)
OH Mel! I’ve literally made this 5 times since you posted this the day before yesterday. It’s amazing as are all your recipes.
I love this so much! Thank you, Becki!
Ii made this to accompany a ham and bean soup I make. It was wonderful as usual! I like your recipes and write ups o. How to handle the dough. It makes it easier to troubleshoot what I did or didn’t so right. I know I was trying too hard for the perfect tucked in tight ball dough, it slipped in my oiled hands and landed in my oiled pie pan. I let it go where it plopped. It turned out lovely. The pie pan was perfect. I might have undercooked it by a few minutes. But nothing was raw dough so that’s just getting the feel of things in my oven. Plus I cut it when it was still mostly hot and that will always make bread gummy. Very delicious flavorful loaf. I used active dry yeast without any issue. Definitely gonna make again! You definitely have to overcome the sticky dough issues to be okay with the process.
Thanks so much for including your details and experience, Andrea! Super helpful. It’s good to know that plopping it in the pan will work just fine!
Currently making my second loaf because the first was so good! I think what impressed me most was that even the day-old leftovers were good, which is not true of any of the other homemade bread I make. I much preferred this to the usual no-knead with the cut-your-mouth sharp crust (though it is beautiful and I do enjoy it). Thanks Mel!
I agree with you on the leftovers! The next day, this bread is still very soft and moist.
Day three and the leftovers are still yummy (toasted and buttered)!
Awesome!!!!
hi when you say all purpose flour do you mean self raising ,regards gary
Hi Gary, no, not self-rising. Just regular white flour (not bread flour) without anything added to it.
Easy and delicious! I used half AP and half white whole wheat, and since my bowl was about 9″ across, I just upended the pie pan on top and flipped the whole thing over. We’re calling it rustic. I just enjoyed some for breakfast.
Ok, LOVE that method! Brilliant! Thanks for sharing, Margie.
I was surprised that you didn’t put it into fridge overnight as in most no-knead recipes. Maybe that’s why it calls for 1 Tablespoon of yeast. I’ll have to try this out. Thanks.
I am making this rdcipe but the flour does not seem to be stucky at all.add more liquid?
Hmmm, if the dough isn’t sticky at all it might need more water to loosen it up.
I made a mistake . I used a two cup measure thi king it was a one cup. So i had too much flour. I just redid it and its sticky!!sorry.
Oh my word. Absolutely amazing!!!! Thank you, Mel!!!
I’m glad you liked it!
Can I bake this bread in a muffin pan for small individual servings? If I can, how long and at what temp?
Thank you.
I haven’t tried that, but I assume that would probably work. I’d probably bake at 425 degrees for five minutes and then decrease to 350 degrees for another 5-10 minutes.
Working from home today, and I whipped this up on my lunch break. Sooo easy! Generously buttered a pie pan as others suggested, and it baked up beautifully. Now my house smells like fresh bread and my belly is full of it! Bliss! I think I must purchase Bread, Toast, Crumbs to get more of these delicious and quick bread recipes. Thanks for sharing, Mel!
I just bought that cookbook based on so many great recommendations!
This bread recipe is so easy! I made this yesterday and it was Soooooo good! My dog approved of it as well. Lol. Thank you, for the recipe. This is definitely a keeper at our house! Yummy!!
Do you think that this could possibly be made into rolls, muffins, or drop biscuits? I find that making it into loaf form poses problems for portion control!!
Thanks.
I haven’t tried making it into smaller portions, but I think it could work!
Yes. It worked!!! I am eating the heel as “we speak”. Fresh homemade bread.
Thank YOU!
(I’m already a subscriber, have been so for at least a year. I love your recipes & your methodology of presenting them. Have never even thought of unsubscribing & have been rewarded with this recipe)
You are so kind – thanks so much, Hilda!
I made it and it was everything you said it would be, most importantly, easy and delicious. Thank you! I will be adding this to my “Mel’s Kitchen Cafe shrine” on Pinterest
Haha, thanks, Charlotte!
I can’t wait to try this I am so excited
So freaking good!! I made it last night and my husband and I were in bread heaven! :).
Thanks for letting me know, Kim!
This bread was so delicious! The crust is a great texture, especially for kids, not too hard to bite through. I baked it in two, rectangle bread pans (I doubled the recipe). Thank you so, so, so much!!!
Thanks for the review, Alicia! I love baking it in loaf pans, too, because it makes great sandwiches!
I love you Mel, but I can’t believe you just ripped off Alexandra Staffords’s recipe. Her blog alexandracooks and her book Bread, Toast crumbs has changed my life.
@Karen I’m a little confused why you’re saying she’s ripped off someone’s recipe. Mel ALWAYS gives credit to the sources she receives her recipes from. She isn’t claiming to say she wrote this recipe on her own. She mentioned she got the recipe from a reader and the original source she received it from was stated here in this post as well. ❤️
Hi Karen, I would never rip off someone’s recipe. I’m sorry you feel that way. I linked to the website I got this recipe from below my recipe card (food52 site where Alexandra shares the recipe). I also modified the recipe (baking pan and buttering method was changed, altered the yeast amount and the flour amount by weight) enough that I felt like posting my version would be helpful. The internet is full of variations on amazing recipes – mine is just my take on Alexandra’s brilliant recipe with credit given to her by way of that link.
Bis Du Dir nicht mehr die Finger verbrennst!!
I make the peasant bread from Alexandra’s Kitchen (very similar to this recipe – and she has a cookbook based around variations of this bread – super recommend it! It’s called Bread Toast Crumbs) and just a tip – using a generous amount of butter instead of cooking spray for the pan really creates an awesome crust. And I do just bake mine in standard glass Pyrex bowls, but I may have to try your pie plate idea! I also always sub in some fresh ground wheat flour. I make this bread all the time, SO good!!
I just bought that cookbook!
Easiest bread I’ve ever made, and so yummy!
So happy to hear that, Stephanie!
Have you tried unbleached flour? What sort of a difference do you think that wld make.?
Hi Nikki, I use unbleached all-purpose flour, and it works great!
How long should I wait before slicing the bread?
Oh yum! This was so fun!
Bis Du Dir nicht mehr die Finger verbrennst!!
Hi Sue, I find the bread holds up best if I wait to slice until it has cooled.
I’m new to bread making and plan to try this ASAP. Looking at my store, it has Fleischmann’s Bread Machine Instant Yeast. Will this work with your recipe as written? Am thinking instant is instant bread machine involved or not. An I right?
Yes, that yeast will work just fine!
I’ve been wanting to make peasant bread for a couple of years, but have never gotten around to finding the vintage pyrex bowl. A pie plate is genius! Thank you!!! I look so forward to making it.
Hope you like the bread, Stacey!
I made this this morning since today is already a bread day and it’s delicious and almost all gone! I like that it didn’t need long rises. I used active dry yeast and swapped in a cup of whole wheat and it was light and fluffy. I’ve made one of Alexandra’s bread recipes before and loved it. Glad to have another one! Thanks for sharing, Mel!
Thanks for including your changes, Nicole!
This is in the oven right now. Can’t wait to try it.
I’m so glad you tried it today, Denise! I hope you love the end result!
I did not hesitate when you said make it now. I’m eating warm bread right now and it is amazing! Thanks for another go-to recipe.
Yay!! I’m so happy to hear that!
I have to make this bread after finding out you are Idahoan by choice…We moved from central Florida to South Central Idaho, but presently exiled in Hawaii due to employment. It’s not a bad place to be stuck, but really miss the Gem State! My bread baking talent is more at the frozen loaf stage, but I’m giving this a try this afternoon, and I’ll think of Idaho the whole time!
I can’t say as I’d be sad to be stuck in Hawaii, BUT, I am a homebody, so I think my heart would be longing for Idaho, too!
Can this recipe be adapted for a gluten free diet?
Hi Donna, I haven’t tried making this gluten free. I’m sorry I’m not more help!
The book, “Bread Toast Crumbs” by Alexandra Stafford, has a very similar recipe which I have been making for years. I do use the pyrex bowls, coated with butter, as her recipe calls for. It makes the exterior crust sooo good. I like your idea of making one loaf in a glass pie dish and shall try it that way when I make it next! Thanks!
Can’t wait to try the pie plate!!
I’ve been making a similar recipe all year! Bread really can be life changing!!
Yes, it sure can be!
Yay! I’m so glad you loved this bread as much as I did! I’m excited to try baking it in a pie plate! You’re the best, Mel!
Thanks so much for sending me the recipe!!
Thanks for all the info on different pans and flours. Will be making this soon. Just to be sure, there’s no second rise, just the rest period while the oven heats up?
Yes! You’re right, it rests in the pan for 15-20 minutes before baking. It’ll puff a bit but won’t necessarily double in size.
Mel, your timing is spot on!! I just learned about and had some peasant bread for the first time last night. I cannot wait to try out your recipe.
There are a lot of different peasant bread variations around online – this one is fantastic, but I bet there are some other great ones, too. I messed with this recipe a bit – using slightly more yeast and a bit more flour.
I’ve been making Alexandra’s bread for years and it is spectacular. I believe she also recently published a cookbook. I think the bread is based on a recipe her mom taught her. Everyone should try this. I make it in the two Pyrex glass bowls and have never had a problem. I love buttering the glass bowl and love the resulting shape and flavor. Yum.
I just bought her cookbooks! Bread, Toast, Crumbs. I’m excited. I’ve heard great things about it.
So excited to try this recipe.
How would this work with sourdough starter instead of yeast?
I was wondering the same thing. Maybe at least replacing some of the flour and water with starter. and still including the instant yeast?
Hey Stephanie and Kami – I thought someone might ask this…I haven’t tried using sourdough starter in this recipe yet, but you could definitely experiment! Maybe subbing in 1 cup sourdough starter and taking out 1/2 cup flour and 1/2 cup water? I don’t know if that would be enough to eliminate the yeast entirely.
Thanks for the suggestions. I made bread tonight with 1C starter, and 1/2 less of both flour and water. I did add 1 tsp yeast. It was fantastic! So delicious and rave reviews from family.
I just made it tonight with 1 cup of sourdough starter. I reduced the flour and water each by 1/2 cup and the instant yeast by half. It turned out delicious! Thank you Mel!
So excited someone checked in on a sourdough version. Thank you, Kim!
Was your sourdough starter fed or was it discard? I want to try this tomorrow!
I can’t wait to try this!
I hope you love it as much as we do!
I’ve been making this bread for years and it is life changing and delicious bread! But I’ve always made it in the 2 pyrex bowls so I am excited to try it in a pie plate. I’ve never done that before and it sounds intriguing. Thanks for the tip!
Sounds like the pyrex bowls work really well for a lot of people!
I want to try this! It’ll be my first time making bread and I’ve got a question.
If using a loaf pan, do you have to shape it or can you just dump the dough into the pan without shaping at all?
I haven’t tried a true lift-and-dump method into the loaf pan. I give it a little shaping with lightly greased hands…but where this dough is pretty rustic, you might be able to just plop it in there.
I just dumped it, and it turned out perfectly
How do you think this would do with cup for cup GF flour?
I’m not experienced baking gluten-free bread, so I’m not sure. Gluten free flour doesn’t *usually* sub well 1-for-1 in yeast bread recipes made with wheat flour, so I don’t know if it would come out the same.
I promise to make this right away. I’ve been making your french bread rolls to go with my Dutch Meatball Soup. Tomorrow I’ll make this bread to go with it to share with a friend who had knee surgery. Thanks again for all your awesomeness!
I hope you love the bread, Kelli! I made it once…and then never stopped. We’ve been making it several times a week because it’s so easy…and so delicious! Good luck to your friend who just had surgery!
Kelli, I saw your comment about making this bread to go with your Dutch meatball soup. I have a recipe for Italian meatball soup and would really like to get the recipe from you if possible. Thanks, Gary
1 pound leanest hamburger
1 egg
1/2 cup bread crumbs
1 tsp salt
1/2 tsp pepper
1/2 tsp nutmeg
1-2 Tablespoons dried parsley
Mix well and form into very small balls
12 cups chicken broth
1 cup pearl/calrose rice
1 cup finely chopped onion
3 cups finely chopped celery with leaves
3 cups grated carrots
1 1/2 cups finely chopped cauliflower
Many dashes of Maggi liquid seasoning.
1 tsp salt, 1/2 tsp pepper, 1/2 tsp nutmeg, 2 TBLS dried parsley
Bring broth to rolling boil. Slowly add meatballs to keep boil going. Add rice, keep boiling, and then slowly add veggies to not lose boil. Put a lid on, turn down to simmer for 1 1/2 hours stirring regularly, especially at the the end or the rice will stick.
Serve with additional Maggi and this yummy peasant bread slathered in butter.
Great….now I want bread…..
Thank you though! I don’t have a dutch oven (can’t use one on a glass stove top) & haven’t figured out how to bake all the wonderful rustic bread recipes. This is fantastic & will be made sooner rather than later!
Hope you enjoy it, Christi!
How about a cast iron pan????
Yes, that would work great!