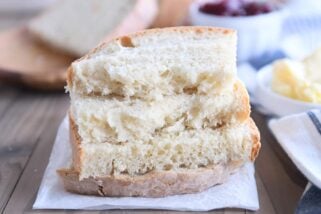
Homemade Sourdough Bagels
These homemade sourdough bagels are fluffy, chewy, and very easy to make at home. Plan for an overnight ferment, which aids in flavor and digestibility.
This recipe alone makes maintaining a sourdough starter worth it. The good news? Keeping up with a sourdough starter is so easy (and very low maintenance). I’m sharing all the tips and tricks you need to ensure this bagel recipe is absolutely foolproof. It is a perfect recipe for beginners and experts alike!

All You Need to Know About Sourdough Starter for This Recipe
First and foremost, use a well-established sourdough starter for this recipe! I keep my sourdough starter in the refrigerator in a large container and pull it out only when I need to siphon off some discard to use in an easy sourdough discard recipe or when I need to feed starter to use in a recipe.
I use this sourdough jar to feed sourdough prior to using in recipes like these bagels. It holds the perfect amount for this recipe and others like it.
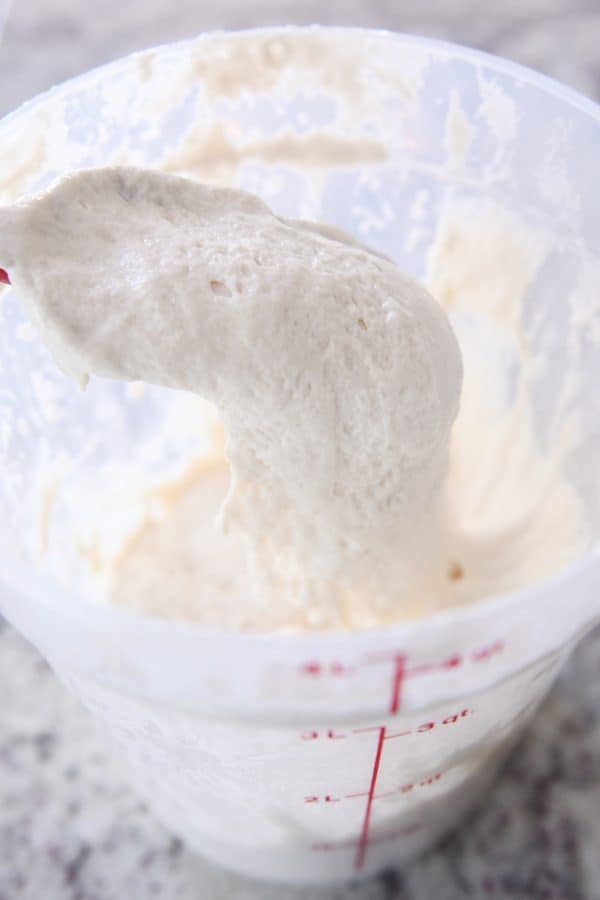
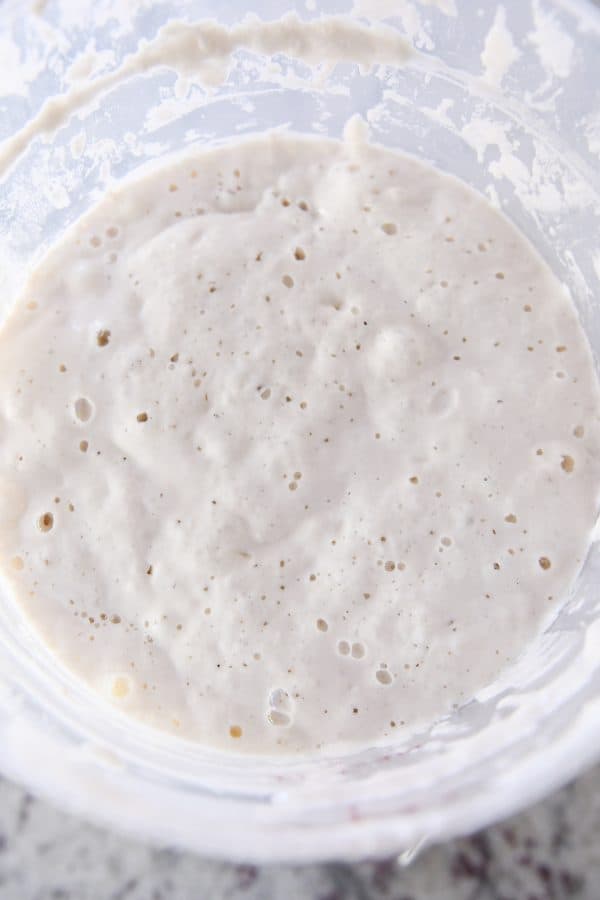
I make these bagels using a sourdough starter fed with a 1:1:1 ratio. It is thick but pourable. It is ripe and ready to use within about four to six hours of being fed. The exact time of when your starter will be ready will depend on the temperature of the starter and water and flour, the temperature of your kitchen, and a multitude of other factors.
Using another feeding ratio, like 1:5:5 or 1:10:10, will mean the starter needs more time to ripen before using. Any starter that has been fed and is ripe and bubbly will work in this recipe, no matter the ratio used to feed it.
If you want to prep just enough sourdough starter for this recipe (following a 1:1:1 ratio), use 57 grams starter, 57 grams room temperature water, and 57 grams flour.
*Make sure the sourdough starter is very ripe and bubbly before using in the recipe.*
Timeline for Sourdough Bagels
For a sourdough starter with a 1:1:1 ratio, I use the following timeline in order to have fresh, baked bagels before noon on the second day. Adjust the schedule as needed depending on when you want the bagels to be finished and how long your starter takes to ripen:
- Day 1: 2:00 p.m. feed sourdough starter and let rest at room temperature until ripe and bubbly.
- Day 1: 9:00 p.m. mix dough, cover, leave out at room temperature
- Day 2: 9:00 a.m. (give or take an hour; wait until dough has doubled) form dough into balls and let rest for 10-15 minutes
- Day 2: 9:30 a.m. shape bagels and boil water
- Day 2: 10:00 a.m. boil bagels and add toppings
- Day 2: 10:30 a.m. bake bagels
The dough can rest in bulk for 12 to 14 hours at room temperature. If your schedule requires the dough to rest longer, refrigerate and cold ferment the dough (up to 3 days).
Important Notes About This Recipe
It’s essential to keep the following in mind about this recipe to ensure you turn out the best bagels of your life:
- The dough for this recipe is likely going to be thicker and stiffer than other yeast doughs you may have worked with when making bread or rolls. This is important – bagel dough needs the extra flour and structure so the bagels hold their shape and don’t disintegrate in the water bath.
- If the sourdough starter you are using is thinner or thicker than the one I use, you may need to adjust the flour amount for the bagel dough up or down.
- Judge the amount of flour by the look and feel of the dough – the dough should form a stiff ball that is not overly soft and sticky (but it shouldn’t have any dry patches of flour). If you live in a really dry climate, at high elevation, or have a super thick starter, start with 5 cups flour and add the rest gradually (and only if needed).
- Weighing the ingredients for the dough will ensure foolproof results. If you don’t have a kitchen scale yet, it is my top-recommended kitchen tool for better baking! This is the one I have and highly recommend (I’ve been using it for years).

How to Shape Sourdough Bagels
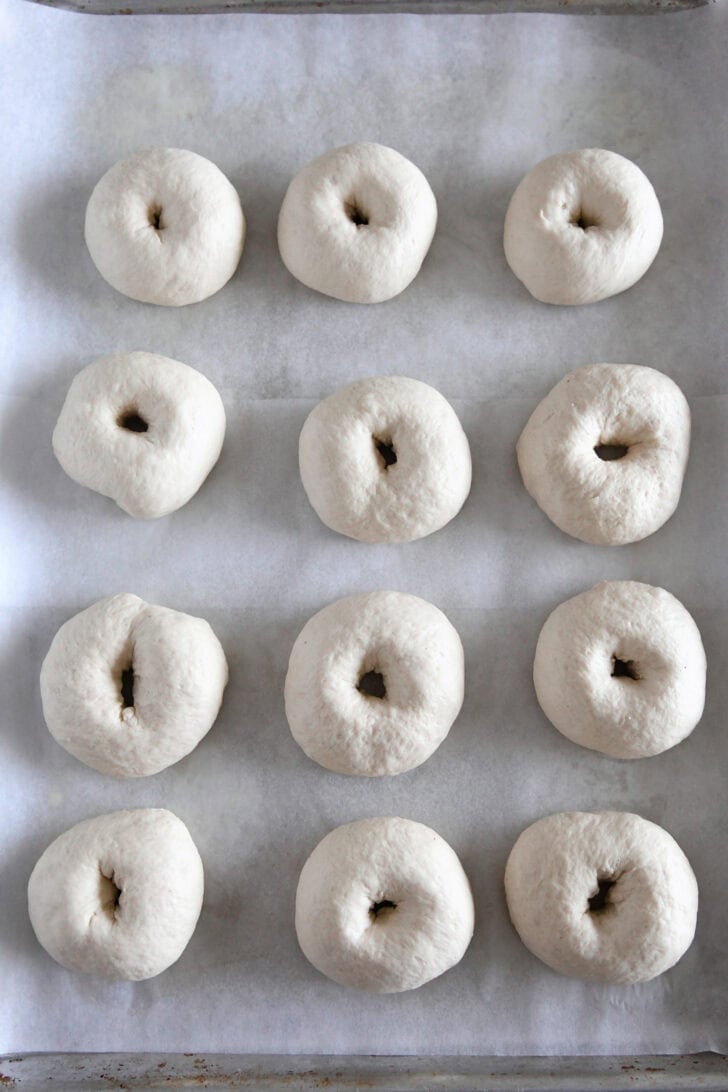
- Turn the dough out onto a lightly greased work surface and divide the dough into twelve equal pieces, about 128 g/4.5 ounces each.
- Roll each piece of dough into a smooth, taut ball. Let the balls of dough rest for 30 minutes. This helps relax the gluten so that when they are shaped, the dough holds its shape without stubbornly springing back.
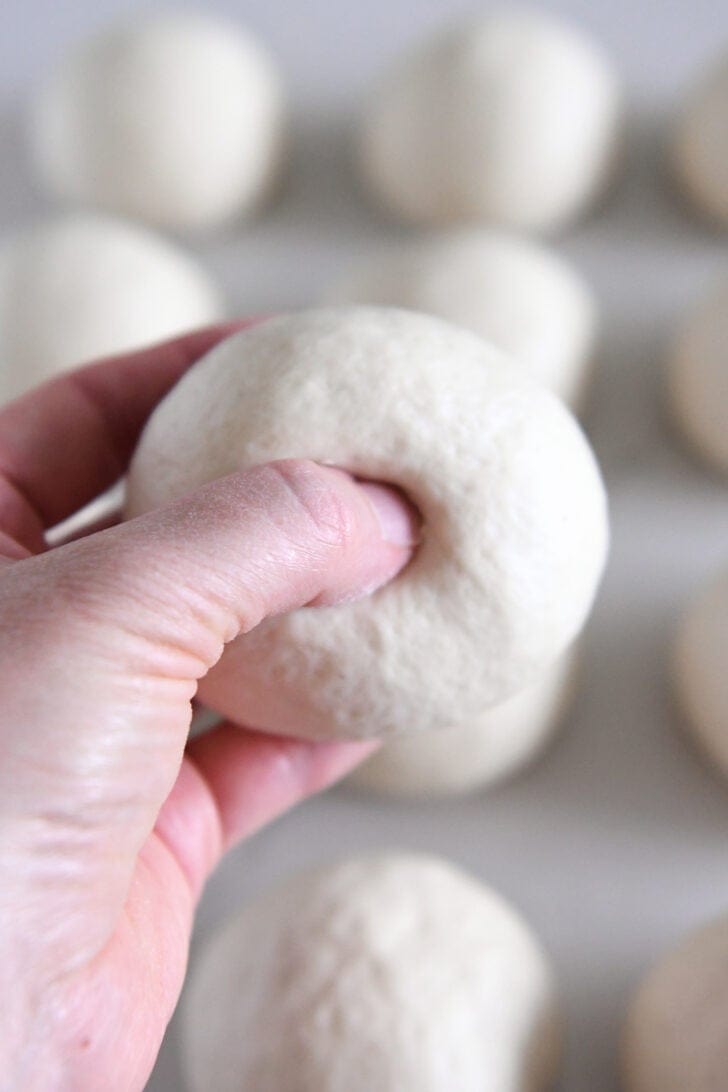
- Use your thumb to poke a hole through the very center of each ball then use both thumbs together to twirl and stretch the dough until the hole is 1 to 2 inches in diameter (the bagel will be around 4 inches across).
It’s ok if the bagels don’t look perfectly symmetrical! Once they are boiled and baked, those imperfections are hardly noticeable.
Make-Ahead Tips
If stored in a well-sealed bag or container, the bagels will stay fresh for several days at room temperature, especially if they’ll be toasted prior to eating.
Don’t store the bagels in the refrigerator as that can dry them out (same goes for all bread – say it with me: never store bread in the refrigerator!).
The bagels can also be frozen for several months.
We are a bagel loving family (we love this non-sourdough bagel recipe in equal measure), and I have yet to hear anyone in my household declare they have officially had their fill of bagels. Give us all the bagels. Every day, all day. We will eat them without complaining. Making and freezing homemade bagels is the the gift that keeps on giving for easy breakfasts (…and dinner and snacks and everything in between).
Why You’ll Love These Bagels
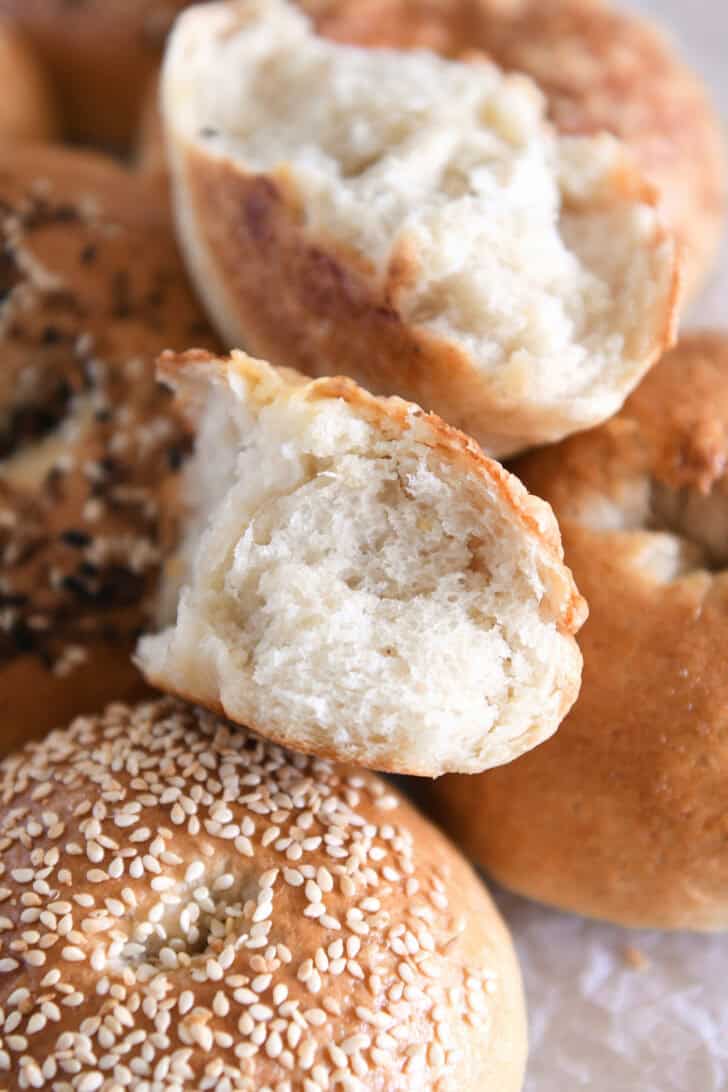
It seems impossible to have a bread product be dense and chewy and fluffy all at the same time. But these homemade sourdough bagels achieve that…which makes me love them with an intensity that is reserved for only the best baked goods (and for my children, of course).
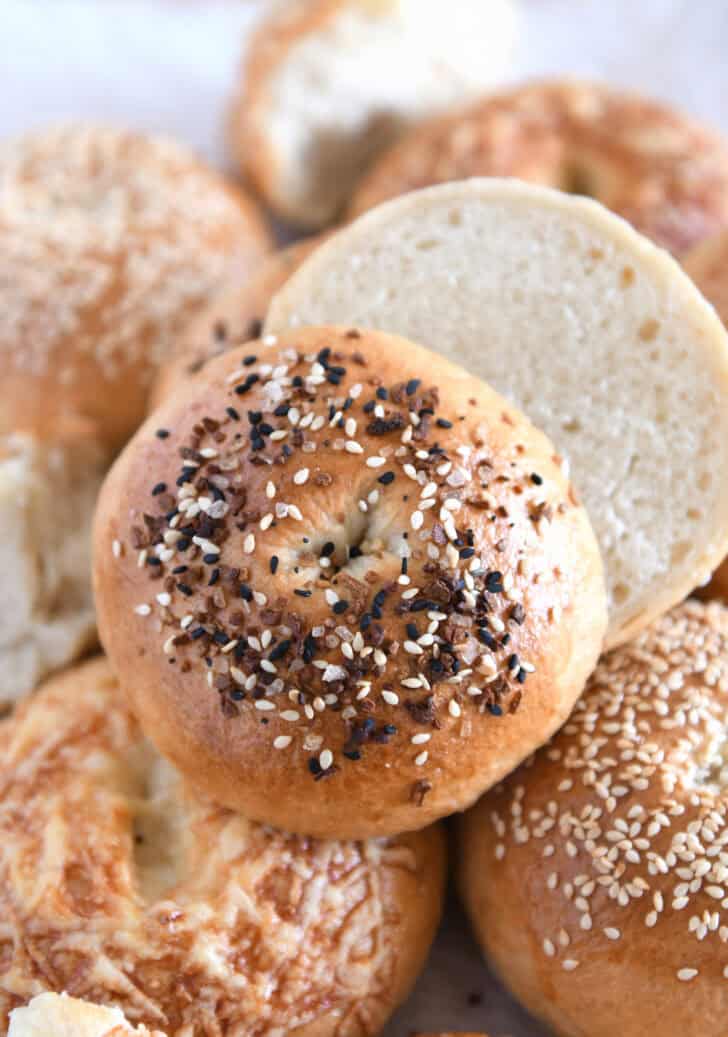
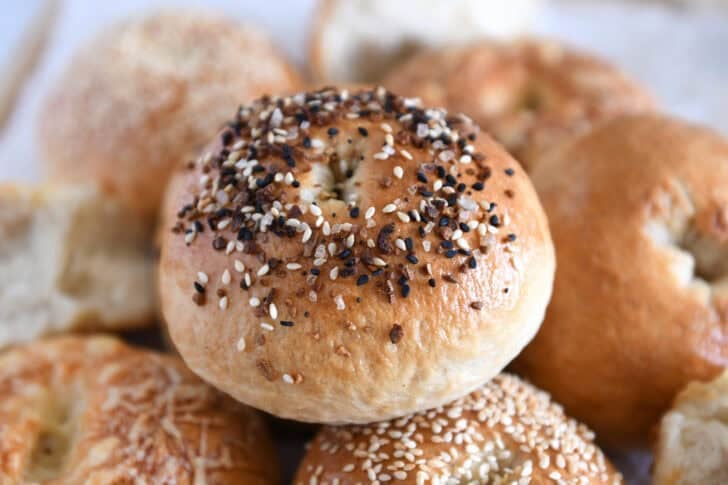
The topping options are many, and the serving options are plentiful, as well. Slice, toast, butter, slather with cream cheese, make into a sandwich, eat plain.
There’s no wrong way to enjoy these sourdough bagels. Once you get the timing down, they’ll become a routine bread bake that will 100% help you feel like a total rock star.

Homemade Sourdough Bagels
Ingredients
Bagels:
- 2 cups (460 g) room temperature water
- ¾ cup (170 g) ripe and bubbly sourdough starter (see note)
- 6 cups (850 g) bread flour
- 1 tablespoon (15 g) salt
- 3 tablespoons (60 g) honey
Water Bath:
- 3 quarts water
- 3 to 4 tablespoons honey
Egg Wash:
- 1 large egg white
- 1 tablespoon water
Optional Toppings:
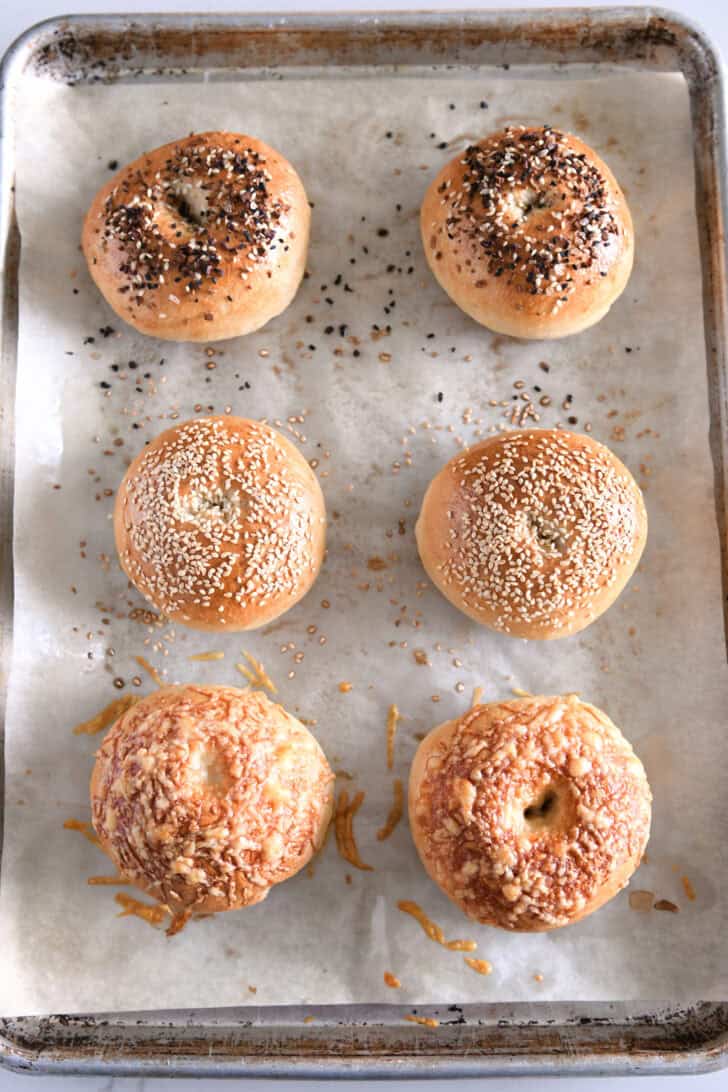
- Sesame seeds, Everything Bagel seasoning, grated Parmesan or Asiago cheese, coarse salt, cinnamon and sugar, etc.
Instructions
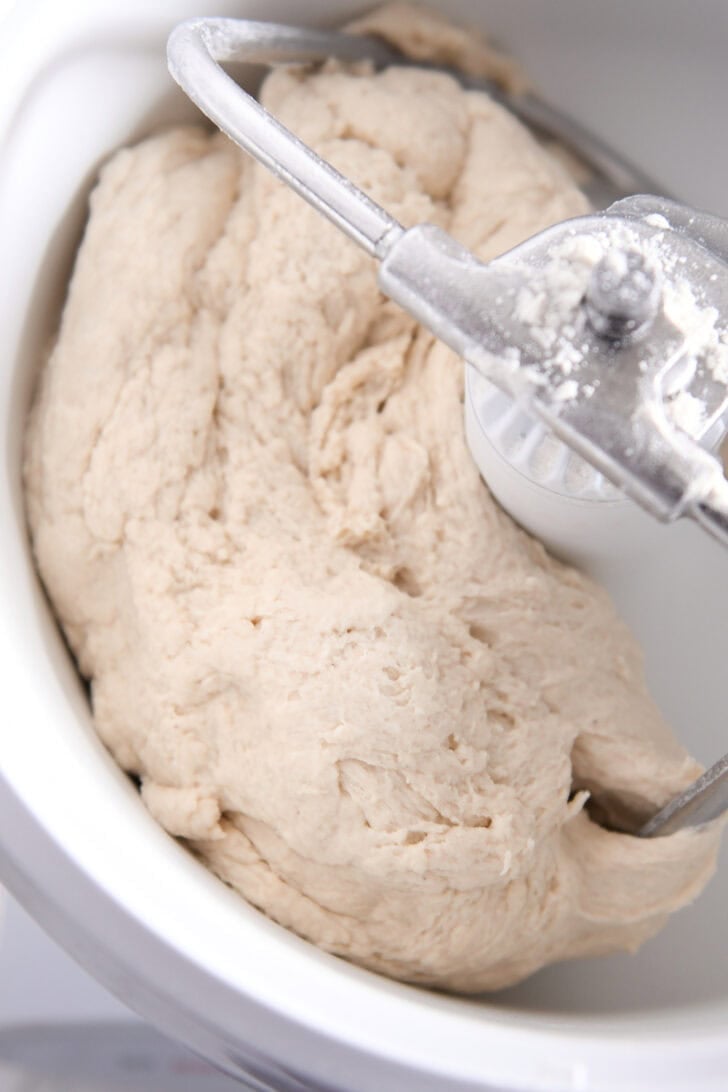
- In the bowl of a stand mixer fitted with the dough hook, combine all the dough ingredients and knead for 5 to 7 minutes until a smooth, stiff ball of dough forms that clears the bottom and sides of the bowl. The dough will likely be thicker and stiffer than other traditional bread doughs; that's normal. The dough will soften as it ferments and rises overnight. Add additional flour only if the dough is very sticky. Add additional water only if the dough is struggling to come together in a ball and has dry floury patches. (See note below about how the consistency of the sourdough starter may impact the dough.)
- Transfer the dough to a lightly greased large bowl, cover, and let the dough rest at room temperature (ideally around 70 to 72 degrees F) for 12 to 14 hours until doubled and very puffy.
- Turn the dough out onto a lightly greased countertop and cut into 12 equal pieces, about 128 g/4.5 ounces each. Form each piece of dough into a taut, round ball. Let the dough balls rest for 15 to 30 minutes to relax the gluten (this will make them easier to form into bagel shape without the dough springing back).
- Line two half sheet pans with parchment paper and lightly grease with cooking spray.
- Take each dough ball and press a hole through the center. Using your two thumbs and middle fingers, stretch and turn the dough until the hole widens and the dough forms a bagel shape. Place each shaped bagel on the prepared baking pans (six bagels per half sheet pan).
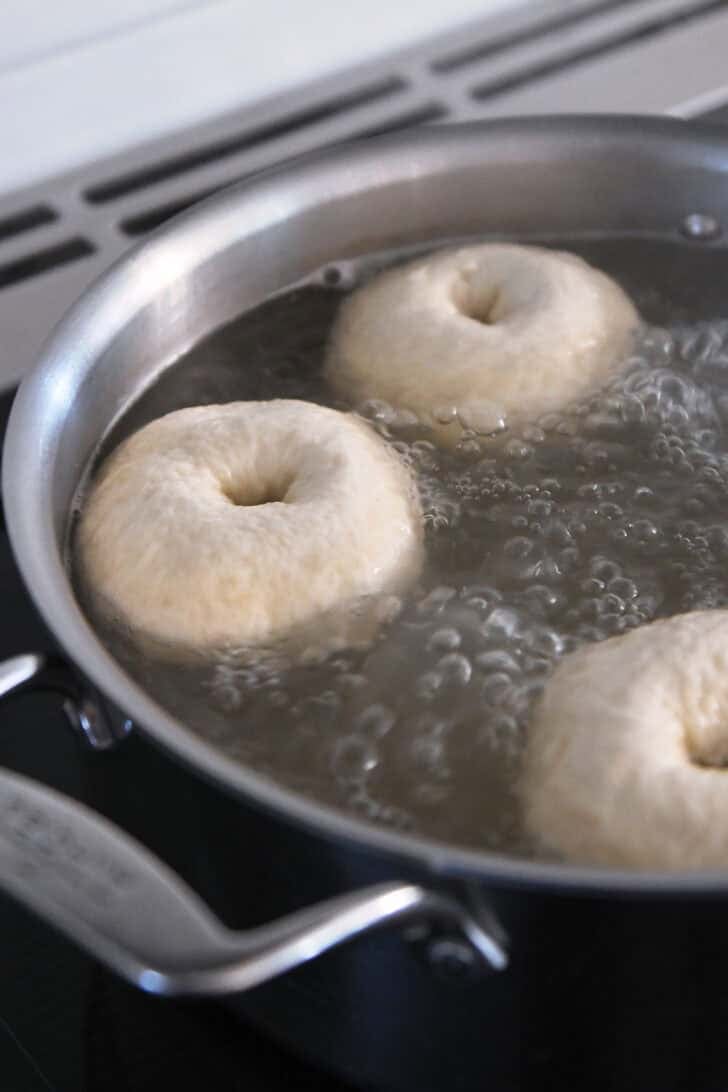
- For the water bath, bring the water and honey to a boil in a large saucepan.
- Preheat oven to 425 degrees F.
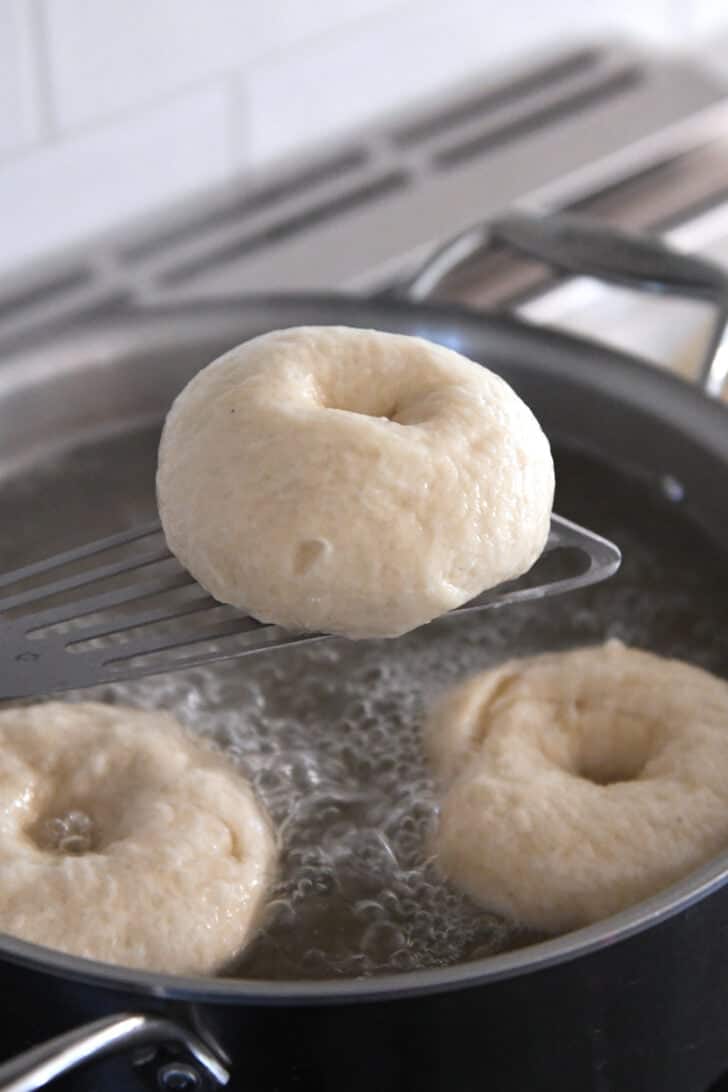
- Transfer the bagels, three or four at a time, to the simmering water. I like to gently re-stretch the center of the bagel if it has closed up while the bagels have rested. This is optional; if you do the same, make sure to stretch gently so as not to deflate and compress the bagel.
- Cook the bagels for 1 minute. Flip and cook for another minute. Use a wide spatula to lift each bagel up, letting the excess water drain back into the pot. Place the boiled bagels onto the prepared baking sheet, spacing them several inches apart. I bake six bagels per half sheet pan.
- Repeat with the remaining bagels.
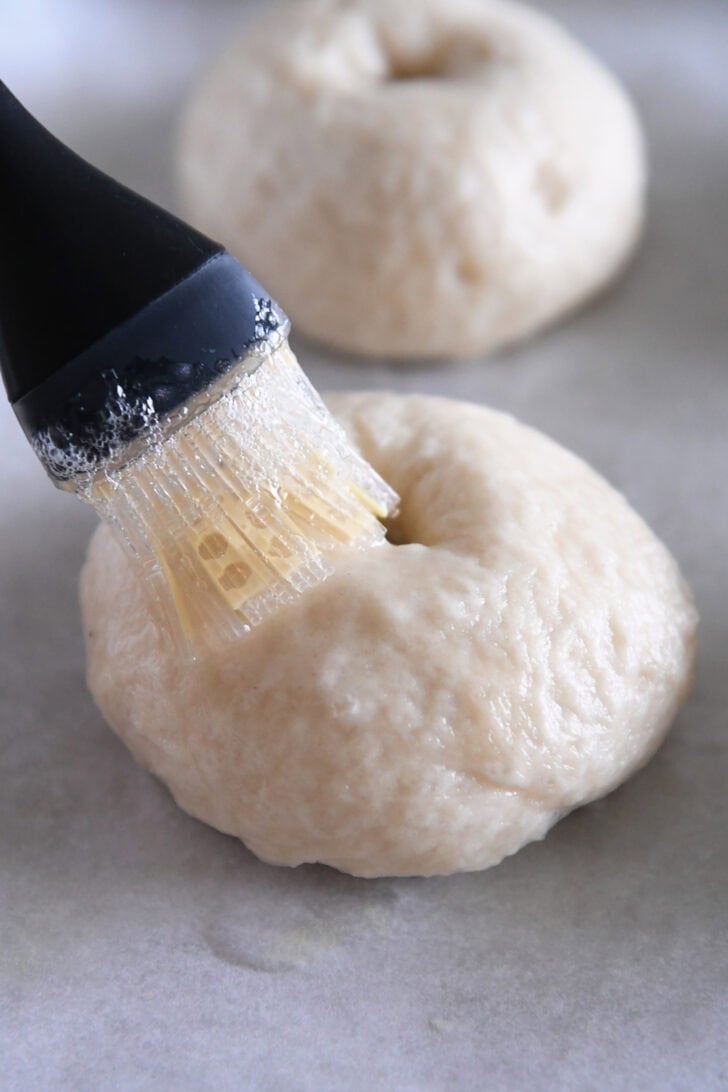
- For the egg wash, whisk together the egg and water. Brush the top and sides of each bagel and then sprinkle with desired toppings: sesame seeds, everything bagel seasoning, cinnamon and sugar, coarse salt, grated Asiago or Parmesan cheese, or other toppings of choice. If leaving the bagels plain, the egg wash is optional.
- Bake the bagels for 20 to 25 minutes until golden brown. Remove the bagels from the oven, and transfer to a cooling rack to cool completely (don't let them cool completely on the baking sheet as they have a tendency to stick due to the sugar/water bath).
Notes
-Day 1: between 12:00 to 2:00 p.m. feed sourdough starter
-Day 1: 9:00 p.m. make dough, cover, leave out at room temperature.
-Day 2: 9:00 a.m. (give or take an hour) form dough into balls and let rest for 10-15 minutes.
-Day 2: 9:30 a.m. shape bagels, boil water.
-Day 2: 10:00 a.m. boil bagels, add toppings, bake bagels. The dough can rest in bulk for 12 to 14 hours at room temperature. If your schedule requires the dough to rest longer, refrigerate and cold ferment the dough (up to 3 days).
Recommended Products


Recipe Source: from Mel’s Kitchen Cafe


I make these bagels every weekend and not only do I love the routine, but I love getting to eat them throughout the week. They are sooo delicious! I always make half topped with cheddar and the other half usually topped with sesame seeds. One of these days I’ll attempt a cinnamon raisin bagel, but for now, I can’t get away from my two favorites 😄 Mel, thanks for the amazing recipe! I tell everyone that has starter that they need to make these.
Vanessa! I’m so happy to read this! If you attempt a cinnamon raisin bagel, let me know how it goes!
I’ve made these over and over and love them every time. I always top with jalapeño and cheddar or everything seasoning. They make these best sandwiches
Great recipe! I live at 9,000 feet and (thankfully) I had already put in the 6c of flour before I read far enough to see the different directions. The consistency was correct but my poor mixer had a hard time working it. Must be time for a new mixer!
This recipe alone is worth keeping up a sourdough starter for. I made these into mini bagels, made a few plain, cinnamon sugar, everything seasoning, salt, etc…. My husband just made me a breakfast sandwich on one and let me tell you. Next level. These are going to be on repeat at our house.
I’m glad you loved this recipe, Laura! I’m making a batch this week to replenish our supply…I’m going to try making them mini-size too!
These are AMAZING! Sorry to shout, but it needed to be shouted! I wish I had doubled the recipe now because they will be gone in a day. I did 3 everything bagel, 3 course salt, 3 parmesan, and 3 sesame seed. I love the chocolate chip recommendation below. Next time! I guarantee there will be a next time! Love this new option for my sourdough!! Thank you, Mel!
Another win and a great way to use my sourdough that isn’t plain bread!
The bagels came out extremely dense and gummy. Had to throw these out. I followed the recipe to the letter. Not sure what went wrong. I’ve tried other recipes that were more successful and very good.
These turned out beautifully!!
Fantastic – thanks for letting me know!
MEL HELP! I made it the first time and the fluffiness was perfect and texture was so good. I accidentally forgot the salt so that was a bummer.
I made it two more times…..remembering the salt….but now they have been dense. What am i doing wrong? The taste is great, but I need to get it right! BAGELS ARE MY FAVORITE FOOOOOD!
Also I love you. And I try to tell you that at least once a year!
Haha, hi, Erica! Thanks for the love! Ok, bagels…with the subsequent two batches (with salt), have you done anything else different, like more or less flour or shaping them differently? I would suggest letting the bagels rest for a bit longer after they are shaped into balls (to help relax the gluten) and/or letting them sit for 10-15 minutes before putting them in the boiling water bath. Also, if your dough is really stiff, you can dial back on the flour just a tiny bit.
100/10 These were so easy and so yummy. I’ve been waiting for someone I trust to drop a sourdough bagel recipe. You never disappoint! When I saw you posted this on Instagram I knew it would be a winner. Thanks so much for always giving us great recipes, and games!
I’m so happy you loved these bagels, Michelle! Thank you!
We have made these twice now- tastes exactly like the Great Canadian Bagel (closed down many years ago) and their beloved Chocolate Chip Bagels. We lightly worked mini chocolate chips into the dough while shaping them and then added a fee on top right before baking. So fab toasted with dark roasted peanut butter or just as-is untoasted. THANKS MEL
Oh yum, Rachel! Why have I never thought to add chocolate chips? I’ll definitely be trying that!!
Do you mean after the bulk ferment at room temperature you can put the dough in the fridge if time schedule is needed before forming the bagels? Or does the cold ferment need to start right after making the dough?
Hi Bonnie, you can do either. I’ve let the bagels go through the long ferment at room temp and towards the end, I’ve put them in the fridge for a day because I didn’t have time to shape and bake them. You can also put the dough in the refrigerator right away after making it and it can stay in the fridge for several days. In that case, the dough likely won’t rise very much in the fridge, so take it out a day before shaping the bagels so it has time to come to room temperature and rise.
SOOOOO good!!!! I didn’t have any asiago cheese so we tried parmesan, and those were definitely my favorite! I also made some cinnamon sugar and plain bagels and they were all delicious! We’ll probably double the recipe next time because this is all I want to eat for breakfast now and we ate them in two days. My kids are requesting blueberry ones for next time.
Marissa, I’m so thrilled you loved this recipe! It’s basically all my kids want to eat for breakfast, too…I’ve been making a double batch every week and we fly through them! Thanks for the comment and review!
Mel! You outdid yourself again! Your instructions were spot on and so helpful. These were incredible and not too time consuming. I made a variety- everything bagel, jalepeno cheddar, Asiago cheese, and flaked sea salt. My family loved them! Thank you for sharing this recipe. 🙂
What a yummy lineup of bagels, Tami! The jalapeno cheddar ones sound DIVINE. Thanks for taking the time to let me know you loved this recipe!
Made these and they were delicious! Any recommendations on best way to get them to an eatable state from frozen?
Hi Alisha, if you aren’t opposed to using a microwave, that’s how we do it. We take one or two out of the freezer, place on a plate or paper towel and put in the microwave for 30 seconds at 50% power, then flip the bagel and repeat.
The chewiness and flavor of these were great! We have all been loving them and bagels really aren’t that much more effort. I can also say that if you make the dough and then get sick and the dough sits in your fridge for a week before you make the bagels they still turn out perfect! I just let the dough sit on the counter for an hour or two to warm up a bit and proceeded as normal.
Sorry that you got sick…but thanks for including in your comment that the dough fared just fine hanging out in the fridge that long!
I have been using a different sourdough bagel recipe but yours turned out better. So delicious and they bake up more puffy than my other recipe. Thanks for putting in the time to create this recipe. I’d love if you were to create a sourdough pizza dough recipe. Once again I have one that works quite well but I love your recipes and know I can trust them!
Thanks, Kaylyn! Really happy you loved this recipe! A sourdough pizza crust is a great idea. I’ll add it to my list of recipes to make and perfect!
When you shared your bagel recipe I was crossing my fingers you might eventually share a sourdough bagel recipe and you delivered quickly!
I just made this recipe for the first time with excellent results! Great flavor and bagel-y chew (these are not just bagel shaped breads like some disappointing bagels can be!) I made everything, cinnamon sugar, and parmesan with a little sprinkle of garlic salt. I so appreciate the easy to follow instructions!
My only caveat is despite measuring all ingredients by weight, my dough was a little too sticky and my bagels didn’t puff up quite as much as yours. I think I just need to add a touch more flour/less water next time, but now that I’ve made them I’ll have a better feel for the dough, that’s just part of bread baking! Obviously these were still a great success the first go around 🙂
Question: how long do you rest the bagels between shaping and boiling? Your directions mention a rest, but not a specified time. Is it just the length of time it takes you to get the water boiling?
Thanks in advance and thanks for another great recipe!
Thanks for the review, Stephanie! Do you mind sharing if you live at high or low elevation? I’m always curious the effect that might have on the weight measures in my recipes. I live right around 2,500 feet elevation and would love to pinpoint why the dough might be sticky (just so I can help others troubleshoot). In answer to your question, yes, the rest is a bit arbitrary – just the natural time it takes to get the water bath prepped. I made them this week and they had hardly any time to rest and still worked out great (might be the best batch I’ve made actually).
There’s so many amazing sourdough pizza recipes
I loved these bagels (my 1st time making bagels! Followed the recommended overnight rise. They were soft, chewy, and very tasty! I’ve already had others asking me to share the recipe…. Wish I could figure out how to add a picture!!
High altitude review: I live about 4500 ft above sea level, in a very dry climate. I started with 5 C of flour and then gradually added more, ending with probably about 5 1/2 C of flour. It was still slightly tacky at night and in the morning, my dough was SOO sticky: like it was very difficult to work with and shape the bagels. I had to grease my hands over and over again and also floured the counter. They still turned out nice and fluffy and delicious, but next time I think I will try it with the full 6 C of flour. Also, do you think you could just use brown sugar in place of the honey?
Thanks for commenting with the high altitude notes, Tracey! That will be super helpful for others and I’ll add a note to the recipe based on your review. Yes, I think you could use brown sugar in place of the honey.
I’m excited to try this true sourdough recipe! I’m not interested in ones that still use yeast and the sourdough is just for flavor. I’m happy to have this from a source I trust 🙂
I didn’t comment on your Friday Thoughts post, but I was fun reading about your trip to Switzerland. I went on a European tour when I was 16, and Switzerland was my favorite stop. We went to Lucerne and our choir sang in the most beautiful white and gold church. I would love to go back to Switzerland someday!
Monica, hi! Always love seeing your comments pop up. You’ll have to let me know what you think about this recipe if you try it! I’ve been making a double batch the last few weeks, and we devour them. I love how easy the dough is (no stretch and folds). Also, that’s amazing about your trip to Lucerne – and singing in the church – WOW. That would be a remarkable experience.
These were easy and delicious! Thanks for posting such a yummy sourdough recipe!!
Awesome, Jenny! So happy you made them and loved them!
Mel, if you cold ferment, do you then need to let the dough rest at room temperature for 12 hours before shaping? I made the dough yesterday & put it in the fridge & noticed it hasn’t risen much.
Good question, Alicia…a cold ferment will likely take longer for the dough to double. I’ll add a note to the recipe for better clarification. So yes, if the dough hasn’t risen much in the fridge, it’ll help to let it rest/rise at room temperature so it’s properly risen before shaping the bagels.
Thank you so much!!! I took it out yesterday evening and have let it rise overnight. It is rising and getting puffy now that it’s been out about 12 hours. I’m so relieved, lol because I thought I should have let it bulk rise and then ferment first. So excited to finish these!! You’re the best Mel!
Thanks for the update, Alicia! Hope they turned out well!
They turned out spectacular!!! Thank you again.
I made these yesterday and half of them are already gone ( there are only 4 of us here). They are so good. My husband said they were the best bagels he’s ever had. I’m sure I will be making more of these soon. Is there a way to add something like blueberries to the bagels?
That’s awesome, Tori! So glad you all enjoyed these. If you want to add blueberries, you can use dried blueberries (if you don’t want the color to bleed) or you can use fresh blueberries and add them as the dough is mixing – the blueberries will burst and color the dough (and the dough might be a touch softer due to the juiciness of the blueberries), but a lot of homemade blueberry bagel recipes use this method.
I made these today and they were absolutely delicious! My husband gave the highest compliment in saying they were really close to his favorite bagels at his hometown bagel shop. Thanks for sharing the timing of the recipe, too. I followed the times to a tee and it was perfect.
Megan, thanks for such a great review – I appreciate knowing the timing helped you. And am thrilled your husband loved the bagels so much!
So excited to try this! Do you feed the starter at 12pm or 2pm? Times differ at the top and bottom of this page…
Sorry for the confusion, Patricia. I’ll edit the recipe for more clarity, but I feed my starter anywhere from 12 to 2 so it is ready for the dough to be mixed around 9 p.m. A lot will depend on the ratio of feeding your sourdough starter. A 1:1:1 ratio will ripen faster than other ratios with less sourdough starter.
I’m curious why the honey is needed in the water. Honey is kind of pricey. I’m sure there is a reason because I trust you explicitly! Just curious. So excited to try this!
HI Wendy, the honey aids in developing the color on the outside of the bagels as they bake (and also assists with the flavor of the bagels).
Just made these bagels. They are so delicious and so easy to make!
Thank you so much for letting me know what you thought, Juliana! So thrilled you loved them!
I am so excited to try this!!! Sourdough is my favorite, and I love bagels!
Have you ever used freshly ground wheat in this recipe?
I haven’t, but I think it could work well? I’d probably start with 1/2 whole wheat/1/2 bread flour.