Easy No-Knead Sourdough Peasant Bread
This easy no-knead sourdough peasant bread is soft, fluffy, and doesn’t need any long rising times. It works with either fed or discard sourdough starter!
This might be the easiest sourdough bread you’ll ever make! And it’s absolutely amazing.
Since the recipe calls for either fed or discard sourdough starter, you don’t need to plan in advance, which means you can have a piping hot loaf of bread fresh out of the oven in just an hour or two.
A Very Popular Recipe
Based on the intense popularity of this easy peasant bread recipe, it was only a matter of time before I hit you with a sourdough version.
I know sourdough might sound intimidating (and even a bit annoying since it seems to be so in-your-face trendy lately) to some of you. I get it! But keeping a sourdough starter doesn’t have to be time intensive, and you don’t have to bake artisan sourdough bread with the ornate carving of a tree slashed on top every day (or ever!).
I personally subscribe to the Lazy Girl sourdough method. And it has brought a lot of peace and good carbs to my life.
Thanks to recipes like today’s easy sourdough peasant bread and these sourdough pumpkin muffins, I can bear my testimony that it is 100% worth keeping a sourdough starter in the depths of the refrigerator.
*I also have a few other easy sourdough discard recipes up my sleeve to share with you in the next little while, and I CANNOT WAIT THEY ARE SO AMAZING.

Also, can we please take a moment of silence to acknowledge that this easy sourdough peasant bread might possibly make the best grilled cheese in the history of ever?? That reason alone should get you hustling to whip up this bread.
Sourdough Starter
This recipe calls for either sourdough discard (you can use it straight out of the refrigerator) or fed sourdough starter.
Not all sourdough starters have the same feeding ratio. Because of that, your sourdough starter may be thicker or thinner than mine. I tested this recipe using my sourdough starter that I feed with a 1:1:1 ratio (by weight).
If your sourdough starter is thicker than mine (pictured below), you may need to add more water to the recipe. If your sourdough starter is thinner, cut the water in the recipe by 1/2 cup and add more only if needed.
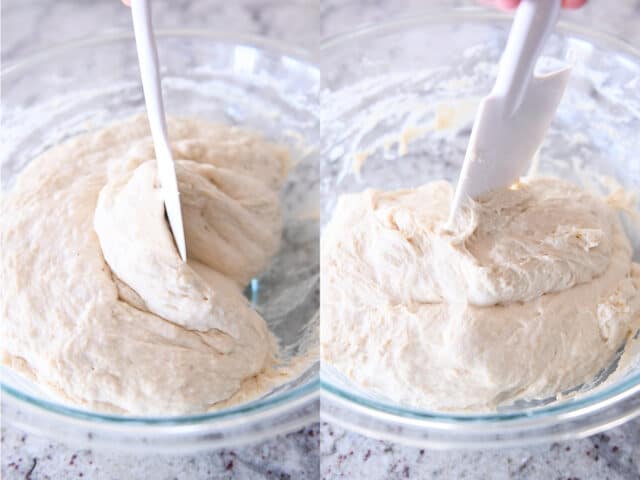
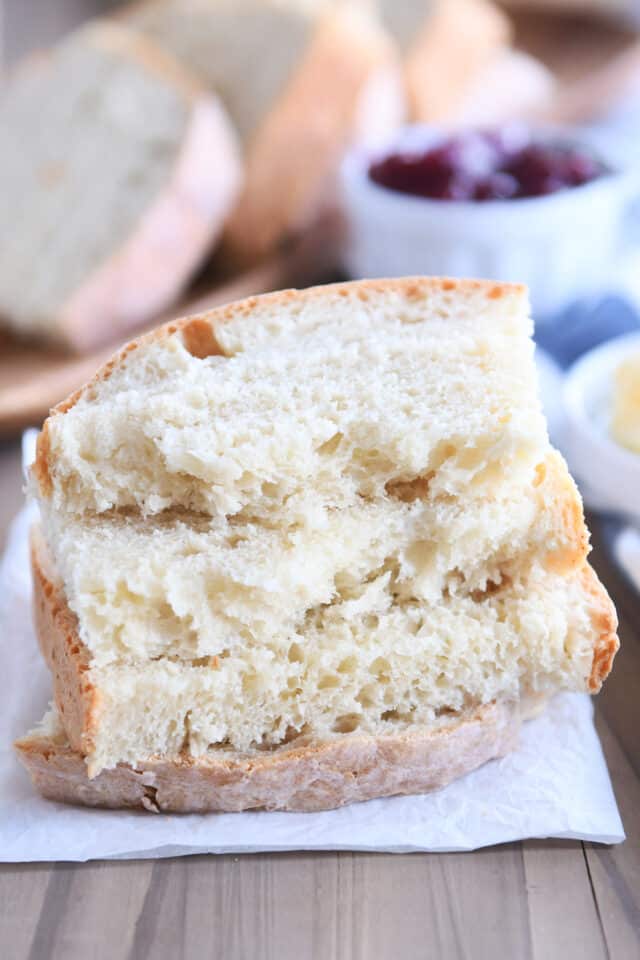
A Wet and Shaggy Dough
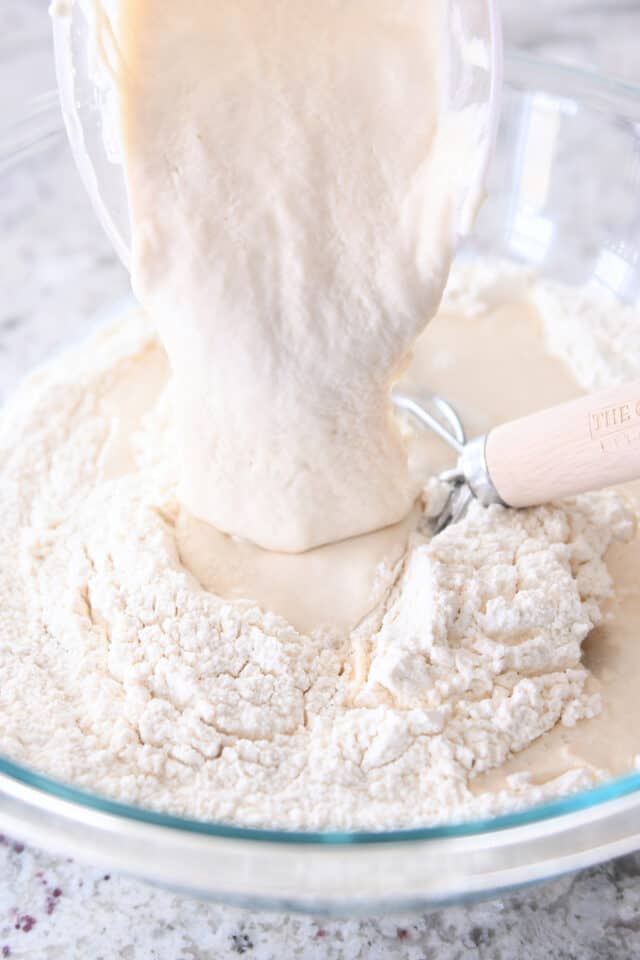
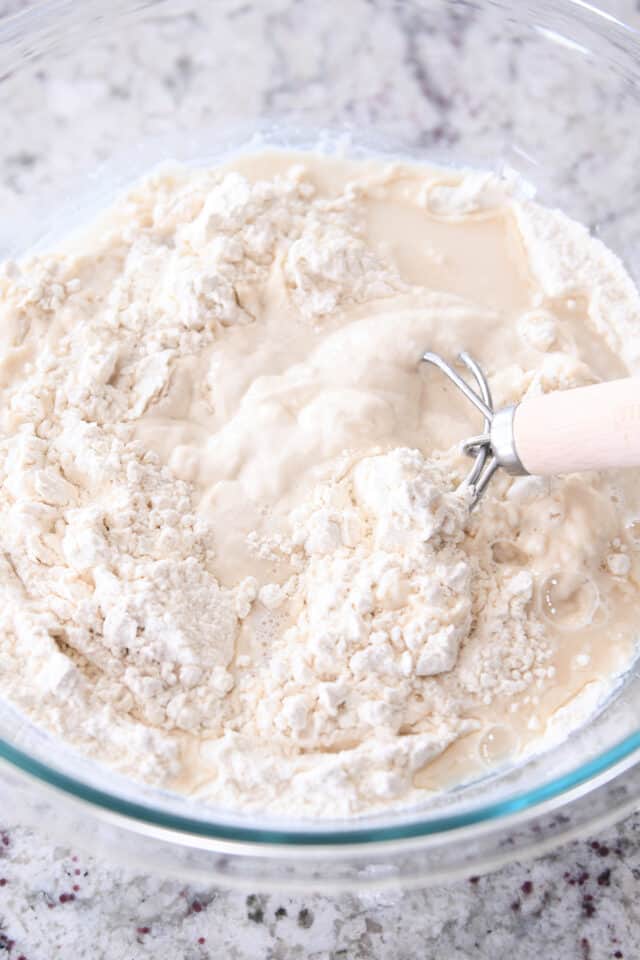
The dough for this sourdough peasant bread comes together fast, and because the dough is much wetter than traditional bread dough, it can easily be mixed by hand.
Mix until all the dry ingredients are incorporated and the dough forms a very rough ball in the bottom of the bowl.
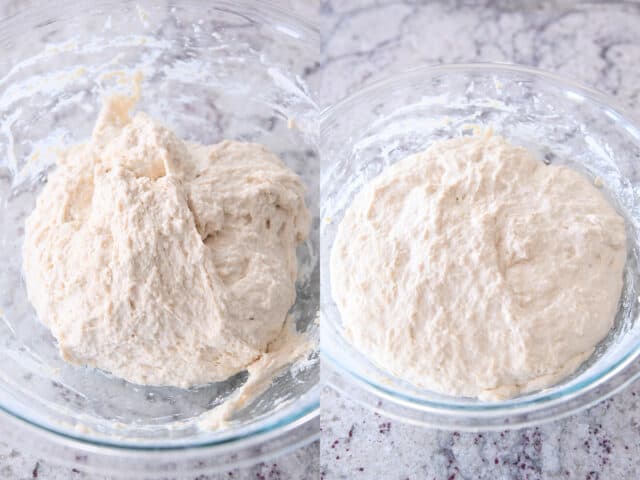
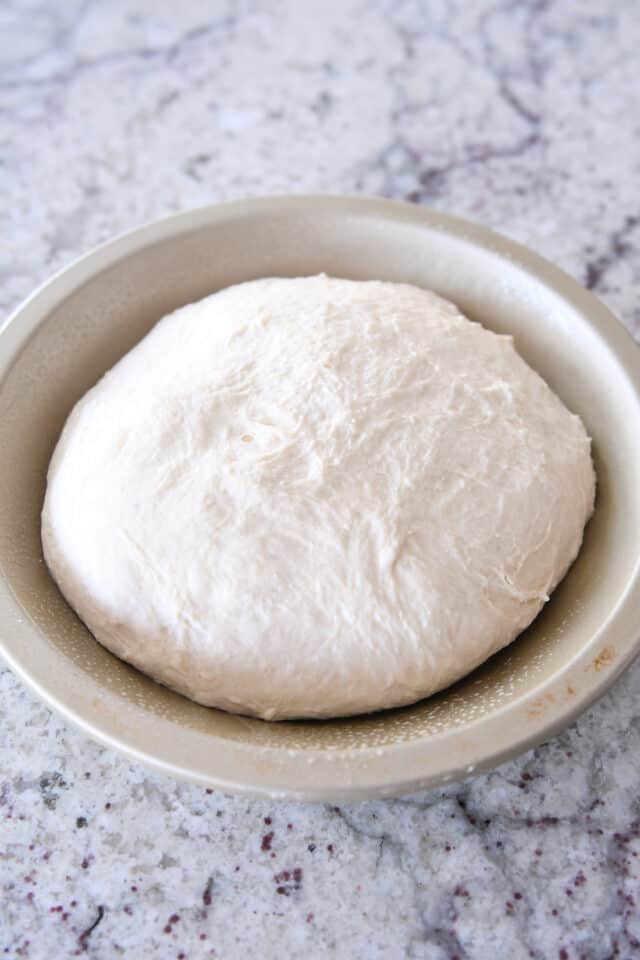
Let the dough rise right in the bowl until noticeably puffy and mostly doubled. Depending on the warmth of your kitchen, this will take about 1 to 1 1/2 hours.
Because the dough is so soft and sticky, you won’t be able to create much of a shape with your hands.
Instead, take a rubber spatula and scrape the dough away from the sides of the bowl toward the center.
Then, either:
- Scrape the dough and plop it right into the prepared pan OR
- Lightly grease your hands, grab the dough and quickly form as much of a round shape as you can, tucking the edges underneath (you can see a video of this on the peasant bread post)
Abandon the idea of a nice, smooth, taut loaf. That is not this bread, and that is ok. 👍🏼
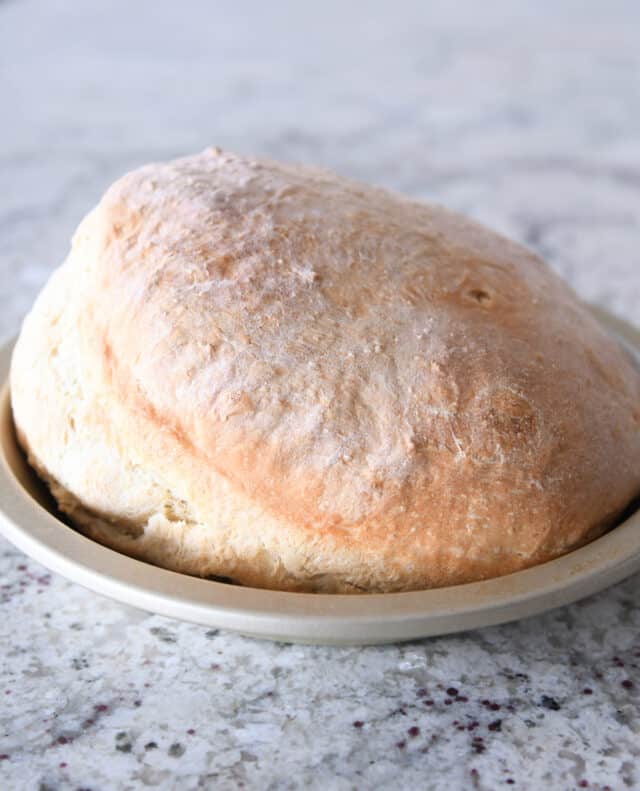
Baking Pans
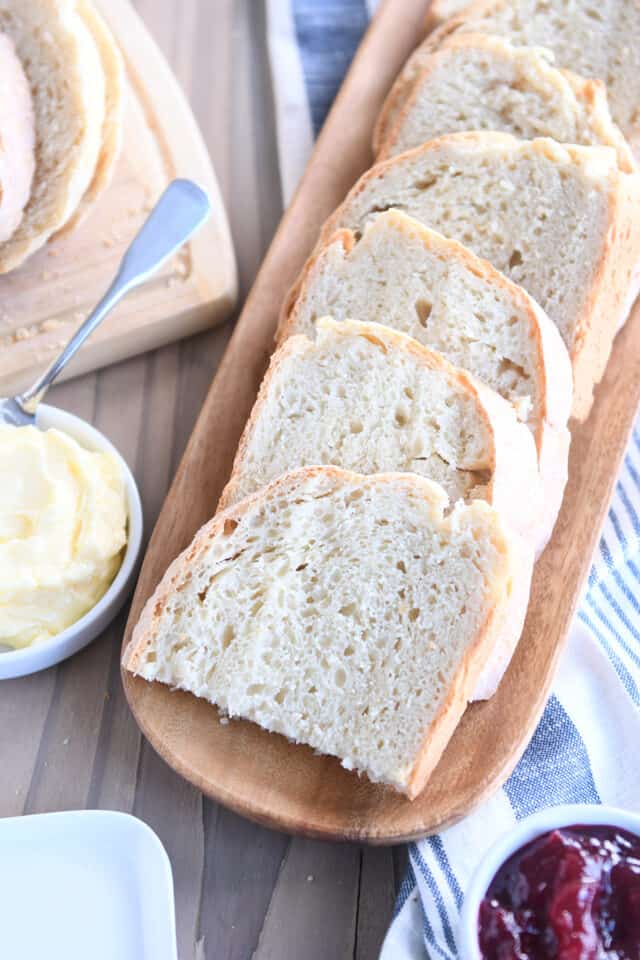
I prefer to bake this bread in a 9-inch pie plate. I like the shape of the finished loaf – not too tall, not too flat.
I find that the bread bakes slightly taller in my metal or ceramic pie plates, but a glass pie plate works well, too. Make sure to grease the pie plates VERY well with either nonstick cooking spray or a healthy amount of butter.
It’s very normal for this bread to split on one side or the other while baking. That’s due to a lot of reasons (namely the wetness of the dough + the sourdough oomph).
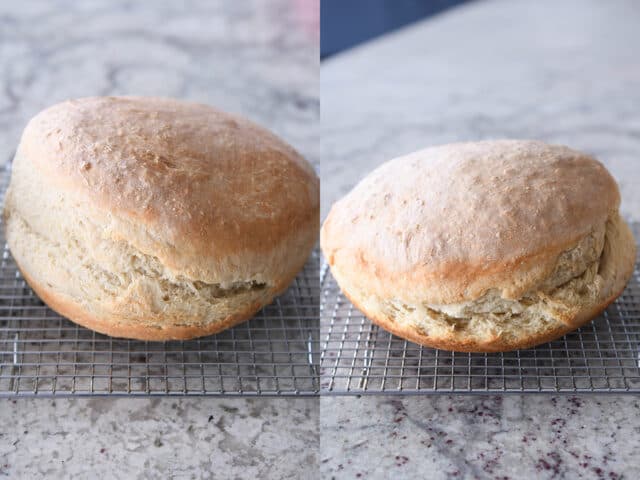
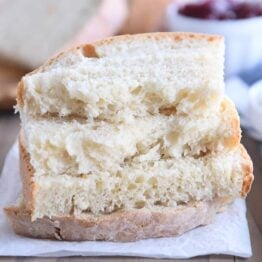
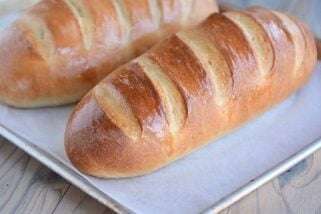
Fed Sourdough vs Sourdough Discard
Below, you can see there is a slight difference to the look of the baked bread when baked with fed sourdough vs sourdough discard.
The bread on the left was made with fed sourdough starter and the bread on the right was made with sourdough discard.
Both loaves are soft, fluffy, and perfect once sliced. The loaf with the fed sourdough starter is ever so slightly airier in texture.
Important Note: make sure to bake this bread fully.
Otherwise, because of the wet dough, it might be gummy inside. I’ve found this sourdough version needs a longer baking time than the original regular peasant bread recipe.
Pro Tip: If the bread starts to brown too much on top while baking, tent loosely with foil. If the bottom of the bread is browning too fast, move the pan to a higher oven rack (middle position or higher).
A Truly Fantastic Loaf of Bread
This bread is dangerously good.
The sourdough flavor is noticeable without being overpowering, and it makes the best side dish for just about any main dish (especially soup!)
When it comes to sourdough bread, this recipe could not be more approachable and user-friendly.
I have a feeling this is the recipe that’s going to make sourdough bread bakers out of a lot of you. And that makes me very happy.

One Year Ago: Easy Chicken Enchilada Casserole
Two Years Ago: Snickerdoodle Brookie Bars
Three Years Ago: Honey Balsamic BBQ Pulled Pork Sandwiches {Instant Pot or Slow Cooker}
Four Years Ago: Caramel Oat Chocolate Chunk Shortbread Bars
Five Years Ago: Delicious Whole Grain Hulk Muffins {Naturally Green!}
Six Years Ago: Thin and Chewy Funfetti Blondies {From-Scratch}
Seven Years Ago: Lemon Sticky Buns with Lemony Cream Cheese Glaze
Eight Years Ago: Skillet Baked Spaghetti {One Pot, 30-Minute Meal}
Nine Years Ago: Sweet Baked Ham
Ten Years Ago: No-Bake Nutella Cheesecakes
Easy No-Knead Sourdough Peasant Bread
Ingredients
- 3 ½ cups (497 g) all-purpose or bread flour
- 2 teaspoons granulated sugar
- 2 teaspoons instant yeast (see note)
- 1 ½ teaspoons salt
- 1 ½ cups (338 g) warm water
- 1 cup (275 g) sourdough starter (fed or discard)
Instructions
- In a large bowl, add the flour, sugar, yeast and salt. Whisk to combine. Add the water and sourdough starter and mix with a rubber spatula or wooden spoon until the ingredients form a shaggy, sticky ball and no dry streaks remain.
- Cover the bowl and let the dough rise until doubled, about 1 to 1 1/2 hours.
- Place an oven rack in the center position. Preheat the oven to 425 degrees F.
- Generously grease a 9-inch pie plate or 8 1/2-by-4 1/2-inch loaf pan with cooking spray or butter. (See note for other pan sizes/options.)
- Scrape the dough away from the sides of the bowl with a rubber spatula, forming a rough ball in the center of the bowl. Lightly grease your hands with cooking spray or oil and place (or just kind of plop!) the dough in the prepared pan. The loaf will not be completely smooth and may look a bit rough in shape, that's ok! You can try to form the dough into a rough ball shape, tucking the edges under, but if it's too sticky, just get it in the pan. 🙂
- Let the dough rest, uncovered, for 15-20 minutes until slightly puffy.
- Bake for 15 minutes. Reduce the heat to 375 degrees F and continue to bake for 25-30 minutes until golden. Let the bread cool completely before slicing (see note).


A great way to use extra discard. Loved how it was a fast recipe and still had that tang from the sourdough without taking three days 🙂 We couldn’t wait for it to cool. YUM!
Do you have a sourdough starter recipe to share? I would like to try your recipes that call for a starter.
lindarager@yahoo.com
I have made this recipe a few times a week for a month or so, and it’s perfect! It’s the best way to easily do homemade sourdough.
Happy you love this one, Angie!
One cup of flour equals 120 g of flour so I’m confused by the measurements since 3 1/2 cups of flour would be 420 grame
Hi Barb – I test all my recipes using 142 grams of flour per cup.
Love this recipe soo so much! Its fantastically easy. I do add some stretch and folds after the first rise and bake it in a preheated dutch oven @ 425 for 30 mins with lid on and the another 10-15 mins with lid off. It gets great rise. Sometimes I add herbs and others different spices. I used to store in a plastic bag on the counter but have found the beeswax bags work much better. Keeps the dough soft. And toasting it in the toaster oven is amazeballs. Ive been making this loaf for about a year and its my preferred loaf of all time besides my easy foccacia recipe. Its fantastic to be able to eat bread again! Even though im gluten free- I can make this with regular bob red mills 1/2 all purpose and 1/2 bread flour and it doesnt tear my stomach up at all! Gluten free breads at the store are just not great. I do also weigh everything with a kitchen scale to be more precise and that works very well. Do make sure to let it cool on a rack completely before slicing. 😉😊
Hi, Brittney – At what point would one add inclusions (herbs, etc.)? I’d like to try this in the future!
I have made this recipe at least a dozen times. I love it. But, I would love to make it in my bread machine. Any suggestions?
Hi Terry, unfortunately, I don’t have a bread machine so I can’t offer a lot of advice. I’m mostly afraid this dough might be too wet to work well in a bread machine.
This is the best sourdough bread ever! I make it all the time. I bake the bread in a 9″ stoneware pie pan. Turns out great every single time (except the one time I forgot to add the salt!). At one point when we had family visiting, I was making this bread daily….it was flying out of the kitchen. Everyone loved it! Thank you for your recipe and all the other ones too!
Made this yesterday. So easy, so delicious! And makes a massive loaf!
Five stars!
New to the sourdough world and this was the first loaf I made. My kids and their friends said it was the best bread they’ve ever had. It’s so soft and fluffy!!
This was delicious. I’ve been making the cheesy version but my vegan daughter was hoping for a loaf she could eat. This exceeded our expectations and is her favorite thing I bake. I did follow the instructions for using regular yeast and it worked perfect. Ended up baking it 10 minutes longer, but I did use a loaf pan. Next time we want to add some herbs and see what that tastes like. Thanks for these easy recipes!
This is the first sourdough bread that I have ever made and it turned out great!!! Thank you Mel for this recipe.
Just to let you know I did use Active Yeast and your notes were spot on. I also used a loaf pan and the bread turned out perfect with great texture.
Glad to hear it, Connie! Thank you!
Hi! Can I bake this in a Dutch oven pot and if so, what temp?
Thank you!
Hi Janet, I haven’t tried that, but I believe others have. You might try googling “dutch oven bread” to get a recommendation for baking time and temp.
Hi Mel,
I’m in nesting mode as baby due this coming Friday and I made your bread for the second time today in the hope I could store it in the freezer (the first one got eaten!😊everyone enjoyed it!)
I’m planning to store it as a whole loaf but what would you recommend for defrosting and re-cooking/heating from frozen?
Hi Rebecca – congrats on your upcoming baby! I usually pull frozen bread like this out and let it thaw at room temperature until fully defrosted. I don’t heat up the whole life (I find it dries it out), but slices make great toast, sandwiches, and we often reheat individual slices for a few seconds in the microwave if we want them warm.
Aw thanks Mel for the congrats and thanks for replying.
Ok I will follow your advice when it comes to defrosting.
Many thanks again!
This bread is awesome
How do I store it? Should I put in cling wrap and in fridge or should I freeze slices.
Thank you
Lynne
It will dry out in the fridge, so either cover it and leave at room temp for a day or two, or yes, you can freeze the loaf or slices.
Can it be baked in a regular loaf pan or does it have to be baked in a round pan?
Yes, you can bake this bread in a loaf pan.
Hi I’m baking my first loaf of this recipe. I’m using a metal loaf pan. So far it smalls so good. My daughter’s friend told me it was so good and easy. I’m new to sourdough and made a lot of recipes with discard. I’ve made 3 sourdough but still don’t have it right for whatever reason I have no idea. But I’m not giving up. Can’t wait to taste this one!!
My friend highly recommended your blog. I want to try some of your bread recipes. I would like to use fresh milled flour. Is that what you use in your recipes? I am fairly new to milling flour.
Hi Angela, glad you’re here! Yes, I often use freshly ground whole wheat flour. I recommend starting with half ground whole wheat flour and half all-purpose flour as you get used to making breads with freshly ground flour. I also recommend using a white wheat variety (like hard or soft white spring wheat). I also use einkhorn and kamut wheat berries.
Love this bread.. Flavor is great and it has a chewy texture.
I am going to make this, but first I have a question. When it calls for the rising time, can I use the proofing cycle on my oven? I wasn’t sure if that might over proof it.
Yes, you could use the proof cycle on your oven – just keep a close eye on it to make sure the dough doesn’t get too warm or over proof.
I made this as written except I used active dry yeast and baked it more like traditional sourdough. I slashed the top with a knife and baked it in a preheated Dutch oven at 425 degrees for 30 minutes with the lid on, then removed the lid and baked another 10-15 minutes until browned (at 425 degrees the entire time). It was crusty and chewy and amazing.
Hi! So you lwt the dough stay formed somewhere else, before putting it I to the warmed Dutch oven, rt?
Love the new website!!!!!! It is so awesome
Thank you so much, Lauren!
So good and so easy! I baked it in a loaf pan and it turned out beautifully. I was worried it was going to be really dense because the top sounded so hard when I first took it out of the oven. I’m glad I waited for it to cool before slicing into it because it was absolutely perfect! About to prep another loaf or two…. Or three or four.
Excellent bread recipe! I have been baking sourdough for a couple of years and have become a “bread snob”. This recipe is so easy and absolutely delicious! Thank you for sharing.
Well I’m ruined now because I can’t be bothered to spend hours making sourdough bread when there is a recipe that is delicious and simple! This is fantastic – thank you!
I didn’t have enough active starter (that I was hoping to use for a sourdough bread, but it was late!). I mixed the active starter with a ton of discard. The results were beautiful and delicious!
Made exactly as directed except 2 cups of red fife whole wheat and 1.5 cups of unbleached white bread flour. Perfect.
I have made this twice and mine seems dense and slow to rise. And once cooked, the outside is rough, not smooth like yours! What do you think it is? Is my discard too dense? Something with the water? I’d love any input. ((I have made the regular version of this bread dozens of times with great success!!)
Hi Alison – what’s the consistency of your sourdough discard? Think/thick/pourable?
It is thick! I am pretty new to sourdough. I was given some starter and its instructions about a month ago (it seems to be from America’s Test Kitchen). The instructions always give me just a small amount of starter and to get a full cup of discard takes several feedings. I think this is why it isn’t working in this recipe. It is the only discard recipe I have tried though. I think I might build it up to a larger amount and use your “lazy method” because I like the idea of having more on hand to use for discard recipes AND for bread.
You know in adventure fantasy novels, when the protagonists stop for the night after a long day of trekking through dangerous woods, wherein they narrowly escaped various eldritch horrors, and the grizzled guide makes a fire while our innocent hero pulls his cloak tighter around himself—then once the fire is crackling merrily, out comes a loaf of bread and a hunk of cheese from the grizzled guide’s cloak and he uses a well-worn, but cared for, hunting knife to slice off pieces of each for our innocent hero and it’s the best food said hero has ever tasted? This is that bread.
Hahaha…best comment ever. And I absolutely 100% agree.
I’m going to book club where this happened… and this is why I decided to make this loaf. Bread, cheese, & apples – the necessities for any fantasy novel hero.