Canning 101: Water Bath Basics
I know in some circles canning your own food is horribly old-fashioned to which I say, call me old-fashioned because I kind of love it. Many of you have expressed interest in learning more about canning (and many of you know quite a bit already!) so today begins a little series on the basics of water bath canning.
Canning may seem intimidating – I get it! I used to feel that way until I actually started water bath canning and realized how easy it is. Often people think they have to can 146 jars of jam in order to justify pulling out the canning equipment. While that is awfully ambitious and wonderful, there are many, many times that I use my water bath canning to process a simple 3-4 jars of strawberry jam or whatever it is. It doesn’t have to be a day long, epic adventure every time. It’s easy. I promise!
To start, there are two main types of home canning: Water Bath and Pressure.
Water Bath canning is the most approachable type of canning (and is a bit more affordable to get started with) and is for high acidity foods like tomatoes, pickles. Jams, jellies, salsa, applesauce and peaches are also ok for water bath canning.
Pressure canning is for those foods that are low in acidity and that need higher temperatures to be food safe. Think: green beans, meats, other vegetables, fish, etc. Pressure canning basically takes the jars/food to a higher temperature (240 degrees instead of 212 degrees) and requires a special pressure canner to do the job.
We’ll talk about pressure canning next month but today, let’s quickly cover the equipment needed for water bath canning.
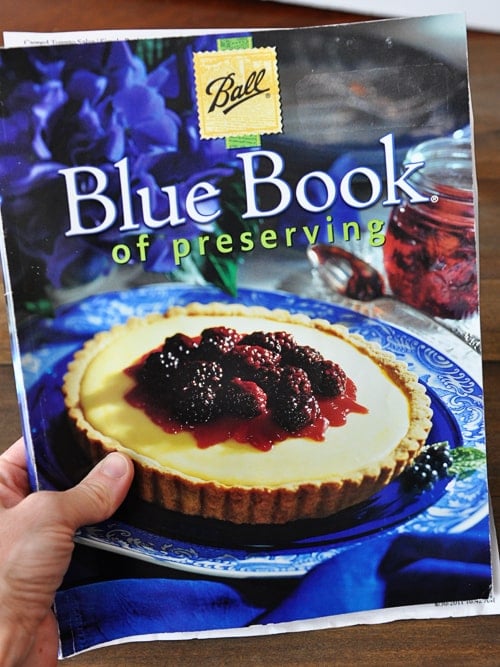
I have a trusty resource that I use for almost all my canning questions: The Almighty Awesome Ball Blue Book of Canning (not the official title but I like to call it that). I always peek in here before figuring out how and what to can as a first step and then usually tweak or use my own recipes along the way. I think they’ve since updated the cover since I bought mine years ago but it’s the same info.
Here’s the rundown on basic equipment needed (not a whole lot of stuff!):
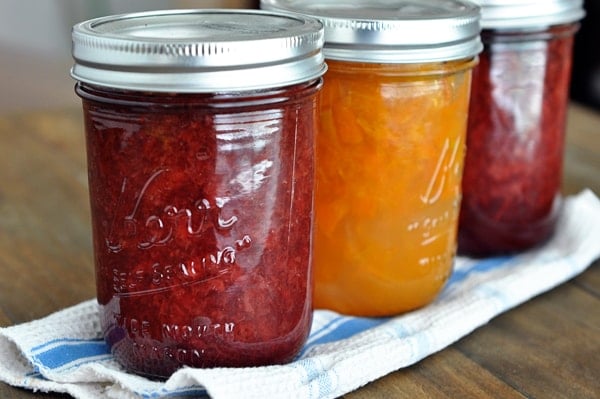
First, you need to get yourself some jars. The size and style will depend on what you are canning. I’m pretty boring and even put my jellies/jams in pint-size jars instead of the cute, quilted glass jars.
You can see from the picture below that jars come in either wide-mouth or regular, which refers to the size of the opening. I far prefer wide-mouth jars for the ease of filling, but in the end, a jar is a jar. Jars can be reused time and time again unless they have developed cracks or chips.

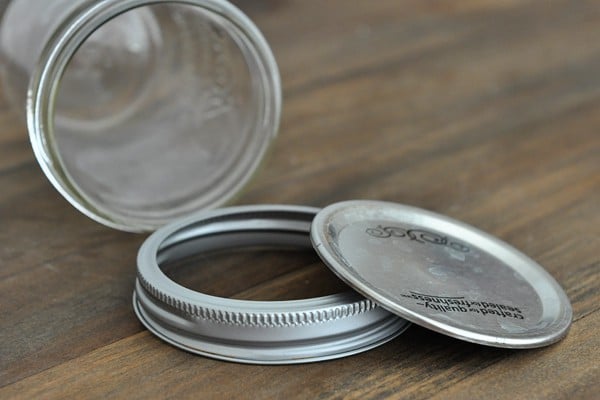
Rings and lids are necessary for canning, too. The rings can be reused over again and I recommend taking the rings off your sealed and canned jars once you put the jars on the shelf – it helps the rings not get rusty and nasty but the jars will still stay sealed after the ring is removed (don’t detach the lid).
Lids, on the other hand, should only be used once in order to make sure the jars seal correctly every time. The little POP! you hear as the jars seal is like music to my ears. That’s the lid in action. Make sure to buy the same size lid as your jar (wide-mouth jars = wide-mouth lids).
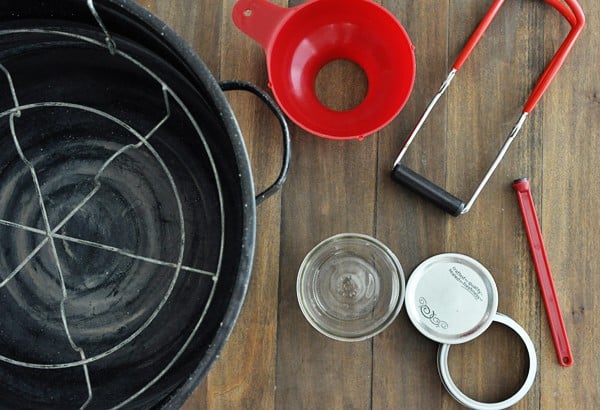
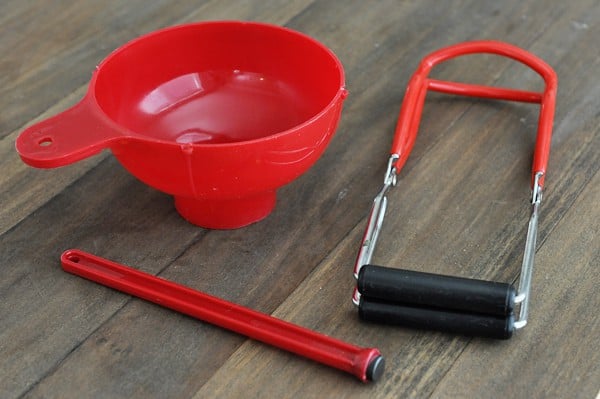
These basic little canning sets are very common and are worth their weight in gold.
The large funnel is perfect for filling jars to eliminate sticky spills down the side of the jar.
The grabber-tong thingies help to get the jars out of the boiling water (sorry, I’d rather not use my hands) and the little stick with a magnet, while totally frivolous, is actually quite handy to nab the lids that sit in really hot water before topping the jars.
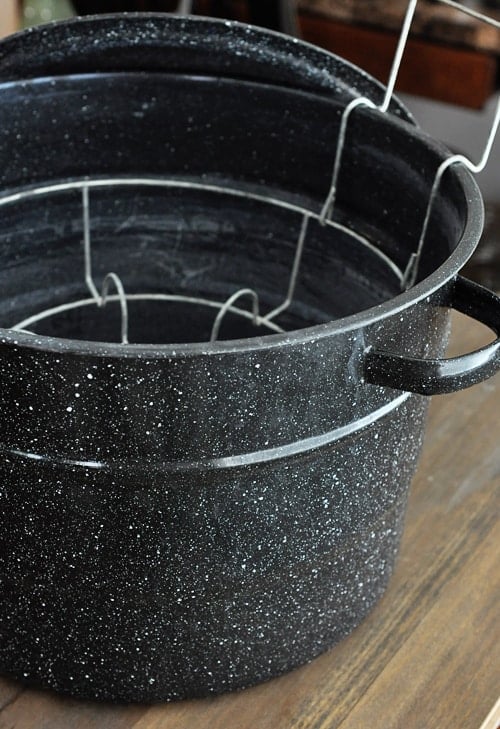
Now, the pot. Pretty essential, I’d say. The style of pot you see here is very common and can be found at most stores that sell canning jars and supplies. They are inexpensive and come with a rack that can fit about 7 quart-size jars and about that many, if not a few more, pint-size jars.
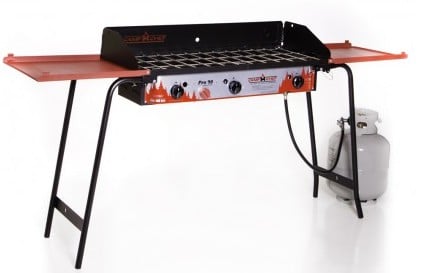
I can’t talk about canning without mentioning my Camp Chef stove. I don’t can indoors. I always, always use my Camp Chef that we got a hundred years ago outside for canning.
It’s so much easier (and keeps my house cooler) to do the processing outside. Plus, you can get two water bath pots going at the same time and have a party.
Didn’t you know canning with friends is much more fun? It is. You can certainly can inside if your stovetop is canning-approved (some glass/ceramic tops are not) but it’s also very convenient to do the processing outside if you can.
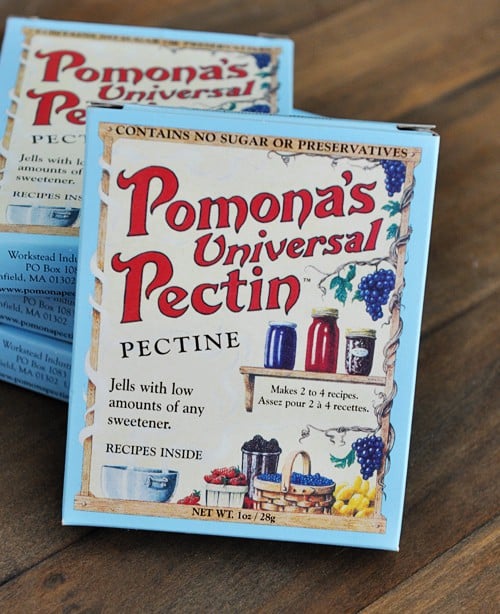
While not a part of the basics of water bath canning, I do have to give a shout out to something that revolutionized how I can jams/jellies. I was spending a fortune at the store buying low-sugar jam (it’s virtually impossible to find jam where the first ingredient is fruit and not sugar or HFCS) and hated the taste of home-canned high-sugar jam (tasted all sugar and no fruit).
Enter Pomona’s Pectin. I don’t even remember how I discovered this gem but I’ve been using it for years and won’t can jam or jelly without it. In a nutshell, Pomona’s is a sugar- and preservative-free citrus pectin that does not require sugar to jell. As a result, jams and jellies can be made with less, little, or no sugar at all and also require much less cooking time than traditional recipes – this means the resulting jams and jellies are healthier and taste more like fruit than sugar. Honestly, I can’t say enough about this stuff. It’s amazing. You have to search around for the best deals online but most recently, I found it on sale at Vitacost. One box can make many batches of jam.
Ok, so that’s the basics of what you need to start water bath canning. Very soon I’ll be sharing a step-by-step for how I can applesauce, peaches and jam. And next month, we’ll start in on pressure canning.
I didn’t see your comment if you need to cook salsa before canning with a water bath
I will be canning salsa and raspberry jam this week for the first time. I truly appreciate your wise advice and recommendations. Thank you for the recipes and your encouragement. It makes me a little less nervous about starting this. I have 20 lbs. of raspberries to process. Thank you. 😊
You’ve got this, Carol – you’ll do great!
Hi, my name is Jamie my question is how long do you process salsa in a water bath when canning?
The recipe I use has the following instructions, however, each recipe might differ, so be sure to follow the recommendations in a tested recipe.
Process in a water or steam bath canner for 15 minutes (add 5 minutes if you live at 1,001 to 3,000 feet; add 10 minutes for 3,001 to 6,000 feet; add 15 minutes for 6,001 feet to 8,000 feet).
How many min. Do you water bath spaghetti sauce.
Have you posted any freezer jam recipes yet? Looked for some but didn’t see anything. You are my go-to for all the best recipes! Thanks for sharing!!
I haven’t yet, Amanda – sorry!
Can you make these instructions printable for me? That or send to my Email address ,a short version
I am not able to do that but you could copy and paste the instructions to a word document or other word processing document and print that.
I use a two burner camp chef for both water bath and pressure canning. I love it. But I feel that I should warn, my presto pressure canner instructions say specifically not to use pressure canners on propane type stoves. I still do, but I felt like I should put that out there.
Are there any tricks to canning on a camp chef that one needs to know before giving it a try? Can you use a pressure cooker on a camp chef, if so, is it hard to keep the gauge on the required pounds. Also, is a two burner big enough or would a three burner be better for the extra space?
Dena C – Not any real tricks except for a little experimenting (with temperature and where to keep the heating dial for even heating). I haven’t used a pressure canner on it but many of my friends have. I like the 3-burner because of the extra space; it’s all I’ve ever used for canning so I’m not sure how big of a pot you could fit on the 2-burner.
I’d love to start canning and hope to make some jam with some amazing blackberries I picked this week. Do you have any favorite canning recipes? Thanks!
JaLeen – I’ll be posting some canning recipes later this summer but mostly I like to follow the barebones instructions on the Pomona’s pectin (all-natural pectin which allows you to make low-sugar jam/syrups) and kind of mix whatever fruits I have to use.
Hey Mel! I have used up my last jar of sugary substance called freezer jam and am ready to start my new adventure with Pomona 🙂
I was just going to ask if you go the honey route or still use sugar? I’m going to do strawberry I’m pretty sure. I also see on the instructions it says 1/2-1 cup sugar (per 4 cups fruit) so it really doesn’t make a difference if you use the low amount…it still turns out solid? (Call me nervous from deviating from the freezer recipe handed down 4 generations! lol)
Hey Nicole! Don’t be nervous! I love Pomona’s and think you will too (but don’t blame you since freezer jam is so yummy!). I’ve never gone the honey route, I always use sugar and judge the amount by the sweetness of my fruit. Super ripe in-season strawberries I only use 1/2 cup but sometimes if the fruit is less ripe or just not as sweet, I’ll use more. You can always taste the mixture and add more sugar if needed so I’d say start low! Good luck!
Will this site become active later as we get into season?
Smilebhappy – I will probably update the canning series later this summer but not sure exactly what it will entail right now.
Great Info! Thank you!
Do you know when you will be posting a recipe and step-by-step for canning jam?
Thanks again!
Hi Jena – good question! I’m hoping when spring/summer comes and I get my hands on some ripe, seasonal fruit, I’ll be able to post more canning recipes like that.
Hi Mel, interesting post. I never ever ever eeeever thought about canning before ! I didn’t even knew that there was a way of doing it at home. Please keep with your posts, they are great and extremely helpful, thank you for your tips =D
Hi Mel! I purchased some of the Pomona pectin but I’m not sure what calcium powder is (to make the calcium water)? Where do you find it?
I love your blog and often bring your recipes to gatherings. When people ask for the recipe I find myself referring to you as if I’ve known you forever and we are best pals. ‘Oh, it is a Mel recipe.’ Now, most of my friends and family know what I mean.
Hey Libby – the calcium powder comes in the box of Pomona’s pectin. There should be a larger white envelope of pectin and a pretty small little envelope of calcium powder. If it isn’t in there then the company that shipped it to you made a mistake so I’d check back with them! (P.S. thanks for the sweet comment…so glad you are loving the recipes!)
Hi Mel,
Has the winner been announced yet?
Thank you for hosting such an awesome giveaway!
Haha! I guess all the comments hadn’t loaded for me, either.
Raquel, if you haven’t gone ahead and tried the bars yet, it’s 1/2 c of butter, 1 1/2 c of sugar, and 1/4 tsp of salt.
Terry A. …Thank you for taking the time to do that. I appreciate it! 🙂
Oh, sorry. All of the comments didn’t load, so I didn’t know this had been answered. Oops! 🙂
Thank you for the post and the giveaway. I have been canning for years and now am passing this on to not only my daughter – but my daughters in law as well. Nothing feels as good as looking at the sealed jars sitting on my counter waiting to be taken down to the fruit room! So glad to see this coming back “in Style”.
Hi, Raquel. I am just seeing your question about the banana bars. I don’t see that symbol, but here is a copy/paste version of the recipe. I will write out the fraction amounts, in case it is still showing that symbol for you.
½ cup butter, softened (one half cup)
1 ½ cups white sugar (one and one half cups)
2 eggs
1 cup sour cream
1 tsp vanilla
2 cups all-purpose flour
1 tsp baking soda
¼ tsp salt (one fourth teaspoon)
1 cup mashed ripe bananas (I used three ripe bananas)
Whipped Cream Cheese Frosting:
1 (8 oz) package cream cheese, softened to room temperature
1 cup white sugar (you can use either granulated sugar or confectioners’ sugar – the confectioners’ sugar tends to dissolve better and not be as grainy but either one works fine)
1/8 tsp salt (one eighth teaspoon)
1 tsp vanilla
1 ½ cups heavy whipping cream (one and one half cups)
Hope that helps!
The service to add entries for the giveaway does not appear to be working for me. I’m not on facebook and its just grinding its wheels so to speak about loading my entires. I hope it works! Canning is on my list of skills to learn.
Winners announced!
my newest retirement hobby!
What a wonder resource for beginners and those of us who would need a refresher. Thank you for taking the time to share. *winning would be nice* (what I had did not make it through a fire). Thanks again.
I love using the Camp Chef for canning. I can cook my salsa and spaghetti sauce while my bottles process out on the patio. It works great!
By the way, my husband came home with the three burner camp chef and it is pretty sweet. Now we have the two burner and the three burner and he said I should be able to get a lot of canning done outside on them. I guess I need a second bath.
I also tried to enter just with email, and it wouldn’t let me. cthogges@gmail.com
I love canning! This is my third year and I can everything I get my hands on. I just bought Pamonas about a week ago. I have always made freezer jam because the Mrs. Wages freezer jam pectin uses the least amount of sugar. Freezer space is so valuable that I am hoping Pamonas will enable me to can strawberry jam. I first read about Pamonas in the cookbook “Put Em Up Fruit”.
Pressure canning is also very easy. Around the holidays they usually go on sale. A Presto large pressure canner that is normally $100 will be on sale for $80. I highly recommend getting the big (tall) one since you can fit 14 pints in it at once! I use mine mostly for homemade chicken broth, chili, spaghetti sauce and soon I’m going to try canning beans.
Yesterday my neighbor gave me a bunch of rhubarb and since freezer space is nil I decided to can it as a sauce. Mmmm is it good. The book I used is called “Putting Food By” it is the fifth edition an it is such an awesome book. I also have two Ball books.
Sorry to go on so much but I just love canning. Hoping for the awesome canning pot!
Mel and Catherine,
Thank you so much for responding to my comment. I am using a Dell laptop. I’m sure the issue I’m having has something to do with my computer. I did notice that I only see those symbols in your older recipes. So for some reason, my computer must not want to read the older ones. I have no idea! 🙂 All I know is that I can make banana bars now! 🙂 Thank you so much.
Raquel
Great timing – that’s all I can say. My mom has decided that I can make my own jam, she isn’t going to do it for me anymore. Ah, no problem, it just seems to taste better when Mom does it. I NEVER thought about doing the canning outside though, and I love the idea. Once again, you’ve changed the course of my life. 🙂
RAQUEL, I’ll answer about the banana bars for you. I think your computer may be having a hard time interpreting data from the internet. I don’t get a horseshoe-like symbol. What I see on the recipe is (without typing symbols):
half cup butter
one and a half cup white sugar
one-fourth tsp salt
one and a half cup heavy whipping cream
Hope this helps you.
Have you ever made the Pioneer Woman’s salsa? I have always wondered about canning it since it makes way more than we can eat in a week or two. But it’s not cooked – so I didn’t know if it could be canned or not. It’s made of canned tomatoes, rotel, onions, jalapeño, cilantro, lime, etc. Can you can without cooking the salsa more than the processing time??