My Favorite Chocolate Molten Lava Cakes
Chocolate molten lava cakes have never been easier! The simple batter for these cakes can be made ahead of time to be baked whenever the craving hits.
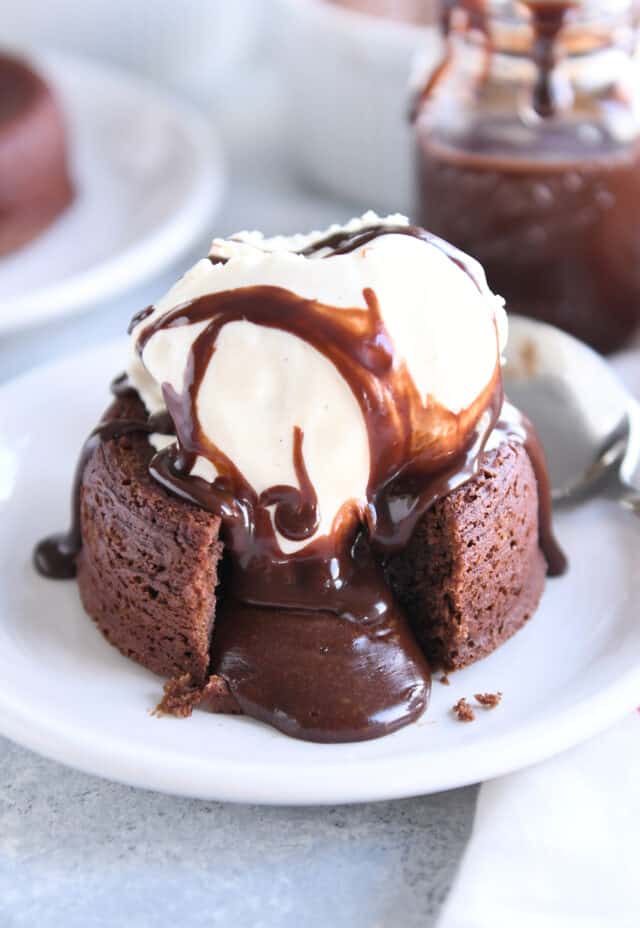
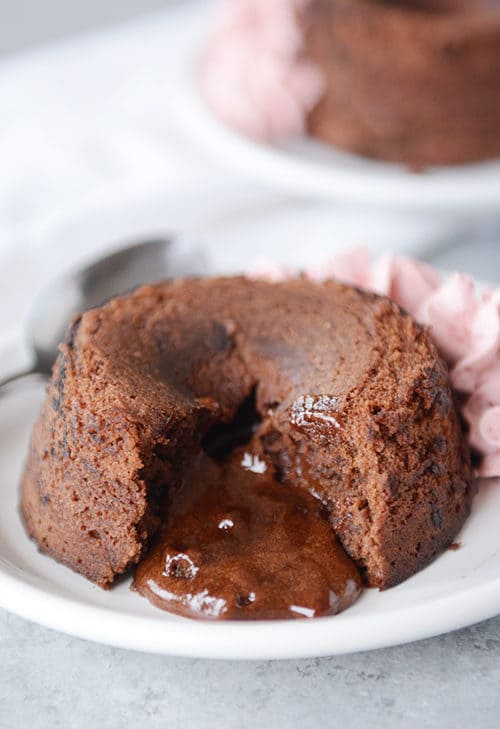
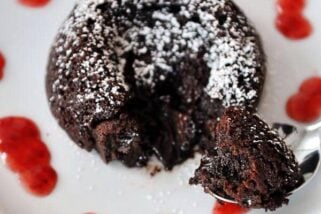
You won’t believe how easy it is to make chocolate molten lava cakes at home!
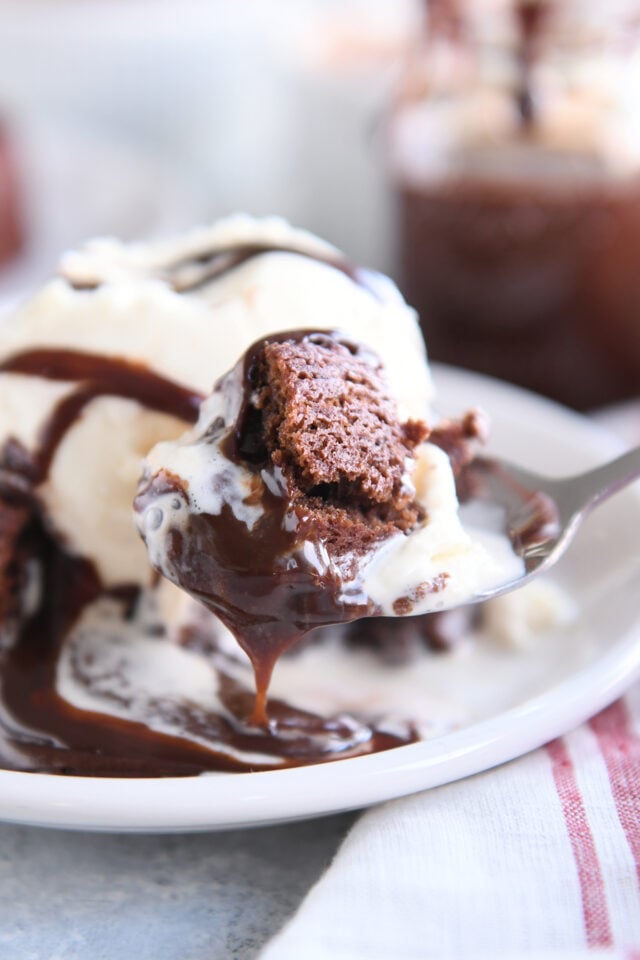
The combination of light as air chocolate cake and decadent hot fudge pouring out from within is what dreams are made of (at least mine).
Molten Lava Cake Batter
This batter is really simple and can be made without a stand mixer, but it does rely on a few key steps:
- Don’t skimp on beating the eggs until very thick, creamy, foamy and light in color! This helps the chocolate batter bake up light and fluffy.
- For the melted chocolate, use a great-tasting chocolate and a chocolate that melts well. I almost always use Ghirardelli bittersweet chocolate chips in this recipe. It’s perfect even for those that prefer a more semisweet chocolate vibe (it doesn’t make the lava cakes too dark and rich). Not all chocolate chips melt as well. I recommend using Ghiradelli or Guittard chocolate chips for melting with the butter in this recipe.
- After adding the flour, don’t over mix. Just give the batter some quick stirs until the flour is just combined.
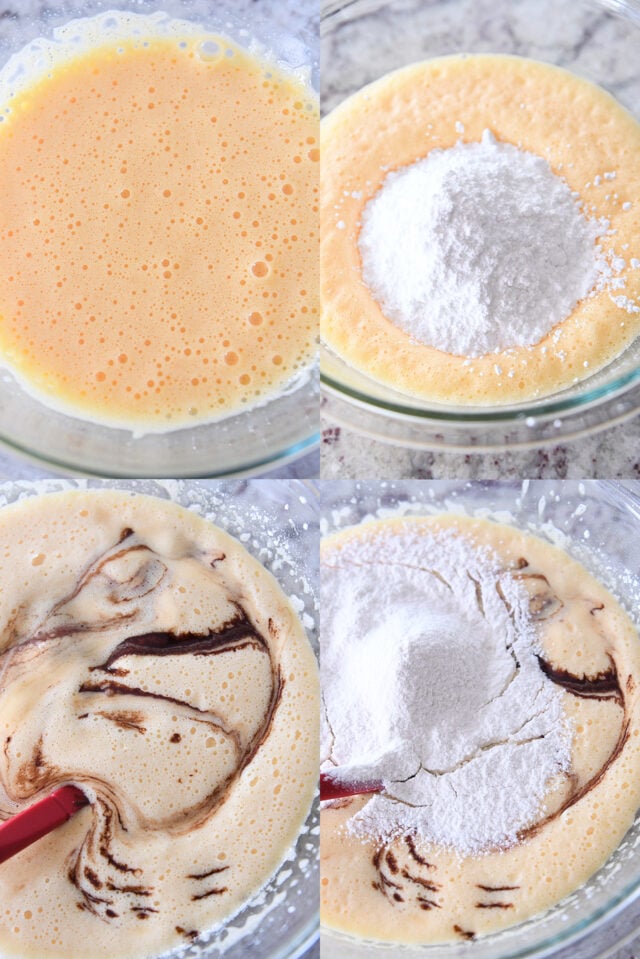
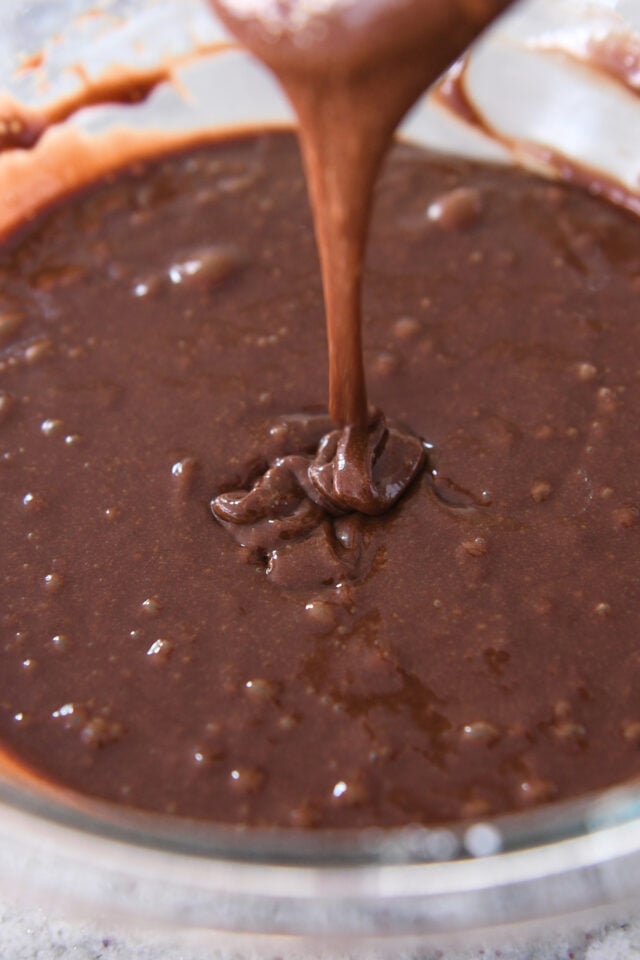
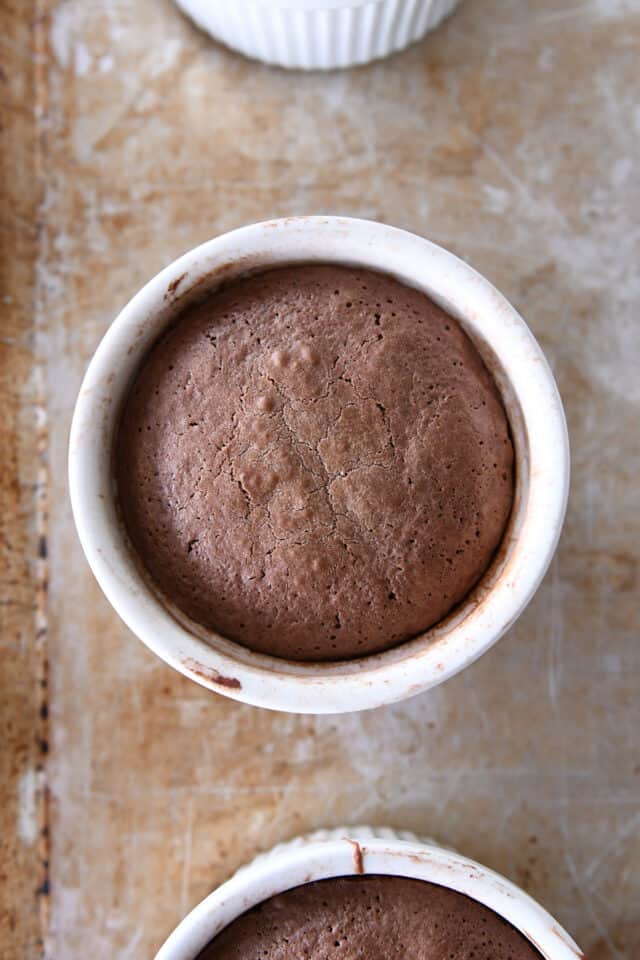
The chocolate batter will be luscious and medium-thick but still pourable.
Small air bubbles throughout are fine!
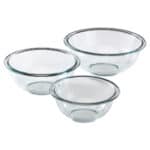
Best Size Ramekins to Use
I make the lava cakes in 8-ounce ramekins {aff. link}.
You can also use 6-ounce ramekins {aff. link} (if so, you’ll likely get eight lava cakes out of the batch instead of six).
AND…maybe the best kept secret is that these simple, super inexpensive glass pyrex custard cups {aff. link} work great for these cakes, as well. That’s what my Aunt Marilyn (originator of this recipe) uses mostly.
I have also made the lava cakes in a standard muffin tin (only filling 10 of the cups, not all 12). The baking time is a few minutes less if using a muffin tin, and it is harder to turn them out and have them look pretty, but it definitely works in a pinch!

How to Grease the Ramekins
These chocolate molten lava cakes rely on a well-greased ramekin so that they pop out easily for plating and serving.
Yes, you can just dig into them right in the ramekin, but it’s fun and a bit more traditional to turn them out onto a plate to serve that way.
How To: Brush or rub butter liberally over the bottom and sides of each ramekin, paying close attention to the the crevices, especially where the sides and bottom meet. Then, sprinkle in cocoa powder evenly and tap out the excess. This seems to do the trick perfectly!
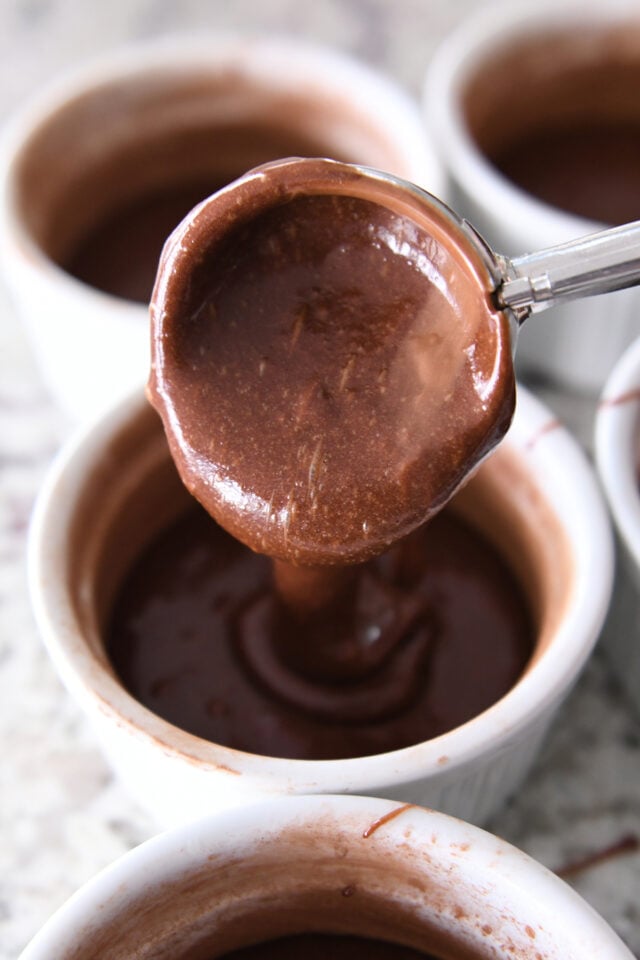
Fill each ramekin about 2/3 full with batter.
Bake just until the edges and top are set but there is still some jiggle to the center.
How to Turn out the Lava Cakes
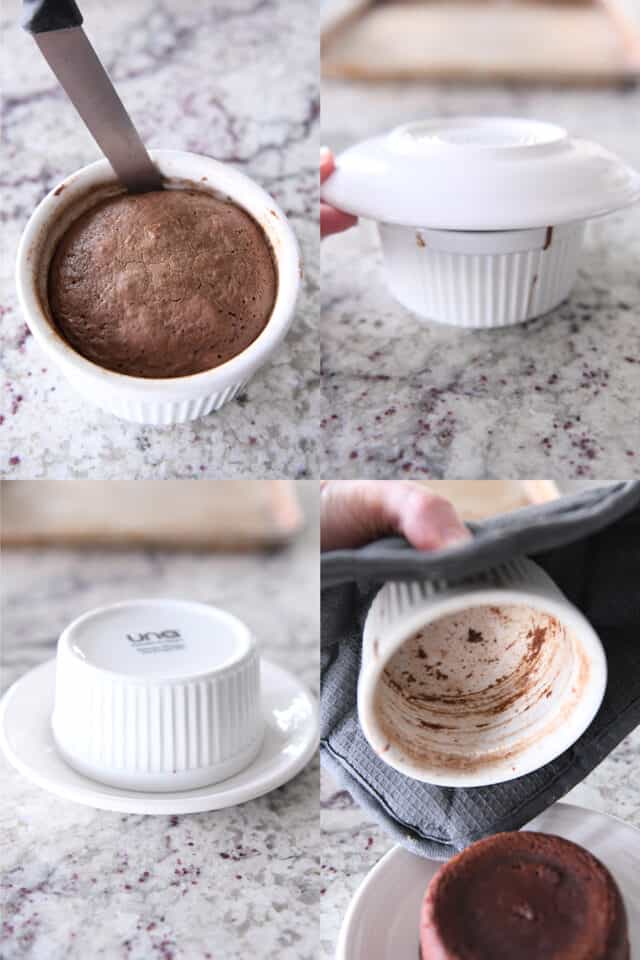
Out of the oven, let the lava cakes sit for 2-3 minutes before loosening the edge with a thin knife.
*They can sit longer than that – just be aware that if they do, it’s likely that it’ll be harder to pop them out cleanly and cooling in the hot ramekin means the molten center may cook a bit more and not be quite as lava-y.
Place the serving plate over the top of the ramekin and tip so the plate is on the counter. Tap the plate and ramekin lightly so the cake slides out.
Use a hot pad to carefully lift the hot ramekin off the cake.
A Favorite Dessert
These chocolate molten lava cakes are so easy to make at home and are one of my favorite desserts EVER.
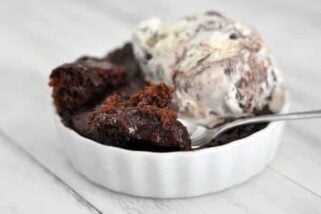
We serve them with ice cream and sometimes hot fudge sauce, but they are also delicious plain. Perfectly chocolatey and so rich and delicious, they are incredible.
Many of you have fallen in love with these at-home lava cakes, too!
Ashley writes: My 13 year old daughter made these today with just a little guidance from me. They were a huge hit. They are easy and we always have the ingredients on hand – this could be dangerous! ⭐️⭐️⭐️⭐️⭐️
Brenda says: Super yummy! Big hit with my family ⭐️⭐️⭐️⭐️⭐️
Shelly says: These are SO GOOD!! I made these with my kids, and they thought the whole process was amazing!! We enjoyed them with some ice cream, and they are just so darn good! Thank you, Mel!!! ⭐️⭐️⭐️⭐️⭐️
Doris writes: Made these exactly as directed in the recipe for dessert on Christmas day. Made the cakes early in the afternoon and baked them after dinner when we were opening presents. Everyone absolutely raved about them! Definitely a keeper! Thank you. ⭐️⭐️⭐️⭐️⭐️

My Favorite Chocolate Molten Lava Cakes
Ingredients
For the Ramekins:
- 2 to 3 tablespoons butter, softened
- 2 to 3 tablespoons unsweetened cocoa powder
Cakes:
- 1 cup (170 g) chopped semisweet or bittersweet chocolate (see note)
- 10 tablespoons salted butter
- Pinch of salt
- ½ teaspoon vanilla extract
- 3 large eggs
- 3 large egg yolks
- 1 ½ cups (171 g) powdered sugar
- ½ cup (71 g) all-purpose flour
Instructions
- Preheat oven to 375-400 degrees F (see note!).
- Grease the bottom and sides of six 6- or 8-ounce ramekins by brushing or spreading a thin layer of butter evenly over the bottom and sides of each ramekin, paying close attention to the the crevices, especially where the sides and bottom meet. Sprinkle in cocoa powder to coat evenly and tap out the excess.
- In a medium bowl, add the chocolate and butter and melt in 1-minute increments in the microwave, stirring in between, until melted and smooth (don't over heat). This can also be done in a saucepan on the stove.
- Off the heat, stir in the salt and vanilla. Let the mixture cool to room temperature (it can be slightly warm but not hot).
- In a large bowl with a handheld electric mixer or in the bowl of an electric stand mixer fitted with the paddle attachment, beat the eggs and egg yolks together until thick and light in color, 2-3 minutes (don't skimp this step!).
- Add the powdered sugar and mix until combined. Add the cooled, melted chocolate mixture and the flour and mix with a spoon or spatula just until combined and no streaks remain (don't overmix).
- Divide the batter evenly among the ramekins and place the ramekins on a large baking sheet with a couple inches between each dish.
- Bake for 12-13 minutes until the sides are set and the cakes feel soft when touched in the center. The timing is really important here and a lot will depend on if your oven bakes hot or cool. You want the cakes to bake long enough to form a crust around the molten filling without baking all the way through.
- Remove from the oven and let sit for 2-3 minutes. Run a small knife or metal spatula around the edges to loosen. Place a plate upside down on the ramekin, and holding onto both the plate and the ramekin, carefully flip so that the cake falls out onto the plate (tap very lightly on the bottom of the ramekin if the cake doesn't come out right away).
- Dust the cakes with powdered sugar or serve with whipped cream and strawberries or ice cream and hot fudge sauce (or a combination of all!).
Notes
Recommended Products
Recipe Source: adapted slightly from a recipe that’s famous in my extended family from my cousin Camille, given to me (and served to me countless times) by my Aunt Marilyn
Recipe originally posted March 2016; updated January 2023 with new photos, recipe notes, etc.
I liked this recipe after trying others. I melted the chocolate slower so it wouldn’t seize.. I tempered eggs and chocolate . Baked 12 minutes at 400.
So good
I used silicone half round molds, worked perfectly, dusting them with cocoa powder was the ticket!
Perfectly delicious!
Where is the note about using semi sweet chocolate versus bittersweet chocolate and sugar adjustment. 170 g of powdered sugar with semi sweet chocolate chip chips would be way too sweet. It needs an adjustment and you didn’t give information about that.
Hi Lisa, the note is listed under the recipe where I address that I almost always use bittersweet chocolate. You can definitely adjust the sugar if you’d like, but when I make this recipe with semisweet chocolate, I use the sugar amount listed in the recipe.
Instructions were clear and the cakes baked up well! My only complaint is that the flavor is a little plain – meh. It’s lacking depth and I’m not sure why because I used good chocolate.
After I congratulated my kids on making these delicious beauties, my daughter said, “Mel does it again!” and I agree. Thanks for a lovely Christmas dessert!
Haha, so sweet of her to give me the credit when she should have taken it all for herself! 🙂 Glad these were a hit!
Thanks, it was great! My kids were so happy! I did use 4 whole eggs and no yolks (I never find anything to do with whites and it always go to trash).
I will do it again with 3 whole eggs only to see it if there is too much of difference.
Have you ever tried this in glass containers? Does it cook differently? Thanks 🙂
Hi Kenzie, yes, I’ve made these cakes in small glass bowls. They take a bit longer to bake than ceramic dishes.
how to make a lava cake I need the recipe
Made this last night and it was perfect! The tip about not over-baking is key—I pulled them out right around the 11-minute mark and got the perfect gooey center. For anyone wondering, I refrigerated the batter for 30 minutes like the recipe suggested, and it worked beautifully.
Delicious! I made this today, and… honest confession… didn’t realize that I needed three eggs AND three extra egg yolks, so I forgot the three additional egg yolks. It still turned out just fine, I just had to cook it longer. Thanks for the great recipe. We’ll be making again for sure.
Can you add the water bath steps to the instructions?
There isn’t a water bath required for this recipe.
Why not include the cocoa powder in the recipe if it’s going to be included in the steps? Bummer.
Sorry for that omission – those notes went missing on a recent recipe update, but I’ve added them back in.
A close friend made your lava cake for me for my birthday. I was so smitten that I bought new blue and white ramekins for myself and my four children. It is the best lava cake I have ever had and have made it many times since my birthday. Everyone who I have served it too, agrees. Can it be made gluten free? I have several relatives who can not tolerate gluten and I would love to make it for them if possible.
Barb
Hi Barbara! Those ramekins sound cute! Lots of readers have reported this recipe works great with 1:1 gluten free flour.
Would a silicone cupcake tray work for these? I do not have any ramikens. Thank you in advance!
Yes, it should work just fine!
It looks like a dog threw up in my bowl, this is a awful recipe and tastes even worse then it looks.
Wow. Could you have provided a review that was more helpful and a lot less rude? I know some food is not for everyone and that’s ok but nothing excuses poor behavior.
Your recipe calls for 3 large eggs and 3 egg yolks. Does this mean to separate the whites and yolks and then beat together? Or is this 3 eggs plus three more yolks?
You’ll use three whole eggs and three egg yolks (discard the three egg whites or use them for another recipe). Does that help?
If I want to underbake to be able to reheat later in either a microwave or oven, what amount of cook time do you suggest? So once it warms up at the correct consistency.
I don’t underbake if I’m reheating (we’ve found that they reheat just fine on low heat without over cooking).
How much in grams is 10 tablespoons of butter?
Right around 140 grams