How to Bake Perfect Homemade Pizza {With and Without a Baking Stone}
Three methods, with picture tutorials, on how to bake the perfect homemade pizza with or without a pizza stone and without any fancy tools!
Baking perfect homemade pizza doesn’t have to be intimidating!
I used to be in that camp of people that baked homemade pizza on a greased baking sheet in a 350 degree oven for, like, 25 minutes, and while the pizzas were edible, they certainly weren’t anything to write home about.
The crust was usually a bit tough and sometimes even soggy.
My pizza-loving life was significantly changed when I learned, among other things, that cranking up the oven to 475 or 500 degrees would not burn the pizza or the house down.
You are going to have to trust me on this one and start gathering the courage to set the temp of your oven higher than it may have ever been.
It will make a lifechanging difference in the crispy, golden crust we want in perfect homemade pizza.
I’m going to share with you three methods for baking perfect homemade pizza – all extremely doable for the home cook (that’s you!).
One method is even specifically tailored to those of you without a pizza stone. Sweet!
My Favorite Pizza Stone:
I have the large pizza stone from King Arthur Flour – I’ve owned this one for years and considering we make homemade pizza usually once a week, it’s been worth the investment.
I had a circle stone years ago (I think it was Pampered Chef??) but it broke when someone who shall remain nameless dropped it on the tile floor; when I started using this large rectangular stone, I realized what I’d been missing.
The size of this is it’s greatest selling point.
When we make individual pizzas where everyone creates their own masterpiece, I can fit two or sometimes three smaller pizzas on here which makes the baking go much faster than cooking one at a time.
Love this pizza stone!
A Note About Grilling Pizza:
Before I start talking about baking methods, keep in mind, I’m not going to discuss grilling pizza in this post but only because I have a tutorial about it already.
Grilled pizza is a great way to beat heating up your house for perfect homemade pizza and we usually grill our pizza through the summer/warmer months (that’s only about 3 months were I live, seriously) and use the oven for the rest of the year (yep, basically winter for 9 months around here, or at least it feels that way!).
The only addendum I’d make to the grilling pizza tutorial is that instead of grilling right on the grates you can put your pizza stone, if you have one, onto the grill and it makes the process even easier!
Ok, let’s get started!
Method #1: Pizza Stone and Pizza Peel
Supplies needed: pizza stone, pizza paddle/peel (I’ve had mine for years, hence the stains, and picked it up at a kitchen supply store) – you can get by without one of these if needed, see details in method #3, parchment paper or cornmeal, nonstick cooking spray (if using parchment paper)
When I use this method: When it’s just our family and we want really stellar pizza (nothing quite compares to this traditional pizza stone method even though the others may come close) and especially when we are doing individual pizzas and everyone is creating their own since I can bake a couple at a time.
This method is hard when we have company over because it takes forever to cook everyone’s pizzas on just one stone.
Yes, I’ve considered getting another pizza stone and sticking it in the bottom 2/3 of my oven (I have one of those standard oven/range combos where the oven is split into a small oven on top and a larger oven on the bottom) but haven’t justified it yet and honestly don’t really want two heavy pizza stones hanging around, so if I need more baking power, I’ll use the pizza stone in the top part of my oven and an overturned baking sheet (method described below) in the bottom oven.
{Update: I finally splurged and bought another of my favorite pizza stones listed above; it makes this method of homemade pizza even faster now!}
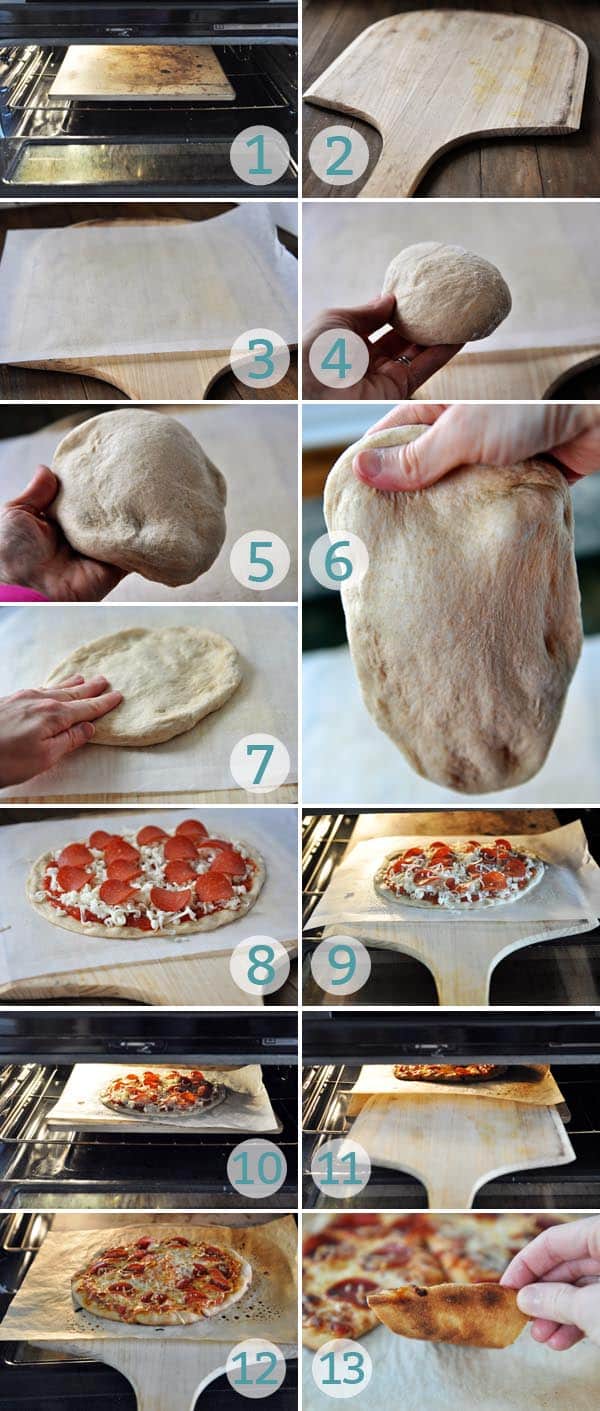
1) About an hour before you want to bake your pizzas, stick the pizza stone on a rack in your oven placed in the lowest position. Preheat the oven to 475 or 500 degrees (some ovens only go to 475) and get that stone piping hot. Don’t let the high temp scare you! It’s the secret to great pizza.
2) Get out the pizza paddle and make sure if you’ve made the overnight whole wheat pizza dough that it is at room temperature and not chilled (it should come out of the refrigerator 2-3 hours before making pizza).
3) Here’s where you have a few options – I like to use parchment paper on top of the pizza paddle but you can forgo the parchment and instead sprinkle the paddle liberally with cornmeal. The parchment makes for much easier cleanup, both on the counter and in the oven (cornmeal gets everywhere). Cornmeal is economical and more traditional, though, so do whatever floats your boat. I know some people have had an experience where the parchment paper burned in such a hot oven but in lots of years of making pizza this way, it’s never happened to me (be aware, though). If using parchment, lightly grease with cooking spray – it helps the dough press out much easier.
4) Grab some pizza dough – the exact amount will depend on the size of your pizza stone.
5) Start to stretch the dough between your fingers, trying to get the middle evenly thick without any transparent thin spots.
6) The dough should be really elastic and if you let it kind of fall down while shaping, it will naturally stretch into an oblong shape.
7) When it is starting to take shape but not yet as thin as you want it, set it on the parchment (or cornmeal, if using) and gently press it into the shape you want. Homemade pizza on a stone doesn’t need to be perfectly round; it’s more important to get it uniformly thick or thin so it bakes evenly.
8) Top the pizza as desired (more info on this exciting topic later this week!).
9) Take the loaded pizza paddle to the oven, open up the door, and get ready to slide the pizza (parchment and all) onto the hot pizza stone.
10) All it takes is a little nudge – put the front of the pizza paddle about halfway onto the stone – and the pizza laden parchment will slide right off onto the stone. Close the oven and bake for 7-10 minutes.
11) To remove the pizza, use the paddle again and gently slide it underneath the parchment paper. I sometimes gently grab a corner of the parchment and help it back onto the paddle but that isn’t always necessary. It should be an easy process.
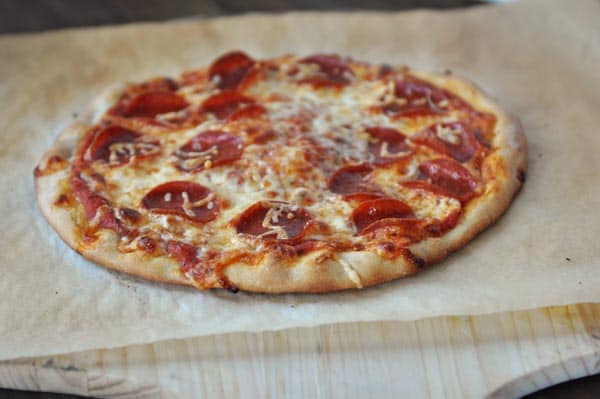
12) Pull that perfect homemade pizza out of the oven!
13) Look at that crust. Now if that doesn’t make your heart sing…well, you are probably not human.
Method #2: Baking Sheet on a Pizza Stone
Supplies needed: pizza stone, nonstick cooking spray (if using parchment paper), large rimmed baking sheet(s)
When I use this method: When I’m lazy and want to make a lot of pizza with minimal effort that still has a golden brown crust and is baked well – no surprise, this method is often used when I’m making the fast and easy pizza dough.
There’s a chance I may rename this The Slacker Method. I’ll let you know.
Although the pictures below don’t show it, usually I’m using enough dough to fill up the entire baking sheet, which is a lot more pizza in one baking session than throwing smaller pizzas in one at a time.
This is also a great method if you don’t have a pizza paddle.
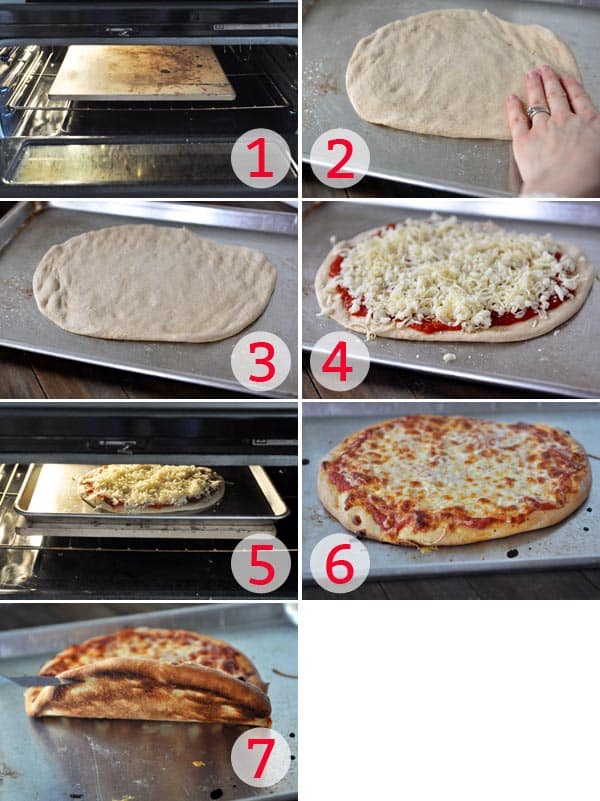
1) Just as before, get that pizza stone preheating at 475 or 500 degrees F for about an hour before baking pizzas (shhh, don’t tell but sometimes I only plan ahead long enough to preheat for 30 minutes and it’s ok, although an hour is preferable).
2) Lightly grease a large aluminum baking sheet (don’t use a nonstick baking sheet or the bottom of the pizza will get waaaaay too dark!) and using the instructions described in the first method above, stretch the dough to the desired shape and then press it the rest of the way into the pan.
3) Although this picture doesn’t truly show it, I usually fill up the entire pan with pizza dough to really maximize the amount of pizza to cook at one time.
4) Top that pizza with your heart’s desire.
5) Set it on the hot pizza stone, close the oven, and let it work magic for about 9-10 minutes.
6) That perfect homemade pizza looks purty!
7) And that crust isn’t too shabby for being on a baking sheet.
Method #3: Mock Pizza Stone {Overturned Baking Sheet}
Supplies needed: one or two rimmed baking sheets, pizza paddle or peel (optional – I’ll describe details below), parchment paper or cornmeal, nonstick cooking spray (if using parchment paper)
When I use this method: When we have company over and I want a second or third “pizza stone” to cook more pizzas at a time. This is also a great option if you don’t have a pizza stone (and you can get by without a pizza paddle either – read below!)
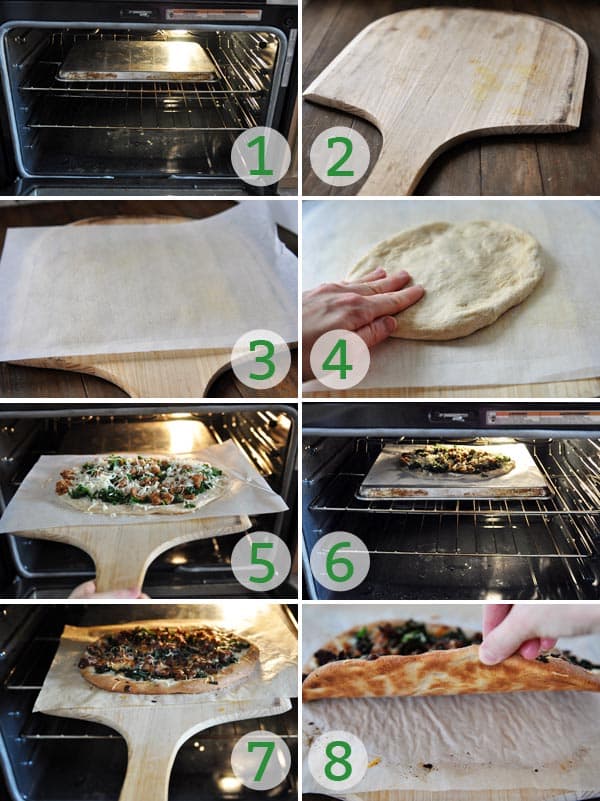
1) Ok, so in this case, instead of a pizza stone, flip a rimmed baking sheet upside down and preheat it for about 30 minutes at 475 degrees before baking your pizza.
2) Get that pizza paddle ready. Now, if you don’t have a pizza paddle, don’t fret! Simply take another baking sheet (if rimmed, flip it upside down, if it’s one of those flat ones, you are good to go) and use it in place of the paddle.
3) Lightly grease a piece of parchment (or use cornmeal as described in method #1) and place it on the pizza paddle (or upside down baking sheet if using).
4) Shape the dough (again, refer to method #1 for details on this) and top with sauce and other yumminess.
5) And slide that beautiful pizza onto the hot baking sheet. If you are using a baking sheet to fill in for a paddle, you’ll have to get a little more oomph into scooting that pizza into the oven. Take care not to burn your little fingies!
6) Try to center the pizza right in the middle of the baking sheet.
7) Let it bake for about 7-10 minutes and then gently slide it out with the pizza paddle. If you used a baking sheet to slide it into the oven, this part is a bit trickier – I place the second baking sheet right in front of the hot baking sheet in the oven, carefully grab the two front corners of the parchment paper (having a little assistance at this point would not be a bad thing) and slide it onto the cool baking sheet to remove from the oven.
8) And look! Beautifully browned crust for perfect homemade pizza without an official pizza stone.
So there you have it! Three great methods for baking amazing homemade pizza right in your own oven.
109 Comments on “How to Bake Perfect Homemade Pizza {With and Without a Baking Stone}”
Hi! Is there a way you can make this printable like a recipe? I would love to keep this tutorial in my recipe binder (which already has your homemade pizza sauce recipe and pizza crust recipe). I tried printing it as is and the print preview showed 45 pages haha.
I’ll try to work on that!
Hi. I’ve been using your pizza making tips for a while now and wanted to come back and thank you…other than the convenience of ordering pizza; there is really no need now; the toppings and combos that we come up with at home are way better and the crust etc is as good as any pizzeria. You are my ‘go to’ site if I am looking for something. I appreciate all the time and effort that you give to make my life easier.
Thank you so much, Beth!!
Thanks so much for this! I recently made a new gluten-free pizza crust, and being gluten-free, it needed all the help it could get! I was a little nervous to turn my oven up that high. In fact, I wasn’t sure it would even go that high (it does) but everything went perfectly and I got a great pizza! (OK, well, technically, because the crust was gluten free and contains more water, I needed to pre-bake the crust for about 10 minutes, then add the toppings and bake again for 10 minutes.) Great crispy exterior, chewy interior… closest to pizza shop pizza I’ve made yet!
hi , may i know on the 3rd method u preheated and cooked it using broiler or down flame in oven ?
I am going to try to make this pizza what kind of sauce could I used we are in quarenten and is not ready to get everything. Thank you so much for your help.i learned to make bread with your recipes
My email is linot92309@yahoo.com
This is a super easy recipe! https://www.melskitchencafe.com/homemade-pizza-sauce/
Hi!
Do you have the child size (12×8″) or XL size (25×13″) pizza peel? Your link goes to the child size but I am thinking that would be too small.
Thanks! Sara
Sorry for the link issues, Sara. I have one similar to this size.
No worries, I know how quickly things change on Amazon…thanks for responding!
Will try it this weekend, have the pampered chef stone but never used it this way or had my oven that hot. Knew there had to be something missing.
Hi! Have you ever made pizza like a take and bake? So put together the whole pizza and cook it the next day? Thanks!
I haven’t tried that (always a little afraid the unbaked dough will get too soggy?)
I did not bake this pizza but I did bake my pizza it at the temperature of 475° which is what I really wanted to know. I must say that this is the best temperature that I’ve ever baked pizza and my pizza came out perfect.
I could use all the help you got.
thanks
Hi Mel! I went with option #3 (as I don’t have a pizza stone). It did still come out soggy (in the middle). Could this be the pizza sauce as I use the one my husband makes for spaghetti?
That might be it – if the pizza sauce is more watery than thick it will definitely have a tendency to make the crust soggy.
You could stir some tomato paste into your hubby’s sauce. That will thicken it up.
I did the oven method with the sheet pan upside down. Used parchment and a pizza peel. I thought I had a great pizza crust recipe (Ina’s) but this one was so much easier and the crust was crunchy on the outside and tender inside. Excellent recipe! I am obsessed with your site. I have had so many successful results from your recipes. Keep them coming!!
Thanks, Judy!
Looking for new ways to improve my pizza making skills.
Thanks for sharing this article. This is really a detailed guide, I can’t wait to make my first pizza!
I have never made pizza but I came across your website and seeing that I can either bake or grill pizza, but to be honest I’m still a bit confused about the differences between grilling and baking when it comes to pizza, also which would be the best method to start with
Mel, I made the pizza without the stone.
It came out amazing.
Thank you.
I must redo my earlier comment, it turns out that my children played a trick on me. They switched my wax for my parchment paper and I did not notice. Excellent pizza once I did it the correct way!
Well I followed the baking stone method as my starving family anticipates this pizza and the parchment paper stuck to the bottom so thoroughly disappointed and do not recommend.
Hi Mel, just tried your pizza hack by way of oven and the results were fantastic! I was a little hesitant at first but after trying your suggestions my pizza was awesome! Thanks!
I use a non stick round pan with corn meal just for added protection against sticking.
I have had great pizzas made this way.
I have the same kind of range/oven and also use the small top oven for pizza (with a stone) but might be changing to a range with single oven. Do you prefer the small oven because it heats up faster or because you don’t get as good results? Thanks.
I just like having the versatility of two ovens in one standard size range, does that make sense? That way I can bake foods at different temps. But yes, when I’m making small batch pizza, I only heat up the small one.
Mel, I just found your website as I was having trouble with transferring the pizza from the peel onto the pizza stone, without the dough getting all crumpled up because it doesn’t slide off the peel easily; especially when it’s weighted down with all the cheese and toppings on it; it is the step I dreaded the most. Then I see you put parchment paper between the dough and the peel! Why didn’t I think of that??? Thanks for a great tip.
Glad it helped, John!
I finally had enough courage to bake pizza on the grill this summer and it is the best homemade pizza we’ve ever had. Now that winter is here in the North East, it’s back to the oven. When I do grill pizza, I roll my doe out and coat my peel with flour to transfer it to the grease sprayed grill. I guess my question is, can I just use flour instead of cornmeal? I’d like to go directly to the stone….not sure I have parchment paper.
Yes, that should work just fine! Cornmeal, with the gritty texture, often makes it a little easier, but if flour works better for you, that is great!
I wonder for the third method should i put the pizza on the lower rack or the middle one?
I’ve found it doesn’t really matter; I usually keep my rack in the bottom third of the oven.
Mel, I tried your baking sheet on TOP of the stone… genius! I thank you and so does my pizza-lovin’ 9 year old!
Great tips!
Just a comment for those who don’t have a paddle. Once I’ve shaped my dough into a semblance of what I want, I simply plop it directly onto the parchment paper, and add all the other toppings. Then, I carefully grip each side of the parchment paper and place the whole thing (pizza and all) upon the waiting stone, No paddle needed! I haven’t had it slide onto the floor yet; if you are careful, it’s pretty easy:)
Also, to further ensure a crisp crust, place a thin layer of cheese (I like a mix of parmesan and mozzarella) first thing on the dough, before adding sauce etc.
Thank you! I was thinking of trying transfer on parchment paper, as I have just spent too much money on a stone, a KA professional mixer and other related baguette baking items. A paddle is next on the list, but I thought I would give my wife a break from my spending for a few weeks.
I have a Lodge Round Cooie/Pizza cast iron pan that I used to just leave on the grill bc I used it that frequently when we lived in SD. Now that I’m in Alabama and soon, moving to Florida, too humid to leave something like that out. I haven’t made homemade pizza in a good year. It was a staple around here. I can’t wait to get back into scratch baking and cooking again. So fun and so much better tasting!
I used your tips to make pizza on a stone. It turned out perfect. Thank you so much for explaining all about how to use the stone to make the perfect pizza. I love your directions and appreciate the help. I will definitely be making more pizza with your advice. Thanks again for this great site.
Alice Smith
Ok. We make pizza once a week and I have tried probably 38 different recipes and for some reason I never tried yours! (Which is surprising since your website is ALWAYS my go to!) and I tried this tonight and it was PERFECT! And way easier than I thought. The parchment was great and I now love my pizza stone that used to just gather dust. Thanks Mel!
This recipe is amazing! Best pizza night yet!
For too many years, my home made pizzas were less than crispy/crunchy…until I read about using the broiler. I bought a 14″ cast iron pizza pan and put it on the top of the stove where it cooks the crust while I’m loading the goodies on it, then I transfer to the oven’s top shelf at its highest slot under the broiler. After a couple of minutes, I turn the pan 90″ to give the entire thing the chance to brown equally. Once the top is done then I take it out and check the bottom. If it isn’t as brown as I’d like, it stays on the stove top another minute or two. MAN. What a change in my pizzas!
This sounds amazing! I may consider trying a mini-pizza this way in my cast iron skillet.
Currently I just use aluminum baking pans on the bottom rack and par-bake the crust while I finish getting toppings ready but I may also try some durum semolina and the upside-down pan method
I just broke my second stone in less than a year. While searching for a replacement, I came across some claims that stainless steel is the new thing for pizza. I’d like to get something for bread and pizza making. Have you ever tried it?
Interesting, Naomi – I haven’t tried a metal one.
Thanks for the great recipe! I’ve tried several different crust recipes and I really liked this one. The dough was nice to work with, the taste was great and it wasn’t too “bready.” My husband said it was the best homemade pizza yet!
Does it matter where the pizza stone is? I have it at the bottom. Pizza tonight was a total flop:-(. I tried the new wheat recipe, and realized too late I did not roll it out thin enough. It was a doughy mess. I did like the flavor of the parts that were cooked. I think the biggest problem was that my daughter somehow misplaced my parchment paper, so the pizza was not directly on the stone, but in the pan method on the stone. What parchment paper do you buy? I suppose I need to restock;-).
I always put my pizza stone on the very bottom oven rack. Sorry it didn’t work out, Bri! On my favorite things page (#10) is a link to my favorite parchment paper.
Mel, I want to write a song about you right now I’m so happy!!! And I don’t even write songs (or sing, or have any musical talent at all). My husband, my almost 8 year old son, and myself have all proclaimed this the best pizza ever! I was worried about the dough since I don’t make dough of any kind, I was worried about the sauce, and I was VERY worried about cranking my oven up to 500 degrees!! The dough turned out perfect, the sauce was perfect, and the freshly grated mozzarella and turkey pepperoni on top were absolutely perfect, especially after a finishing sprinkle of freshly grated parm, as you recommended. I could go on and on, it was so good! I’m SO happy that I’m finally using my pizza stone that I received for Christmas 3 years ago! Oh, and I don’t have a pizza peel, but building my pizza on parchment paper on the back of a cookie sheet, and sliding it off and on, worked like a dream! We’re definitely going to start having homemade pizza nights on a regular basis. You’re the best!!
Thanks, Melanie! I am so, so happy your homemade pizza worked out so well and that you loved it. I’ll be waiting for my song! 🙂
I have been making homemade pizza for years, but I have yet to find a cooking method with consistent results. I have used method #1 several times and it cooks the pizza perfectly. Thank you!
Hi Mel!! I’m so excited to try this, would you believe I got a pizza stone for Christmas a couple of years ago, and it’s been sitting in the box on the floor of my pantry ever since?!?! Well, time to dust it off and make some pizza! Question – I would like to try the first method (stone & parchment paper), but I don’t have a pizza paddle/peel. Could I just build the pizza on the piece of parchment on a cookie sheet, and then slide it off onto the hot stone?? This may seem like a dumb question, just wondering if you’ve ever tried it, and if the pizza on parchment will slide off the cookie sheet easily. Thanks!
Melanie C – Yes! That should work just fine – be sure to use the underside of the cookie sheet if it is rimmed (so turn it upside down).
Thank you!!!! You have changed pizza forever at our house. I have had a pizza stone for 15 years and never really knew how to use it. Used this method last night and had the most incredible chicken pizza. The crust was cooked well on the bottom and slightly crisp. No more soggy pizza crust. Can’t wait to do it again!
Yay, Wendy!
Hi Mel,
I love your idea to place the baking pan on top of the stone, since I don’t have a pizza peel. I just made pizza for my son and his landscaping co-workers for lunch, since they were in the neighborhood. One tip I want to share is that if you put the mozzarella in the freezer for about 10-15 minutes, it will grate easily in a blender (I used my Vitamix.) Great job with your entire week of pizza posts!
Awesome! I wish there was a way to print this to keep in my file!
If you are on a desk or lap top, open an Office Word document, then copy and past the recipes and save them. If you don’t know how to copy/paste I’m sure someone will show you how. Just don’t ever publish them without the author’s permission.
Stupid question, but what is the difference between wax paper and parchment paper? I didn’t have parchment paper, so I used wax, and it burned up in a POOF the moment I put it in the oven. Ashes everywhere, haha. The pizza was still edible because the part underneath the crust didn’t burn, just the parts around the edges. Still, we had to pick black spots off here and there.
Changed. My. Life. You rock. Best pizza I’ve ever made.
Amazing! I might actually try this out! (I have run the other way for years when it comes to talking about baking homemade pizza. . .) Thanks, Mel! You are changing our lives, one recipe at a time! 🙂
Loving your pizza posts but hating the fact that my kitchen is, literally, gone! It was all torn out on Tuesday and it’ll be 4-6 weeks before the new one is installed. In the meantime we are camping in the bedroom with a microwave, coffeepot and a grill on the porch. I’ll be sooooo ready to try all these pizza recipes when we are finally back together. Your posts are so full of interesting, innovative ideas I just can’t wait to give them a try – especially pizza. Thanks for the awesome website.
Would love to try all these products. I love making and trying new pizza recipes.
Okay, fine, I relinquish my self-proclaimed title of the Pizza Queen to you. I’m loving your pizza posts and have decided to try some new things for our Friday Pizza Night! I still want to be the Pizza Princess, though. Thanks for some great recipes and tips, as always.
How about we be co-queens, Estee? I have a feeling you are probably pretty awesome at homemade pizza. No need to give up that title! 🙂
hi Mel, I LOVE summer and I love the that it stays light till 8 or 9pm. I love soft cool breezes and friends sharing a bbq and good cocktails. Summer makes us all feel alive and happy to be in the living! I love that PIzza oven so awesome. Please pick meeeee! <3 Love your blog! Keep on blogging mel
~ lisa
Can’t wait to go to the cabin on the lake in Washington State with our family. It’s going to be nice and relaxing. Flying there and back with 2 kids under the age of 2 not so relaxing, lol!
How do you get the crust even? No matter what I do the crust is uneven. I have thick and thin spots. It makes me crazy. I don’t know if it is the way I ball the dough to let it raise or if it is the way I try to stretch it. I can not get it to work out. I need you here in Green Bay to show me! I hope you are lovin’ your new place, though. It looks Awesome!
Hey Angela – sure miss you guys! I’d love to be there to hang out in your kitchen talking food. About the crust…mine is never perfectly even but I try to get it the best I can. If the dough is soft enough, I find I pull it with my hands and then press it the rest of the way on the parchment/baking sheet. I can fill in thin spots by pressing the dough into that area – does that make sense? I’d pay a million for someone to teach me how to toss it in the air (in fact, I’m going to youtube some tutorials) because I think that’s the key, but I haven’t mastered it (the only time I tried, it ended up on the floor).
I’ve cooked pizza every Friday night for the past 4 years!! I picked up techniques like hand tossing the dough for extra thin crust as the years went by. Yet, why I am commenting is because you said cornmeal was the more traditional way to keep the pizza from sticking to the stone. I did this as well when I first started until a friends father who happened to own a pizza joint in NYC before retiring told me to throw out the corn meal and use 100% durum semolina. Trust me when I tell you there is a BIG difference. The semolina doesn’t get absorbed by the crust, you don’t need as much of it to slide the pizza off the peel, and it actually adds to the flavor of the crust.
Waiting with baited breath for the next installment of “pizza week”. Love, love, love your pizza dough recipes. Bring it on Mel!
Well I guess this will show what an amateur I am at pizza, but Ive always been happy with my perforated pizza pan. I prebake the crust on a low rack for a crispy bottom, then add toppings, then broil a few minutes till the top is kinda melty and good. However— I think my next experiment will be the overnite pizza dough, and then using the grilled method.
Perfect for when summer heat makes us not want to be in the kitchen. Thanks Mel.
Hi! I dont have a pizza stone but I love the inverted pan idea! It looks like that one is closer to the top of the oven while the stone is right at the bottom. Is that what I should do? Put is closer to the top? THANK YOU!
Tori – I usually place the pizza stone and inverted baking sheet in the lower third of my oven but for these pictures I had my oven on convection so it didn’t necessarily matter where the baking sheet was place (I should have clarified that in the post – sorry!). If you have a standard non-convection oven, I’d recommend placing the inverted baking sheet in the bottom of your oven. Hope that helps!
Is there a reason you put the oven rack on the bottom? Is it to bring the pizza closer to the heating element? My oven heats from the top so I’m just wondering where to position my oven rack. Thank you for creating this wonderful bloc!
Oh, good question, Emily – yes, it is to bring it closer to the heating element so you may need to play around with that a bit. Thanks for bringing that up!
Grandkids are coming over Friday for a sleepover. Perfect make your own pizza coming up!
Love you and your pizza-making goodness! Hopefully in your toppings post you’ll mention your homemade pizza sauce. It’s the best.
In case this helps anyone, I use tongs to pull my pizza and parchment paper out of the oven. That way I’m not getting my fingers anywhere near the hot baking stone. Also, I don’t have a pizza peel, so I use a large square piece of mdf board and it works great. No handle, but still really functional (and makes for easy storage). I assemble all of my pizzas at the same time on pieces of parchment paper spread out across the table. When I’m ready to bake, I line the mdf board up with the edge of the table, slide the parchment onto the board, and then slide it from the board onto the stone in the oven. Ta-da!
Love the tips, thanks Sherry!
seriously,
your last tutorial changed pizza life at our house. i had always cooked my pizza for way too long in cookie temp oven. the stinking hot oven is what gives the crust those beautiful little pockets of yum on the bottom of the crust…you know, like pizza hut.
anyway, thanks again for the follow up to what was already working great.
do you think you could use a stone and an inverted cookie sheet at the same time?
i’ll have to try it.
thanks!!
Liza – You definitely could if you have a convection oven or a double oven – I haven’t tried it in a standard oven though.
hey mel just one question, does it make a difference if i use a rolling pin to roll out the dough? thanks for all the great tips!!
nosh – probably not – it’s more a matter of getting the dough to an even thickness so if you’d prefer to use a rolling pin, that should be fine.
In case this is a help to someone without a pizza peel, I use a large aluminum pizza pan to slide the pizza on and off of the pizza stone. It works perfectly, and I already owned it!
We use parchment and a pizza stone, but I usually trim the parchment paper closer to the pizza. I have definitely had the experience of lighting the corners of the paper on fire before. 😉
Love that tip, thanks Nicki! Sounds like a good idea just to be safe.
Thanks for writing these posts! I will definitely try the parchment…but I have a bit of an issue because not only do I not have a pizza stone, but my baking sheets are stoneware (Haeger). I LOVE them but you aren’t supposed to preheat them or put them in an oven above 450. I guess I should find a cheap aluminum pan just for pizza…
Oh man. The pictures today are killing me. I want pizza so bad, but I can’t have it tonight because it’s my son’s birthday tomorrow, and he wants pizza for dinner. I will definitely be trying your technique, though. I just hope preheating my oven that hot for an hour doesn’t make 39-weeks-pregnant me faint in the kitchen.
I really like the idea of preheating the stone, but mine smoke horribly if they are heated empty. They’re fine with pizza on them, though, so I usually just put the cold stone in the warm oven. Any ideas on why?
Hi Janelle – what brand is your pizza stone? Does it have a lot of crusted bits on it? A good scrape with a flat-edge metal spatula might help. Otherwise, I’m not sure why they are smoking. The one I have doesn’t smoke at all at that temp so I wonder if it depends what the stone is made of?
I believe I am going to make pizza for dinner tonight. 🙂 Thank you for the great tips. I do not own a pizza stone but am going to try the upside down cookie sheet to bake my pizza on.
Hi Mel! Thanks for all of your great tips. I wanted to share one with you. We’ve been making lots of homemade pizza lately…we use a baking stone and parchment but I wanted to share something that works well for us…we use parchment to eliminate the mess of cornmeal, but we really like the crust better when it has direct contact with the stone, so we tried putting the pizza in with the parchment and when the dough begins to crust, we lift it up with the pizza peel and pull the parchment out. Then the pizza finishes baking directly on the hot stone giving us a better crust. We get the clean, non stick benefit of the parchment and the full benefit of the stone. Works great!
Thanks!
This is a wonderful post! I make my pizza on a large rectangular aluminum pan, but I oil it and then stretch the crust out on it. Cooking it at 500 degrees does make for a good crust, but sometimes the middle piece or two is not quite as crisp as I would like. Maybe the oil is the problem? I wonder if method #3 would work better. Does that method produce a different result than just using plain parchment (no oil) on a baking sheet the regular way (not upside down)? I am curious about why it would be turned upside down.
Hey Teresa…the reason the baking sheet is turned upside down is to mimic a pizza stone and get preheated until hot which helps really brown that crust. Having the flat side up instead of the rimmed edges makes sliding the pizza on much easier too. Does that make sense/help?
Such a useful post! Will definitely try this out soon!
You don’t understand how excited I am about this post! I’ve been making homemade pizza dough for a while, and my problem is always transferring the pizza onto the stone in the oven…I’ve seriously cried about this because I couldn’t figure out how in the world people do it! Now I know, use parchment paper!! (I couldn’t figure out the cornmeal method, mine still stuck.) So not only am I thankful for that genius tip, but all the others. Can’t wait to try your pizza dough, too. Thanks so much!!!
Thank you so much. We make pizza both in the oven and outside on the grill. The mess with the cornmeal is so big that I really am only willing to do pizza on the grill. The parchment Is brilliant and will solve that problem. Woohoo. Pizza all year long.
Our family also has a weekly pizza making tradition. We even get our 3 & 5 year old boys to help rolling dough and topping the pizza. I have also found that baking the pizza on a stone at the hottest temperature my oven will allow (in my case 550F) makes the best pizza! We actually have 2 stones (Pampered Chef) – one round and one rectangular which can also be used for baking french fries, chicken fingers etc on the ‘slacker’ nights. I’ve also tried to bake cookies on them a time or two.
Wow, thanks so much, Mel! I learned a lot. Since discovering your “The Best Pizza” recipe, this has been the one I always use. Now newer recipes. I have so much trouble with pizza stones not the pizza paddle. I have purchased 3 of them (circular) and ALL of them broke upon using the first time. The first 2 I bought at Wal-Mart so thought it was because I was buying cheap ones. The 3rd one I bought (way more expensive) at Bed, Bath, and Beyond and the very same thing happened. This tutorial gives me so much information that I might consider ordering the one from King Arthur. My biggest frustration was trying to get the loaded pizza (made on the pizza peel w/ cornmeal under) onto the baking stone. I did not know you could use parchment paper — I, too, thought it would burn and couldn’t be used at high temperatures. And I hated the mess! In the meantime, I going to try the upside down pan. Who knew? So much information to make my life easier and my family happier! 🙂 You rock, Mel!
Thanks so much for the pizza making info. We make pizza here and my biggest problem has been the top being done (and beginning to brown) and the bottom being crispy but when we pull it out the dough in middle of the pizza is still not cooked all the way. I thought turning down the oven temp would help this but hasn’t really. Have you encountered this??
Hi Marie – I think this can sometimes be because the pizza is too big (try making smaller pizzas to see if it helps). Or else, you could try parbaking the crust, especially if you prefer thick crust pizza. Just shape the crust, top it with sauce, bake it on the pizza stone for about 3-4 minutes (at the high temp) and then top with your toppings and bake for a few more minutes. Are you baking it directly on a pizza stone? Usually that stone should be hot enough to bake the pizza right through. Let me know if you have any other questions!
Thanks Mel! I realize I need to crank up the oven. (I usually bake it at 400) We have homemade pizza often at our house and I am excited to make it even better.
Does anyone know a good way to wash a pizza stone? I have one, but I just never knew how to use it right or how to wash it. Is it okay to use soap?
You don’t want to use soap on the stones. I usually just scrape mine of excess stuff and then rinse it with water. Some people make a paste with baking soda and water and use that.
Hi Holly – a pizza stone is like a good cast iron skillet. It shouldn’t be washed with soap and water, it kind of needs to be seasoned. That’s why you’ll see from my pictures that my stone looks pretty gnarly but it’s actually smooth and clean, just seasoned with dark spots. When it has cooled after making pizza, I brush off the hard bits with a bristly brush or sometimes a flat metal spatula and wipe clean with a lightly damp cloth. If there are gooey spots from sauce and cheese, after all the pizza has baked, bake the stone by itself for a few minutes so those spots get crusty…then when it cools, they’ll be easy to scrape off.
Looking forward to bbq and swimming and hanging out with friends and family
Great tutorial! I desperately need to improve my homemade pizza technique, so this will definitely come in handy. 🙂