DIY Homemade Yogurt
Have you ever tried making your own homemade yogurt? This detailed post will give you all of the tools you need to make it yourself at home!
I have to tell you that since moving to our tiny little town stuck in the Northern reaches of Minnesota, I’ve realized that if I don’t start getting in touch with the inner reaches of my resourceful soul (I swear, it’s in here somewhere), I’m going to be in big trouble.
Mainly because I don’t have the same access to groceries and “things” that I used to have. Let’s face it – I was spoiled. Big time.
And now my family is learning the true meaning behind the phrase “make it do or do without” or rather “make it ourselves or do without” in our food-loving case.
I’m not saying we can’t buy stuff; we can. But I don’t have the luxury of seventeen flavors of organic, Greek yogurt staring me in the face at the store. Which brings me to this post. In fact, I’m so excited to share it with you that my fingers may or may not be shlowken…I mean, shaking.
In the last three months, I’ve made this DIY yogurt nearly weekly.
I wanted to really have the method perfected before sharing it with you, and I can honestly say I am as sold on making this yogurt as a regular part of our lifestyle as I am making all of our bread, which was a huge leap for me when I first started over three years ago but now seems like second nature.
Once you get the hang of it, this yogurt is practically mindless. I have it down to a science.
I know that by starting it by 3:00 or 4:00 in the afternoon, I’ll be ready to pop it in the oven for an overnight rest by 10:00 or 11:00 and it will be strained and devour-able by 2:00 the next afternoon.
Besides taking the yogurt’s temperature (think of it as a beloved child you are nurturing) and moving it from point A to point B, this couldn’t be simpler.
When I initially tried it, I figured it would be kind of neat-o and novel to make my own yogurt. But I didn’t count on the absolute delicious, creaminess of this yogurt. In my opinion, it beats out any storebought yogurt I’ve ever had – Greek or regular. And if you live in the boonies like I do where grocery prices are a little bit inflated, it’s very cost efficient to make it yourself.
I’ve included a step-by-step tutorial along with the recipe. And I’ve added lots and lots of notes to the recipe in order to help you along (basically my finds after dozens of times making this) so please settle in and read through it all.
It’s riveting and educational and it will make you smarter while changing your life.
Ok, not really to any of those things, but seriously…get on the yogurt making bandwagon! You’ll definitely be the cool kid in town, no doubt about it, and I’ll be here to hold your hand through the journey. Promise.
DIY Homemade Yogurt
Ingredients
- 1 gallon milk
- ½ to 1 cup nonfat dry milk powder, optional
- ½ cup plain yogurt with live and active cultures, look at the ingredient list to make sure it includes Lactobacillus bulgaricus and Streptococcus thermophilus
- Fruit syrup, if desired (recipe below)
Instructions
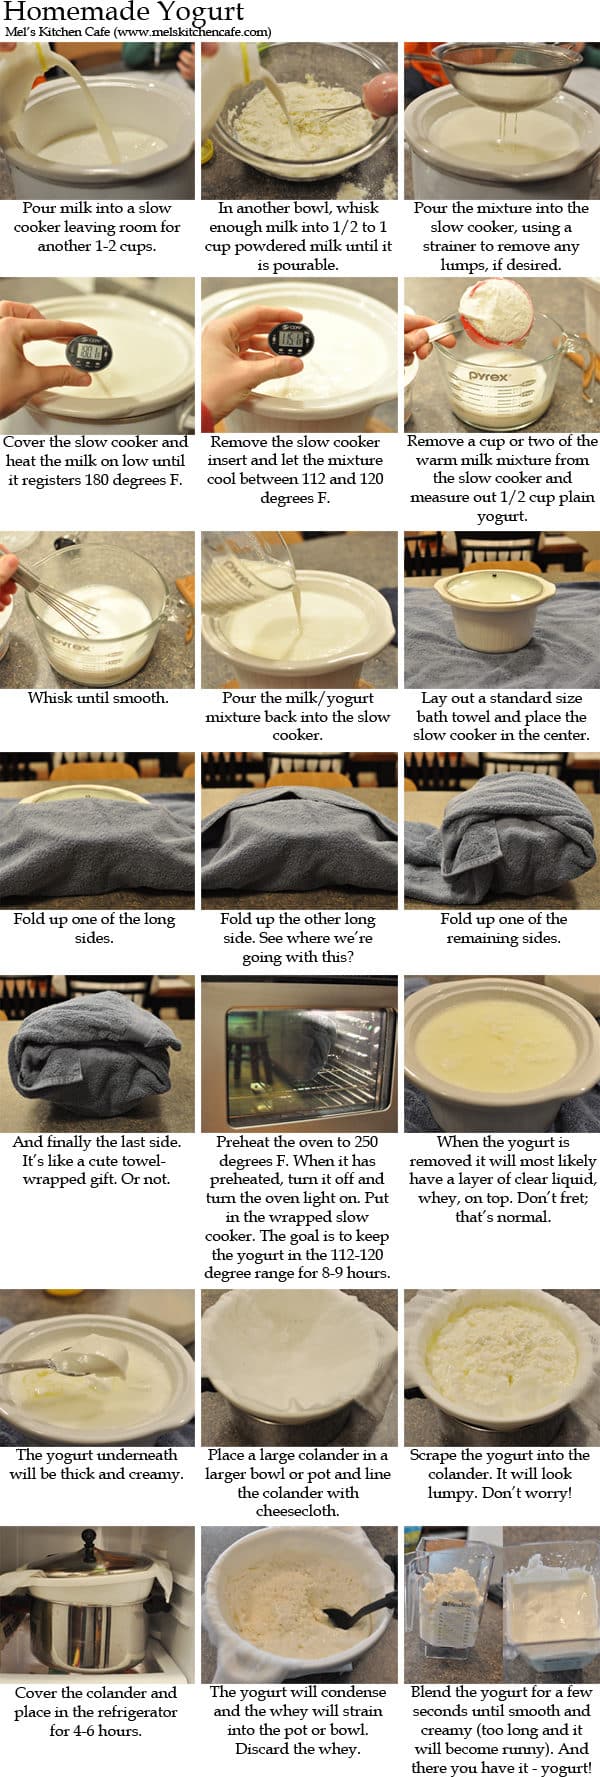
- Pour one gallon of milk into a 5-quart slow cooker, leaving enough room for 1-2 cups more liquid. See the note above for adjustments if you are working with a larger or smaller slow cooker or pan. Whisk a cup or so of milk into 1/2 to 1 cup powdered milk until the mixture is smooth. The powdered milk is optional but adds protein and creaminess. Pour or strain the powdered milk mixture into the slow cooker. Cover the slow cooker and heat on low until the mixture reaches 180 degrees F (in my slow cooker, this takes about 2-3 hours, although each slow cooker will heat a bit differently). Remove the slow cooker insert and let the milk cool to between 112 and 120 degrees F. Too warm or too cool and the milk won’t culture into yogurt. Without any stirring to help cool, it takes 1-2 hours for the milk to cool. Stirring will help the milk cool more quickly.
- Once the milk has cooled to that temperature range, measure out 1/2 cup plain yogurt (Greek or regular) in a small bowl and whisk in 1 or so cups of the warm milk into the yogurt. Whisk the yogurt/milk mixture into the warm milk. Now lay out a standard size bath towel and place the covered slow cooker in the center. Fold up each side until it makes a neat little towel wrapped package and the slow cooker is completely insulated. Preheat the oven to 250 degrees F. Once the oven is fully preheated, turn it off. Turn the oven light on. This will help maintain the warmth of the oven while the yogurt cultures. Place the towel-wrapped slow cooker into the warm oven. Let the wrapped pot sit in the warm oven for 8-12 hours. The idea is to keep the milk/yogurt mixture in the 112-118 degree range for that period of time. It is what cultures the milk and turns it into yogurt.
- After 8 or so hours, remove the pot, take off the bath towel and take off the lid. The mixture should be very thick and set and it may have a layer of clear liquid on the top (whey). If it is still too liquidy, return it to the warm oven for a longer period of time. If you think your oven may not be holding warmth, you may need to preheat it to 250 degrees and then turn it off every couple of hours but usually just keeping the oven light on after preheating it once should do the trick.
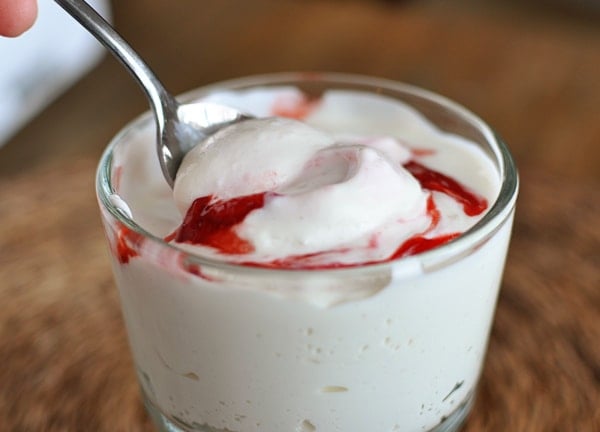
- Once the milk has successfully cultured and turned to yogurt, line a colander or strainer with cheesecloth and set it over a large pot or bowl. Pour the yogurt into the strainer. It may be lumpy but as long as it’s thick, it will strain just fine. Using lowfat milk will produce more whey and the yogurt will need more straining time; using whole milk will produce less whey and you may not even need to strain it at all. Place it in the refrigerator and let it drain for 4-6 hours. There will be quite a bit of whey in the pot or bowl. Discard this liquid. Scrape the yogurt off the cheesecloth into a bowl or other container. Whisk to recombine the yogurt. My yogurt, at this point, looks almost like cottage cheese and has little lumps no matter how much I whisk it, so I pour it into my blender and blend it for a few seconds (too long and it will become runny). The yogurt can be stored in the refrigerator for 1-2 weeks. If you want to continue making yogurt like this, reserve 1/2 cup of the yogurt to use as a starter in your next batch.
Notes
Recommended Products
Yogurt Inspiration: Taken from Annie’s Eats and Jillee, among many other sources and sites around the internet
172 Comments on “DIY Homemade Yogurt”
Hello from Texas! I found your blog while searching for how to flavor up my first time ever batch of homemade yogurt. I’m bookmarking this page for next time. I would’ve never thought of the oven for a warm place to ferment! Duh! LOL. In reading through the comments, I noticed that you mention adding sweeteners and flavors to your yogurt before the fermenting process. I’m wondering if that makes your yogurt unusable as a starter culture for the next batch? If so, how do you pull enough out before flavoring for a starter culture? I know this is an old post, but I really hope you see this and have some advice for me. Thank you!
You can still use the sweetened yogurt for a starter as long as you are making the next batch sweet, as well. Otherwise, it’s best to add sweeteners at the end after it has cultured so you can have a plain starter. Hope that helps!
I clicked on the link to print the pdf version of the step-by-step instructions but I get an error message stating that the page doesn’t exist. Is it still possible to get the pdf?
Thank you!
Let me try to find that file and reupload it, Mary!
A few days ago I stumbled across the fruit syrup recipe that was included in this DIY yogurt recipe, but today when I wanted to write down the recipe, I can’t find it. Am I losing my mind or did the simple recipe for the fruit syrup get moved? Thanks
It’s at the very bottom of the recipe in the notes section.
Thanks – I found it! I knew I was losing my mind last night 🙂
sorry I forgot. I heat milk in my microwave 14 minutes. let it cool to 108 temperature, then add just 2 tbsp plain yogurt. all the rest is the same as on the site I posted. all the rest is the same,
Mel this is the way I make my yogurt , an it is wonderful and thick after I strain it. Here is the website I got my method from.
http://www.keeperofthehome.org/making-homemade-yogurt-2. I add sweetner( have diebetis) fruit, jam, after it is all done. So good
I have a new ‘Instant Pot’ pressure cooker and it has a yogurt setting. Have you tried making yogurt in the pressure cooker? How long would I leave it to ‘cook’ in the second series of the instructions? The standard 8 hours still?
Hi Laurie – I’ve only made it in the Instant Pot once and it’s been a while…I still stick to my original method. You might try googling for more help or here’s a how-to from a fellow blogger: http://www.tidbits-cami.com/2015/09/homemade-yogurt.html
I just finished my first ever batch of yogurt, and I don’t know if it was a complete failure or not! I have been studying this recipe and your updated one for weeks, and spent a few days testing various methods of incubation with water, before finally venturing into actually using milk. Unfortunately, I could never get anything to hold a consistent temperature for longer than a couple of hours in my testing, but I decided to be brave and go for it anyway. I kind-of did a combination of this method and your new one, and I heated the milk on the stove to 180, added my sweeteners, then cooled it to 119, added the starter, and left it in my pot and stuck it in the oven. I used a thermometer with a wire attached to it so I could constantly check the temperature. The problem is, the temperature would get too low, and as I tried to adjust it by turning the oven on warm for a few minutes, it would then get way too hot. And since I couldn’t sit and babysit it ALL day long, I had variances of 90-130 degrees when I checked the thermometer! I finally pulled it out after 12 hours, and I don’t know what to do with it. It doesn’t smell bad, in fact, it smells quite sweet. The texture reminded me of flan or creme brûlée or something when I scooped it out to strain it, and the whey is quite yellowish… it looks a lot like lemonade. But my question is, is it ruined?? I don’t know if I dare eat it! My fear is that I killed the live cultures when the temperature went up, so when the temperature went down there was nothing to keep the bacteria at bay. Anyway, I’m going to stick everything in my fridge tonight and do some more research in the morning, but if you have any advice to offer me, I would greatly appreciate it!
Hi Suzanne – from the way you describe the finished yogurt, it seems exactly the result I get when I make homemade yogurt. So in that sense, I think it worked just fine! As for the bacteria issue, you might do some looking online to see. My gut feeling is that the yogurt is just fine!
Well, my family consumed all the yogurt, and no one ever got sick! So, I guess that means it was okay! It was so delicious… I think next time I will just stay away from the thermometers and let it do its thing. Thanks for the encouragement, and for the tasty recipe! I’m excited to try it again!
Hey! I absolutely loved your post on homemade yogurt. I have been making my own for a while now and love it. Just a little idea. Instead of discarding the whey, which is sooooo rich in protein and other nutrients, you can mix it into shakes and smoothies, use it as a water or milk replacement for bread ( OMG so freaking yummy!!) or pancakes and muffins etc….
I’d love love love it if you would an updated version of this using the Instant Pot to what I assume is a very long to do list. If you could include all your various types (vanilla, coconut, sweetened or unsweetened, etc), I would be eternally grateful! I can guess as to how you would adapt it, but I’d most likely get it wrong as I’ve never made it before.
Thanks Mel!!
I have been making yogurt for several months now with great success. I do not heat the milk on the stove because I am afraid of scorching it (I have a tendency to burn things no matter how attentive I try to be). I read several articles on using the microwave to heat the milk and decided to use that method. I heat it on high temp and in my microwave that takes about 16 minutes. – works great – I’ve never had a failure. I’m anxious to try your suggestions on adding flavor. Thanks for your helpful suggestions.
I made yogurt for the first time ever last night/today, and it turned out great! I heated it on the stove and then wrapped my pot in a towel and put it into the lighted oven overnight. I did manage to start my towel on fire when it brushed against the hot coils that had just preheated…no worries, I didn’t even need the fire extinguisher. However, I have a few questions. First of all, I see others commenting that they put their yogurt into 7-9 jars. Hmmmm…I made 1 gallon of 2% milk, and after straining, I only got 2 full quart jars. How are others getting so much from this recipe?! Second, the yogurt itself is quite tart plain. I am making yogurt parfaits for MOPS this week, so how would you suggest that I do that? Should I sweeten the yogurt with something first? Or will the honey in the granola and the chunks of fruit be sweet enough? If I add sugar, would it even dissolve? Thanks Mel–I am so excited about my new yogurt-making skills!
Hi Melanie – I usually yield about 2-3 quarts for every gallon of milk I make. Interestingly, it depends on brand. Some brands of milk yield less and give off more whey during straining. And of course it also depends on how long you let the yogurt strain, too. I like to add sweetener during the cooking/cooling process (I usually use agave nectar) but I think you could definitely sweeten it lightly now, too. I’d try to use a liquid sweetener (honey or agave nectar or something like that), otherwise, I think it might taste a little granular from the sugar.
Just wanted to say ‘thumbs up’ to Judy J – it is came out so thick and creamy-very,very happy with it-only way I’ll make it from now on thx Janice
Hi Mel-first time to your site also kinda new to yogart making [ my 3rd time]-I have a gas stove and the pilot lite is enuff to warm the yogart all nite in the oven -as to flavoring several sites say to add flavoring before fermentation process -what are your thoughts on that-I have a batch in the oven right now but was afraid to mess with what had worked so far-will brave it on next batch-would like your input thx jmdt
I add any sweetener and vanilla as the yogurt is cooling (before adding the yogurt starter and before fermenting).
I make 5 quart mason jars of yogurt monthly! I use 5 qts whole milk, in a heavy pan on the stove til 180 degrees, then let it cool to 115, and add 1 cup of my last batch of yogurt. Next, I scoop it into the jars, then in the cooler with 115 degree water poured up to the neck of the wide mouth, uncapped mason jars. In the morning, (12-14 hours later), I remove the jars, and cap them! ( I use the water bath for my plants upstairs! ) I put a half cup in a fine mesh sieve that fits into a bowl to make my “greek yogurt” and have the whey for our dog. I use that yogurt to top my smoothie! As I add more to the sieve for next day, I put a couple spoonfulls into the dogs bowl with the whey. He recognizes the sound of the mason jar being opened and comes running.
I’ve tried making yogurt before, without success, so I’m looking forward to trying your method. I was wondering if you’ve ever made it with non-dairy milk (specifically almond or coconut). I tried almond before, and wonder if that might be why it didn’t work.
kristib – I haven’t tried it with non-dairy milk(s) but my cousin tried it with coconut milk and said it worked great (was slightly more runny but still good). There might be more info in the comment thread as people have tried and it and commented back. Good luck!
Hi, Mel!
Love your blog, I stumbled upon it in my quest to break out of a cooking funk. And so far, so good! I tried this yogurt over the weekend and I need to make it again already (am heating the milk right now in the microwave) my family loves it! Thanks for your easy-to-follow tutorial, it gave me the confidence to finally give it a try myself!
I tried using large size coffee filters to strain the yogurt and that worked really well. I just lined my colander with those, overlapping a bit to avoid any leak through. And I loved the fruit syrup, I ended up making a second batch because ours turned out a little more tart than we like. I will incubate for less time this go around, and hopefully this will work!
Keep up the great work, I have tried two of your other recipes (the Thai Chicken Salad and the Lemon Broccoli Chicken Pasta), and we loved them. Thanks for helping me emerge from my cooking funk!
Thanks, Michelle! I’ve started to use the coffee filters too for straining and I agree that it works great.
Hi Mel,
I have been making my own yogurt for about 6 months. It is so much better than any store bought I’ve had. I first tried the slow cooker method but ended up using the double boiler way. It just goes a little bit faster.
I use 1/2 gallon batches, and I add to the milk:
3 tblsp sugar
a pinch of salt
1/2 to 1 cup dried non-fat milk
4 tblsp dried goats milk.
The sugar makes it just sweet enough to make the yogurt taste like vanilla ice cream. I have tried without the pinch of salt, and I can notice a difference. Just a pinch though, no more. I add the dried milk for extra protein, and the dried goats milk gives it just a little tang, which I like.
When the milk reaches 180 degrees, I hold it there, or there abouts, for 30 minutes. Never over 190. I read that somewhere, to make it creamy and it really works.
I like my yogurt thick so after it has come out of fermenting I put it in the fridge until cold – maybe overnight, and I strain it with cheesecloth for at least 3 hours.
And the whey – Pure Protein – Soak in your hair for at least 15 minutes, rinse, wash – and Oh So soft!
Thanks, Judy – love your yogurt tips!
I can’t seem to find anywhere online what to do in this case: I left my milk to warm on high in my crock pot for a couple hours, got sidetracked and came home 8 hours later…to light brown bubbling milk. I went ahead and finished making it into yogurt (which turned out fine, it’s just brown.) BUT is it safe to eat??? or feed my 1-year old?? I hope you know what happened!
Heidi – I’m not a food science expert but my personal opinion is I think it should be perfectly safe – especially since it cooked to a higher temp and not too low of a temp.
The sugars in your milk were on their way to making caramel. The color should be the only difference. If you process (can) fresh milk for shelf stability, it will have a slight tan color.
Pretty section of content. I just stumbled upon your website and in accession
capital to assert that I acquire in fact enjoyed account your blog posts.
Anyway I will be subscribing to your augment and even I achievement you access consistently quickly.
I’ve been making yogurt for a few years now– the method of heating milk in a pot on the stove, cooling, pouring into quart jars, putting all seven jars into a cooler, hot water to the necks of the jars, culturing about 8-10 hours.. .. about the same as you and many other commenters. Delicious! We add homemade raspberry or strawberry jam. YUM! Here’s another reason why I love your blog… the comments from others help me learn even more! 🙂
Today I just happen to see a comment from someone saying they put a coffee filter over the top of the jar and replace the band, turn it upside down and strain it that way. What a great idea! When I do strain it (which isn’t every time) I’ve been putting the coffee filter in a colander and dumping the quart into the colander and straining it that way. Hello? The new way is much easier and less messy! I’ll probably start straining more often now that it’s so simple!
Yay for helpful comments to make my life easier! And yay to you for all your hard work and effort! 🙂
Hi Mel, thought I’d share my trick Mel. I’ve made yogurt about 6x now & am loving it! Thanks for the inspiration! How I do it is your new method – heat on stove in big pot. Then let cool & add yogurt to culture it. Then I pour into 9 quart size mason jars & put lids on. Then preheat oven to 175(lowest my oven will go to). I then fill 2 huge jars w very hot water & place them in my oven. Turn off the oven & add my yogurt jars in with the water jars. I the cover everything w an old bath towel. This is the easiest method for me. I tried the cooler method but I had to drag 2 coolers in our house to get all the jars plus the small jars filled with water to fit. Easiest to just put in 2 huge jars w water & use my oven.
My kids LOVE my new homemade yogurt! I usually add honey or some jam to it for breakfast. So glad I am doing this. Takes about an hour in the kitchen & I can be doing other things & the 9 jars last us just over 2 weeks.
I know you had promised to do an update to your yogurt recipe so wanted to share my method to see if you wanted to try it & then add to your idea list as an option for the warming part. I just saved 2 huge jars & now will just reuse them every time I make the yogurt.
I was really surprised to see you instructing to toss out the whey after you drain the yogurt. That part is protein! Body builders buy whey powder specifically for it’s protein. Don’t throw it away!
Instead use it. Here’s a site that goes over some ideas http://www.theprairiehomestead.com/2011/06/16-ways-to-use-your-whey.html
Personally I use it in making pancakes. Our family recipe originally calls for milk and only white flour. I substitute half wheat flour and use the whey for the milk with a bit extra because the wheat flour needs more fluid. They have a bit of a tang from the whey, but they are light and fluffy so they disappear fast.
If anyone is interested in keeping their whey, my mom sent me this absolutely delicious recipe for whole wheat whey pancakes. Mel, you should try them! They are so hearty and fluffy! We love them 🙂
2 cups whole wheat flour
1 tablespoon sugar or honey
1 tsp baking soda
1/2 teaspoon salt
2 cups whey
2 large eggs
2 – 4 tablespoons vegetable oil (or substitute half of the oil with flax meal)
1/4 tsp vanilla
Mix the dry ingredients together in a mixing bowl.
In a small bowl, beat together the way, eggs, and vegetable oil.
Blend the liquid ingredients together with the dry ingredients. You may have to add a little more whey.
Variation: you can blend roasted pumpkin seeds and sunflower seeds and use as part of your flour if replacement desired.
Awesome, Hannah – I’m definitely bookmarking this to use with the leftover whey next time! Thank you!
If you have an Asian market near you, you can pick-up fish soup bags. The bags are cheese cloth. It’s much easier for me to find these than order cheese cloth, and they’re usually very cheap
P.S. Sorry! I thought I had read all the comments but it looks like I missed a few or I would have seen the one about your thermometer.
Thanks for getting back with me so quick! I’m totally psyched to try this new adventure…sick of paying for storebought yogurt with all the added sugar and who knows what else. So here are my questions before I begin: Do I need raw milk? Or will regular pasteurized homogenized be ok. Where do you get your supplies like cheesecloth, whatever kind of thermometer you use to check the temp of the mixture, and your thermal pack….how big of one do I need? I’m leaning toward that versus the oven thing in favor of reduced energy cost. Or maybe I just need to know how many quart jars fit in yours to give me an idea of its size. Anyway soon as I get all I need I can begin, please forgive me for wanting everything spelled out! You are a gem. I’d never have dared attempt all this stuff on my own! Thanks so much for your help.
Mia – ok, here’s my best shot at answering your questions. Feel free to let me know if have others!
a) No, you don’t need to use raw milk. I don’t. It’s insanely expensive (and actually nearly impossible to find) where I live so I use everyday milk from the store. However, if your preference is to use raw milk, you certainly can.
b) I usually buy cheesecloth on amazon because I can get more for my money (it’s a little pricey at my smalltown store). But it is available in grocery stores, Walmart or Target-type stores, etc.
c) My cooler can fit 8 quart jars of yogurt. It’s the method I use nearly all the time now (instead of the oven) and actually I’ve been putting them in our (cleaned) everyday cooler with a lid (instead of the collapsible cooler) and filling the cooler up with 120 degree water until it goes halfway up the sides of the jars.
Hi Mel! J-cloths work great, I find even better than cheesecloth, they wash up great in a little vinegar and warm water, rinse well and hang dry. I then fold them up and set in my colander for next time. I’ve been using the same ones for 8 months! Adele
Hey Mel! I just want to say thank you for your wonderful blog! I spend hours each day searching and reading it. Almost every recipe I make comes from your blog so thank you again!
Question about the yogurt making:
Where did you get your little thermometer? Is it just a meat thermometer or is it something different?
Hi Hannah – thanks for your sweetness! I use an instant read thermometer for the yogurt (and about 100 different things). I have a thermapen (I think it’s from Amazon; my husband gave it to me for my birthday last year) and it’s amazing…but is kind of pricey. Any simple instant read thermometer should do the trick as long as it is fairly accurate. Hope that helps!
I haven’t read all the comments but here’s my solution to proofing bread dough for the first rise. Two things I use for this process; my electric oven and an indoor/outdoor capable thermometer. I have quarry tiles in my oven for bread baking.
I turn the oven on to preheat (mine is factory set at 350 degrees) and turn it off after 15 seconds. I’m looking at the kitchen wall clock for the timing. I shut the oven off and taking the outdoor temperature sensor with the end of its wire taped around a long paper clip, I stand the sensor in the oven using the tiles to hold it upright. My oven is usually around 80 degrees with that quick preheat.. I don’t turn the oven lights on until the preheat temp drops to 75 degrees. For the yogurt I’ll, keep the preheat on longer to get the temp around 125 degrees and use the oven lights to maintain that temp.
Mel,
After a full year of wanting to try this… I DID!! I followed your instructions and I think I messed up on a few things, but this turned out wonderfully!! I have a couple of questions after reading thru all the comments and your updates.. Do you still prefer the crock pot method or should I venture out and try the mason jars.. I really liked doing it in the crock pot, keeping in warm in the oven in the crock, and straining for several hours in the fridge. I’m curious if you have a STRONG preference after on method.. since you have tried some others… The texture of my yogurt turned out amazing after I blended it, It doesn’t look quite as white and your pictures.. has a slight brown color to it… any thoughts on that… even though I don’t think it effected the flavor. Also, have you tried anything yourself with the whey… I see lots of suggested Ideas here, and I have lots of leftover whey, but I’m not very feeling too brave without some backup from you… do you use the whey… Okay, that’s all Thanks Mel, I’m excited to have entered the world of yogurt making
Hi Helen – I don’t have a strong preference on method but I do find myself using the stovetop/mason jar method over and over. I haven’t used the slow cooker method for a few months now mostly because I can heat the milk up so much quicker on the stove. I’m not sure why your yogurt is brown. That’s odd…did it get a little burned around the edges in the crockpot? I’ve thought about using the whey in bread but to be honest, I haven’t used it in anything yet although I do have big plans. 🙂
I tried making yogurt for the first time last night using your instructions. It turned out beautifully. From 2 litres of milk (roughly $4), I’d say I got about 1 litre of nice thick greek style yogurt, which, depending on the day/store, would cost me about $10 in the grocery store. I didn’t keep the light on in my oven overnight, so pretty minimal electricity costs – I suspect even less had I heated the milk on the stove vs the slowcooker. It’s a fair bit of effort, but not a lot of work, if that makes sense. I’ll definitely do it again.
Mel, if you haven’t tried this with part coconut milk along with your vanilla and coconut extract, oh man are you missing out!
Oops … on my second time making this, I accidentally left it in the crock pot for too long and it was simmering when I finally stopped it! Did I completely ruin it? Any chance it may still turn out ok??
Allyson – were you able to salvage the yogurt? I’ve gone over the temperature mark before and as long as you let it cool to the range (110-120), it should be ok.
Hi Mel,
I came across your post here while searching how to flavor my homemade yogurt. I plan to try your fruit syrup recipe next time! I make yogurt in mason jars in an oven heated with a 60 watt light bulb. I heat it to 185 degrees, hold it for 25 min, then cool it down, add starter, and culture it for around 9 hours at 105-112 degrees. Couple things I’ve found helpful:
1. Heating the milk on the stove in a double-boiler setup so it doesn’t scorch
2. Sterilizing the jars by boiling 15 minutes before culturing (the yogurt keeps indefinitely in the fridge if you do — like 12 months, seriously!)
3. Using only wide-mouth jars for ease of cleaning
4. And a warning: Do not attempt to make yogurt with soured milk!! When I tried this, I ended up with some awesome ricotta cheese instead 😀 Plus about 2 quarts of sour whey (which made great bread).
Thanks for your inspiring post. I’m definitely going to try flavoring the yogurt next time.
Thanks for the tips, Melissa! I’m going to sterilize my jars next time for sure!
I am slowly but surely adding more homemade things to replace storebought goods, and used your yogurt tutorial. Just did my second batch and it is soooo super wonderful creamy and awesome! I did a whole gallon the first time, and gave some away because it was so much, this time I just did a half gallon and it was the perfect amount. Also am using the whey in making my bread! Thanks for an awesome straightforward tutorial!
I’ve been making yogurt for about 6 months now and not had one batch fail. I think my method of preparation is simpler and involves less fuss.
1. add a gallon of whole milk (and 1 quart of cream if you want extra rich yogurt ) to a stock pot and bring to 180. Stir occasionally to prevent burning.
2. Cool to 110 degrees. I fill my sink with cold water and ice to speed up the process.
3. Stir in 1/4 cup of starter yogurt.
4. Cover the stock pot and put in your oven over night (8-12 hours). Do not turn on your oven – only the light for heat. You don’t want it getting over 130 degrees.
5. Strain the yogurt using a wire mesh strainer lined with a smooth dish towel (or pillow case). I strain mine in the refrigerator for 4-6 hours.
Stevia is a plant that contains natural sweeteners that are used in foods. Researchers have also evaluated the effect of chemicals in stevia on blood pressure and blood sugar levels. However, research results have been mixed.”;’^
Make sure you visit our own web portal as well
<http://wellnessdigest.co/
I love my homemade yogurt with pure maple syrup, Rasberry jam, and homemade granola!
Sparky. PS. Add the vanilla and honey to the finished yogurt when you serve it
Sparky wants to know how to make vanilla yogurt. Try adding some Lorann Butter
Vanilla Bakery Emulsion (Amazon or a good grocery store) and some honey. It makes wonderful vanilla yogurt!!
I don’t know what I was thinking when I asked about th bread proof option on my oven as I have a wonderful dehydrator that has temperature control and setting JUST FOR YOGURT!! 🙂 anyway, I don’t know if anyone has said yet but to produce a more tart yogurt, simply incubate for a bit longer. I also add agar agar (a natural thickener) to create a thicker yogurt without having to strain all that lovely whey out. You can also use gelatin powder with amazing results too.
I just made my second batch of yogurt. The first time I read through your post I was super overwhelmed by all the comments from readers of alternative methods. I decided to just make it exactly as you instructed and now that I’ve done it twice I feel confident to try out some of the other ways and see what works best for me.
A couple notes that readers might find helpful: My first batch was actually not very good, but I knew exactly why -my milk powder was old. The whole batch from start to finish had the milk powder smell then taste (the kind that makes children refuse to drink the milk made from food storage). Luckily, my toddler didn’t seem to mind so at least my yogurt didn’t go wasted although I couldn’t stomach it. With new milk powder, this new batch of yogurt is just perfect!
Also – what to do with the whey: I’ve researched what to do with it (use when baking bread, make my own ricotta, etc), but the only thing I use it for is in place of ice cubes in my smoothies, protein shakes and even Mel’s Orange Julius recipe! The whey gets poured into ice cube trays, then transferred to freezer baggies until I need the cubes. I get such a kick out of not wasting it PLUS being able to fill my frozen drinks with even more nutrients!
I tried this recipe this weekend and it turned out great! I used 1% milk and heated it on the stovetop. Mine was not lumpy after straining it, so I didn’t need to run it through the blender. It tastes just like plain greek yogurt. So good! Thank you!
Do you think the bread proof setting on my oven would work for this?
Lien4424 – does it give you a temp? I’m thinking it’s probably right around the correct temp but I’d look for an official one before trying because you don’t want the yogurt to go either above or below the range (110-120 degrees F).
Mel, Back when we were still milking our cow (she has since calved and now just has calves on her instead), I was making yogurt like crazy just to use up all the milk we had coming out our ears. Feeling nostalgic (ha!) I made a couple batches after you posted this, albeit with store-bought milk. I loved your suggestion of heating the milk in the crock-pot. I always had such a hard time keeping it from scorching on the stove top because I would get distracted with kids or something else. My previous method had also included putting the heated and then cooled milk into a gallon thermos over night. Keeping the insulated crock pot in the oven worked just as well and I didn’t have to wash the thermos afterward. Anyway, thanks for the yogurt-making tips.
i am making my own yogurt every week thanks to this recipe 🙂 i am now trying to convert everyone-because it is so delicious! thank you so much for all your research and wonderful instructions.
Just letting you know Mel.. I finally tried this! Love it! I still like my jar method for when I have time to stand over the stove… but the last two times I’ve made yogurt I needed your method. Perfect both times! Love straining it for the thick Greek yogurt too. Thank you for always turning out perfect recipes 🙂
My crockpot took 7 hours to heat the milk!! I totally forgot it had to cool, so I was cursing this yogurt while I was stirring it at midnight last night. I swore I would never do this again. But this morning when I took it out of the oven I changed my mind! Now I’m just waiting for it to strain a few hours. I’m going to try heating it on my stovetop next time. Thanks for the detailed post, it really helped!
My crockpot took 7 hours to heat the milk!! I totally forgot it had to cool, so I was cursing this yogurt while I was stirring it at midnight last night. I swore I would never do this again. But this morning when I took it out of the oven I changed my mind! Now I’m just waiting for it to strain a few hours. I’m going to try heating it on my stovetop next time. Thanks for p
I’ve tried that before many times. I think that it’s the sugar that doesn’t allow the yogurt to properly set. The yogurt consistency is like snot everytime.
I’ve been making a gallon of yogurt twice a week for years and a couple of years ago found a great trick that keeps the whole process down to about 6 hours from start to finish.
To avoid fiddling with an oven and water baths etc., after adding the culture to the tepid milk, i wrap the pot with a towel and then place it in a sleeping bag, wrapping the bag around the pot a couple of times for maximum insulation. Four to five hours later the yogurt is set and ready to be chilled and strained. The temperature only drops between 5 and 7 degrees over the four hour period.
I also prefer just to bite the bullet and stir the gallon of milk continuously over high heat. It takes 10 minutes to reach 180. Then if I really am in a hurry, i cool it to 115-118 in the fridge, which takes about 30 minutes. Then stir in the culture and into the sleeping bag it goes. 4 to 5 hours later it’s good to go.
No one should be wasting money buying yogurt, except to use as a starter.
Vanilla Yogurt….Sparky asked about vanilla yogurt. I just had an idea about that. You can infuse a vanilla pod into sugar. Then add the sugar to sweeten the yogurt.
Thank you for the recipe and instructions. I tried a different method last night they may be of use. I poured my milk in mason jars first. I heated them on the stove in a water bath. When they reached 180 I removed them to cool. When 118 I added the yogurt culture and transferred jars to a small cooler. Inside the cooler was an additional mason jar with boiling water wrapped in a thin dish cloth. I did this to maintain the temperature during incubation. In the morning I swapped out the mason jar lids for a coffee filter and turned the jars upside down to strain. I will let it strain for a few hours then add the sweetened fruit directly to the jar. I haven’t read everyone’s comments so I apologize if this is a repeat. Thank you again for the recipe and the wonderful blog.
I am in the process of making this, but it took me five hours in my crock pot to get up to 180! I even put it on high for the end. I don’t know why, it is a new crock pot. Would high the whole time need stirring do you think? I loved the ease of not worrying about it, maybe I’ll just have to plan five hours then for warm up 🙁
Bree – that does seem like a long time but each crockpot can vary in temperature. Cooking on high can burn the milk (especially on the bottom of your crockpot) – at least in mine. When my crockpot cooks on high, it actually simmers a bit and you don’t want the milk to get that hot.
I used organic whole milk, made half gallon at a time, and got almost a liter of whey when I drained it. I think that it is definitely cost effective as a gallon gets 21 “cartons” of organic greek yogurt, which costs me $26, and the gallon of organic milk plus the starter was only $8! Plus I know what sweetners are going into it, and I can control the flavor! Thanks so much Mel for sharing this recipe!!!
oops…make that “Make” the Bread, Buy the Butter
I too recently came across Jennifer Reese’s “Bake the Bread, Buy the Butter” book. I’ve only made the yogurt twice but plan on making all of our yogurt. I bought the Norpro and Kinderville ice pop molds to make my 3 year old’s frozen go-gurts…he likes to eat them frozen. I’ve only tried once and it seems to work.
http://www.amazon.com/Norpro-431-4-Piece-Silicone-Maker/dp/B0036B9KHO/ref=sr_1_3?s=home-garden&ie=UTF8&qid=1363269608&sr=1-3&keywords=ice+pop+molds
http://www.amazon.com/Kinderville-Little-Bites-Ice-Molds/dp/B002YVGNHC/ref=sr_1_2?ie=UTF8&qid=1363269581&sr=8-2&keywords=kinderville+silicone
I want to make a rhubarb curd/syrup. I suppose it can be done with the same recipe? When we were in England we had THE BEST yogurt ever (sold at Sainsburys). It was like rhubarb custard!
Thanks Mel for another great recipe. I’ve made this several times and had great results. However last night I forgot to add the yogurt to culture it. This morning I realized my mistake. Think I can add it now and repeat the last step or do I risk making everyone in my house sick??? Any advice would be appreciated!
Kathryn – oh, bummer! If it were me, I’d feel better being safe and starting over. I am overly paranoid about bacteria in food, though. Have you tried googling? I wonder if anyone else has done the same thing and saved it. Good luck!
If you had a keep warm function on your crockpot, would that work instead of putting it in the oven????
Nadine – it’s all about maintaining the temperature so as long as the warm function does that, it should work. You want to keep the yogurt in the 110 to 120 F range for 8-10 hours.
Mel~Thanks again for making me feel like a kitchen rock star!! I was so proud of myself for making yogurt! I kept telling my hubby over & over how excited I was (nerdy!). It was so creamy & delicious. I made it on friday and it is wednesday and it is almost gone (shared some w/ my mother-in-law too).
The only thing I did different was use a heating pad on low on the countertop instead of the oven overnight. I also got busy & let it “cook” on the counter for 13 hrs. It strained for 8 hrs (b/c I was at work) and despite all of my delays…it still turned out perfect! I just blended it in the food processor with some of the whey to make it a nice creamy consistency. And I used coffee filters cuz I didn’t have cheese-cloth.
I’ve been using it in my fruit smoothies in the AM, adding my lemon-flavored stevia drops (amazing!) (www.nunaturals.com) to it w/ a few sunflower seeds. For my kids, I add honey & they use it as fruit dip. Yummy!
Also, for the whey, I used it in your whole wheat oatmeal pancake mix w/ some of the yogurt. Perfect! I haven’t been doing much baking (trying to lose weight), so I used it to water my plants (read it online). So far, they aren’t dead yet…haha!
Thanks so much for helping me conquer this fear! I will never go back to store-bought!
I just got done trying the recipe. SO YUMMY and CREAMY!! I loved it!! Thanks for sharing! It was a fun miracle to watch the milk turn into yogurt. I may never go back =). THANKS for all of the delicious recipes! I love your blog!!!!! And use it every day!
I have also heard that the whey can be used in place of buttermilk. I’ve been experimenting with different ways to make yogurt for the past year. I just tried your method, but my crockpot took almost 6 hours to get to 180 degrees. Next time I’ll have to place it on a higher setting — obvious, I should’ve just turned it up in process but there was a lot going on. Another method that’s worked for me is putting a gallon of milk straight into 4 mason jars and then into a large pot on the stovetop filled with water up to the neck of the jars. I boil the water until the milk inside the jars reaches 180 degrees, then cool off to 120. Stir in my starter, place plastic canning lids on the jars and put into my oven overnight with the light on. I haven’t used a towel with this method but maybe that would be better? I also don’t strain it (although I was using whole milk and really didn’t need to). This method works great ’cause the yogurt is already in smaller containers for storing. It doesn’t work great if you are letting it culture in the middle of the day with the plastic lids on and forget it’s in your oven when you’re preheating it for dinner …
Sparky – I’ve never tried the vanilla homemade yogurt so I don’t know why you are having textural issues but it’s definitely on my radar to try soon so I’ll let you know how it goes when I try it.
Mel,
I’m hoping you can help. I would love to find a way to make homemade vanilla yogurt. (The good kind using a vanilla pod). I’ve tried many recipes and no matter what I do, the consistency turns out like snot. Help please!
I’ve made it twice now and my only complaint is that we eat it too fast! It is so delicious, my kids are always begging for more! I am excited to try heating the milk up on the stove though to shorten the process a bit. Also, the second time I made it i strained it for too long so I just added some of the whey back in until it was the right consistency. I’ve also used the whey to make bread and rolls and I love how they turned out as well. Thanks for all of the instructions!
I just wanted to add my review. My husband and I made this together two days ago, and it’s already almost gone!! I can’t believe that my kids and my hubby are eating it without complaint, and even asking for it. They won’t touch store-bought Greek yogurt. Thank you for such a fantastic recipe/method. It worked so well and I’ll definitely be making it again! 🙂
I have been making yogurt for years, and I keep simplifying the process. One note, I always use ultrapasteurized milk, as that the my only organic option, and I have NEVER had a problem getting it to thicken. I add powdered milk, (just stir it right in), then I just heat it in the microwave to 115-118 (since it’s already ultrapasteurized and hermetically sealed, there is no rouge bacteria to kill!) and then stir in the culture and put it in the oven (warmed and turned off) with the light on overnight. If there is a lot of whey, I spoon it off, but then I whisk in 1/2 packet instant vanilla pudding to thicken it and sweeten it just a little. My family loves it! And when I have strained it to greek yogurt (no pudding added) it is the most creamy, delicious greek yogurt ever – so much better than storebought!
So…I tried making the yougurt this way, and I have to say, I don’t think I will do it again. I really wanted to like it better! It took FOREVER!!!!!!!!!!!!! Too many steps in my opinon. I will go back to the stove top method and then just pouring it into jars and putting it in a cooler with hot water. Even if you wanted it a bit thicker, I would still think it would be easier to strain them as needed. When I do it the stovetop way, it takes barely any time or fuss, and it lasts for at least a month in my fridge. I am so glad it works this way for other people, but I thought it required a lot more time and thought. I’m still glad I tried it out though!
Here’s a good website for a few ideas on what to use leftover whey in.
http://www.salad-in-a-jar.com/recipes-with-yogurt/18-ways-to-use-whey-a-by-product-of-greek-yogurt
There are plenty more on professor google 🙂
FYI on the use of Mason Jars… I realized that most of you are using commercial milk to make this yogurt.. something I have noticed in all the recipes that use comm. milk is that they all talk about mopping up the whey or straining the whey.. I use RAW milk and I can use the quart size jars with out a lot of whey mop up. So if you try the quart jar method, beware you may still have a lot of whey 🙂
I just made yogurt last night! I tried to make homemade yogurt a couple years ago from instructions on a crockpot blog that I shall not mention. 😉 It turned out awful and was a waste of money! I just had to try your instructions because everything I make of yours is great! And this didn’t disappoint! I used 2% milk and placed it in the fridge right from the oven this morning. I had very little whey, so I just stirred it in. The consistancy is great! I am going to make a peach “stir-in” from frozen peaches and this will be our afternoon snack! I also used a half gallon of milk and half the other ingredients since we won’t eat it all before it goes bad. It made two full quart mason jars.
I really cannot believe you convinced me to make yogurt. I have seen it on all the money-saving blogs & large family blogs but I just didn’t understand why we would spend so much time on making yogurt. Anyway, I started my yogurt yesterday afternoon, used 2%milk & milk powder. I read all the comments & heated the milk on the stove then wrapped in in a towel & set it on a heating pad on the counter for 11 hours. My yogurt turned out thick & tart. My 4 kids & I just ate it for breakfast with bananas & homemade granola!! Thank you so much, it was very simple. Now what can we do with all this whey besides in bread dough?
Army of 7 – several people have suggested using it in place of buttermilk also.
I made this and it WORKED! I feel like I’ve done some kind of magic! I used 2% milk and it turned out fine. I could only leave it in the oven about 6 hours to culture, but I think it turned out great anyways!
Thanks for taking the time to figure this out and share with all of us- my husband has been going through yogurt like crazy and this is much cheaper!
Whitney – what kind of milk did you use (skim, 1%, etc.). I get quite a bit of whey, also, so I don’t think it’s a huge cause for concern. You might try straining for less time if you find the yogurt is thicker than you would like – that will reduce the amount of whey.
This was DELICIOUS! I can’t believe how easy and inexpensive it was (except for the fact that we’ll probably be eating a lot more yogurt!). Thanks for a wonderful tutorial. You really streamlined the process; I love using the slow cooker through the whole thing. When I’ve seen it on other blogs it’s seem too complicated to try, but this was easy and wonderful the first time through! I also loved the fruit syrup recipe!
I just put my first batch into the fridge. It looks wonderful but I had like 8 cups of whey. Is that normal? If not, what might have caused this. Did I do something wrong? Any help would be greatly appreciated!
Did you melt the handle off of your slow cooker lid? I ask because it looks just like mine 🙂 and I have to use a meat fork to help me lift the lid.
Yogurt is just cooling now, and that stirring really speeds that process along, as well as avoiding the slimy skin from forming. Thanks for this lesson!
BarabarO – good eyes! No, I didn’t melt mine…it got knocked off the counter years ago and broke off (thankfully the glass part of the lid survived)!
LOVE this! I have a friend who does this with the raw milk she gets and I am so jealous I might have to just start trying. I know everyone is commenting about the nutritional value about the Whey, I just wanted to add my two cents, that it is REALLY important part of yogurt, because it is where the Calcium is … so please try to find a way to use it because women & children especially need lots of Calcium. So even though Greek yogurt is higher in Protein, it is lower in Calcium. So just make sure there is Calcium somewhere in our diets :o)
Mel,
I have been making my own yogurt for a couple of years now. We live on a island of only about 7,000 people and the products that we can get are really limited or really expensive. Fresh milk is really expensive (sometimes it $5 USD for 1 quart). I make my yogurt completely with non-fat milk powder, adding extra milk powder for creaminess.
I use my yogurt for regular eating, in place of buttermilk in recipes, and I use it to make yogurt cheese. Yogurt cheese is similar to cream cheese, but I can add flavors such as garlic and italian seasoning. If you are interested in a recipe let me know.
I can’t believe I made yogurt. I am a yogurt-maker! I am going to try again with a shorter incubation time as it was a little too sour. I had to leave it in for 12 hours because it was a crazy morning and I couldn’t get to it. So, I used it in your tzatziki recipe and it was amazing! The texture was perfect, and that is the best recipe for tzatziki I have ever made. Scratch that– the best tzatziki I have ever tasted!
Made this last night – Holden took over when he got home, partly b/c he loves a good experiment I think, and partly because he was worried I wasn’t doing it right. I was happy to hand it over. Anyway, it seemed pretty easy and turned out great I think. I didn’t strain it initially, but I’m straining it now since it seemed more liquidy than i wanted. I’m planning to use the whey to ferment something – another new experiment! Thanks this was fun, I had just seen someone else’s recipe that I was going to try when you posted yours’, funny how you read everyone’s mind!
Hey Mel,
Just thought you might like to know (being the frugal, mom-of-5, breadmaker you are, just like myself) that you can use that whey to replace some or all of the water in your home-made bread. Then the nutrients (and money you spent on the milk) go in the bread instead of down the drain! I’ve done it several times when yogurt (or cheese) making day has coincided with bread making day, and we can’t tell the difference. And I always feel good about not wasting all that whey. You should try it!
ps. for non-breadmakers, I’ve also heard you can use the whey to make kool-aid, but we aren’t kool-aid drinkers, so I’ve never tried it, therefore can’t vouch for that one!
I have heard that many people use a heating pad to maintain temperature during incubation rather than the oven light option. So if your oven light is unreliable or some such, that might be another possibility. Good luck!
Just enjoyed my first bowl of this delicious concoction. Like you, we eat yogurt by the ton here and this will change our lives! I love the texture, I love how easy it is to make and I love that it’s less sour than store bought yogurt. I really like the crockpot method because it requires no babysitting, I just inserted my thermometer timer and it beeped when it reached temp. Thanks so much for the detailed method and pictures, Mel, you are awesome!
Just checking back in to let everyone know, I’ve made this twice already since posting it (I’m telling you, we eat the stuff like crazy). One of those times I heated the milk on the stovetop instead of the slow cooker to save time and it was great (although the slow cooker takes the guesswork and possible scorching out of the equation). Both times this week, I also poured the cultured milk into quart size canning jars, capped them with lids and rings and put them in the warm oven for 4-8 hours (without covering in a towel). It worked great! Even though it meant more jars to clean instead of one slow cooker pot, I felt like it cultured more quickly. And finally, I am pretty convinced that if you are using a lowfat milk (I use 1%) you really need to strain the yogurt (1-4 hours is perfect straining time, in my book, I strained one batch overnight and it was so thick, I had to add a lot of milk to get the right texture). I tried not straining it after using the quart jars for incubation and it just didn’t jive for me – the texture was all wrong. Many of the reviews who say straining isn’t necessary are using whole milk, which is great, but may produce a different result than lowfat milk, which is how I’ve always made it. I’ll test out the whole milk yogurt in the next few months as baby Cam starts eating yogurt and needs the full fat content, but for now, lowfat milk can still produce extremely thick, creamy yogurt – it just needs to be strained first.
Also, although reviews are mixed on using nonfat dry milk or not, I have to add my two cents that I’ve made it without and highly prefer it in – both for protein content and creaminess. I don’t add it to make the yogurt thicker (that depends on straining time, in my opinion), but I love how it enriches the yogurt. That’s just our taste preference, however. I use organic nonfat dry milk and so while it does increase the cost a bit, it’s worth it for how we like our yogurt. Just something to think about. Everyone will have a different preference.
Thanks for everyone who has left tips. Valuable info for all of us! Who knew homemade yogurt could be so exciting (insert nerd alert)…so grateful to everyone who has shared their expertise.
I love the timed out steps of this plan! I make my yogurt on the stovetop, and knowing how long each step takes makes this so easy. I make mine in mason jars in a yolife yogurt maker ($45 on amazon). i like that there are so many different ways to make yogurt and still have a fabulous end product. A couple comments based on my 3 years making yogurt.
1) If you are having trouble with your yogurt not getting tart enough, even with long incubation, try using less starter, and switching brands of plain yogurt starter if you can. I had trouble with this after moving back from overseas, and discovered that i needed to use less starter. if there is too much starter, the probiotics compete too much for the same food and some die out. I use the Fage full fat plain yogurt as my starter. I buy the smallest size, and use half the container for my 10 cups of milk. I freeze the second half for the next time I need a fresh starter.
2) you can use your yogurt as a starter, but most places I have looked say that 5 ‘generations’ is the max, meaning that after using your yogurt 5 times, like once a week for 5 weeks, you need a fresh batch of store yogurt (or powdered starter, or frozen plain yogurt from your first generation).
3) I am surprised no one says they refrigerate their yogurt before using or straining. Maybe it is unnecessary, but when I was figuring out how to do this, all my sources said to refrigerate the yogurt after it is done incubating, but BEFORE you disturb it in anyway. Don’t move it to a new container, don’t strain it. Just stick it in the fridge for 24 hours. This is supposed to help your yogurt stabilize and thicken, and should make added thickeners like gelatin and milk powder unnecessary. I make mine in quart mason jars so it is easy to refrigerate. I use whole organic milk and never add anything but the starter until I am ready to eat it. It comes out very thick.
4) careful using powdered milk, which is still a processed product, and still costs money. Luckily you can still get fabulous results, even if you don’t use it, or run out, or just can’t find it at your store.
5) for those that want to use other milks, or non-milks to make yogurt, check out culturesforhealth.com. They have great instructions on how thinks like coconut milk or soy or almond milk behave when culturing, and what you might want to do a little differently. They also are a great source for specialized starters.
5) lastly, if you can make yogurt, you can make Awesome frozen yogurt. Just strain your yogurt as long as you can stand, like a full day, and then mix the yogurt cheese you made with agave, honey or maple syrup and some vanilla, and then freeze it in your ice cream maker (if you are lucky) or in Popsicle molds of some kind. If it is fully frozen, let it soften a bit before serving. Take that, Yogurt Land!
I love all the comments on this post! I’ve been making this recipe for yogurt for about 6 months and it is yummy! I use whole milk (still have babies who need the fat for brain development.. and come on, it tastes better!) 🙂 I have tried adding a bit of sugar and vanilla during the process because my kids love vanilla yogurt, and it turns out fine. I tried brown sugar because I like the flavor better, but brown sugar made it gooey and sticky! It was gross. I haven’t been straining it, but I’ll try it now to see the difference. For what it’s worth, I wrap it in 3 towel and leave on the counter. After it sets up, I pour off the whey and put the whole crockpot in the fridge overnight. It seems to thicken more if I do this before stirring or scooping it. In the morning I put into 4 quart jars. Super easy and tasty!!
Thanks for all your awesome recipes! I love your blog!
Mel…try doing it on the stove top heating the milk to 190 then letting cool to 120. Add your starter(I usually do a cup) then pour into mason jars and put in a cooler. Pour heated water(120 degrees) up to the “shoulders” of the jar. I take it out after about 4 hours or so. You would still have to strain if you want it thicker, however, I have never added the powdered milk to it, so maybe that would help with the thickness. This way, I can do it in the morning while I’m cleaning up breakfast etc…and then not think about it again until I put it in the fridge. I don’t know if it saves me money, but I think it does, and as you said it’s just the coolness factor of knowing how to make it!
Also, I think it lasts wayyyy longer than a week. You’ll know if it’s expired!
Some have also told me that the whey can be used to water plants. I’ve poured it on a spot of my grass needing some help and I think it worked!
Thanks for your amazing recipes!
Tommie – it all kind of depends on how thick your yogurt and/or syrup is. I often stir the syrup into the yogurt and store it that way but if my yogurt isn’t quite as thick as previous batches, I’ll just dollop some of the fruit on top before serving.
One more thing I forgot to add, but was reminded of when reading the comments. If you like a milder flavored yogurt, keep your incubation time closer to the 8 hour mark. If you like it more tart, aim for an incubation time of 12 hours. I have been making my own yogurt for about two years now and the only time I have had to throw it out was when I attempted to experiment with flavored yogurt. I found out that simple is best and add the fun stuff later! My kids love it served with homemade jam or just a little bit of honey and some granola. Yum!
It’s finished, and it’s amazing!! I had no idea it could be that creamy! I made the strawberry syrup for it, and now I can’t wait for my kids to come home and try it! My only question is can you stir up the syrup in with it now, or should you just spoon a little bit on top as you go? I was worried it might get runny stirring it all in.
I have this going right now… 🙂 Can’t wait!
Made it its awesome! I thought I ruined it the first step but it was awesome! I love controlling how sweet it is! Thanks for all your scientific documentation
One more suggestion. I place the bowl on a heating pad set to low and cover everything up with a heavy towel. Leave it for about 6 hours. Works great and frees up the oven.
Hi Heather – glad this worked out so well despite the hiccups. Try a different brand of yogurt for the starter if the tartness seems off. My homemade yogurt is more mellow in flavor than plain yogurt from the store (which I like) but if you want more tartness, the brand of starter may make a difference…and also, letting it culture longer, even if it’s set will probably help enhance that flavor.
I have to say this really is a fail proof method or mine would have flopped! I mis-read and thought the milk had to reach 212 before cooling and adding yogurt. It took a lot longer than 2-3 hours but then realized it was not supposed to be that high. Followed everything else. Then I got up in the middle of the night to find my oven totally cool. Preheated to 250 and left it on warm. (My light only comes on when the door opens or closes. ) I also left it in the oven longer as I realized that I didn’t have cheese cloth. I ended up using an old clean pillow case and it worked beautifully! It is delicious! I only wish it was a little more tart. Any suggestions?
Literally, yesterday I said to hubby that I was going to learn to make yogurt! I’m so excited that you read my mind! 🙂
When I strain my yogurt, I line the colander with coffee filters instead of cheesecloth. Works perfectly!
Kate (and others) – thank you so much for all your feedback! Methinks I’ll be doing an update to this yogurt post as soon as I try out some of the other methods. The steps I included in my tutorial are no-fail (if you ask me) but I’d love to find a way to streamline the process so I’m going to try it out with the mason jars and perhaps heating it to a hotter temp. I’ll report back!
Janette – I’ve kept mine in the fridge as long as a week (we go through it pretty fast) but I think a good rule of thumb is to keep it as long as the milk expiration on the carton (perhaps even a bit longer since it’s been cultured).
This was actually my last post on my food recipe blog. We’ve been making it at least weekly (2x a week for a while) since the beginning of summer.
A couple things: 1- even with whole milk the finished yogurt is less sour and more creamy if you strain it. We always do and use the whey for pancakes – yum! 2 – we heat our milk to 195 deg F for 10 min, before cooling the milk down. 3- use only a teaspoon or two of yogurt. 4 – we put mason jars with the milk in a cooler with another jar or two filled with simmering water… close the cooler lid and it stays the right temp for the ~4-5 hours it takes to firm up.
We heat the milk hotter because it makes for a thicker yogurt. Why? well, Harold McGee’s “On Food and Cooking” says that manufacturers cook the milk for 30 min at 185 deg F or 195 deg F for 10 min, this “denatures the whey protein lactoglobulin, whose otherwise unreactive molecules then participate by clustering on the surfaces of the casein particles. With the helpful interference of the lactoglobulins, the casein particles can only bond to each other at a few spots, and so gather not in clusters, but in a fine matrix of chains that is much better at retaining liquid in its small interstices.”
Translated: the hot temps is needed to unfold a particular protein that will help the yogurt be thicker at the end of the day.
Not as practical for your slow cooker, but it makes fabulous thick wonderful yogurt for us!
Hi Mel, thanks for this great recipe. I always enjoy your site. Just wondering how long homemade yogurt is typically good for? I know you have a large family, so it might not “last” very long in your house, 🙂 but maybe someone else could chime in?
Thanks!
tsmith – good point! I forgot to add that in the instructions, so I’ll edit because that is very important that the yogurt starter have active, live cultures.
Leigh Anne – adding the nonfat dry milk significantly increases the protein content in the yogurt.
Awesome Mel! I have been wanting to make my own Greek yogurt cuz I too am in the same rural boat as you….just warmer in Texas….haha! Since this is Greek yogurt, does it have the same high-protein content as the store bought? I use it in my morning smoothies to help me feel full longer. And it helps to keep my kids full too, which is hard to do! My local store only carries sugar-filled yoplait, so when we go to the big city I buy some plain Greek. But now, I am gonna make my own! You make it look so easy! Thx!
Make sure the yogurt you are using for your starter contains live and active cultures. Check the packaging, not all yogurt does. I also add a package of unflavored gelatin to the milk after it has been heated to 180. It makes a nice thick yogurt without straining. If I am in a hurry, I heat the milk on the stove and then set the pot in the sink with a little bit of water for a quick cool down before I add the yogurt starter.
This yogurt information looks very interesting. I will have to try it on a weekend.
I also wanted to comment that I have been hoping to try the Spaghetti Pie recipe sooner rather than later. But oh baby, is it ever good. Thanks for all you do.
Pat
…Now pinning! :o)
…Thank you so much for this! Great tutorial and again, thank you, as I know this was no small feat.
…Enjoy your day!
…Blessings. :o)
Hi Mel! I never comment but have been a reader for the past year. I love your blog! I just had to comment today because I noticed that you also have the small piggy whisk, the cutest! =)
wow this post makes it look so simple. I’m going to give it a try this weekend. My kids and I love greek yogurt but in NYC I pay about $2.00 for a single serving cup. It really adds up when you are buying yogurt for 6 people.
Oh, Mel! I’ve been wanting to try making my own yogurt, but I needed very clear instructions from someone like you! Thanks 🙂
Wow! I’m excited. I think my life might change forever once I give this a shot!
I second Jen’s question, would any of you that say you make ricotta cheese please pass along the recipe you use?
I’ve been using this method for a couple years, but I don’t heat the milk up in the crock pot. I turn my crock pot on low while I use a stockpot on the stove to heat the milk to 176 degrees (the temperature milk is heated to for making yogurt commercially). This takes about 20 minutes. Then I put the stock pot into an ice bath in my kitchen sink for approximately 4 minutes, watching the temperature carefully to get it between 112 and 115. I then pour the milk into the crock pot and continue from there. It shortens the whole process by several hours. Love your pictures, Mel!
My ancient oven doesn’t have a light. Could I just keep the oven on at 250 for the duration?
I know that Mel said she hasn’t tried this with nonfat milk, but has anyone else? I’d love to hear your results!
Any experience making yogurt with milk substitutes?
For those who commented about using the whey, do you have a good recipe for making ricotta cheese with it?
I have never tried making my own yogurt, but have thought about it more and more recently. My daughter and I love yogurt (Greek in particular) but even on sale, a small container can cost $.50-$.75.
I’ve been making my own yogurt for a while using the method in Jennifer Reese’s book, Make the Bread, Buy the Butter (http://www.amazon.com/dp/1451605870/?tag=googhydr-20&hvadid=7682999557&hvpos=1t1&hvexid=&hvnetw=g&hvrand=12111526531630074376&hvpone=&hvptwo=&hvqmt=e&ref=pd_sl_7d9801p7qr_e). It uses the stove instead of the crock pot, but I personally prefer it. The one time I made a crock pot yogurt I don’t think it cultured all the way. But your tried-and-true method looks like it’s worth a try, even just to compare.
As someone else mentioned, don’t throw away the whey! It still has nutritional value. When I have some I use it in place of water when I make bread.
Also, I got tired of buying and using cheesecloth, so I bought a pack of those white flour-sack style dish cloths from Target and I use them for all my straining needs. I just dampen one before using it to line the colander. Easy to wash and use again.
To all those wondering about milk substitutes – someone left a comment on my Facebook post saying that yogurt can be made with soy milk, rice milk, coconut milk, etc. I have NOT tried it, but apparently others have. Good luck!
let me re-phrase you get you yogurt for 4 for the price of 1 that’s better than half 😉
Thanks for the instructions! What brand of thermometer is that?
Awesome!! I was surprised how easy this looks. Fantastic tutorial, Mel!
I make my yogurt a similar way, but there’s even less work – I usually make it in a smaller crock pot, but you’ll get the idea – 1/2 gallon milk in slow cooker. Cook on low for 3 hours. Turn off for 3 hours. After 3 hours stir in 1/2 c plain yogurt. Wrap up crock pot in blanket and let sit overnight. ( I usually start the whole process at about 3:00 in the afternon). In the morning put a cloth over strainer and pour in yogurt. Let sit for however long… Works great!
I love this! I love when I can make something at home froml scratch instead of always having to rely on a store. Thank you for sharing this!
I can’t use my oven light since it smells like it’s melting if I leave it on too long. My oven does have a cool dehydration feature that allows me to set the temp as low as 100 degrees. Would that do the trick for the 8 hour culturing period?
Judy – you’d have to experiment and see but if you could set it to 115 degrees, that should be perfect.
Don’t throw away your whey, use it as the liquid the next time you make bread, yummy! Try making yogurt cheese, too, I’m hooked.
Great instructions, by the way. Takes all the scary out of it!
To Amanda’s comment: You only save money this way. You can never buy yogurt for cheaper than you can make it yourself. I have done the math many times. Whether you buy organic milk, raw milk, or regular store bought, making your own yogurt is way cheaper! Even at $2 a quart you can’t beat the price of making it yourself. My opinion is that it also tastes better :). 4 qt.s of yogurt = 1 gallon of milk. A cheap gallon at Costco is $1.89, so you get your yogurt made at home for half the price of the store bought stuff that has more junk in it and doesn’t even taste as good. No electric waste really either… maybe a few cents… IT’s worth it 🙂
Mel- I would call this true Greek yogurt. Regular yogurt doesn’t strain the whey (I don’t). Watching America’s Test Kitchen the other day, they said that was the only difference…. and to your credit… the American brands of Greek yogurt, not one of them actually strain the whey in their processing methods. They all cheat and use pectin.
I do a couple things different but the only one that really matters is to keep mine simple… after heating the milk, I pour it out into quart size jars leaving room to add the yogurt culture to each container. Then I put all the jars into a large pot
of warm water with the lid on and the water to the level of the yogurt in the jars. Place in the warm oven (heated to 170 then turned off)…. I don’t strain the whey. It rises to the top and I dump it out or use it for other things… Mine has never been lumpy this way. It’s very smooth and I love the fact that I can keep it easily stored. We do go through a lot of yogurt, but I like it this way!
Love you stuff as always!
Great tips, Amanda E! All my quart jars are in storage but it may be worth digging them out to try it this way. I’d love to find an alternative to blending and maybe even straining. Thanks!
Don’t throw out your whey! It is really easy to make ricotta with it. Or use it instead of buttermilk in baked goods.
Didn’t realize the lumps were normal, and hadn’t even thought to just put it in the blender to smooth it out. Duh moment.:)
Thank you! I tried to make homemade yogurt a couple times last winter and was skunked both times. Thank you so much for this detailed tutorial. I’ll be giving it a whirl very soon!
Nancy – I read on Jillee’s site that she uses whole milk and doesn’t strain it so using a lower fat milk is probably the reason for the straining time.
Nancy, it IS thick and creamy after it incubates in the oven, but if you were to discard the whey and stir it up, it would still be runnier than a thick, Greek-style yogurt. If that doesn’t bother you, then you could use it at that point but it’s too runny for me, which is why I like to strain it. After it strains, it’s lumpy like cottage cheese, so the quick blend in the blender helps smooth it out. I’m using 1% milk so those factors may change if you use a fuller-fat milk.
I’m confused, why drain it and blend it if, after it comes out of the oven, it’s already thick and creamy? Or is it because it’s not thick enough to be yogurt?
Trisha – I honestly don’t know. You’d have to experiment or google to see if anyone else has tried it.
Homemade yogurt isn’t for everyone. It takes time and effort. If you read through the post before the recipe, you’ll note that the reason I have started to do this is because I live in a remote area of Northern Minnesota where yogurt, especially organic Greek, is very expensive. So for me, it is cost effective. Plus, there is a sense of total awesomeness and Pioneer-ish-ness when making your own yogurt (even though Pioneers didn’t have slow cookers or ovens, just go with it). Sometimes it’s not about saving money; in this case, it’s a twofold purpose for me: making something I can’t find easily and feeling a sense of accomplishment from making yet another food staple instead of buying it.
Do you think you could use soy milk for this? My kids can’t have regular milk and I have been trying to figure something out for yogurt because they love it. Thanks so much for your website and all the time you put into it! 🙂
We’ve done this for about a year and love it! Slightly different method…we don’t put it in the oven, just wrap it twice (once with a big beach towel and then wrap a giant, fairly thick blanket around the whole thing) and we leave in on the counter, and in the morning it’s yogurt. The weird thing is, we recently got a new crockpot and it didn’t work in the new one (it turned out a little lumpy..?) I think it might get a little hotter than my old one did. I’d imagine if I do a little tweaking/monitor the temp I could get it to work in the new one. Love your clear, precise directions and photos. You rock!
I am questioning how much money this would save, if you factor in the electricity cost. Here I can get 32 oz of organic yogurt for $4 (less often with a coupon), but organic milk is $6+ a gallon, so even if I made my own, the $2 in savings is largely eaten up by electricity.
This looks like a fail-proof method. I have tried a few different ones and this looks the easiest. I am excited to try it. How much yogurt are you left with after straining? I know you mentioned that there is more whey with 1% or 2 % milk. I have made yogurt with whole milk and even added heavy cream to it. It makes a decadent treat.
Geez, Mel, are you reading my mind??? I JUST told my husband I’ve been craving yogurt and that I miss having it in our regular rotation. After I hung up the phone, I checked my FB wall and saw this new post – couldn’t have been more than five minutes after I’d mentioned my craving!
Wow Mel! I am impressed. That seems like a lot of work for yogurt. I bet it is delicious though. I will do a lot more than most people for food prep. ( weighing ingredients, making most things homemade, etc. ) But homemade yogurt is something I never thought of. You might have just inspired me! 🙂 homemade croissants were probably my most difficult but this looks doable. Thanks Mel!
I was just talking to my husband about making homemade yogurt to save some money (we eat LOTS of yogurt!) and he didn’t think it would be worth it but it looks like it will basically be the cost of 1 gallon of milk for an equal amount of yogurt (for plain, anyway) so I think I will try this! Thanks! About what temperature does your oven seem to stay at with the oven light on (say about 1/2 way through the process)? I ask because my oven light doesn’t work (it won’t stay on and comes on unexpectedly other times) but my utility room is basically a tiny little hole that is always really hot compared to the rest of the house. I wonder if I could make it in there?
Katie Rose – I don’t have an oven thermometer so I don’t know the exact temperature the oven stays, although from what I read online as I’ve gone through this process, the thought is that your oven should maintain right around the 250 preheated temperature (hence using the oven light to help it stay warm and not lose all the heat) to incubate the yogurt. Does that make sense? You could use any number of incubation methods as long as the yogurt stays between the 112-120 mark for the 8-10 hours. If your oven light isn’t working, you can preheat the oven to 250 degrees and then turn it off every few hours to keep it warm enough.
Are you reading my mind again, Mel? Just yesterday, after reading an article in a food magazine about homemade yogurt, I was searching the web for recipes. Seriously- and then this morning I see that you have posted this recipe! I am so excited that you have been making it (aka perfecting it!), so now I know the tried and true method! While it saddens me that you (being such a foodie), are so limited in the ingredients you can purchase in your new town, I am happy that you are finding creative ways to make your favorite foods despite your limited local resources! 🙂