DIY Homemade Yogurt {New and Improved + Updated Tutorial}
Check out this post, complete with a step-by-step guide, on making your own foolproof, delicious, creamy homemade yogurt. You won’t believe how simple it is!
Have you made their own yogurt since I posted this DIY homemade yogurt method two years ago?
I know many of you have been making it much longer than even that, but back then, it was my first foray into homemade yogurt.
I’m excited to report we’ve been religiously making and eating it for the last two years and are happier humans because of it. (Actually, that’s probably not the case since someone still usually ends up in timeout – sadly, not me – at least 14 times a day so perhaps homemade yogurt really isn’t the cure-all for toddler tantrums and brotherly mishaps. I’ll get back to you on the scientific research behind that claim.)
By virtue of making it at least 3X a month for the last two years, my process has changed a bit since the original post.
If anything, I’ve streamlined my method a bit – it’s faster and easier and less work.
The slow cooker is still a great way if you want a hands off approach, but if time is at a premium and you want to finish the process all in one day, I’m here for you.
Not only have I changed up the cooking method – but also the straining and incubating tools.
So let’s talk for a second about a few things you need for this really simple yogurt-making process:
Milk: I alternate between 2% and whole milk (sometimes a combination of both). I haven’t used fat-free milk or milk alternatives (like almond, coconut, soy, etc.) but there are several comments on the thread of the original post with feedback on using those types of milk. I generally only do a gallon of milk at a time. Depending on the fat content, and even brand, as well as how long it’s strained, I get about 3 quarts of yogurt from one gallon of milk.
Yogurt Starter: Plain yogurt, Greek yogurt, vanilla yogurt – all different types of yogurts can be used for the starter, but I would probably stay away from fruit-based yogurts especially those with real fruit pieces. The most important feature is that the yogurt must have active cultures so look at the ingredient list to make sure it includes Lactobacillus bulgaricus and Streptococcus thermophilus. Once you start making yogurt, the homemade yogurt can be used as the starter.
Sweetener (optional): Because we eat most of the yogurt for snacks, breakfast, etc., I almost always sweeten it and add vanilla extract during the process (and then once a month I’ll do a plain batch to use for cooking/recipes and if we want to eat it, we’ll add a low-sugar jam or fruit syrup). If you want to exclusively use it for plain yogurt or a sour cream substitute or just want to sweeten it as you eat it, you may not want to add sweetener during the cooking/culturing process. I use agave nectar (for no real reason except I like how it tastes and it’s a little lower on the glycemic index) to sweeten ours but you could definitely play around with sweetener (sugar, honey, etc.).
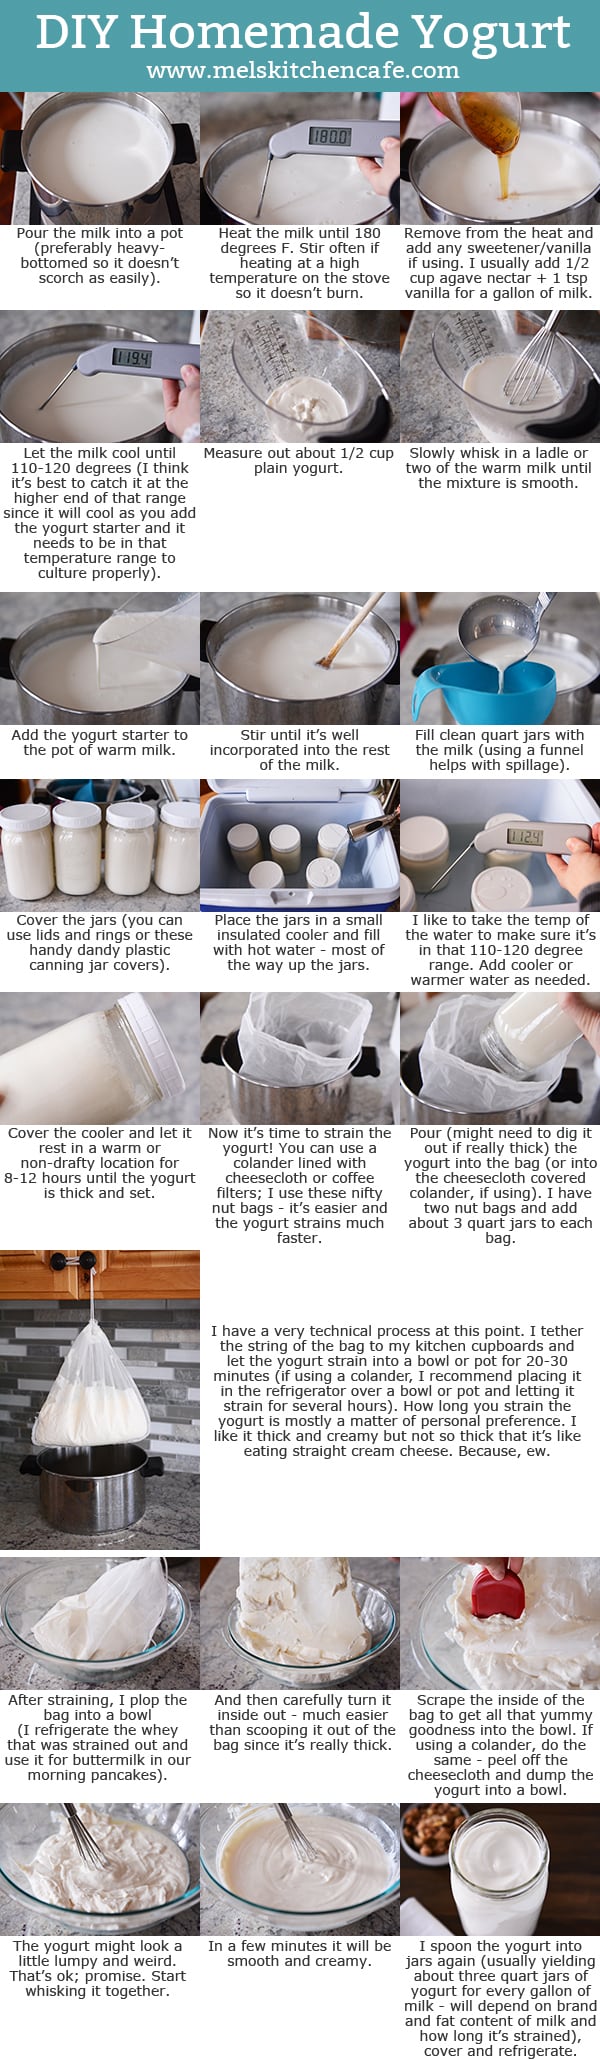
Thermometer: An instant-read thermometer is pretty crucial to yogurt making – the good news is that they aren’t terribly expensive + you can use them for so many things (like getting your pork tenderloin to come out as juicy and tender as can be). I can highly recommend the one I have – a Thermapen (don’t faint, it is on the pricey end even though I just claimed you can get them inexpensively; Brian gave it to me for Mother’s Day several years ago and it’s the only kind I’ve ever used and I love it very much) or I have several friends that have recently purchased this less expensive brand of thermometer (still with excellent reviews). It’s really important to heat the milk to 180 degrees F during the first step and then let it cool to between 110-120 (where it will need to stay in that range throughout the incubation period) and those are hard things to judge just by dipping your finger in the milk.
Straining Mechanism: Gosh, that sounds technical. But really, all I mean is you need a way to strain the yogurt. I used to line a colander with cheesecloth or coffee filters (word has it that some restaurant supply stores have oversized coffee filters which would be really handy). But after my friend Deb told me she uses these nut milk bags (usually for making almond milk) to strain her yogurt, I decided to try and I’m hooked. They are reusable and wash up really easily plus they strain the yogurt much faster. So instead of it straining for a couple hours in a colander with cheesecloth, I only strain it for 20-30 minutes using the nut milk bag. I have two of the bags and can fit about 3 quarts of yogurt in each one. They are inexpensive and well worth it in my opinion (plus, as I mentioned earlier this week, I use them for wringing out zucchini which has also revolutionized my abhorrence of that task).
Jars/Lids: Quart-sized canning jars (I prefer the wide mouth ones but either will work) are perfect for making yogurt but you can really use any type of container that has a lid and will fit in the cooler you use for the long incubation period. I also really, really love the plastic lids just for canning jars so I’m not messing with a lid and a ring. I bought several boxes of these lids just for yogurt making and use them all the time when I pull jars of jams and syrups and peaches off my shelves.
Cooler: Instead of using the oven all day or night long (with the light on) to keep the yogurt warm, I’ve switched to using a cooler. I’m pretty sure several of you mentioned this method in the original yogurt post so thanks for the brilliant idea! I have a 13-year old cooler (it was a wedding present over a decade ago) that is the perfect size. You don’t need anything fancy – just a well insulated, not super big cooler. I can easily fit six quart jars in the cooler and the lid closes tightly. I fill it up with hot water (using that valuable thermometer to dip in the water and make sure it reads between 110-120 degrees) – all the way to the neck of the jars, close the lid, and let it rest in a warm/non-drafty spot for 8-12 hours.
A couple other quick notes: I don’t add powdered dry milk to my yogurt anymore and haven’t for a long time but you can do so if you want a little extra protein.
Also, if I start the process around 8 a.m., I can have the yogurt made, cultured and strained by the time I go to bed. And the dreamy thing is that for 9 or so hours of that day, I’m not doing a thing but sitting there watching a closed cooler do it’s work.
Phew! I think that’s it. If you have questions, feel free to leave them in the comments section. The notes below the recipe title have additional information as well as the picture tutorial so read through those, too.
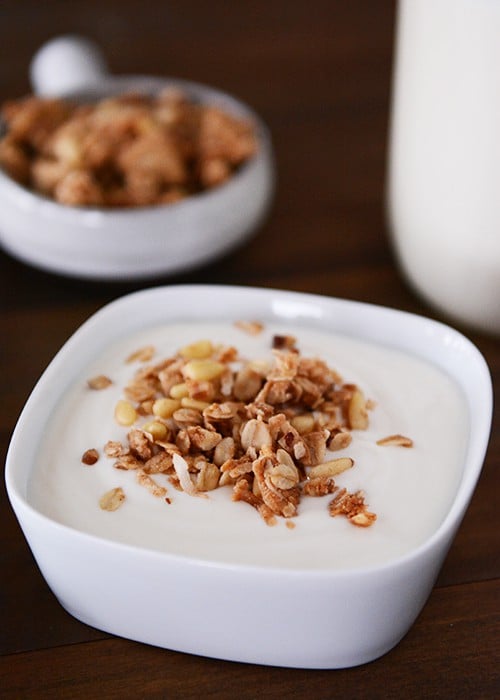
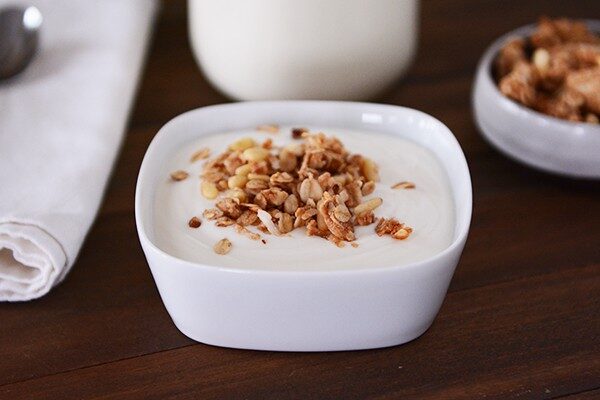
There are not many breakfasts I look forward to more than a bowl full of creamy, thick homemade yogurt topped with a smidgeon (a large smidgeon) of granola.
Thankfully, as long as time is in your favor, homemade yogurt is simple and totally stress-free.
One Year Ago: Slow Cooker Beef and Barley Soup
Two Years Ago: Honey Lime Tilapia
Three Years Ago: Macaroni Grill Rosemary Bread
DIY Homemade Yogurt {New and Improved + Updated Tutorial}
Ingredients
- 1 gallon milk
- ½ cup plain yogurt with live and active cultures, look at the ingredient list to make sure it includes Lactobacillus bulgaricus and Streptococcus thermophilus
Instructions
- Heat the milk on the stove over medium heat to 180 degrees F. Stir often to prevent scorching on the bottom.
- Remove from the heat and stir in any sweetener or extracts, if using (see note above).
- Let the milk cool until between 110-120 degrees. I prefer catching it at the higher end of that range (around 119 degrees) since it will cool after you add the yogurt starter and it needs to be between 110-120 to culture properly.
- Measure out the yogurt starter in a liquid measure or bowl. Slowly whisk in a couple ladlefuls of the warm milk until it is smooth.
- Add the yogurt starter to the pot of warm milk and stir until it is thoroughly incorporated into the milk.
- Ladle the yogurt into quart-sized jars (a funnel helps!) and cover with a lid/ring or with a white plastic cap.
- Place the jars in an insulated cooler. Fill with hot water most of the way up to the neck of the jars. I like to take the temperature of the water to make sure it is within that 110-120 degree range. Too hot and the yogurt won’t thicken (same if it is too cool). Add warmer or cooler water as needed.
- Close the cooler and place in a warm/non-drafty spot. Let the yogurt rest for 8-12 hours until thick and set.
- Using a nut milk bag or a colander lined with cheesecloth or coffee filters, strain the yogurt. You might need to spoon it out into the nut bag or colander vs. pouring, depending on how thick it is. I use the nut bag and tie it to a knob on my kitchen cabinets, letting the whey drip into a pot or bowl (I have two nut bags and put about 3 quarts of yogurt in each bag) – it strains much faster than cheesecloth; I let it strain 20-30 minutes. The colander with cheesecloth/coffee filters can be placed over a large pot or bowl and refrigerated to strain a couple hours. The total straining time will really depend on how thick you want the yogurt so watch closely. If it strains too thick, simply whisk in a little of the whey (or milk).
- After straining, scrape the yogurt into a bowl and whisk until smooth and creamy. Spoon the yogurt back into clean jars, cover and refrigerate. It will thicken even more as it chills.
- The yogurt should keep 1-2 weeks in the refrigerator (using well-sanitized jars helps it keep longer, as well as using milk that isn’t close to expiring).
Notes
Recommended Products
Recipe Source: from Mel’s Kitchen Cafe (updated from this original post)
155 Comments on “DIY Homemade Yogurt {New and Improved + Updated Tutorial}”
have you ever used the instant pot to make your yogurt? I want to try!
Yes, it works great!
I have a yogurt question that I don’t see the answer to on here and I can’t find the place to leave a comment. My question is, the place I work makes their own yogurt and I have taken over the yogurt making (reluctantly). They way they do it is add the honey and vanilla at the very end, after straining. However, the yogurt always turns out runny, even though it is thick before adding the honey and vanilla. Is that the problem? It shouldn’t be mixed after straining? It makes sense, but just want to confirm before I start messing with the recipe. Any help would be greatly appreciated!
I’m not entirely sure, but I do think that could be a factor in why the yogurt is runny. Usually when I add in ingredients after it is strained, it liquifies a bit.
I made this today and it went really well. I started it late last night then finished it up in the afternoon. The only thing I did differently was I skipped the cooler and used my sous vide. I set it for 115° and left it for 12 hours. It was perfect! Now I’m gonna make some whey ciabatta with the liquid!
Thanks so much – I am new to making homemade yogurt and have now made 4 batches- 2 plain, 2 vanilla and all delicious! I did further simplify and the yogurt continues to come out great:
1- I don’t strain – just pour into my large 2Qt glass jar (only fills 1/2 of it but that’s fine – it was the only large jar I had)
2- I turn on my oven to 150 degrees F for a few minutes while I’m waiting for the milk to cool down and then turn off the oven. By the time I am ready to put the jar in there the oven is lukewarm. I wrap the jar in a dishtowel first.
3. I have an old digital candy thernometer I use so I know exactly when the milk hits the high and low temps- if I had a way to program it to signal when I hit each temp that would make the process so much easier!
Does the water in the cooler have to stay at 110-120 degrees the entire time? I didn’t think it did, but the temp of mine 3 hours in has dropped significantly and the yogurt has not thinned at all. It is covered, but I’m wondering if I should’ve used a cooler like the one you had pictured. I just couldn’t reach it easily, so I grabbed my styrofoam cooler since that was more accessible.
Hi Barbara – yes, the water will need to say in that temperature range in order to properly culture the yogurt.
If I wanted to make a fruit flavored yogurt would I add the fruit with the sweetner?
I usually stir in fruit syrup or puree after the yogurt has cultured but you could try that.
I just made yogurt for the first time this weekend and it was easy and delicious! I really appreciate your detailed instructions and pictures and am positive I’ll be making it weekly. I had to cut my daughter off after three bowls today! I must have been overly enthusiastic because after I told my mom about my yogurt accomplishments she called to tell me she was making her own batch 🙂
I was also going to tell you that I bought the nut milk bag you recommended and used it to strain chokecherry juice when I canned jelly today. That bag worked perfectly. I used Pomonas Pectin and am very pleased just looking at those adorable reduced-sugar jars. I honestly have no idea where I’d be without you and your blog!!!
You are a rock star, Nancy! So proud of you!
Just used your tutorial for my very first batch of homemade yogurt. Great instructions & tips! I’m hooked. Adios pricey store bought yogurt
Thank you for sharing!
Way to go!
Have you ever made yogurt in the Instant Pot?
Yes! But I guess I’m a creature of habit, because I still prefer my old homemade method.
What is the minimum time the yogurt HAS to incubate? Have you always done 8 hours?
Yes, I’ve always done 8-10 hours but you can do less as long as it thickens well. My friend incubates hers about 6 hours.
I tried the method suggested by one reader to heat the milk in quart canning jars in a water bath on the stove, then process the jars in a cooler lined with a fleece blanket and two additional jars of 110^-120^ water. Worked like a charm! The milk heated up faster without the worry of scorching, and clean up was a breeze!
I’ve made the yogurt a few times since you originally posted, and I’m super close to saving enough for an instant pot, and I’ve seen that it has a yogurt setting, so I’m wondering if you’ve ever made it in there…
I’ve made it a few times in the InstantPot but maybe I’m just a stick in the mud, but I still prefer my tried-and-true way. However, I know a lot of people that LOVE making yogurt in their IP.
I realize this post is a couple years old but I thought I might answer someone else’s question also.
I make mine in the Instant Pot every week, I love it! So easy & has convinced my hubby to love yogurt too. My recipe is pretty much exactly like Mel’s just using the IP. Make sure you buy the IP with the yogurt function tho, the LUX model doesn’t have the yogurt button!
Completely new to yogurt making and was sent here by my sister who’s been following you for some time now – and now I’m also turning to your recipes. 🙂
Quick question, can I cool the milk in a cold water bath to expedite the cooling process before adding the starter? I’ve done it for candy making, but not sure if I can do it for yogurt.
Yes, definitely! The key is just not letting it cool down below the 110-120 range (optimally, keep it right at 120 since it will cool down a bit more when adding the starter).
Thank you! I’ll do it next time to cut back on time.
My very first batch of yogurt turned out quite well. I’m using straining clothes tied like a bag and hanging from my cupboards, like you do with your nut bags. It worked great! (NNTR)
Hi Mel, I made yogurt for the first time last week and thought I’d died and gone to heaven!! Quick question for you, after letting my yogurt culture for 11 hours it was still a bit on the runny side, not as thick as your pictures. I incubated mine in a cooler with hot water to 120, but when I opened the lid after 11 hours the cooler water was only luke warm. Could that be the problem? Should I add more hot water during the incubation? Does it need to stay between 110-120 the entire time? After staining through the nut bag I had nearly 6 cups of whey. I only use whole milk. I was reading your granola post where you mention making yogurt and you say when using whole milk you never strain! I was surprised and can’t imagine mine being runny. But maybe you can tell me where I went wrong? Thanks Mel!
Hi Jennifer, yeah, that sounds like too much whey for the end product. It is important for the water in the cooler to stay between 110-120 the entire incubation time. You can wrap the cooler in towels to help this (especially since all coolers will insulate a bit differently – the towels add another layer of insulation) or just check periodically and add hot water as needed. Hope that helps!
Have you ever made yogurt with non homogenized milk? I usually buy that for our drinking milk, but I don’t want to ruin a whole gallon of milk if it wont work for yogurt. Thanks!
I haven’t, Katie – have you tried googling to see if it can be done?
Have you tried using your InstaPot to make yogurt? I thought I’d check for words of wisdom from you before I tried it… :). Also- thank you for bringing nut milk bags into my life! What a huge improvement over expensive, messy cheesecloth. I find a new use for them all the time. Yesterday I used one to strain honey. I keep bees and had some honeycomb that broke out of a frame while I was moving some equipment. I crushed it in my nut milk bag, hung it to drain the honey, dumped the wax (and bits) into a ziploc to render later and the bag washed out perfectly. I was pleasantly surprised- I thought the wax might wreck it, but nope. Awesome!
Seriously? That’s amazing about the honey! And I’m totally intrigued by your beekeeping. I’ve been tempted to dive into that for years (on a very small, backyard scale) because the issues surrounding honey bees are really important to me. About the InstantPot, I have made yogurt in it twice but to be honest, I still prefer my stovetop method. I guess in this respect, it’s hard to teach this girl new tricks. 🙂
I prefer “regular” yogurt to the thick “Greek” style stuff. If I want that runnier texture, do I still need to strain the yogurt at all, or will it be way too runny?
You might try not straining and see how you like the texture. If it’s too runny you could always strain it for a few minutes (even if it’s been chilled).
Thanks!
I’ve been eyeing this recipe for months, but haven’t made it for lack of a thermometer. My mother-in-law just got me a Thermapen as an early birthday present. That thermometer is life changing! I can’t wait to try making yogurt with it!
So, I started making yogurt in January after reading your first post on DIY yogurt. I had read some of your hints at things you had changed up before you posted this, and I had arrived at almost the exact same method you posted here – I think I figured out the nut milk bag a few days before you posted it! But I thought I’d let you know of my current method (only slightly different) but it has made it even easier for me! My least favorite part about the whole process is ladling the hot milk into the jars. I’m very impatient, and so I usually make a big mess of it, dripping milk as I go. Then I read about heating the milk in the mason jars to begin with. Brilliant! I get out my big canning stock pot, fill it with water, stick the mason jars (already filled with the milk) in there (not lids on the mason jars), put the lid on the pot, and turn on the heat. I don’t have to stir it or anything, and I just check the temp now and again, until it’s hit the magic 180 degrees. Then I plop them out on my counter to cool. It takes about an hour to 90 minutes for them to reach the right temp. I stir in about 2 tablespoons of starter into each jar, and throw them in my dehydrator (my new kitchen toy) to incubate. SO EASY! No dishes, no ladling, no stirring. Now I can make yogurt in my sleep!
Is it fine if I’m putting my yogurt back into the original bottles and putting them in the fridge? It seems fine to do, right? Also, I only ever get 2 quarts out of the 2 % milk. I’ve only let it go 8 hours so far. Should I be letting it go longer? My yogurts still a little grainy too. Any idea why?
It might continue to be grainy with the 2% milk – it’s an extra step but blending it will get rid of most of the graininess. I usually put the yogurt back in new jars only because I think it lasts longer in the fridge that way (vs using bottles that haven’t been washed in hot, sterilizing water). Although if you are eating through the yogurt quickly, it’s probably not an issue.
I tried blending my skim one and it ended up being really thin, I’ll try it though because the graininess does bug be a little. I usually let my yogurt sit 8 hours and I get 2 full quarts. Would I get more yogurt if I let it sit longer? My kids will eat a whole Bottle of this for breakfast so I really wish I was getting the 3 quarts that you do.
It’s a possibility you might get more yogurt if you let it sit longer – but also, how long are you straining it for (at all?). If you are straining it, try for a bit less time. It will make the yogurt slightly runnier but you’ll get more.
I did it! I did it! I did it! I am so excited – I just made homemade yogurt!! And it is so delicious. This homemade yogurt is so much better than store brought. I would never have believed it since I love store brought yogurt so much. I read your post of a few years ago and it was way too complicated and time consuming for me. When I read this post (seriously about 10 times through), I decided I was going to try this easier, less time consuming method. The tutorials were such a blessing. I used 1% milk and my yogurt is thick and creamy. I used the nifty recommended nut milk bag too. Thank you so much Mel for the confidence and courage you instill in your blog followers with yours words of encouragement, exceptional tutorials and precise instructions that produce great success when we try. I can’t believe I just made DIY yogurt. You rock and now I do too! 🙂 So happy.
I’m so happy for you, Sheila! Is it weird/lame/nerdy that I was nearly dancing around my living room after reading your comment shouting “Yippee!” You DO rock!
So love your inner spirit, Mel! 🙂
Ok. So I tried to make this yogurt and somehow managed to fail completely. I have slimy milk at best. Is there anything I can do remedy this, or do have to find a different use for this batch and start over again?
I’m not really sure, Ronna – what do you mean by slimy milk? Did it not set up thick?
hey Mel! So, I’ve been making homemade yogurt for a while now and I got super excited when you posted about the nut bags–they sounded amazing! So I quickly ordered mine and made some new yogurt to try them out right away. Well…is your whey that strains out mixed with milk solids? Before when I made yogurt I would strain it through a piece of muslin and the whey was always yellowy and see-through. I’ve tried it a couple times with the nut bags now and the whey comes out very milky. Is that what yours does? Or am I doing something wrong? I just want to know if it is normal 🙂 I do use the milky whey though, and it is way better in recipes then the see-through whey (if that makes sense). Thanks!
Hi Katie – good question. When I strain my yogurt through the nut milk bags it is yellowish clear. There are a few milky parts that get through at the beginning but after that it’s mostly clear whey. What’s the consistency of your yogurt? Thick or fairly thin?
I figured it out! My yogurt was a lot thinner than usual, but I couldn’t figure out why. Turns out my thermometer had gone crazy and wasn’t working any more, I don’t think my yogurt got warm enough in the first place. I got a new one (thanks for the suggestions!) and now my nut bags are working fantastic! Thanks!
Ok so, I made this three times and each time it has gotten runnier. This third time, not much was left in the milk bag so I put it back in the jars and back into the 110-120 degree water. The only difference I can think of is that I got in a hurry for the 180 degree milk to cool to 120. I put the pot in a sink of cold water and stirred it till it was 120. Is it important for the milk to cool slowly? Is it also important to warm it to 180 slowly? or can I put the burner on high as long as it doesn’t stick because I’m stirring it. Is this batch save-able? I guess I am impatient even though this is the quicker version of the recipe.
What are you using for the yogurt starter? It might be that if you are using the homemade yogurt as a starter, you need to get some from the store to give the yogurt a little more oomph. I don’t think cooling it quickly or heating it quickly makes a difference as long as the temperatures are maintained.
I’m intrigued about using whey as a buttermilk substitute, do you sub it 1:1? In some recipes but not others? I always save it and use it when making bread (sub it for about half of the water in the recipe) and I freeze it in ice cube trays for smoothies (and once I even rinsed my hair with it… one of the gems I found when googling what to do with the whey), but that’s about it. I know I can google it but I’m curious to hear more from you about it – for buttermilk and otherwise.
Hey Stephanie – yep, I usually use it 1:1 for buttermilk. I’ve mostly used it in waffles and pancakes and only occasionally in muffins and such but so far it seems to work great.
I’ve been making yogurt since your first post, but I’m excited about this method because 1) with the original method it was often hard to choose a day I knew I’d be home in the evening when the yogurt in the crockpot was ready for me and 2) I don’t like cleaning my crockpot.
I attempted the blanket/rice bag method too. Specifically, I put the jars into an insulated bag with a rice bag on top. Put that bag inside my cooler, put a rice bag on top of the cooler then wrapped it in a big fleece blanket. That all sounds really ridiculous now that I’m typing it:) It’s possible I didn’t need all of those components, but I’m really happy to report it worked well and I REALLY like that I’m not dealing with needing to heat additional water to put in the cooler around the jars.
In case this is helpful to anyone else, it took about 25 minutes to heat my milk to 180 degrees then about 45 to cool it to 120. I needed an additional 10 or so to get the yogurt starter mixed in, the milk into jars, and then the craziness with the rice bags and the cooler wrapping. SO now I know I need a morning where I have about an hr and half to do the process. Not too bad. I put off trying the stove/cooler/daytime method because I didn’t know how much time I needed to dedicate to it. Mel, chime in if that’s totally not the timing you experience.
I am in LOVE with your updated/easier method! I have made yogurt off and on for years using my mom’s old (30+ years) Salton yogurt maker with individual jars. While that worked it wasn’t the best because each 6 oz jar when strained only produced about 1/4 to 1/3 cup of yogurt. I have used this method two times now and couldn’t be happier. I have also been making your fruit syrup from your original yogurt post. I made a couple different kinds for variety then froze in cubes and I throw one of those in the individual serving containers for my husband to take to work. Thanks for all your great recipes!
My sister made this with 2% milk and it came out awesome! I decided to try it with skim milk and make a vanilla bean paste/unsweetened version. My end product is not perfectly smooth and creamy. It has a texture almost like cottage cheese that has blended a bit. It doesn’t taste or smell bad and I’m not sick after eating it yesterday. I strained it to long and have had to mix in some whey to thin it out too. Do you know where the problem lies? Why the weird texture? Also, the skim milk only made a quart and a half so I won’t be trying that again.
Hi Marci – I’m almost certain it’s because of the skim milk. I notice pretty big differences when I start lowering the fat content of the milk. Whole milk is by far the creamiest and I’ve successfully made it with 1% (I don’t get as high of a yield since there’s more water in less-fat milk) but the 1% isn’t quite as thick and it can sometimes be almost grainy. Much of the nonfat or low fat storebought yogurts have the additives (gelatin, carageenan) to make them silky and smooth; I don’t think homemade yogurt with nonfat milk will ever be quite as creamy.
Good to know. My sister did it with 2% and it was the best yogurt I’ve ever had. Do you think I can still use the whey for a buttermilk substitute? It’s kind of yellowish and very thin and watery. Is that how it’s supposed to be?
Absolutely! That whey is good stuff. How you described it is exactly what my whey is like (it will be slightly less thin with fuller fat milk).
I’m also in love with my thermapen. Pricey, but I love knowing it’s right! What do you use for a candy thermometer? The thermapen obviously doesn’t do a good job sitting on the edge of pots…
I love this one.
hey mel, ive made yogurt using your recipe a coule of times ..and its so creamy n yummy . but before straining its a bit gluey and the whey is mixed all inside the yogurt….umm just checking thats normal or im doin something wrong with it? time or temperature? after straining its thick just like in the pic and doesnt taste sour at all. thanks for such wonderful tips and recipes!
Sounds like it’s just fine to me! That’s how my yogurt is most of the time (sometimes the whey has separated a bit before I strain it but usually it’s a big mass of yogurt going into the strainer).
Quick question: You said you generally only make one gallon at a time that yields 3 qts of yogurt, but there are several references to 6 qts of yogurt and it seems like that is what you made in the photos. So is it best to double it? Did I miss something?
The yield of yogurt after it is strained is between 3-4 quarts but during culturing, it’s more like 5-6 quarts (once you add the yogurt and any sweetener). You can definitely double the recipe, though, if you want to.
Thank you!! I get it now!! 🙂
Hi Mel. First comment ever, but DAILY for the past few years, I click on your site to see if you have posted anything new…love, loVE, LOVE your site. Thanks for all your hard work. Question about the yogurt, if I live in Utah (Murray to be exact), with an elevation of approximately 4300 ft above sea level, what temperature should I heat the milk to…to be the equivalent of the 180 degrees? Also, then would my milk temperature of 110 to 120 degrees need to be altered? Sorry this is SO technical. THANKS ! ! !
That’s a good question but I don’t know. If it were me, I’d just heat it to the same temperature. However, you might try googling to see if it really does make a difference at higher elevations (like in candy-making or with boiling water).
I made yogurt for the first time today and it was super easy, thanks to these step-by-step instructions. It was so delicious my daughter was licking out the bowl I whisked it in! But I wondered, if you are using store-bought milk, why heat the milk to 180 and wait for it to cool to 110-120? Is there a purpose to the high heat other than killing bacteria, which would be done during pasteurization? I just sat there this morning looking at my hot pot of milk for an hour while it cooled pondering this question 🙂
Good question, Sara! Actually there is a reason – I don’t know the exact scientific explanation but I know heating the milk has something to do with building the proteins in the yogurt. Here’s a description I pulled online:
The second advantage to the heating stage is that the most abundant protein in the whey of in milk – lactoglobulin – fully denatures and unfolds at about 172-degrees. This allows those proteins to bind to some of the other proteins in milk, called caseins. Ostensible result: a firmer, thicker yogurt curd.
So there you have it!
Just finished making this and was much easier than before. I opted to follow the comment about blankets and not put them into water. I stuck them in one of those insulated bags that keeps food hot/cold along with two bottles of warm water and it worked great! Used less water and seemed easier. I wrapped a blanket over the inside bag and the outside cooler. Also for those calculating costs, include the product of whey. No need to buy buttermilk! Lastly, I ordered a nut bag and didn’t realize it only came with one. I drained one batch and since it is so quick I just put the second batch in when the first was finished. Happy yogurt making!
Love this tutorial! I never stir or whisk my final product, though. After spending so many hours creating the protein bonds in yogurt, I don’t want to break them.
So I’m getting ready to make my first-ever yogurt, and my supplies have all arrived. (Thank you, Amazon.) After poring over your original yogurt post plus all the comments, and then this updated one, my only question is why you now only use 2% or whole milk for your yogurt, when you only used 1% a few years ago?
Hey Alicia – good question, it’s really just a matter of preference. We go through phases where we drink different types of milk and lately we’ve been drinking more 2% and whole. But 1% works great for the yogurt, too.
Awesome – thanks for the quick feedback. Heading out now to buy my milk. And by the way, we made the zucchini-crust pizza last night for dinner, and I cannot believe how amazing that nutbag is for getting the water out! I can see it being used for lots of other things, zucchini noodles for one.
Thanks for all the great recipes! This is my FAVORITE blog. I am really interested in making yogurt and was all set to buy the materials I needed, but then I found a great deal on a yogurt maker. Do you know anything about these? My main question is why you don’t have to strain the yogurt in a yogurt maker? I am just trying to figure out the best way for me to go, but I want the best product.
Hi Teresa! I am not familiar at all with yogurt makers so hopefully others can chime in if they are. As for straining, that’s probably a matter of preference, yogurt maker or not. Someone else left a comment in this thread that they don’t ever strain their yogurt and asked why I do. I’ve left it unstrained a time or two when I was making it with whole milk (back when I had a baby/toddler) but anymore, I like it a little thicker.
this yogurt is so creamy and delicious! I’m amazed at what little effort it is…the nut bag thing is genius! although my ups man gave me a funny look when I exclaimed…yes my nut bags are finally here! thanks your the best!
Oh my gosh, Jill, your comment seriously made me laugh out loud. Hilarious.
Great recipe. Thanks for the tutorial.
I shared this article on my site.
I read through the comments to make sure my question hadn’t been asked so I hope I didn’t miss it but do u check ur water temperature during the incubation period and add some if the temp drops too low or do u just leave it and not worry? I made it and my water dropped to 100 even in my closet which is warm and not drafty. The yogurt is currently straining but I was wondering for future reference. Thanks.
Hey Brye – I used to take the temp of the water but my cooler is really well-insulating and since the temp doesn’t drop I don’t check anymore. If your temp dropped, it wouldn’t hurt to add hot water about halfway through.
I have had homemade yogurt on my list since your last post on it and STILL haven’t tried it! I need to do it, I just hadn’t been able to find cheesecloth so hadn’t got around to trying it. I’m going to get one of those bags and try it soon. Love this post!
Hi Mel,
Nice recipe. thank you. Using a cooler is so smart !
Different cultures, different and same meals :
In France the unstrained mixture is our yoghourt, and the strained one is called “fromage blanc” (white cheese). To make “petits suisses” (little swiss), we add rennet, and we strain it more time. It has the consistency of cream cheese.
You are inspiring, Mel! I’ve stopped eating yogurt because it seems too sweet and artificial, no matter the brand. I think this will turn me into a yogurt eater again. Wish me luck! 😉
Hi,
I’m excited to try to make yogurt! I had 2 questions… 1st do you have to periodically check the water in the cooler over the 9 hours to keep it at the right temp or do you just leave it alone? 2nd, what kind of yogurt do you use or like for your starter?
Thanks!!
Hi Tori – I’ve gotten used to the cooler I use and it doesn’t seem to lose much heat; the first couple times I used it, I checked the water temperature but found I didn’t need to mess with it so now I don’t check it at all. I often use my homemade yogurt for a starter but if I’m out or want to start fresh, I honestly have used everything from store brand plain yogurt (not Greek) to expensive plain Greek to even some Greek Goddess Honey Vanilla (one time when that’s all I had).
I love making yogurt and my family’s pallet has finally become used to it homemade. I use this same method except I pour the milk in the jars and sterilize it in a big pot of water. After that I let it cool, stir in the starter and then Incubate. It’s even less clean up!
Oh, and thank you for sharing your experience with the nut milk bag! I just ordered one thanks to your link. I have been using the cheesecloth method and am excited that you discovered a faster way. Also, after your recommendation, I will be using it for my cauliflower pizza crust and plan to try your zucchini crust recipe soon!
I love the effort you make to test and retest and update and then share your research with us. I learn so much from you. I love homemade yogurt! And I have been using a cooler, too. Just thought I’d share with you what works for me. I put the warm yogurt in jars, then into a cooler lined with a big fleece blanket, folded a couple of times. I wrap the blanket around the jars, covering the tops. Then I heat up a rice bag in the microwave (you know the bags you can make and use as heating pads, filled with dry rice or wheat?) for about 3-4 minutes until very warm. I place it on top and close the lid, and my yogurt is thick and creamy in 8-9 hours. I used to do it the way you described, but this method works just as well, and is easier for me than messing with heating up and testing water, and then dumping it afterwards. I have been on a yogurt making journey for a few years, like you, and I keep finding ways to make the process simpler. Let me know if you try this method–it has never failed me!
Also, for people trying to use up the milk in food storage? Just mix up the powdered milk and heat it to 110-120 degrees. No need to go up to 180 first because of the nature of powdered milk, so it saves a step. I usually use fresh milk, but it still tastes great when I used powdered milk.
Thanks, Mirien!
Never, ever, in my entire life, did I ever think I would want to try making homemade yogurt…. It seemed way too complicated and way too scary to even dare think about. After reading this, however, I have to say that I can’t wait to try making a batch! We love the plain Greek yogurt from Costco with a little honey added in. It sounds like this yogurt is very similar in texture and possibly better in taste, and I can’t wait to see how we like it!! Plus, it define will save money as it costs about $7.50 for two tubs, and I will be getting about the same as 3 tubs for about $5. Can’t complain about that!! You keep changing our lives, and we love you for it!!!!!!! Thanks again!!!!
I love making my own yogurt. I sweeten with honey before I put it in my cooler and instead of filling the whole thing up with water I alternate mason jars filled with yogurt with ones filled with hot water just from the tap. It works like a charm. I also discovered I don’t like it as tangy, so I only leave it in there for six hours and it comes out just perfect. So not messy, simple, and best of all, short!
YAHOOOO! I have been waiting for this post! LOVE IT, every part! Thank you for introducing it to me a few months back and giving me the confidence to make it myself, it’s our favorite and I’ll never go back. You’re a favorite too!
I tried the oven method before and gave up. This looks awesome!! Even my nine year old remembers the homemade kind and said, yeah I love that stuff! Definitely going to give this a try. It really does taste much better than store bought and you control the sugar content, store bought stuff is so sweet.
Check out the Thermopop. Made by the same manufacturers as the Thermapen, it is $30 opposed to $96 Thermapen. A bit slower (5-6 seconds opposed to 2-3 seconds of Thermapen), still very consistent! Thanks for a great tutorial update!
Mel – I have made yogurt literally every week (sometimes twice a week!) since your original post. You inspired me then and the amazing taste and easy process have kept me at it ever since. I eat it 6 days a week for breakfast (sometimes 7 if I don’t have time for waffles on Saturday :)) and it is amazing! I actually don’t sweeten mine except for a tablespoon of jam mixed in when I’m eating it occassionally. It is smooth and creamy and not sour and I love it. You changed my life and I thank you for that! Oh and I love the nut bag idea, gonna have to get one of those! Thanks Mel, you remain my favorite food blogger, hands down 🙂
Love your guts, Deb – you are too sweet.
I have been concerned by the fact that my kids are getting most of their sugar intake for the day from their single a.m. yogurt serving. This recipe tutorial has given me the courage to just DIY so that I can control the sugar. Thank you for such a clear, concise recipe!
Just thought I would give my two cents and recommend kefir making in addition to or in place of the yogurt. Kefir made from real kefir grains (not the powdered kefir starters, which are NOT the same thing) is one of the simplest cultured milk products you can make. You mix the grains and some milk in a clean jar, cover with some cheesecloth, wait 24 hours and, voila, you have kefir. It is also extraordinarily healthy. I have been drinking kefir for two years now, and I rarely get sick. I would be very happy to share some of my grains if someone is interested in trying. They can even be sent by mail.
Great tutorial as always. Your blog is AWESOME.
Hey Dawn – thanks for commenting! I’ve been wanting to learn more about kefir but the little I’ve read says you need to have an active starter and to be quite honest, I didn’t even know where to start with that. Is that the grains you are talking about?
Kefir is grown from live grains, that resemble a cauliflower cluster. It is very good for the gut and super easy. You can buy grains from many different culture websites, you can also buy powdered yogurt culture from many of these sites. Kefir grains grow and are great for sharing. I have never had to buy grains because I have friends who are willing to share theirs. If you would like to email me, I’d be glad to share. Thanks for sharing such great recipes and ideas on your blog.
Hi Shiree – thanks so much for offering to share your grains! I actually just found some locally but I really appreciate your kindness.
Can you send me a start of your grains to make kefir? I’d love to try that!
Email me with some info please!
Bonnie@ abcstorytime@gmail.com
So my favorite thing about your site is making everything from scratch with less sugar and no preservatives. However when showing my husband this post (with me very excited) he asked “Why would we make this from scratch? It cant be cheaper or better.” So Mel, why should I make this? That is not meant as a rude question. Im hoping you have some awesome points I can sell my husband on. Your blog is amazing and has changed my life !
Hey Britney. This is Mel’s sister Em. I rarely chime in unless I am replying to a contact e-mail, but I thought I could be helpful this time. I thought this same thing when Mel told me to make this a few years ago. Could it really taste as good as store yogurt? And, is it even cost effective? I of course tried it though because Mel and I are always on the same page about making from scratch and using less preservatives. Here are my personal selling points: One, it just tastes way better. I go through spurts of being lazy and just buying it again and then when I make it homemade we are all like, oh yeah, that is why we should make it every time. Two, I think it is cost effective. I made a batch today and it made two giant tubs (like the big Greek yogurt tubs that you would buy from the store for like $6) and one small tub. I haven’t done the math, but it is cheaper for sure. Third, I only use 1/2 cup sugar for 1.5 gallons of milk and 1/4 cup sugar for the blueberry fruit mixture that I put in so it is markedly less “sugary” tasting than the store bought kind I used to get, especially the kiddie yogurts that are just filled with sugar. Honestly, my kids and husband look forward to it. My husband came home from work for lunch today because he knew I had made blueberry yogurt, it really is yummy. It takes some time to get used to the process and figuring out exactly how you and your family like it, but that is the great thing you can make it just how you want it! I split my batch and save some just as vanilla and then I make blueberry or strawberry with the rest, and I strain it for a long time so that it is the consistency of Greek yogurt, which I love. Anyways, I hope that helps. It has converted my skeptic boys for sure!
Thanks so much! That actually really does help me. My husband is not willing to eat the cheap stuff so we definitely pay a premium for the greek stuff at Costco. I actually don’t eat yogurt so when he wasn’t jumping up and down I felt like I needed a push. Plus I feel super cool now that Mel and Em have commented to me 🙂 Here goes nothing. My first yogurt attempt!
Good question, Britney! Your husband isn’t the only skeptic out there (ahem, Brian, my love, I’m talking to you). Speaking completely honestly here, if someone is totally ok eating really inexpensive yogurt, then homemade yogurt probably isn’t the way to go (because you won’t be saving any money to make it at home). But that type of yogurt (and I really do not mean offense here because people should eat however they want to eat) is usually higher in sugar and additives. A few years ago as we continued to make the push to less processed foods, I started buying more expensive yogurt. It tasted better, seemed healthier and lower in sugar…but because it was kind of pricey, it was like liquid gold. Someone else commented on this thread already that a lot of US Greek yogurt isn’t necessarily strained any differently – but to be made thicker, additives like gelatin and carageenan are put into the yogurt. While those two things (and probably others that I don’t recall the names of) aren’t necessarily bad, it kind of bugged me when I looked down at my $8 tub of yogurt and realized that while I was paying a premium, I still wasn’t getting real yogurt without extra, unneeded stuff thrown in there. So that’s what gave me the push to start making our own – because I knew that I wanted good yogurt which costs a lot in the stores and I could try making it at home for less money. Just like my sister, Em, mentioned – sometimes when I don’t have any made or I get lazy, I’ll buy it from the store and we all live through it (in fact, my kids are usually excited they get real, live store yogurt) but I guess it’s one more area, a pretty substantial area since we eat it every day, where I’m making something at home that’s cheaper (totally depends on the cost of your milk but I can make 3 quarts of yogurt for about $5) and is also as pure as the ingredients I add to it. You should try it at least once and tell your husband it’s because I said you had to. 🙂
Many of us spend more money in our homes to get good quality stuff. Since my college days, my home décor does not come from WalMart. My sisters love yard sales and spend day upon day upon week upon month searching for bargain stuff. I buy exactly what I want from my home computer for a fraction of the cost (adding up time, gas miles, wear and tear on car, grabbing lunch out, etc.) of their good, quality bargain stuff. Of course, I do not get the wonderful fun and fellowship of this shopping style. We all willingly spend just a little bit more for updated, stylish clothes, better lotions, nicer vacations, cars, on Christmas, eating out more than we should, gym memberships, etc. My point is I think all of us women and mothers will go “the extra mile” to deliver good, quality food to our precious families bypassing as much as possible the “cheaper and quicker” processed foods. Doing so also reinforces to our little ones the tremendous value to our bodies in consuming nutrient rich foods with little or no chemical additives including sugar and salt. Obesity and lack of exercise is crushing many of the hearts and minds of children and adults alike in our U.S. society. Most of the husbands and fathers I know work very hard to provide a quality life for their families. Teaching and reinforcing a healthy lifestyle to our children by “our actions” is an essential in parenting. What husband or father would argue with spending a little more to gain a lifelong benefit to both their children and themselves?
I just couldn’t stand the thought of giving my child something (store bought yogurt) with that much sugar in it and we don’t use anything with artificial sweeter.
I don’t think my yogurt is less expensive than store bought since I use a little real maple syrup in it.
It is more about what am I feeding my family.
When I start using our own goat milk it will definitely not be cheaper since in our area (if I were to sell it) I could get $12 for a gallon of raw goat milk.
It’s all about quality here. I use grass-fed organic whole milk from a local dairy, and so the grass-fed whole milk organic greek yogurt I produce from 1 gallon of milk (about 3 quarts) for $6 is way cheaper than I could find a store! And I know exactly what I’m putting in it, which is probably what I like the best. And it is SO delicious! You just have to give it a try!
I need to try this sometime!
Hey, I’m wondering if you’ve ever done a post about your grocery budget. That’s kind of personal information, but I’m always interested in tips about that kind of thing. Especially because you have a very similar family — I also have five children and live in the west — so there might be comparable things. I can definitely see how making your own yogurt would save me a lot of money (if I could get my kids to eat it. They are partial to Yoplait, which doesn’t help my budget, but I make them eat Western Family).
Hi Emily, I’ve never done a food budget post mostly because I spend a lot more than I would if I didn’t have a food blog and so my monthly budget is a little skewed.
Thanks Mel, I can’t wait to try this!
I wish I would have known about the nut bag method of straining before I purchased a pricey bouillon strainer years ago to strain my yogurt. I like the idea of straining it quickly and saving fridge space.
How long does 3qts last your family? I was told to make yogurt once a week to keep my cultures alive and there’s no way even my yogurt loving family would go through 3qts a week. Thanks!
It can last around two weeks (and I’ve read some places you can even freeze some). So I keep mine in the back of the fridge where it sometimes tends to get colder and even freeze produce. I’ve gone 2-3 weeks before without any problem. I wonder if it depends on the type of yogurt, too, though. I use an heirloom starter (which is an “eternal starter” that has a very wide range of bacteria in it). I don’t know if that’s a factor in shelf life. http://www.npr.org/blogs/thesalt/2012/04/30/151699885/eternal-yogurt-the-starter-that-lives-forever
I make a new batch about every 10 days but that’s something I’ve never considered (how fresh the starter cultures need to be) and is a good point. I’ll have to do some looking into that.
I have started to make homemade yogurt and think I have finally mastered the basic process. My biggest problem is what to do with it after I have it. I mainly want to make it for my kids to eat at breakfast, but they insist that it needs to be as close to Yoplait Strawberry Smooth yogurt (no fruit chunks) as possible. I have yet to find a great way to flavor it. Do you have any get flavoring options (not just limited to strawberry, because I like all kinds of flavors)? Also, I read once that you can only save a start from your yogurt for about 2-3 batches and then you need to start over with a fresh start. Have you found this to be true or do you just keep using a start from your last batch?
It depends on what kind of starter you have. If you bought store yogurt and are making yogurt from that, it will only last a few generations. If you can find an heirloom start, you can make yogurt endlessly off that start because the range of bacteria is wider. Here’s an article that explains it nicely. http://www.npr.org/blogs/thesalt/2012/04/30/151699885/eternal-yogurt-the-starter-that-lives-forever
If you can find an heirloom starter, do it!
Anyone have an heirloom starter they want to share?
I usually make fruit syrups like I detail in the original post. And if you blend them until smooth, there are no fruit chunks. By default I usually end up with a store bought starter every few times because all the yogurt gets eaten but that’s definitely something to consider.
When do you add the syrup? I cooked my last batch using coconut creamer from the dairy case. I would love to get close to the chobani coconut flavor. Any suggestions?
I had fruit syrups after the yogurt has cultured and is thick and strained. I add sweetener (agave nectar or honey or sugar) as the milk mixture is cooling to the 110-120 temp range.
Just curious if there’s a benefit to culturing the yogurt in jars vs leaving it to culture in the big pot inside the cooler. I’m always trying to save a step;) I’ve been making yogurt for a while and have tried various methods but usually culture the yogurt in the crockpot, wrapped in a towel with the oven light on. (One time I cultured them in individual jars with the plastic lids in the oven and forgot the next morning which resulted in a big mess of melted plastic and ruined yogurt when I preheated the oven for something else…) I was also curious where you find the best price for Agave Nectar?
Yeah, I’d say if you are going to use the oven method like I talked about several years ago, I wouldn’t use the plastic lids on the jars – thanks for bringing that up. There’s no advantage to using the jars other then I like to portion it out that way and it cultures a little faster in the jars than it does in a big pot, usually. I buy my agave nectar at Costco.
I love making homemade yogurt. I’ve been making it for 12 years. Started when my first born could eat solids.
I have used different methods for incubating it but seven years ago my parents bought me the mother of all dehydrators (Excalibur) and I just take out all the shelves and put my yogurt in there and leave it a 110 degrees.
I haven’t made any since we moved to our farm last May….just to busy learning to be a farm girl. One of our goats is due in less than a month and then I will have fresh goat milk to use.
I’ve also switched to straining it a lot so that it makes “Greek” type yogurt.
This looks fantastic. I love the idea of making what you and your family need instead of relying on a store. Not that it matters much, but I was wondering – do you think the end product would be considered Greek yogurt? It seems thick like Greek yogurt would be. My husband is lactose intolerant so we use Greek yogurt as a substitute for sour cream and I would love to be able to just make it!
Also, if you could now learn how to make cheeses and share that info with us…that would just be really great 😉
I believe what we call “Greek Yogurt” here in the US is exactly what Mel is making. Yogurt that has been strained of the whey. But, according to a French friend of my husband, true Greek yogurt is more than that. Something to do with the particular cultures you use, or maybe it actually has to be made in Greece? Ah, the French.
“Greek” isn’t regulated here in the US in terms of labeling, so a lot of companies touting “Greek yogurt” haven’t necessarily strained the whey. They’ve added thickening agents in many instances. That’s probably a huge difference, too.
Greek yogurt is just regular yogurt that has been strained of the whey.
Hey Mel – I don’t know all the ins and outs of how Greek yogurt gets marketed differently than regular yogurt but as far as texture yes, this yogurt can be just as thick as Greek yogurt (it’s all in how long you let it strain – or even letting it strain twice). As for the lactose issue – I’m afraid I don’t know if homemade yogurt is better for that. You might try googling to find out (or maybe someone else can chime in). Also, about the cheese, my friend gave me a phenomenal farm yogurt cheese recipe (kind of like the texture of cream cheese) and I’ve been meaning to take pictures the next time I make it. Now I will and try to post it soon.
Oh. My. Gosh. Do you use this cheese as a cream cheese substitute?! If you say yes, you have changed my whole life. This is one of the two things (heavy cream being the other) that I can not find a suitable lactose free version of! Either way – yes! That would be an awesome post!
I think you could definitely play around with subbing it in for cream cheese. I found a link to the basic method I use when I make it. I mean honestly all it really is doing is straining the yogurt for almost 12 hours until it is really, really thick so it’s not anything complicated. It’s really delicious – it might be a while before I post about it so at least you have something to start with!
http://www.stonyfield.com/blog/yogurt-cheese/
Thank you Mel for the excellent tutorial and thank you Marci , for mentioning your pressure (cooker) in the post !!! I have a All American pressure (canner) that I am certain will work after getting the H2O up to proper temp. I’ve never tried checking how long the water will stay warm inside the canner but today I’ll give it a test run with out the starter and milk . The walls of my canner are quite thick so I think it will have good insulation to do the job . I LOVE my pressure canner and use it year around for canning stocks , beans , potatoes, meats and soups ect . and now with my fingers crossed ,perhaps yogurt ! Man or man I hope this works so I don’t have to use the oven any more for making yogurt !
My method is pretty much the same although I make less because there are only two of us. I use a smaller cooler with yogurt in 2 large jars and warm water in 2 jars with thick towels wrapped around all four jars to keep them warm. We now have home delivered milk from a local dairy available. 🙂
Great tutorial. I’ve made yogurt since before yogurt was popular (back in the 60’s and early 70’s) – a middle eastern friend gave me a starter and I used that for a long time. I haven’t made it in quite a while (I’ve become lazy) and usually buy plain Greek yogurt but it’s never as good as homemade. I’ve never strained yogurt. Nobody ever said to do it unless you want it really thick – I’ll have to give it a try now that you’ve mentioned it. Mine usually comes out pretty thick. I just got a new oven that holds a temp for dehydrating between 100 to 140 degrees and I was thinking of
just placing the yogurt in there at around 110 or 115 degrees – what do you think? Also, I’ve never put my yogurt in jars to “mature”. Originally I put it into a large ceramic/pyrex bowl and wrapped it in towels and put it in my oven (old oven that I had heated to 200 degrees, turned off and cooled to around 130 and just stuck the wrapped bowl in there and by the next morning it was fine. Of course the new methods seem so much better. I’m going to follow your suggestions because now you have inspired me to give it another shot. Much easier than what I used to do.
Thanks again!
I have used the oven that way many times for yogurt. After I turn it off and put my yogurt in there ,wrapped with a towel, I leave the oven light on .
I use the oven for making Chevre too.
Hi Jane – I think that oven feature sounds like a great tool for the yogurt!
Thanks Mel for this awesome post! I’ve had making yogurt on my list for quite a while, and haven’t tried making it. I think now it is time! I’ve pinned your post, and printed the tutorial… thanks for the picture tutorial – very, very helpful!
Oh, and what about the whey? I’ve been using it in smoothies, and also to make pancakes. Apparently it’s high in protein and lots of other goodness. Have you found any uses for yours?
My chickens love it. You can use it in bread making too. Google “uses of whey” and there are a bunch of things.
Google lacto fermentation. You can use whey to add probiotic to all sorts of things: kegchup, mayo, mustard, veggies, dips, etc. It’ll give you the same probiotics that the yogurt has but in other ways.
Hey Mollie – I do the exact same with pancakes. I generally use it up for any recipe that calls for buttermilk since we use buttermilk a fair amount (in baked goods).
Wow! This looks amazing! I have tried making yogurt before with a different recipe, but I’ll definitely try this sometime this week. We use yogurt all the time in my house; for breads, muffins, snacks, and just to eat yogurt. And after seeing your beautiful pictures, I couldn’t be more sure that this will be the best yogurt I’ve ever made.
I’m just still amazed at how easy this looks!
Cheers,
Megan
I love this! Organic Yogurt and buttermilk is so expensive! You’re the bestest Mel!
Yay! I’ve been looking forward to this update ever since I found your first post a couple months ago, and I’m so excited! Funny, because I just started using a nut milk bag to strain my last week, but I just stuck in in the fridge, so I didn’t notice it’s a lot faster. I’ll have to hang it this week. I’m excited to read up on all your details! How long do you typically let it culture – closer to the 8 or the 12? My yogurt turns out quite tart sometimes, and I think it’s when I let it culture for longer than 8 hours. I’m still pretty new at this, but I have been making all of our yogurt for the past 2 months (with the super-fresh-straight-from-the-dairy-grass-fed-organic whole milk I get delivered every week – yum!) and I am in LOVE with homemade yogurt. Thanks for all the inspiration!
The longer you incubate the more tart the yogurt will become. I use pint size jars just so it goes faster.
Hey Mollie – Karen’s right – the longer it cultures/incubates, the more tart it will be. I usually stick closer to the 8-9 hour mark mostly so I can get it all done in one day.
Mel,
Can I use a jelly straining mesh bag for yogurt straining. I noticed my local Meijer has put them all on discounted prices and it comes with a rack to hang the mesh bag on. What are your thoughts on this QUICKLY so that I can grab one before they’re gone!
Alice
I’m not sure, Alice – you might try googling to find out; I’ve never used a jelly bag before.
Great post! We’ve been making homemade yogurt for years; we live off the stuff! 🙂
OK, that nut bag seems amazing! (although, I’m not going to lie, saying “nut bag” makes me giggle a little) I haven’t made yogurt in a while…I should get back in the habit! I’ve used my slow cooker as an insulator, but I’d like to give the cooler method a try.
Thanks for all the handy pictures!
Haha! You aren’t alone, Becky. 🙂
I’m so excited to do this! I’m gonna do it exactly how you instructed, but I bought an electric pressure cooker with the plan of using it to make yogurt. If anyone has done this and knows how I could adapt this recipe to a pressure cooker, please chime in, thanks!
What a great tutorial. I have not ever made yogurt before, but the idea really intrigues me. There’s something great about doing things yourself!