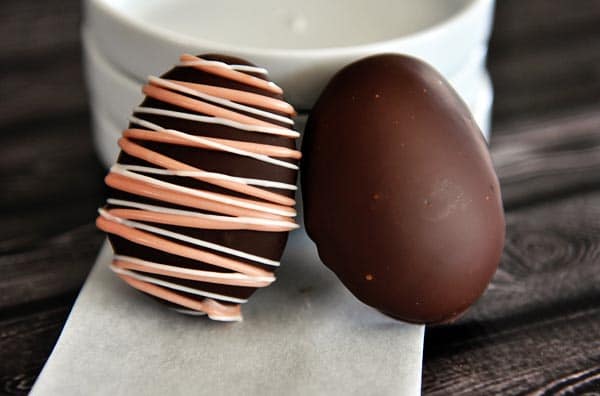
Homemade Marshmallow Easter Eggs
Check out these simple, homemade marshmallow eggs that include a step-by-step tutorial. Who knew making your own marshmallows could be so easy (and cute!)
I’m not 100% positive but these homemade marshmallow Easter eggs (chocolate-covered, no less) may just be one of the coolest things I’ve ever made. Ever.
I mean, homemade marshmallows. Homemade! Marshmallows!
I know some of you are total rock stars and have been doing homemade marshmallows for, like, centuries, but I’ve just never really seen the point.
Until I decided I wanted to make homemade marshmallows in an Easter egg shape and cover them with chocolate. Now that’s something I can totally get behind.
First of all, my Aunt Laurie is totally responsible for these babies. She’s famous for her marshmallow eggs in her Idaho town (hello, Rexburg!) and I’m guessing she makes hundreds of these every year.
So in other words, she’s a chocolate-covered homemade marshmallow Easter egg expert.
Is there really any other kind of expert to work toward? I think not.
I decided to try my own hand at the famed eggs this year and they are one of the funnest projects the kids and I have done together in the kitchen in a while.
Not to mention the fact that I have seriously been converted to the ridiculous goodness of homemade marshmallows. Heaven help me.
Truth: Homemade marshmallows are a bit sticky and can be messy (that’s kind of part of the fun, though, if you can just chill out for about an hour) and you definitely don’t want the kiddos in on the boiling sugar syrup action, but there is a lot they can do.
Pressing the egg molds into the flour, scooping out the marshmallow, taste testing. You know. That kind of stuff.
As excited as my kids were for these marshmallow eggs, I was the one over in the corner patting myself on the back for totally killing it in the rock star department.
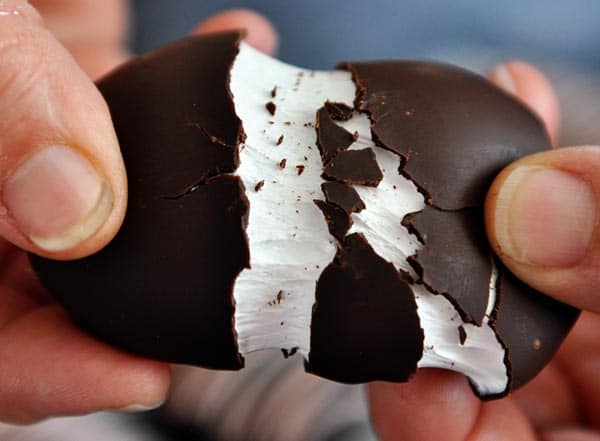
Not only are they cute as cute can be, this homemade marshmallow action is so delicious, it totally blows Peeps (if you like them, sorry) out of the water.
Of course the Ghirardelli bittersweet chocolate covering the insanely light and fluffy marshmallows doesn’t hurt either.
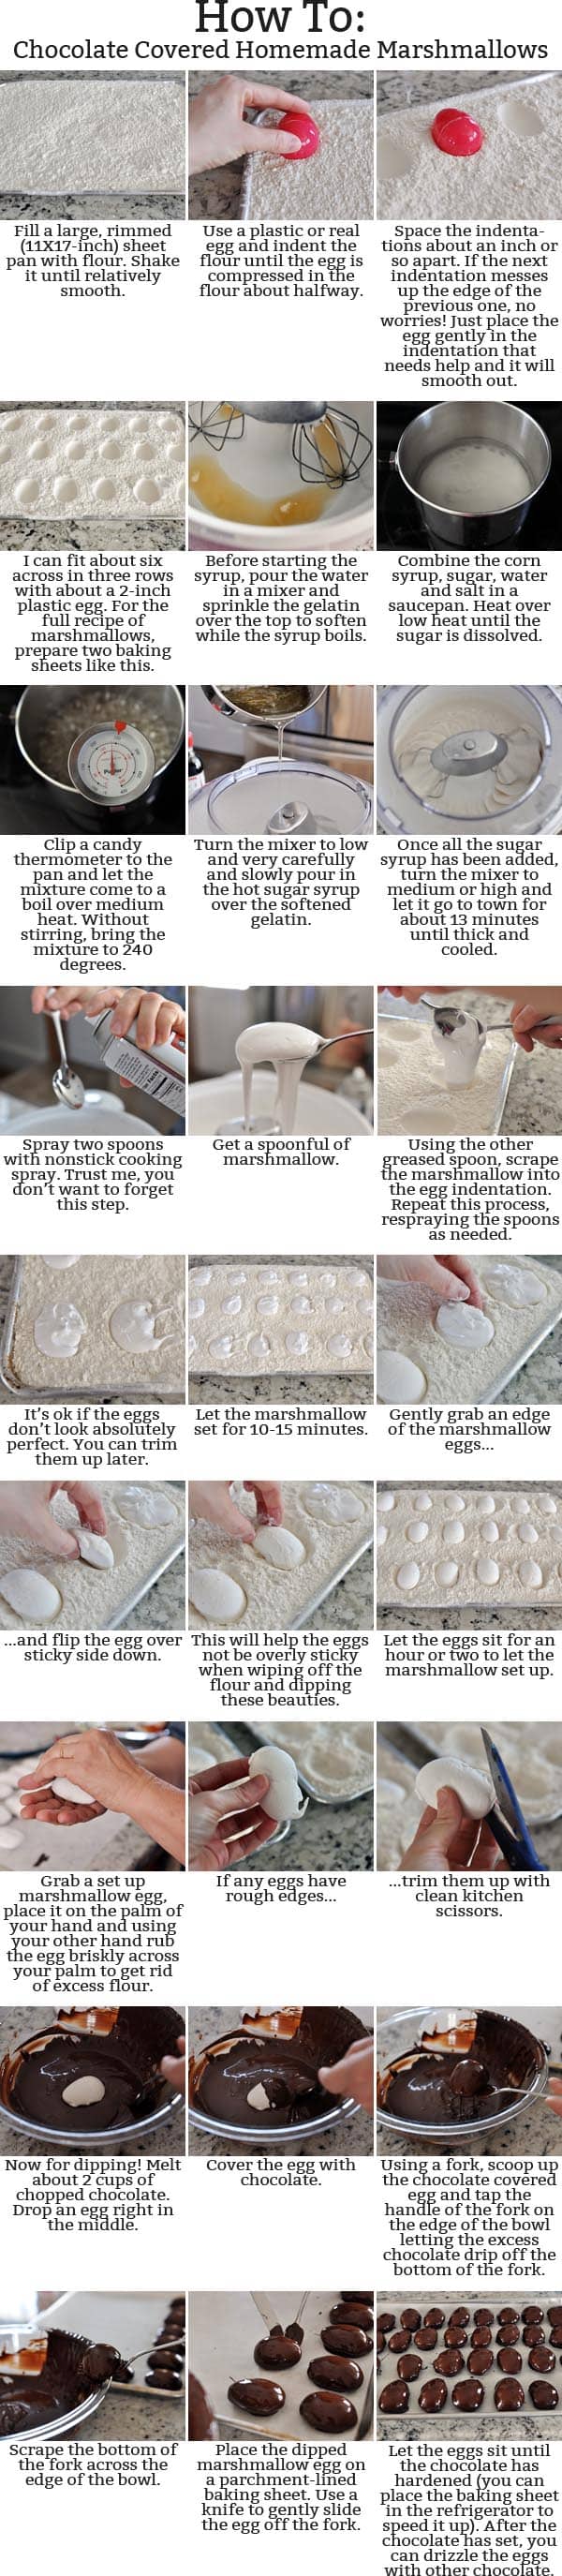
Because I love you and I don’t want you to be scared of this, I have a whole in-depth picture tutorial below (thanks to my lovely mom for being the hand model for this post).
But really, you probably don’t even need it. They are so simple.
If you can press egg shapes into flour, use a mixer to whip up marshmallows, and have the patience not to curse when strings of marshmallow may or may not end up in your hair, you are good to go.
Homemade marshmallows! Egg shaped! Covered in chocolate! It totally needs to be your thing this week.

Homemade Marshmallow Easter Eggs
Ingredients
Marshmallows:
- ½ cup cold water
- 3 envelopes unflavored gelatin
- 1 ½ cups (318 g) granulated sugar
- 1 cup light corn syrup
- ½ cup water
- ¼ teaspoon salt
- 1 tablespoon pure vanilla extract
Other:
- Lots of all-purpose flour
- 2 cups (340 g) chopped chocolate or good-quality chocolate chips for dipping
- Sprinkles or colored chocolate wafers for drizzling
Instructions
- To start, fill two large, rimmed baking sheets (11X17-inch) with flour, shaking to get a mostly even layer. Using a plastic Easter egg (you can also use a real egg or other egg-shape object for the mold), press lightly into the flour to make egg molds. Space the indentations about 1-2 inches apart. If the next indentation messes up the sides of the first indentation, don’t stress. Simply press the egg shape lightly into each indentation that needs the edges fixed a bit. Using a 2-inch (in length) plastic egg, I make about 6 indentations across in 3 rows for a total of 18 indentations for each sheet pan. Set the sheet pans carefully aside.
- For the marshmallows, pour the cold water into the bowl of an electric stand mixer fitted with the whisk attachment (you can do this without a stand mixer, but you’ll need to use an electric handheld mixer that won’t burn out after 10 or so minutes of mixing) and sprinkle the gelatin over the top, letting it soften.
- While the gelatin softens, combine the sugar, corn syrup, water, and salt in a medium saucepan and heat over medium-low heat until the sugar dissolves. Clip a candy thermometer to the side of the pan and increase the heat to medium. Let the mixture come to a boil and continue cooking without stirring until the syrup reaches 240 degrees F on the thermometer.
- Turn the mixer to low speed and (carefully!) pour the hot syrup into the mixer in a slow and steady stream. Once it has all been added, turn the mixer to medium or high and let the mixer whip the mixture for 10-13 minutes, until the mixture is cooled and is thick and fluffy. You don’t want it to mix quite as much as when making marshmallows that will be poured into a pan to later be cut into squares. The mixture should be slightly softer than that so that it molds to the egg indentations made in the flour. Mix in the vanilla extract.
- Grease two spoons with cooking spray and carefully scoop spoonfuls of the marshmallow mixture into the indentations in the flour (see the pictures below, if needed). Once all the egg molds are filled with marshmallow, let them sit for 10-15 minutes.
- Once slightly set, gently lift an edge of the marshmallow and carefully flip over so it is now sticky-side down in the flour. Don’t press on it or push it into the flour, just let it gently sit on the top of the flour.
- Let the marshmallows set for 1-2 hours (or up to overnight – covered loosely with plastic wrap).
- Take each marshmallow egg and rub it briskly with the palms of your hands to remove any excess flour. It’s ok if there is still a very light coating of flour on the egg – it won’t be noticeable after the egg is covered in chocolate. All the excess flour can be poured right back into the flour bag/container.
- Melt the chocolate over low heat or in the microwave on 50% power in 1-minute increments until melted and smooth. To prevent blooming (the white streaks in chocolate after it has set), stir in a bit of reserved finely chopped chocolate into the hot, melted chocolate to lower the temperature just a bit.
- One by one, drop a marshmallow egg into the chocolate. Using a fork, cover the egg in chocolate. Lift the egg up onto the fork and tap the handle of the fork on the edge of the bowl to let the excess chocolate fall through the tines of the fork into the bowl. Gently scrape the bottom of the fork on the edge of the bowl and then transfer the egg to a parchment or wax paper lined baking sheet, using the edge of a butter knife to help slide the egg off the fork onto the parchment.
- Repeat with the remaining eggs. If using sprinkles, toss them lightly on the eggs while still wet with chocolate. Place the eggs in the refrigerator to let the chocolate set. After the chocolate has set, colored melting wafers or other chocolate can be drizzled over the eggs.
- Store in the refrigerator for up to a week.
Notes
Recommended Products
Recipe Source: adapted slightly from my Aunt Laurie (who is famous for her chocolate-covered marshmallow eggs!), marshmallow recipe from Ina Garten
I made these for Easter, and my family now thinks I am a rockstar! (Thanks) I would love to know how to make regular marshmallows for backyard campfires… What would you do differently and how would you store them?
Hi Stacey – if you want to make regular marshmallows, whip the mixture a couple minutes longer, then generously dust a 9X9-inch pan with powdered sugar. Scrape the marshmallow mixture into the pan and dust the top with powdered sugar. Let it set for about 4-5 hours before cutting into squares (I find greasing a pair of kitchen scissors works the very best for cutting them apart).
I’ve wanted to make marshmallows for so long but have been intimidated. Made these this weekend with my 5 and 10 year old girls and it was so fun! They were super easy and not near as messy as I expected…the flour was the messiest part! Thanks for the step by step tutorial and the courage to finally tackle these. They were delicious and that’s coming from an anti-marshmallow gal!
For those trying to make candy at higher altitudes…be forewarned that you probably need to adjust the target temperature. Water boils at 212F at sea level, but with my older candy thermometer, water boils at 204F at my house, so I lop off 8 degrees from candy recipes unless I know it is from someone at my altitude (approx. 4500 ft). Also, I have two thermometers, and the second one regsisters boiling water at 206, so I keep a note on my fridge during Christmas candy making to take 8 degrees off with the old thermometer and 6 off with the new. :-). Action item for you? Boil some water and get a reading of the temp with your thermometer and adjust recommended candy temps accordingly.
I’m so bummed! I tried making these but my syrup burned. 240 degrees is way too hot apparently. I had my stove on the temp you mentioned, I was following this recipe to the letter. Any suggestions? At this point I won’t make them now till next year.
Hi Jill – it sounds to me like your candy thermometer may be off. That isn’t uncommon – I like to check my candy thermometer every once in a while in boiling water just to make sure the temp is reading correctly (and if not, just make a note on the thermometer to adjust accordingly). Like Holly said above, water boils at different temperatures based on where you live…but if your candy thermometer registers 210 at boiling (instead of the standard 212), then you’d want to boil this marshmallow sugar syrup to 238 instead of 240. That’s an example of how you could adjust your thermometer. Sorry this didn’t work out for you!
I made these last night for Easter weekend, intended to be my childrens’ main Easter candy, in an effort to scale back on the loads of candy I usually buy for my children each year. Instead of baskets of junk to consume, we now have a table graced with these lovely sprinkle-covered, chocolate-coated marshmallow eggs. They are delicious and beautiful. They took a bit of time but no step was too difficult. I even tempered the chocolate.
I made these today with my kids 7 and 4. It was pretty messy (as expected.) My eggs aren’t near as pretty as yours (as expected.) They tasted great and we had so much fun. We shared some with our neighbors. This may be a new tradition. This was my first time making marshmallows and it is really doable thanks for all the steps. I do think the 10 minutes I beat the marshmallows was too long. They were not very cooperative going in the egg impressions. I was surprised how well the flour molds worked even being made by my kids. Thanks for this great tutorial.
How do you like using your Bosch for marshmallows? I always make marshmallows in my Kitchenaid and never even thought to use the Bosch until I saw your pictures. But, my KA always slows down after a few minutes, and I worry about it overheating…
Also, for anyone wondering, I made a few marshmallow eggs in a pie plate with a cornstarch and powdered sugar mixture (like what I usually roll marshmallows in) to make some gluten free, and it worked really well! The only problem is that it uses so much. I put the leftover mixture in a bag for next time I make marshmallows. Using one or the other would probably work as well.
Hi Becca – I have virtually no experience using a KitchenAid – I only have a Bosch so I guess all I can say is I love it for marshmallows! 🙂 Thanks for the tip on the cornstarch/powdered egg mixture – glad it worked out well!
I do have one tip: don’t double a batch of marshmallows in the Bosch unless you want to melt the plastic collar of the whisk attachment…oops.
Oh no!
Just made these and they turned out so well. I’m so happy with the results. A few things that we did that I thought could be helpful were that we put ice packs on the side of the mixing bowl to help it cool faster. We only had to whip the mixture for less than 5 minutes before it was thick and fluffy. And we lined the baking sheets with parchment before we put the flour in them. This made for easy clean up and then we used the same parchment to put the eggs on after they were dipped in chocolate. Thanks so much for the recipe. My kids and I had a blast making them! Happy Easter!
oops — just needed to go to the next page — vanilla added! 🙂 We are half way through making them and having such fun!! Thanks!
When do I add the vanilla? before I boil the mixture? to the gelatin?
Bethany, that was a good description of what I smelled as well. I hope that’s normal.
I am making these as we speak. This is my first time to use gelatin, and I’m noticing a strange smell. To be honest, it smells like puppy pee. Is it supposed to have that gamy smell, or has my gelatin gone bad?? Thanks for your help!
Bethany (and Barbara) – some brands of gelatin definitely have more of a smell to them than others so I wouldn’t be worried about the gelatin being rancid or anything. I’ve found that some natural food stores (like Trader Joe’s) have unflavored gelatin that doesn’t have that same type of smell, although where I live, I definitely don’t have access to gelatin options and usually use the Knox brand (which has a bit of a smell, especially noticeable if you haven’t used it a lot).
I made these today, and they are tasty! I have a kitchenaid stand mixer, and it must be a lot more powerful than the bosh. I whipped it for about 7 minutes, but it was probably done after just 5 or 6. My marshmallows were a little lumpy since it was too thick and with all of the extra air I ended up with 52! Thankfully white chocolate drizzles and Easter sprinkles hide most of the imperfections and they are still nice. I love the idea, and the taste, though next year I’m tempted to just make them into squares and add the festivity through sprinkles and colored melts. I think that would save half my time and much of the mess. What a great idea!
I made these yesterday, and they are great! I’ve never made marshmallows before, so it was a whole new experience. A couple things I would do differently next time:
I thought 1 T of vanilla in the marshmallows was WAY too much, at least for marshmallows that were being dipped in chocolate–they taste very strongly of vanilla. Next time, I’ll probably use a scant teaspoon.
When I made Mel’s thin mint cookies over Christmas, I dipped them in melted chocolate chips, which worked well, but the chocolate layer was pretty thick. For these, I used melted baking chocolate (being oh so careful not to overheat it so my eggs didn’t bloom!), and while they turned out beautifully, the chocolate layer is much thinner than I was expecting. I would ideally like a higher chocolate-to-marshmallow ratio, so next time I might try using chocolate chips again (even though they’re not technically made for use as dipping chocolate).
Anyone have any other suggestions on how to get a thicker chocolate shell?
my life in tune – you could always try double dipping them!
You just made my decision of what to make for Easter SO much harder! Maybe I’ll make multiple desserts! Love love love home made marshmallows!
These look a lot like tea cakes in England, only the ones in England have biscuit at the bottom and some even have a little jam inside too. they were my favourite confectionery before I moved to the states.
Can you double the recipe? This might make enough for me but if I wanted to be generous and give some away…. 😉
Jamie – Absolutely – just make sure you have enough baking pans filled with flour for the eggs.
I learned how to make these in my high school foods class, and totally forgot about them until this very moment. You have inspired me to do it this week for my kiddoes! And everyone, if a high school kid can do it, so you can you! (p.s. we put food coloring in ours way back in the day. Kind of fun to see pink marshmallow under your chocolate.)
My husband LOVES chocolate covered marshmallows. I have always wondered how to make them. I suprised him when he got home from work with these beauties and he was thrilled! Thanks so much for posting! And I also agree that your photography is outstanding!
Hey Mel, these look so fun! I’ve made homemade marshmallow before and I may or may not have just eaten it directly out of the bowl when I was done…
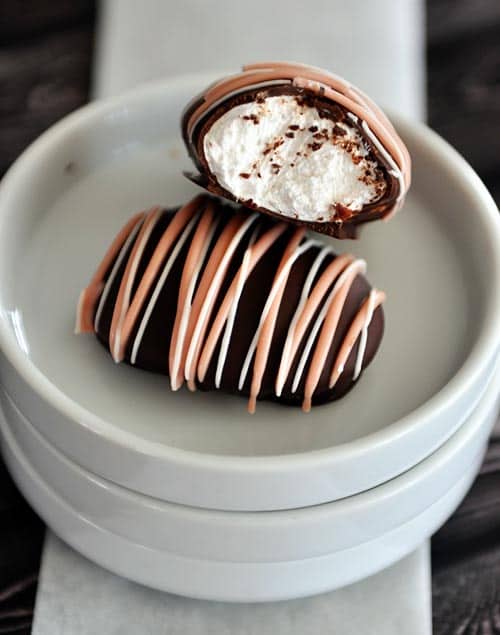
Anyway, what is the pinkish drizzle on the finished eggs in your pictures? I’m assuming the white drizzle is melted white chocolate.
Thanks!
Hi Cameron – the white drizzle is melted white chocolate and the pink drizzle is some pink Wilton candy melts I had in my pantry (don’t ask me how old they are – ancient – but they still melted and gave the eggs nice decoration!).
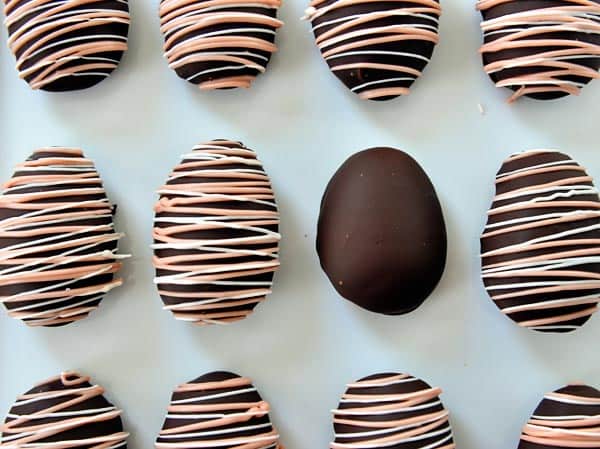
The photo with the 12 eggs—-11 of them with drizzles—and 1 without drizzle—you should send that photo into one of those food photo sites that specializes in outstanding photography (isn’t Food Gawker one of those sites?)—because that photograph is just amazing.
Thanks, Becca – that was so nice to say!
Oh! This looks like so much fun!
One of my favorite easter candies are the Elmer’s brand Heavenly Hash eggs, with a roasted almond in each candy. For these, I think I’d just sprinkle the marshmallow with chopped up nuts, or maybe stir them in before forming the eggs?
I do think I’d use cornstarch. I’ve seen other candy recipes that use it, and seen the way candy companies do the same thing (forming gummie bears, for example), so for me, I think it’s the way to go.
I think I need you to come to Arkansas and move in. Awkward? Nah, we’ll be too busy eating homemade chocolate covered marshmallows to feel weird.
Ok I might attempt this fri with the kids. No school but I ama little scared. PS. I lived in Rexburg. Love that town. Met my husband there and had my first baby there. Going back for the first time in 5 years!
I totally felt the need to make these but had no idea how to do it. Thanks for making this photo tutorial so I can feel like a pro.
How cute and fun are these? Mel- every time I think you have blown me away with a recipe you do it again! 🙂
Wow! Those look fantastic! And you have made it look incredibly easy! Thank you.
I have always wanted to try making homemade marshmallows, and this tutorial might be the first time I actually do it! Making the egg molds in the flour is so smart – I never would have thought of it on my own. Thanks for the fun, seasonally appropriate idea!
I love your recipes and so does my family! I was going to make your hot fudge sauce for end-of-the year gifts for teachers at church. I pinned the link but now it says that it can’t find it on your site. And I searched your site and the same thing comes up. Is it possible for you to email it to me or maybe is there a different link. Thank you and have a great day!
Here you go Kim – http://www.melskitchencafe.com/hot-fudge-sauce/
The link issues should be fixed shortly!
I am thinking of buying a candy thermometer just for these. They look amazing. Do you have any idea what kind of shelf life they have? Thanks!
my life in tune – I’ve only stored them in the refrigerator (they last 1-2 weeks) but as far as room temperature, I’m not sure. They taste much better chilled in my opinion but I’m guessing you could keep them well-covered at room temp for a couple of days.
Those look so cool! I don’t like marshmallows, but homemade marshmallows?! You are such a rock star!
These look great! Do you think you would be able to use a deviled egg serving tray as the mold? I was thinking if you sifted flour over the deviled egg tray and then after the marshmallows set, sifted flour over the other side it might work as well. I think my kids might enjoy doing this, but I just see that much flour as a gigantic mess the matter how careful we are.
Erin – oh, totally! I’ve actually never used a deviled egg serving tray but I think it’s definitely worth a try. Just make sure there’s enough dusting so the marshmallow doesn’t stick!
Hi Mel! This looks great and I definitely want to try these with my kids. Can you convert the 3 envelopes of gelatin to ounces for me? I buy unflavored gelatin in bulk…
Hi Stacey – good question. I just looked it up online and one envelope of gelatin is 7 grams or 2 1/2 teaspoons. So for this recipe, it would be 7 1/2 teaspoons (or 2 tablespoons + 1 1/2 teaspoons) gelatin. Hope that helps!
For those looking to avoid GMOs, you can get organic light corn syrup. I’ve used it to make peanut butter krispie treats, and it has a lovely light vanilla taste. I pick it up at Whole Foods, as it is the only store in the area that carries it. It is one of the more expense baking products, but for 1x, 2x a year baking, I don’t mind splurging.
These look amazing and will be trying them!!!!
Looks amazing! You are very patient to try something like this with your kids.
Would it be possible to fix the link to the BBQ Turkey Quesadillas? My kids go nuts over these – I use chicken instead – and I want to share the recipe with a friend. Thank you!
Hey Becky – my links are having a few issues right now but I’m working to get them resolved ASAP. In the meantime, you can use this link:
http://www.melskitchencafe.com/2010/11/bbq-turkey-quesadillas/
Can you stir the sugar and water mixture while the sugar is dissolving? I’ve found that stirring helps mine to dissolve all the way.
fmandds – sure, just stir gently and stop stirring when it comes to a boil.
so fun!!!
Wow! These look like they would be incredible. I never in a million years would have thought of using flour as a mold. That is genius. It’s good to know the flour can be reused and not wasted.
My granddaughter is still too young to be involved in making these (only 4 months) but you can bet I will be doing this with her in the future. Thanks for the great post!
How cool! I would like these as much as my kids!
I’m totally doing this and earning fun mom points 🙂
This is insane! These are my absolute favorite Easter candy and you just made them!! I know I won’t be attempting them this year but I may hold onto this recipe for many years in case i get the time to do so at some point. Mmmmm marshmallow eggs…. 🙂 Thanks for all the pictures!!
Thanks! My kids don’t have school on Good Friday and I’ve been trying to come up with something super fun to do with them. Thanks for solving our dilemma!
These look awesome. My mom made these for me several times in my youth-I need to make them with my kiddos! Thanks for the reminder 🙂 Everything you do is fabulous!
My husband is a big marshmallow chocolate fan so I tried these quite a few years ago and you are right. They are way better than ANYTHING you can buy in the store! You need to try homemade marshmallows just poured into a pan, then cut them into squares to be served in hot chocolate. YUM! I cut them into strips and rol them into flour as I cut. Thanks for all the fun and delicious ideas!
I wish my children were still little so we could make these eggs together! Oh well. I think I’ll practice making them anyway so I’ll be able to make them with future grandchildren. The picture tutorial is great. Thanks!
So cute! And your method is SO much easier than how I’ve made marshmallows in the past. I’m excited to try this!
What a wonderful idea! I have been loving your recipes, pictures, tutorials….everything really! I can’wait to make these with my niece and nephew. They are young, so I will get everything ready and then just give them sprinkles and such to decorate their eggs. Wouldn’t these marshmallow eggs be wonderful to entertain children with on Easter! Wow! Thank you so much for the idea!
L
I have been obsessed with Easter baking lately. I made cheesecake Easter eggs, but these marshmallow ones are next on my list!
http://jenniferbakes.blogspot.ie/2014/04/mini-cheesecake-easter-eggs.html#.U0uhfMfg8ig
Looks delightful! And you definitely are a rock star, Mel!