Red Velvet Cheesecake Cake
Talk about a knock-your-socks-off, decadent, show stopping holiday dessert. This red velvet cheesecake cake is outrageously delicious!
Talk about a knock-your-socks-off, decadent, show stopping holiday dessert. This red velvet cheesecake is outrageous!
I’ve been wanting to recreate the Junior’s version after seeing a picture of Junior’s original red velvet cheesecake repinned close to 2,000 times on Pinterest.
It is probably one of the most beautiful desserts I’ve ever seen and since I’ve already ventured into chocolate chip cookie dough cheesecake and brownie cheesecake and chocolate cheesecake and pomegranate cheesecake (I told you we were lovers of cheesecake), it was high time I figured out a red velvet version.
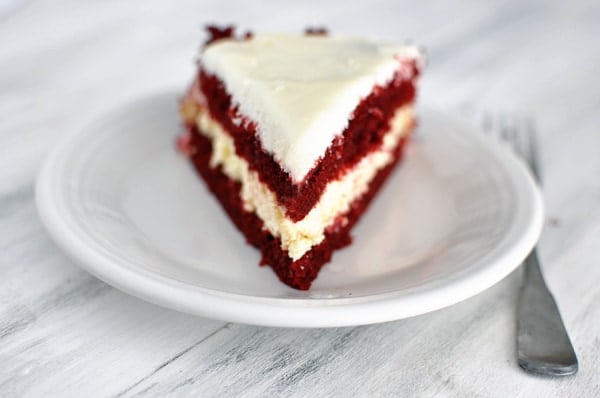
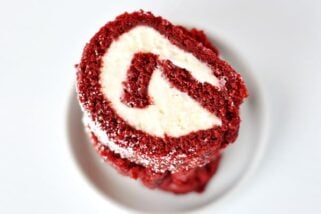
This recipe is a bit deceiving. It isn’t entirely made of cheesecake.
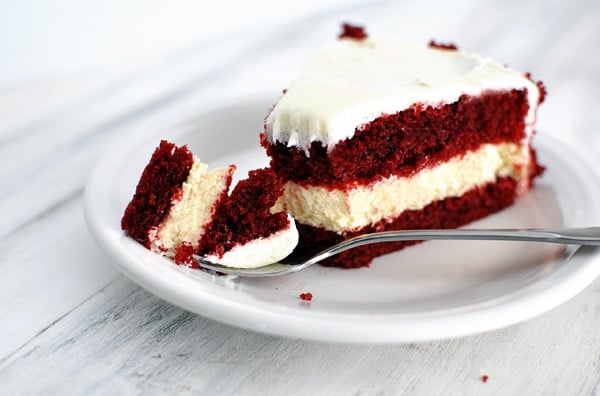
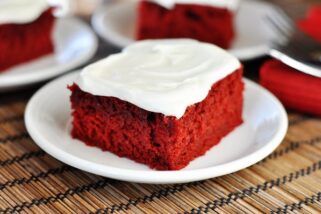
Instead, layers of red velvet cake sandwich a creamy, luxurious layer of baked cheesecake (which might look like frosting to the unsuspecting eye) and the entire confection is smothered in swirls of cream cheese frosting and red velvet cake crumbs. There is all sorts of red velvet cream cheese love going on here.
While it may look intimidating to make, it really isn’t.
I whipped this up on a Saturday morning and because each of the components can be made separately and independent of each other (it all gets assembled at the end), I just popped in and out of the kitchen as needed.
Of course, it helped that the temps were sub-zero that day and I could use my back porch as a resting spot for the baked cheesecake. It was cooled and frozen in approximately 28 seconds. Stop being jealous.
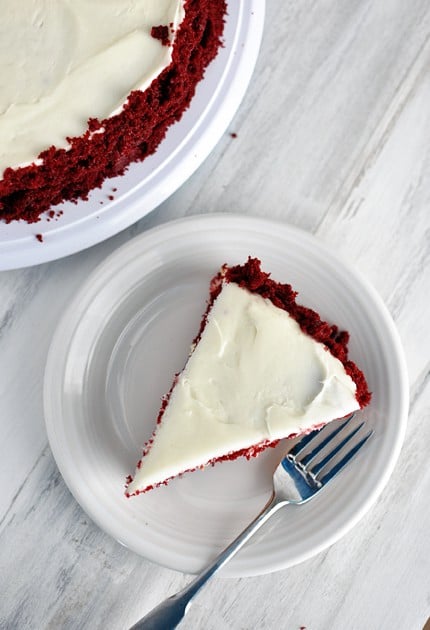
This cake is ridiculously appealing – both in looks and taste.
The fact that I couldn’t narrow down the pictures to less than four to use in this post should indicate how in love I am with it.
While my finished version doesn’t look exactly like the original, I’m still pleased with the result because after one bite, I forgot all else. Taste is what really matters, right?
Red Velvet Cheesecake Cake
Ingredients
Cheesecake Layer:
- 2 packages (8-ounces each) (454 g) cream cheese, at room temperature
- ⅔ cup (141 g) granulated sugar
- Pinch of salt
- 2 large eggs
- ⅓ cup (75 g) sour cream
- ⅓ cup heavy whipping cream
- 1 teaspoon vanilla extract
Red Velvet Cake Layer:
- 2 ½ cups (355 g) all purpose flour
- 1 ½ cups (318 g) granulated sugar
- 3 tablespoons natural unsweetened cocoa powder (not Dutch-process)
- 1 ½ teaspoons baking soda
- 1 teaspoon salt
- 2 large eggs, at room temperature
- 1 ½ cups vegetable or canola oil
- 1 cup buttermilk
- ¼ cup two 1-ounce bottles red food coloring
- 2 teaspoons vanilla extract
- 2 teaspoons white vinegar
Cream Cheese Frosting:
- 2 packages (8-ounces each) (454 g) cream cheese, at room temperature
- ½ cup (113 g) butter, at room temperature
- 1 teaspoon vanilla extract
- 2 ½ cups (285 g) powdered sugar
Instructions
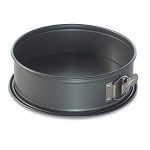
- Make the cheesecake layer first so it has time to chill while the cake and frosting are being prepared. Preheat the oven to 325 degrees F. Lightly coat a 9-inch springform pan with nonstick spray. In a large bowl with a handheld electric mixer or in the bowl of an electric stand mixer, whip the cream cheese until it is smooth and creamy. Mix in the sugar and salt and blend for 2 minutes, scraping down the sides of the bowl as needed. Add the eggs, one at a time, blending after each addition. Mix in the sour cream, whipping cream and vanilla and beat until smooth. Don’t overbeat – just mix until smooth and creamy. Pour the batter into the prepared pan. Bake the cheesecake for 40-45 minutes until it is set and not jiggly in the middle. Remove the cheesecake from the oven and let it rest on a wire rack until completely cooled. Wrap the pan in foil and place the cooled cheesecake in the freezer until ready to assemble.
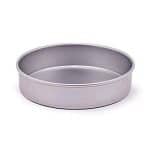
- For the red velvet cake, preheat the oven to 350 degrees F. Grease and flour two 9-inch round metal baking pans. In a large bowl, whisk together the flour, sugar, cocoa powder, baking soda and salt. Make a well in the center of the dry ingredients and add the eggs, oil, buttermilk, food coloring, vanilla and vinegar. Whisk until fully combined, and continue whisking for another minute or two until the batter is thick and smooth, scraping down the sides as necessary. Spread the batter evenly into the prepared pans, dividing equally. Bake for 28-30 minutes, until a toothpick inserted in the center comes out with a few moist crumbs attached (don’t overbake or the cake layers will be dry). Let the cakes cool in the pans for 5-10 minutes. Run a knife around the edge of the pans, then invert cakes onto a piece of parchment or wax paper set on a cooling rack. Let them cool completely.
- Prepare the frosting, by whipping the cream cheese with an electric handheld mixer in a large bowl or in the bowl of an electric stand mixer until smooth and creamy. Add the butter and vanilla and mix. Gradually add the powdered sugar and mix on high speed until it is light and fluffy and creamy.
- To assemble, cut each of the cake layers in half to form two thinner cake layers (so you’ll have four thin cake layers total). Place one of the bottom halves in the middle of a serving platter or cake plate. Remove the cheesecake from the freezer. Gently loosen it from the sides and bottom of the pan with a flat knife/spatula that has been run through hot water (this will help loosen it from the pan). When removed, lay the cheesecake layer on top of the red velvet cake layer on the serving plate. Place another red velvet cake layer on top of the cheesecake. Try to choose the layers that are the flattest on top and bottom so that the cake, when frosted, doesn’t tilt or look like it is uneven. Crumble the remaining two cake layers into small crumbs and set aside.
- Frost the cake by scooping dollops of the frosting on top of the cake and using an offset spatula, spread the frosting over the tops and sides. The sides will be covered up with cake crumbs so they don’t need to be perfectly frosted – just make sure there is an even layer of frosting so the cake crumbs can adhere to the cake. Swirl the frosting across the top. Carefully gather handfuls of cake crumbs and press them into the sides of the cake. You’ll have a mess, but don’t worry, it is easy to gently sweep the fallen cake crumbs out of the way. Keep pressing them to the sides until the entire perimeter of the cake is completely covered.
- Cover the cake lightly (or else the cake crumbs on the side will dry out) and refrigerate until ready to serve. The cake can be made up to two days in advance and chilled until serving.
Notes
Recommended Products
Recipe Source: cheesecake, cake and frosting adapted from a recipe spied on Recipe Girl, method is my own to mimic the pictures I’ve seen online of Junior’s Red Velvet Cheesecake Cake
My son requested a red velvet cake for his birthday and I found this recipe. It had rave reviews from all of our guests and my son was extremely pleased!
I’m glad this worked out so well. Thanks for letting me know!
Hey, what do you do if the cheesecake doesn’t come out of the oven flat? Do you cut it flat to help with stacking?
Yes, you can trim the top so it is flat.
We don’t have any springform pans. Could we cook the cheesecake layer in a normal 9 inch cake pan?
I think so! It might be harder to get it out in one piece so maybe lining the bottom of the pan with parchment might help!
I made this recipe with the dollop method like your carrot cake cheesecake recipe. My spring pan is 10”, so I didn’t want to cut down a 10” cheesecake to fit the 9” red velvet cakes. 45 min at 350 and it came out great! The red velvet cake rose a little higher than the cheesecake, but I covered that with the frosting. Also, I didn’t half the recipes (there’s no way I’d figure that out), but I did use half of each.
I made the Red Velvet Cheesecake Cake today and it was delicious. I will be making it again for Christmas Eve. My kids ask where I get all of these great recipes and I say my friend Mel. I also made the pizza crust and pizza sauce today. The pizza turned out great. Keep up the good work.
Thanks, Ann!
Hi. Just wanted to know if I can half this recipie? As I don’t want too make too much just want to try it out as 4 packs of cream cheese sounds a bit too much however much cream cheese is awesome.
Sure, it’s worth a try.
Hi mel, is this recipe require a water bath while baking? Thanks
I just made this cake this morning for our Valentine dinner tonight. Oh my goodness, the cake is delicious. So moist and tender and nice flavor. Can’t wait to try the whole thing. Looks exactly like the picture! Will be malting this again for company! Thanks.
Hi Mel! Just discovered this recipe and looks wow!
Would like to know that if I bake the cake butter in just one pan would come out nice or how I have to do it because I don’t have so much pans
I’m afraid if all the batter went into one pan, it would overflow in your oven, unless you used a much larger pan.
I had been looking forward to this ever since it was posted. so today I’m making it for Sunday dinner and so far I am bummed. The cheesecake didn’t turn out for some reason. It was very eggy, curdly, custardy, I can’t salvage it. :(. The red velvet layers are in the oven right now, so hoping they turn out. I will just frost those layers and not tell anyone about the missing layer. I think it was probably something I did, though, b/cause I got interrupted several times, so who knows.
Sorry the cheesecake didn’t work out for you, Barb – hope the cake layers fared better.
Hi Mel- The red velvet cake layers were beautiful, moist and delicious. I frosted it in white and made marshmallow fondant designs of holly and red berries around it. It was the perfect Christmas cake and everyone loved it. I blame myself for the cheesecake layer failing. I got interruped alot, there were guys remodeling the porch, the dog kept barking, etc. I will give the cheesecake layer a second try when I am ALONE.(ha ha)
Hi Mel- I am trying this again this year. that’s how much we loved it. I am going to do the cheesecake layer ahead so I can concentrate and hopefully not make a mistake. It wasn’t the recipe- it was my sidetrackedness that went wrong last year. Have a great holiday season– Barb
humm…only the first 1/2 of my comment posted. anyway I use you for all my recipes! Would it be a horrible, terrible, very bad thing to make the cake part of this using a box mix? I have a crazy ton of parties coming up and I don’t know if “made from scratch” will fit in to the schedule every time…. but I’d hate to ruin it if it ‘s the only way 🙂 thanks for all you do!!
I haven’t tried it with a boxed mix, Crystal, so I don’t know if the quantities match up and things like that. Good luck experimenting if you try it!
Wow this looks awesome!! I love all your stuff, you are my only go to for entertaining recipes
Hey! This cake turned out so well! I reduced the quantity of sugar in the cake to just 1 cup and didnt make it with cheese cake but just the red velvet with cream cheese frosting. And man, it was delicious! Made it for a friend’s wedding anniversary and it as a hit! So moist n so so yummmmm!
I just made one change (don’t you just hate it when people make changes to your awesome recipe)? I just used the cake layers as is, and then only frosted the top of the cake . This way you don’t need to cut one cake layer in half, which can sometimes be tricky, and you don’t have to worry about crumbs getting hard on the side of the cake. You still see the beautiful color of the red velvet cake layers, and the cheesecake layer, with the frosting on top . Delicious !! I’m making it again for a Valentine’s Day party 🙂
Hi I would love to make this for my dad’s birthday but we’re having about 30 people over, should i make 2 separate cakes or just double the mixture?
Sarah – I would make two separate cakes.
I made this for my mom and she said it was one of the best thing she ever tasted
I made this for Christmas 2012………WOW! It was a HIT! Honey, Cheesecake Factory ain’t go nothin’ on this one in my opinion! My family loved it and I plan on making it again for Valentine’s Day!! Thank for sharing this one! IT WAS AND IS DELISH!!!
Kim in MD posted that she made a carrot cheesecake cake – anybody got the recipe for that?
Awesome recipe 🙂
I love a good cheesecake… Here’s a New York Cheesecake you might like to try.
New York Cheesecake Recipe
Thanks for sharing.
Katie
I made this for Christmas Day… it was AMAZING! I made the cheesecake about a week early and froze it. The rest I did the day before. I chose not to bring the leftovers to work so I could eat them all week 🙂
Dear Mel,
Thanks for making me look like a rockstar this Christmas! I made this cake (in addition to your Killer Brownies and Buttermilk Cinnamon Rolls) and it was a show stopper! Everyone loved it! I sent my husband to work with the last of the leftovers this morning. He started work at 8am and at 810 he called to say the cake had been devoured and one coworker even professed his love for me. (Jokes on him because it’s you he should love!) You make a visit to our dinner table at least 3-4x week. Thanks so much!!
Happy Holidays from Canada!
Ps. I am nick naming this cake the 5lb’er… This cake weighs a ton 🙂
I made this cake for Christmas. It looks awesome!!!! I hope it tastes as good as it looks. :). It was also super easy to make. I made it over 2 days so I didn’t have to go crazy making it all day!!! Thanks.
Red Velevet Cheesecake dake
Isn’t the red supposed to be from beets?
Ok-I just read it wrong! Crumble the other layers- or just eat them! Yum! Thanks for these delicious cheesecake recipes-will be having this one for Christmas dessert!
This looks out of this world! Wondering why 2 cake pans to make 4 layers-the picture shows 2 layers? Am I missing something? 1 layer of cheesecake-right?
I have a bride that wants a PURPLE velvet cake (instead of red velvet). Any ideas out there? So far, I am getting a nice muddy looking color. I offered to make a white chocolate cake in her favorite hue, but she’s not buying it.
I made this last week and it was amazing! So beautiful and delicious, too! It was gone the same day………..
Looks delicious and I can’t wait to try this! I was wondering how this would do as a cheesecake filled cupcake. Has anyone tried that?
I got so tempted by your photo I just have to pop in for a closer look! Now I am even more tempted! Super gorgeous and yummy looking!
I can probably make the whole cake for the price I pay for one slice at Cheesecake Factory. It’s one of my favorites! I am excited to try this.
this is pretty sinful and probably the only way i’d ever eat red velvet cake. 🙂
WOW! those pictures are so amazing! My husband would ask me to marry him again and have more children (because 5 children, including twins, are so not tiring) if I made this cake. It is still 74 here if you want to make one in my kitchen.
Melody – nope, this recipe is slightly different in quantities.
Mel,
I haven’t compared it yet, but is the cake part your same recipe for Red Velvet with the greek yogurt frosting? I have made that one before!
Good heavens friend! Love this!!
Looks wonderful. So one whole cake layer gets crumbed to cover the outer rim? I guess could halve the cake recipe
and omit the outer crumbing?
This looks AWESOME! I bought a similar cake from Sam’s for my birthday a week ago and was sadly disappointed in the taste (and the chemicals in it!). I’m glad to have this recipe because I WILL be making this soon.
This is AWESOME! I can’t wait to make it over the holidays! PERFECT! Thank you so much for your inspiration!!
Wow, this is one stunning cake! Red velvet is my favorite and sadly I don’t make it as often as I should. Using this recipe next time I decide to indulge. Thanks!
gorgeous and so festive! And it sounds absolutely divine! Two of my favorite things combined!
Oh my! It almost looks too good to eat (almost 🙂
It’s so pretty! And I’m happy to hear that it’s not too much work. I can only imagine how amazing this must be. I’ve got to try it at some point!
Totally one of our favorite cheesecakes at Cheesecake Factory – will be making this over the holiday break when my red velvet loving daughter is home!! Thanks Melanie!
This is such a beautiful dessert! And it sounds absolutely scrumptious. I love the idea of adding a cheesecake layer. If you are going to have cream cheese frosting, might as well go all out and add a layer of cheesecake!
Hi Mel! I love your recipes! I wanted to ask 2 things. Do you use red gel food coloring and if I freeze my cheesecake layer, how long would I thaw it for in the fridge?
I use liquid food coloring (but I’m sure you could use gel food coloring – you’ll need far less than the recipe calls for). If you freeze the cheesecake, thaw for 1-2 days in the fridge.
This looks amazing! so pretty.
Stunning! Seriously, this is one stunning dessert! I understand why you posted four photos of it! I know how delicous this is because I created a carrot cake cheesecake for my best friend’s birthday. The combination of the cake with the cheesecake was to die for!
Mel- sub-zero temps already? Yikes! Although I am a little jealous of your extra freezer space! 😉