My Favorite Cherry Pie in the History of Ever
No, really, this is the best cherry pie EVER. Nothing hard or secret about it – it’s a classic! Notes included in the recipe for using sour OR sweet cherries.
Cherry pie. It’s my favorite. It is the pie I can’t resist even when I’m already stuffed to the gills. I love the tart sweetness. The bursting cherries. The buttery, flaky pie crust.
There are other fruit pies that don’t hold my attention, but cherry pie has my whole heart.
A few years ago, I decided homemade cherry pie did not appear in my life as frequently as it should, and I resolved to change that by establishing it as a tradition. If it’s tradition, it has to happen right? So I decided every 4th of July (or within a week or so if we are traveling), we needed homemade cherry pie. (And let’s be honest, most Thanksgivings, too.)
It took me a few years to get this cherry pie perfectly perfect, but this is the version I’m sticking with forevermore. It’s straightforward. It’s simple. And the flavor is the best I’ve ever tasted (and trust me, I’ve eaten a lot of cherry pie in my day).
We are going to pretend I don’t already have a cherry pie recipe in the archives. That recipe is almost 10 years old; chalk it up to cherry pie maturity (and a decade of taste testing), but today’s recipe is 1,000 times better. Promise.
Homemade pie can seem really intimidating. I get it! It’s not exactly the quickest thing to whip up on your average Tuesday night. But if you plan a little time, work with fresh, delicious ingredients, and keep everything cold, cold, cold, you’re going to be making pie like a rock star before you know it.
I’m going to walk you through the steps of making this homemade cherry pie today. Not because it’s hard…but just because sometimes a visual how-to can make all the difference so you can go from “no way, not me, homemade pie is the devil” to “I think I’ve got this; oh yeah, I’VE GOT THIS!”
There’s a lot of information in this post. Read it. Absorb it. Think about it. Take some deep breaths. And then go make the best cherry pie of your life.
Pie Crust: Which is Best for Cherry Pie
I have a lot of pie crust tutorials/boot camps/lectures already on this site, so I’m not going to get into the nitty gritty of how to make pie dough on this post.
But I will say that for this cherry pie (and all other pies), I use one of two pie crust recipes:
- My favorite sour cream pie crust (video tutorial on this post)
- Perfect flaky pie crust (in-depth how-to make pie crust tutorial on this post)
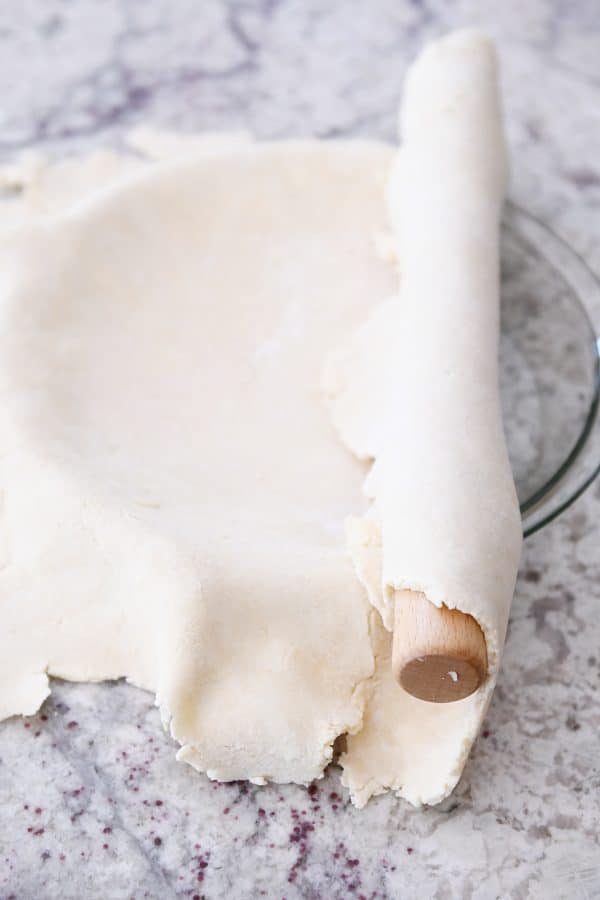
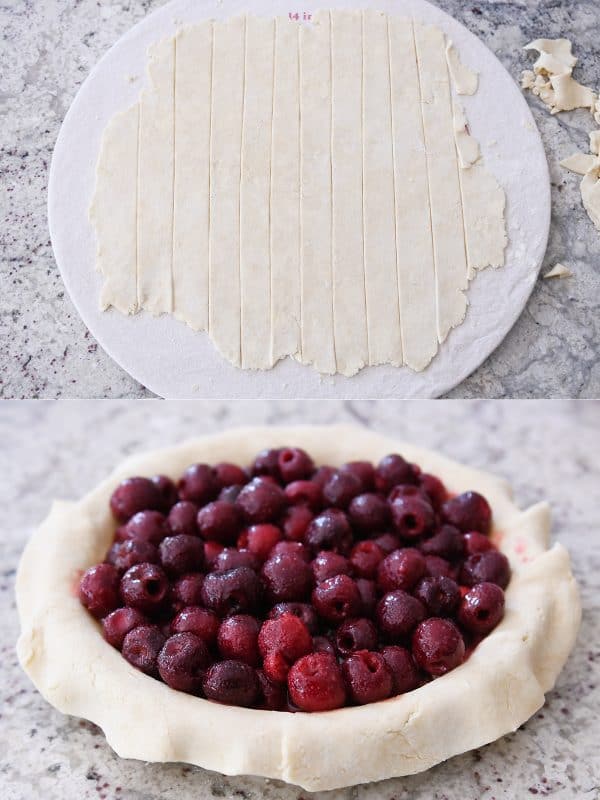
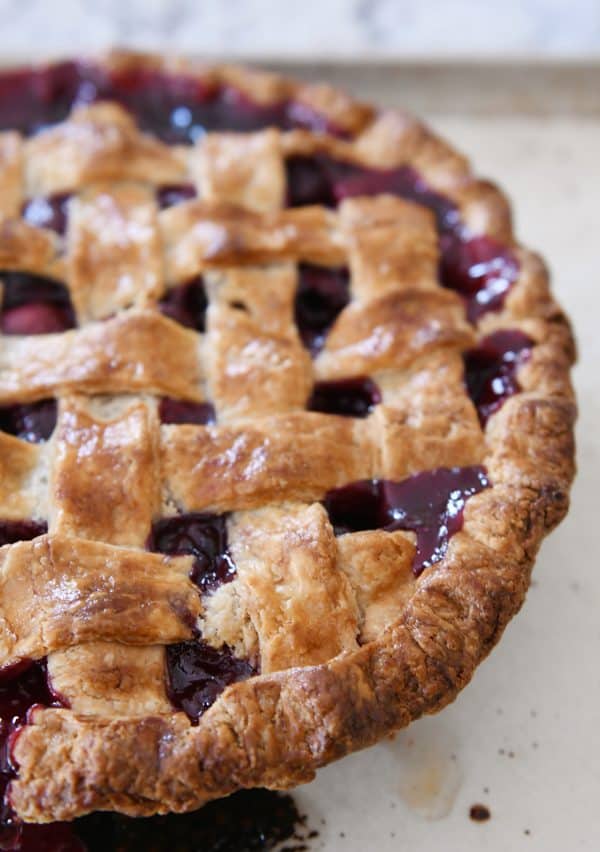
For the pictures in this post, I’m using the sour cream pie crust. The flavor and tenderness and flakiness is so, so good. To get started, you’ll want to roll the bottom crust to about 12-inches in diameter and gently place in the bottom of a 9-inch pie plate. Trim the dough leaving 1/4-inch excess beyond the rim of the pie plate.
Sweet cherries vs. sour cherries
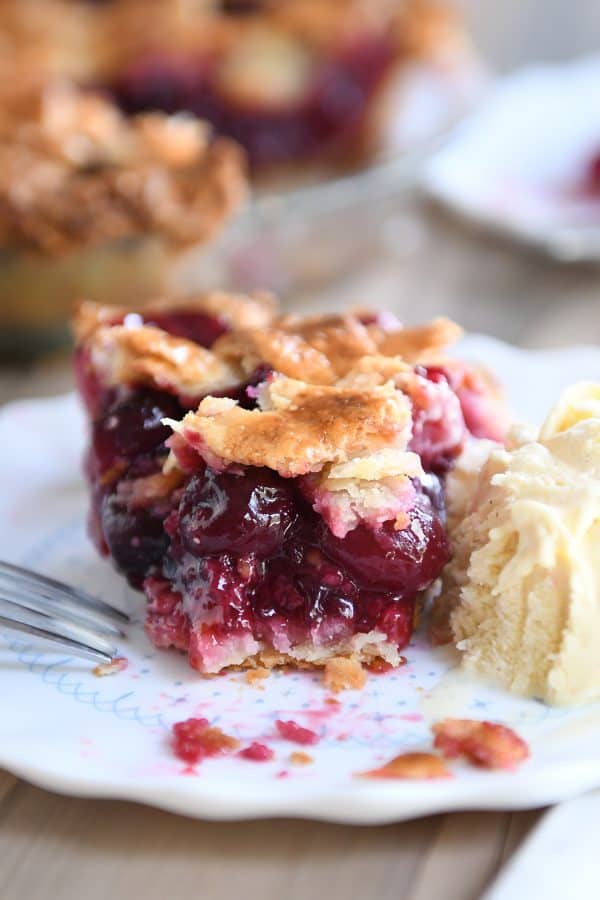
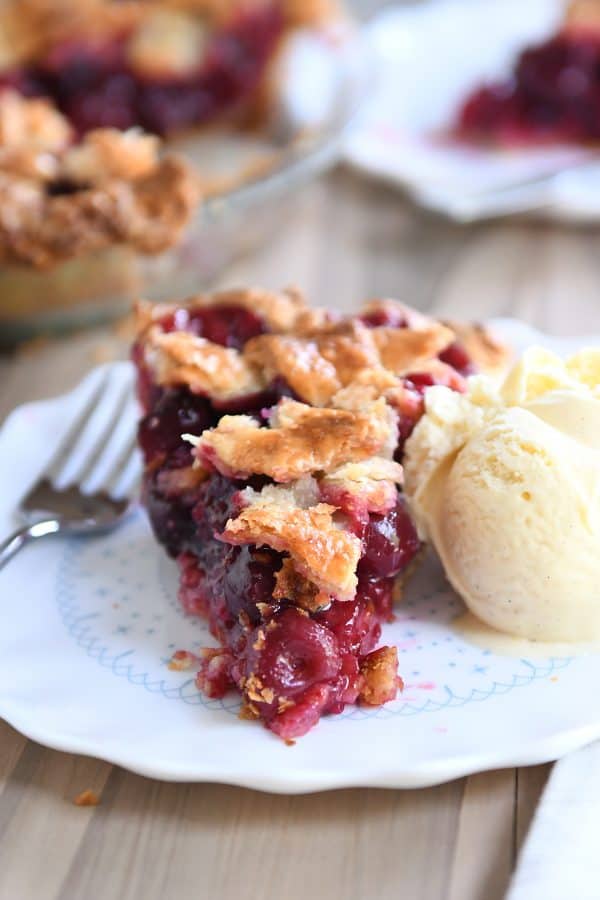
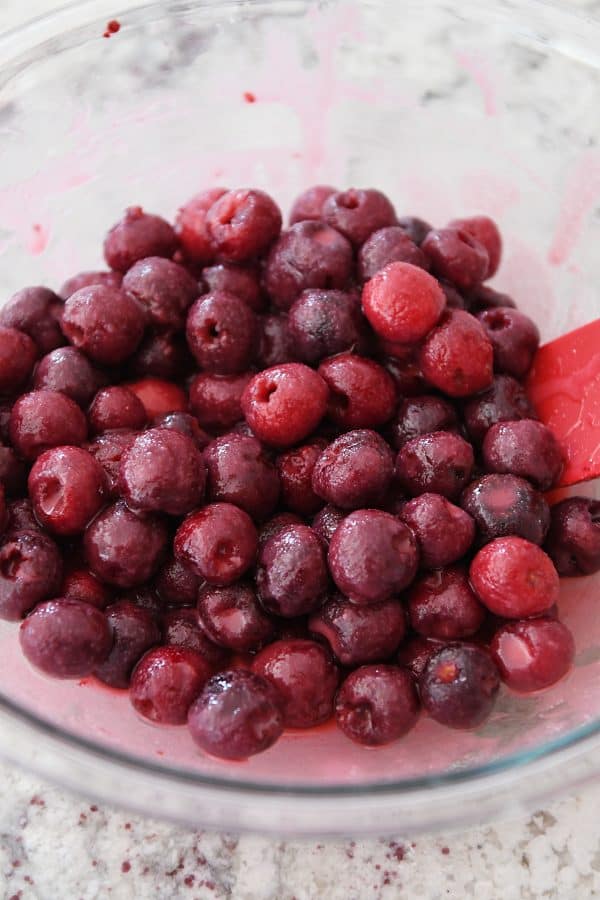
Homemade cherry pie filling! Could life get any better?
I include many of these same details below in the recipe, but I’ll outline them here, too:
- I’ve tested this recipe using sweet, dark cherries. The sugar level in the recipe is counting on the cherries being perfectly ripe and naturally sweet. If the dark cherries you are using are on the tart side, you might want to increase the sugar just a bit.
- I haven’t tried Rainier cherries, although they usually substitute really well for dark cherries in terms of sweetness and flavor.
- I also haven’t used sour pie cherries because they are rather hard to find fresh where I live (and the canned varieties scare me off a little because, hello, mushy cherries).
The good news is, I hear it’s pretty darn easy to convert a cherry pie from using sweet, dark cherries to sour pie cherries.
To substitute sour pie cherries, try, decreasing the lemon juice to 1 teaspoon (don’t leave it out completely) and increase the sugar to 1 cup (or slightly more, depending on how sweet you want the pie).
Can I use frozen cherries for cherry pie?
I haven’t tried frozen cherries (yet!), but I think they could be used with pretty good results as long as they are thawed and very well drained before using. They might be a tad bit softer after the pie is baked – but if they are good quality prior to freezing, chances are, it stands a good chance of working.
The filling of this cherry pie recipe is as simple as combining all the ingredients together in a bowl and letting it hang out while you get the pie crust in the pie plate. We have a lot of u-pick cherry farms near us; maybe that’s what’s increased my love for cherry pie? Very possibly.
Pie Filling Thickeners: A Million Opinions
You can bet just about every homemade pie maker has a pretty strong opinion about what should be used to thicken the filling. Flour. Cornstarch. Tapioca. Clearjel. Fasting and prayer.
I’m not out to make enemies over the subject, but after loads of testing (and so.many.cherry.pies), I stand firmly by the recipe below. I’m not saying this thickener lineup should be used for every fruit pie ever made, but for this cherry pie, it’s money.
Tapioca flour/starch + a little bit of cornstarch. The combination creates a perfectly set cherry pie filling that isn’t cloudy or glumpy with weird gelatinous blogs hanging around.
I know tapioca flour isn’t the most common pantry ingredient in the world (we happen keep it on hand 24/7 for this Brazilian cheese bread that gets made at least weekly), but it’s worth grabbing for this pie recipe. It’s widely available in many grocery stores, even my small town grocery store, in the baking aisle (Bob’s Red Mill is a popular brand) and definitely available online.
Does using tapioca flour vs 100% cornstarch make a difference? YES! It’s what transitioned my cherry pie from pretty good to really amazing.
Now…let’s get to assembling this pie!
As I mention in the recipe below and already once above, keeping the pie dough chilled is the key to success. Warm pie dough is a recipe for disaster.
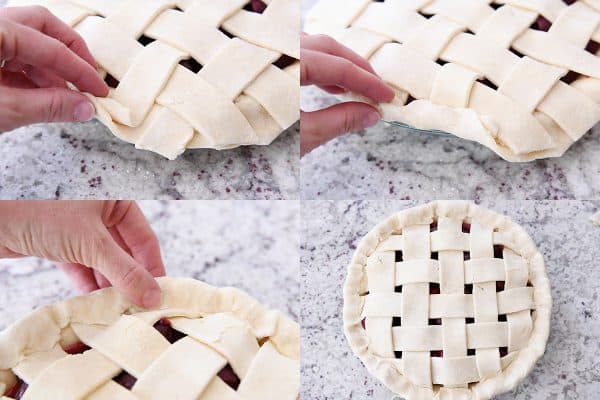
Roll the top crust out to a 12- or 14-inch circle and cut 10-12 thick strips. Scoop the pie filling into the pie plate and get to work on that lattice crust!
Yes, you can bypass the lattice crust and just slap on a whole top crust, cut a few vents and toss in the oven.
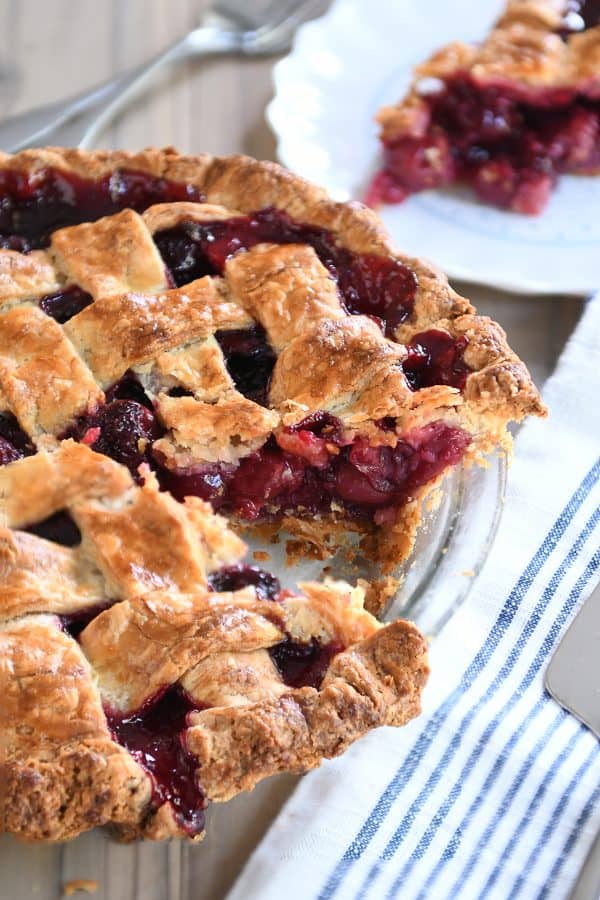
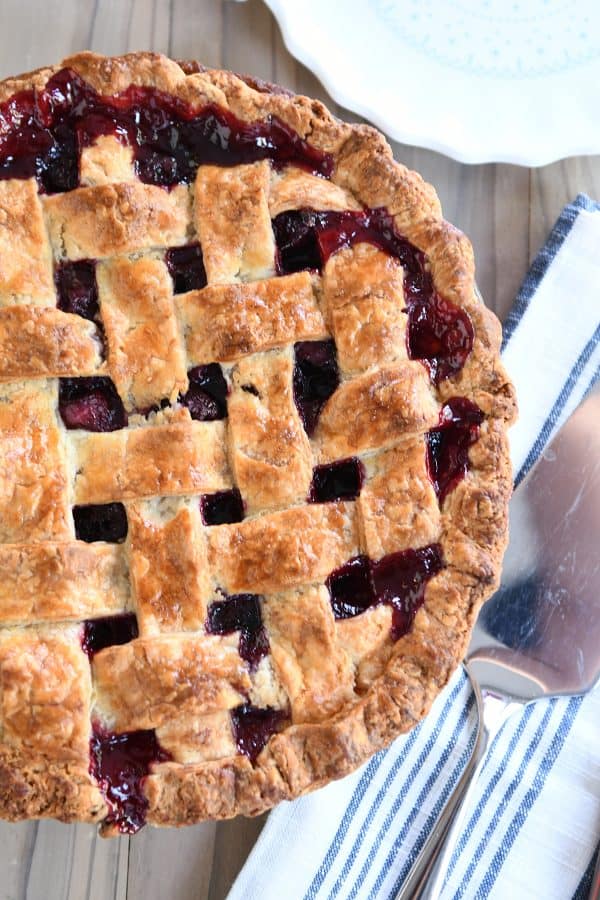
But where’s the fun in that? Plus, I submit that creating a lattice-topped pie might be one of the most satisfying endeavors of my life. And also, cherry pie JUST NEEDS A LATTICE TOP.
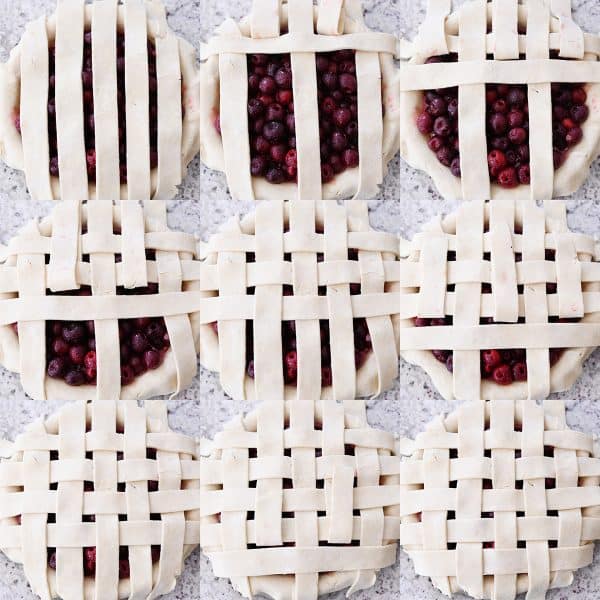
You can see from the quick little collage below that it’s really just a matter of lifting the right pie dough strips in order to lay down a horizontal lattice strip…and repeating that several times. It doesn’t have to be perfect. The strips don’t all have to be the exact same size. Pies should have personality!
Just go for it. You’ll be glad you did.
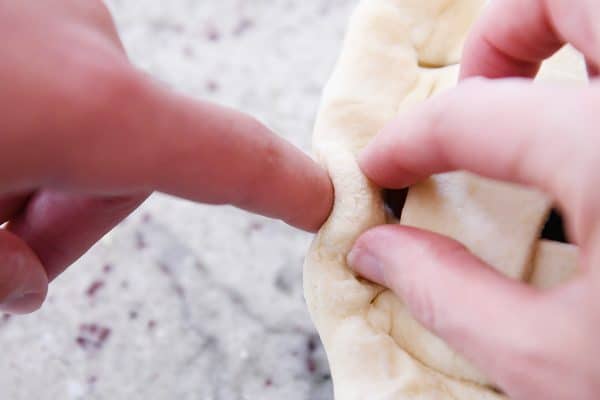
Once the lattice top has been lovingly and carefully assembled (work quickly so the pie strips stay cold and don’t get warm and melty in your grubby little hands!), trim the lattice strips evenly with the bottom crust.
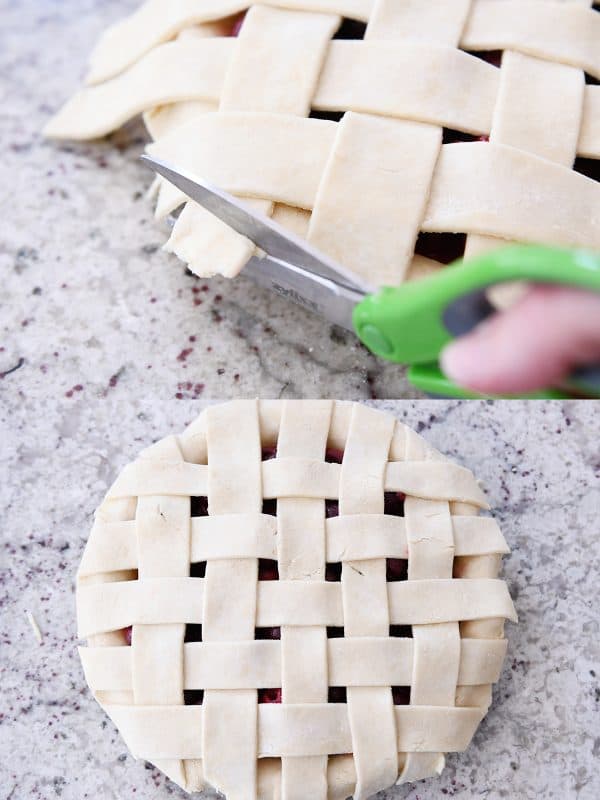
Now take the bottom crust and roll/fold it up and over creating a lip that sits right on the edge of the pie plate. Press gently toward the inner edge of the pie to seal the edges and trap the ends of the lattice strips.
With that thicker edge, you can flute the edges of the pie all the way around. Again, this is another aspect of homemade pie making that doesn’t have to be perfect. And it’s also another area that should go quickly so the warmth of your little fingies doesn’t melt the butter in the pie crust.
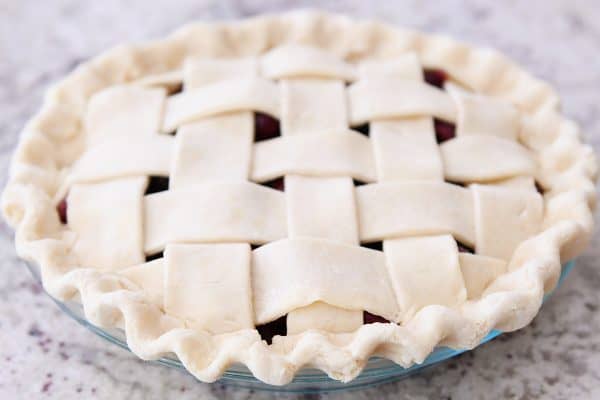
Refrigerate that pie for at least 30 minutes! An hour is even better. You want to make sure the pie crust is really, really cold. I wouldn’t let it hang out in the fridge much past an hour – the risk of a soggy bottom crust is not worth it, in my opinion.
I like to brush the top of the pie with a simple egg wash. This is optional. But it greatly enhances the ability of that pie to get the perfectly shiny/golden vibe going on that definitely increases the pie rock star feelings.
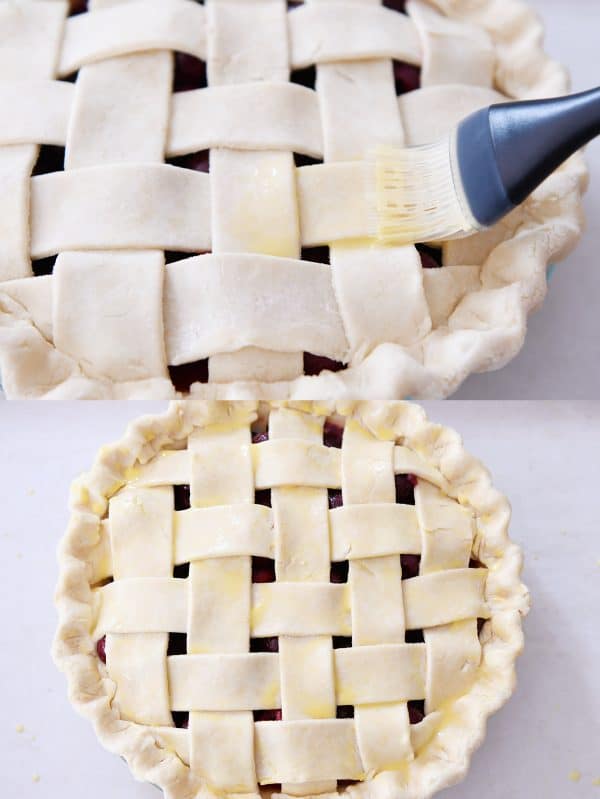
Pop that pie on a foil- or parchment-lined baking sheet (trust me, it probably will bubble over a bit – totally normal – and easy cleanup will be your friend). Bake it at 400 degrees for about an hour. Watch closely. Every oven differs a bit in oven temp.
If the top or outer crust is over browning but the bottom crust (looking through a glass plate) or filling needs more time, tent the top of the pie with foil to continue baking.
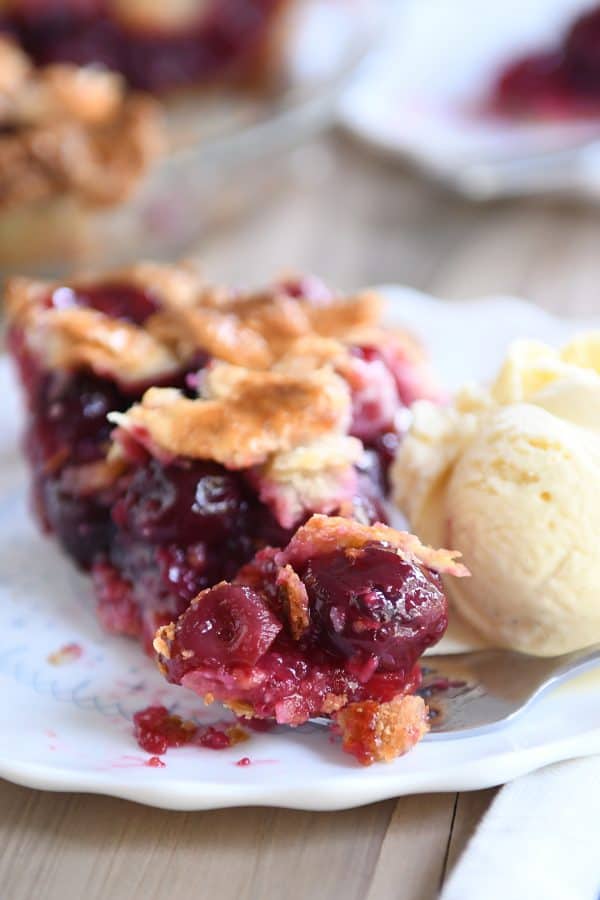
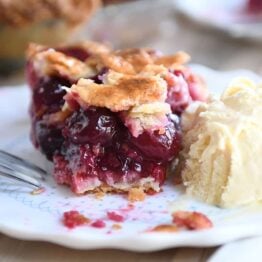
Now for the hard part. As appealing as it is to dig into warm pie, if you don’t want a soupy mess running all over your plate (and probably your pants), let the pie cool. It doesn’t have to cool completely, but I recommend a 2-3 hour cooling period so the filling has time to set up.
If you cut into it too early, you’re going to cry big buckets of tears and insist the recipe is flawed or that I was totally off on my thickener soapbox. Cooling it for the right amount of time means perfect pie. And if I’m being honest, I actually prefer my cherry pie at room temp. It’s the best.
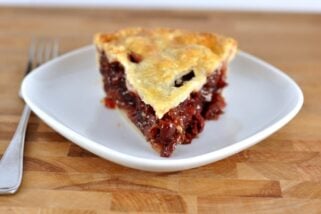
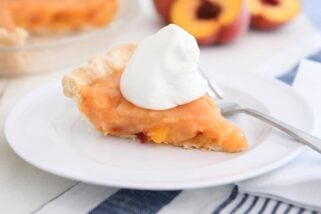
Ok, there you have it! My favorite cherry pie in the history of ever.
I wouldn’t consider myself the best pie maker in the world, and I certainly don’t make pie on the weekly, but I’ve come to really love the pie making process (even the frustrating moments).
There’s just something magical and so utterly self-confidence boosting about taking a homemade pie out of the oven. It’s the closest I’ve ever come to hearing angels sing in my kitchen.
And embarrassing as it is to admit, I’ve actually been known to say these words as I stare lovingly at the piping hot pie in my oven mitt clad hands: “oh my gosh, I’m amazing.” Homemade pie will do that to you.
My Pie making tools
Here is a quick list of all the tools/ingredients I use for this cherry pie (and for most of my pie-making endeavors). The right tools make all the difference. Affiliate links included for products I’ve purchased from Amazon.
- 9-inch pyrex pie plate (inexpensive and awesome)
- Pastry cloth and board (this is what finally enabled me to conquer rolling out homemade pie crust)
- Rolling pin (I’ve fallen in love with this simple rolling pin)
- Pizza cutter for the lattice strips
- Tapioca flour (if you can’t find it locally; this is my favorite online brand)
- Cherry pitter (I have this large-ish one but a handheld pitter is perfect, too)
Now go make yourself some cherry pie!
My Favorite Cherry Pie in the History of Ever
Ingredients
- Double crust 9-inch pie dough (see note for recipes)
For the cherry pie filing:
- 5 cups (794 to 850) pitted sweet, dark cherries – you'll start with around 2 pounds whole fruit (see note for sour pie cherries)
- 2 tablespoons fresh lemon juice, from 1-2 medium lemons
- ¼ teaspoon almond extract
- ¾ cup (163 g) granulated sugar
- ½ teaspoon coarse, kosher salt (use 1/4 teaspoon for table salt)
- ⅓ cup (43 g) tapioca starch/flour (see note)
- 1 tablespoon cornstarch
- 1 tablespoon butter
Egg wash:
- 1 egg yolk
- 2 teaspoons water
- 2 teaspoons cream or milk
Instructions
- Keep all ingredients/pie crust as cold as possible throughout the making process to ensure the most delicious pie ever! Roll out bottom pie crust according to pie dough recipe instructions and place in the bottom of a 9-inch pie plate (I use a glass pie plate). Trim edges leaving 1/4-inch excess from outer rim of pie plate. Refrigerate until filling is ready.
- For the filling, in a large bowl, combine the pitted cherries, lemon juice, almond extract, sugar, salt, tapioca starch and cornstarch. Mix until well combined. Set aside.
- Roll out top crust to 10-inch diameter and cut into 10-12 strips (I like to cut thicker 3/4- to 1-inch strips).
- Scoop cherry pie filling evenly into refrigerated bottom crust, scraping out all the sugar and liquid. Dot the top with 1 tablespoon butter (pinched or cut into small pieces).
- Weave strips on top of the filling for a lattice crust (see above pictures in post for how-to). Trim lattice strips evenly with bottom crust. Fold bottom crust up and over evenly with edge of pie plate and press/pinch to seal. Flute the edges of the pie crust.
- Refrigerate the pie for at least 30 minutes or up to 1 hour to make sure the top crust is completely chilled.
- Preheat oven to 400 degrees F. For the egg wash, whisk together the egg yolk, water and cream/milk. Brush the mixture over the top pie crust.
- Place the pie on a parchment or foil-lined baking pan. Bake for 50-60 minutes until the crust is golden and the filling is bubbly and thickened (will thicken more as it cools). The exact time will depend on type of pie plate, thickness of crust, if pie was refrigerated, etc. {The pie will be soupy even after cooling if it doesn’t bake long enough, so err on the side of adding extra time – even up to 75 minutes total. Tent the top and sides of the pie loosely with foil to prevent the crust from over browning or burning.}
- Let the pie cool for 2-3 hours before serving (if it’s too warm, the filling will be soupy). The pie can be covered and kept at room temperature for 2-3 days.
Notes
Recommended Products

Recipe Source: from Mel’s Kitchen Cafe

Baked this in a 9.5 glass pie pan paired with your perfect flaky pie crust recipe and it was so delicious!! Amazing!! Next time I will check in a little earlier to tent with tin foil- I think it could have used more time to bake but the top was getting too done so I had to pull it out
You didn’t include this pie in your best pie section, but it seems like you love it.
That was an error on my part because it really is one of the best. I’ll add it there!
Looks amazing! Can’t wait to try it out. But what do you use when fresh cherries cannot be found?
You can try frozen cherries that have been thawed and drained of excess juice.
I made this and followed the baking instructions, but the crust came out overly toasty. It tastes a little burned on the edges. I image we just won’t eat that part. I probably should have watched it closer and put tinfoil over the edges. I’m posting this to give others a heads up.
How does the glass pie plate not break in a 400 degree oven with cold ingredients in it?
I haven’t had an issue with the pie plate breaking.
I used this recipe with my niece to make a pie with fresh cherries from my dad’s tree. This is the best cherry pie I have ever tasted, so flavorful and not cloyingly sweet. The whole family loved it and agreed. Thank you for this wonderful recipe!
I made this pie.. And made it again…and again…and again…and again, and it’s only been about a month since I discovered it! And I just made another batch of the cherry filing to sandwich between some almond meringue crisps because…why not? It’s just that delicious! I love it so, so much.
To all you almond haters, I also always omit almond extract when I see it in a recipe (because, ew, fake almond taste! :X ), but because such a compelling case was made for leaving it in, I figured I’d trust the author and wow, she’s so right! That little bit of almond extra just makes the cherry taste pop! It adds a little bit of a lip-smacking quality to the filling, in my opinion. This filling is so delicious I had to rave about it in a comment, and I can count on one had the number of other recipes that I actually bothered to comment on (and I bake a lot). If you have doubts, try it! At least once!
This pie was delicious! It set up very nicely and so flavorful! I used a different pie crust but still amazing!
Hi Mel! Not sure if you have an answer: I’d like to make a crumble topping at the request of a friend for whom I am making a birthday pie. Do you think the cook time would be the same as it would with the crust top?
Yes, I think so! you might need to tent the crumble topping with foil part way through baking so it doesn’t burn.
Do you have a cookbook with this recipe?
I don’t, sorry!
This was soooo soupy… tasted ok but even after being in the fridge since yesterday, it’s still soupy…
My friend asked me to make a sour cherry pie for her husband’s birthday – his favorite. I’ve made a million apple pies, but never cherry. My friend brought me freshly picked sour cherries. I pitted them all and realized I didn’t have all the ingredients for the dough. So the pitted cherries are in a tub in the fridge. There is a lot of juice. What do I do with all that juice and I can’t make the pie until tomorrow. Did I mess it up already??? I am petrified I am going to mess up his birthday pie and won’t be able to make another one. My other friend offered to buy a cherry pie. I probably should’ve let her. HELP..
Hi Jacqueline, sorry for the delay in responding, I was out of town. Did you make the pie? How did it turn out?
SO GOOD! This was my first time making a cherry pie, and I’m still practicing getting crusts flaky…the sour cream pie dough worked great, though to get the edges nice it meant my crust was thinnish…maybe my pie plate was larger than 9in. I made this for some Kiwi friends and co-workers who aren’t exposed to the amazingness of fruit pies much. They LOVED it! I tried to follow the directions exactly and was very pleased with the end result. I couldn’t find corn starch in my local groceries so substituted with flour…not sure how that affected the consistency, but the taste was still phenomenal. I also took the excess cherry juice from the drained jarred cherries and boiled it down with some sugar and marsala wine and drizzled that over individual pie slices when I served it up….OOOO LA LA 😉 so yum…will definitely make again.
Please tell me if i can use Costco frozen cherries or i need to buy canned. Which is easier? and what brand of canned if i need to buy those?
Yes, you can use the frozen cherries.
I had such high hopes for this pie! I even made a mad dash to the store for tapioca flour. I followed the directions exactly. My crust is devine….the filling is disappointing. It definitely has a cornflour taste to it…especially close to the bottom crust. Did it need more baking time? I feel like I should have cooked the starches with the cherries before adding to the crust and baking.
Hi Mia, it sounds like it needed more time in the oven so that the filling could cook and thicken properly. Was the filling cloudy?
I add lemon juice to the cherries. I blend the sugar, tapioca flour, corn starch, and salt. I sprinkle this on the cherries in a pot, and allow everything to mix and combine for a few minutes on the stove. Then I put the cherries in the pastry-lined dish.
Can jarred sour cherries be used in this recipe? Thank you.
I haven’t tried jarred cherries so I’m not sure. The pie calls for sweet cherries so if experimenting, you’d need to drain them very well and probably adjust sugar.
Once again . I’m on google only wanting a recipe a d I get a novel. ♀️
No hate, but I’m not reading War and Peace when literally ALL I’m looking for is a recipe.
Click the Jump to Recipe link at the very top of the page just under the title… Almost every recipe online has that.
I’m with you ELISTARIEL, I couldn’t find the jump button and was annoyed by all the text.
Mel is a blogger…. That’s what she does and that’s what her followers love about her! Keep up the background stories Mel – and if you don’t like it S.C.R.O.L.L!
I have a LOT of cherries that I need to use up and was thinking of making a pie today and then making another one to freeze prior to baking. Or maybe making some hand pies and freezing those…..or could I make up the filling and can it?
Have you done any of these?
Hi Rachel, I’m not a lot of help as I haven’t done any of those variations or steps, but I do think you could freeze the pie prebaked (or hand pies).
This pie was so good. I made two. The first one I got my crust a little thick. The second one was perfect. What an amazing balanced flavor. It thickened perfectly. I am not a baker but am working hard at it. Pie crust has always intimidated me, so I keep trying new recipes. For a fruit pie, this was perfect. I loved the tip on rolling the crust on to the pin. Most success I have ever had getting my crust in to the pan. Thank you.. I will be following you for more!
Thank you for the recipe. Made this as written with the sour cream crust and fresh B.C. cherries, lapins I think they are called? Turned out wonderful, although I could only find minute tapioca and couldn’t get it super finely ground even with a mortar and pestle and a coffee grinder. It didn’t effect the final result too much but I was worried about it being gritty when I first took it from the oven and I could see grains of it visible on the top fruit. Luckily couldn’t discern any texture when we ate it though. Also I had good results with baking at 400 convection for 40 mins, put foil on the edge and in for 10 more minutes after I turned it down to 375.
Delicious and so easy! We used our own store-bought crust because we had some on hand. The filling was so good and it was surprising that it didn’t need to be cooked before baking. Love love love this pie!
This pie is totally worthy of the name. Perfection. Cherry pie on the 4th of July! (Said with a warm, Kentucky accent). Thank you!
By any chance could the almond extract be replaced with amaretto?
I haven’t tried that, but it should work as long as you don’t add too much (more liquid will mess with the thickening).
Hi Mel,
Could this recipe be done substituting munkfruit sweetener for the sugar?
You could definitely try that! (I haven’t, personally, so I don’t know for sure how it would work)
This pie is AHHHH-mazing! I love cherry pie, but I usually dump a can of pie filling I get from the store into a store bought crust. This recipe is easy to follow (I used a different crust I’ve had luck with before) and it turned out great! I like a little more juice in my filling (cause, you know, canned pie filling ♀️) but you can’t beat the taste of this pie! Definitely a keeper recipe
Hello! I never comment on recipes, even the best of them, but I felt I had to on this one. Cherry pie is my favorite. I loved the taste of the filling and the crust. It was a little soupy but I really wanted to make it work. I did a little research and I read that tapioca flour can be a little more temperamental in terms of needing to be heated perfectly through. I think it may have needed a little more time (as you mentioned in the instructions lol). Thanks!
My children and I just finished reading a book called PIE that inspired them to start a Birthday Pie Project where they drop pies off to local moms on their birthdays. They did a survey to find out favorite pies and surprisingly out of 12 women there were 12 different favorites…..so we came to your site to help us with the best pie recipes. Their piano teacher’s favorite happens to be cherry pie! My children (10, 8, 5, and 2) feel so accomplished and proud of their efforts because your recipes are so delicious and well written. They are able to make the pies on their own and deliver them with joy in their hearts. I started following your blog when my daughter (now 10 was born) and I can’t express to you how grateful I am for how much you’ve inspired wonderful meals, recipes and time together over the last decade.
Katie! This was the greatest thing to read! I can’t believe your kids are taking pies to local mommas on their birthdays. If that isn’t the greatest idea…I don’t know what it is! Pie is such a labor of love, and how awesome that your kids are learning to make something so fun (and kind of challenging!) at young ages! You are a good mom to inspire them and help them and let them do this. I love this so much. Thanks for being around after all this time. I have a soft spot in my heart for all of you who have been here since the blogspot days. 🙂
Is there a substitute for the almond extract? We have a tree nut allergy in the house.
You can leave it out.
Just reading this now, Katie! Such goodness to do this with your kids… what memories they’ll have and what a meaningful gift! Appreciate you sharing this- touched my heart and made my day❤️
Made this per your recipe… crust came out great but the pie filling was completely watery!! Even used the tapioca flour as suggested.
Good flavor but the texture was terrible.
My pie is in the oven, so have not, as yet tasted it. I do have a query: when using frozen cherries, why drain / discard the juices? These are the same juices found in the fresh berry…perhaps freezing “relocates ” intracellular fluids. I think that tossing the juice = tossing flavor. Why not simply adjust the thickener as needed?
You could certainly do that. 🙂
Follow up: Soupy despite extra thickener, so best to leave recipes as written!
I found the filling to be a bit boring, no snap, unlike the many others that love the sweet cherry filling. So, I guess that I am a sour cherry fan.
Follow up: Soupy despite extra thickener, so best to leave recipes as written!
I found the filling to be a bit boring, no snap, unlike the many others that love the sweet cherry filling. So, I guess that I am a sour cherry fan. I hate failure, so I tried again with frozen sour cherries using tapioca and a sm bit of cornstarch precooked on the stove to ensure proper thickening. Curiously, the filling on the stove looked as though the cherries lost all of their integrity and that it was a bunch of mush. However, after the pie sat for 24 hrs, the cherries plumped up, and looks “just right”–at least to my eyes.
I LOVE Cherry Pie…so when my son asked me to make him a Cherry Pie, I came here first because I remember seeing your favorite cherry pie recipe.
Well. This pie delivers! I LOVE it!
I had to grind my tapioca, as I couldn’t find the flour, so thanks for that tip, Mel. I also used jarred sour cherries from Aldi. I drained them and increased the sugar to one cup.
I loved how this pie wasn’t so soupy…it was perfect! And to me, it was even better the next day!
This will be my go to Cherry Pie in the future!
Thank you, Terri! So happy this pie worked out for you! Thanks for taking the time to comment and let me know.
PERFECTION!!! This pie was so wonderful but that sour cream pie crust is the absolute star!! I have a TNT crust recipe, but it will promptly be replaced!
I used frozen dark sweet cherries and let them drain for 24 hrs…I wish I had left a little more juice in them for more “goo” in the filling, but for frozen cherries I was quite happy with the final result texture.
Lovely recipe! Thank you Mel!
Thanks for the review, Miriam! So happy you loved this pie AND that you fell in love with that crust!
Mel, one more question about the crust. I wanted to use it for pecan pie…no restrictions on what filling to use with it, correct?
Happy Sunday!
Miriam
Correct! You could definitely use the crust for a pecan pie!
AWESOME! Thanks!
Hi Mel, I have made the sour cream dough and it is in the refrigerator. Really exciting! Is it necessary to pre bake the dough first before adding the filling? I worry that the dough won’t cook, and nobody likes eating uncooked dough! Help please.
I don’t prebake the crust (I don’t like overdone pie crust) – it should bake just fine in the oven filled with the cherries. Make sure to roll the pie dough thin enough or else it will be a bit doughy.
This pie was wonderful, thank you! I wasn’t sure when to use the egg wash because I didn’t see it called out, so I used it right before putting it in the oven, after it had chilled in the fridge. Is that correct?
Oops never mind. I see the previous comment asked the same question. Sorry!
Hi Mel! I’m super excited to bake this pie. We love cherries! The directions don’t say where to add egg wash. Do you want to add it pre-chilling Assembled pie or post chilling just before it goes in the oven? Thanks!
Sorry about that, Jackie! I brush on the egg wash after taking the chilled pie out of the fridge right before baking.
I am bound and determined to take this on our camping trip this week where we have a massive potluck on Friday night. We’re in mid-Michigan. I’m going to make the crust and filling separately tomorrow and refrigerate them and then assemble before baking Friday (camper ovens… we’ll see ha!) . I’ll definitely report back!! Thanks for the
Amazing recipient.
Recipe! Bah autocorrect!
Thank you for the recipe. Made this as written with the sour cream crust and fresh B.C. cherries, lapins I think they are called? Turned out wonderful, although I could only find minute tapioca and couldn’t get it super finely ground even with a mortar and pestle and a coffee grinder. It didn’t effect the final result too much but I was worried about it being gritty when I first took it from the oven and I could see grains of it visible on the top fruit. Luckily couldn’t discern any texture when we ate it though. Also I had good results with baking at 400 convection for 40 mins, put foil on the edge and in for 10 more minutes after I turned it down to 375.
This was so delicious. I used frozen rainiers. Mine was a bit runny, but I was too impatient to defrost the cherries all the way. Everything had absorbed by the next day anyway. The only change I’d make for next time would be to increase the amount of cherries because the crust to filling ratio was a bit high to me, although this could be because I weighed the cherries while frozen. I’m not usually a cherry pie person, but now I’m a convert.
Thank you so much for the review, Sarah!
Hi Mel. You’re site is amazing. Do you only make this during fresh cherry season only? I live close to pie cherry land (Orem, Utah) and have bottled them before. I don’t understand what to use if cherries are not in season. I think I could have cherry pie at least 5 times a week for the rest of my life
Thanks,
Roxie
Hey Roxie – great question! You could probably use canned/bottled cherries. Drain them well and pat dry and you may need to decrease the baking time a bit (the cherries will be much softer).
Hey Mel!
You’re amazing! I have like 10 pounds of cherries that need to get used ASAP!
Quick question! Do you think I might be able to prep the cherries and let them chill for a couple days? For quicker assembly? Or would it be best to keep everything fresh and do it right before? Can’t wait to try this deliciousness!
Hi Stacey, it’s worth a try! I worry a little it’ll make the filling more soupy but I’m not sure since I haven’t tried.
I made this yesterday with my little girls for a Sunday treat. Followed it exactly, using your flaky crust recipe. So yummy! But it never did thicken up, stayed soupy. We let it cool the 2-3 hours and then refrigerated to see if that would help and it is still thin. Not sure why? But it tasted great!
I should follow up to say that when we went to have leftovers today it wasn’t soupy. So I guess it just took ours longer to thicken up. We had it yesterday at about 4 hours after baking, so it needed longer than than the 2-3 of sitting, for us at least.
Thanks for the review, Kiersten. I’m glad it ended up setting up. Was the pie pretty warm when you cut into it? Also what kind of cherries did you use (just curious to see if that might have something to do with it – maybe different water content in different varieties of cherries)?
I just made this today and loved it but I had the same problem with my filling not setting up. It’s been 6 hours and still runny. My sister made this last week and said the same thing happened to her (I live in UT and she’s in MT). I used the weight measurements and followed it exactly (as did my sister). My cherries were from Sprouts. I threw the bag away (and my son already took the garbage out) so I’m not sure what brand they were. I still love it, I just wish it had more of a filling consistency. I’d like to try it again but I’m not sure what to do differently to make it set up?
Ah, darn, sorry to hear the filling didn’t set up, Tricia! One thing that helps is to bake it longer. Even an extra 10-15 minutes (tent the top with foil if it is over browning) will help the filling be thicker if it’s too runny (will still need to cool). Also, try adding more thickener (a couple tablespoons extra tapioca flour or cornstarch) to give it an extra boost!
WOW!!!
SO VERY WASTEFUL TO THROW TWO BAGS OF PERFECTLY GOOD PRODUCT AWAY!!!
I think she only threw away the empty bag after using the cherries. 🙂
I’m so glad that you posted this recipe! I’m going to make one this week. Just wanted to let you know how much I appreciate you adding the “Jump to Recipe” button. It is fantastic! I read every word of your posts because you are so engaging. This makes it so I can quickly get to the recipe when I come back time and again to your site to prepare practically all of my meals or treats. Sure do love ya!
Thanks! I’ve wondered if anyone has noticed that little button (I added it a month or so ago). 🙂
I totally love that button too! Especially for the recipes I come back to over and over.
Love this! I have commented or emailed you way to much about this, but just wanted to let you know that we have one Montmorency pie cherry tree here in our 4 acre orchard. We use to have 600 of them. Now we have lots of peach trees, etc.
You are welcome to come and get some. They are just about ready for picking time. When they are ripe, they are tart with a little sweetness too. They freeze really well too.
Let me know. Would love for you to have some!
Susan Oler
North Ogden, Utah
Thank you so much, Susan! You are the sweetest. I wish I didn’t live up in Idaho or else I’d be there in a second to pick those cherries. Thank you so much for the offer!
I like to make fresh fruit pies. Can I use this recipe for other fruits?
Also, can I substitute tapioca flour equally in my other fruit pie recipes that call for flour, tapioca, cornstarch, etc. For example, if a recipe calls for 1 C cornstarch can I replace it with 1 C tapioca flour?
Also, should I refrigerate all my homemade fruit pies for at least 3o min. before I bake them? I have never done this, but I’m curious if this is a good idea for all my fruit pie recipes? Thanks for your great recipes.
Hi Katie – I always try to refrigerate my fruit pies before baking if they have a top crust – it helps make sure that top crust is really well chilled resulting in a flakier crust. I haven’t tried this recipe with other fruits so I can’t say for sure if it would work 100% to substitute for the cherries. Usually you can substitute the same amount of tapioca flour for other thickeners – but so much depends on the variety of fruit, how ripe it is, how juicy, etc. Really it’s just a matter of experimenting!
Oh my goodness. That cherry pie made for a delicious dinner tonight. I was anxiously waiting for the recipe and am so glad you posted it today. We gathered the ingredients and got to work. My husband is over the moon (he loves cherry pie), and I think that is the best pie I have ever made. You, of course, nailed it again!
PS. I have an almond allergy and couldn’t use the almond extract. I subbed it with vanilla extract-it probably enhanced the ice cream but we loved it.
You are amazing, Sheila! Thanks for making it so quickly AND for checking in with the review. So, so happy to read that you and your husband loved it!
Why can’t I have a friend like you nearby? Oh my this looks absolutely amazing. I’m going to try -I’ve never made a pie from scratch and I’m almost 50 -it is time! Thank you for breaking down the instructions -much appreciated!
Go for it, Debbie! You can do it! Let me know how it goes and if you have any questions!
ooh I’ve been waiting to see your take on the perfect cherry pie. I’ve got 20 pounds of cherries in the fridge calling to me. I made one the other day that was good but I love the look of this one it’s so pretty with the egg wash. Thanks Mel!
20 pounds! Lucky!! 🙂 Hope you love this pie if you try it!
The rolling pin link goes to the “mini” size, which the description says is more for kids (or small kitchen drawers). Do you recommend the smaller version? The company also offers “medium”, “large” and “standard”. Which do you like?
Yes, I’m “that guy”. 🙂
I love this site/e-newsletter, btw. So many compliments when I use your baking recipes. (I only bake; I do not cook.)
Thank you, Peter! So glad you are here. 🙂 Sorry for the link issues. At that link there were options to select a different size, but yes, that was confusing. I just updated the link to go directly to the size of rolling pin I have (which is the 13 1/2-inch rolling pin). Hope that helps!
We too are cherry pie lovers in this house. I can’t wait to try it! I am intrigued by your sour cream pastry. This is going to be Sunday dessert. Side note, Rainier cherries make an AMAZING cherry pie (though the kids had a hard time getting over the non-traditional colour).
I’m excited to try this pie with Rainiers – I love eating them by the handfuls so I can see how they’d be ridiculously good in a pie!
This looks amazing! I always use the cherry pie recipe from Cook’s Illustrated. Calls for cinnamon that I don’t put in but just a smidge of almond extract. Yum!!! The jarred sour cherries from Trader Joe’s are great for cherry pie. Sometimes they even have them at Aldi. I stock up when they do because the closest TJ’s is 2 hours away. 🙁 Will definitely have to try the tapioca starch.
Thanks, Renee – I’ve never noticed those cherries at Trader Joe’s!
“Fasting and prayer”
Cherry pie is my favorite dessert in the whole world. One my Littles are back in school and I can focus again in the kitchen, this is happening. And boy do I need to focus so I too, can pull it out of the oven and declare myself awesome.
Thanks, Mel!
Oh man, my laughing emojis disappeared after the fasting & prayer quote. That was such a funny end to your list of thickeners!
Haha. Glad you caught the humor in that, Rachel. 🙂
I haven’t been a fan of cherry pie, probably because most people make it out of a can. After reading this post, I feel I need to give it a try! I absolutely love fresh cherries. I have one question. My raspberries are starting to get ready to pick. Do you think this recipe would work if I substitute the cherries for raspberries instead?
Hi Marilyn – that’s a great question, and honestly, I don’t know as I haven’t made that substitution myself. Because raspberries and cherries differ in sweetness, texture and water content, I’m not sure how the sugar, tapioca or cornstarch amounts would transition. Good luck if you try it!
Hi Mel, I finally made this pie last night. I bought the cherries a few times, but they didn’t make it to the pie stage. It looks so great, I had the exact feelings you described in your blog about angels singing and how beautiful it turned out. My husband even said it looks nice! Can’t wait to taste it later. I put it in the fridge because mine hasn’t set up yet. Probably should have baked it longer instead of taking it out when the top was golden. Anyone else love to eat the sticky juice that ended up in the foil pan instead of at the bottom of the oven? That was a great tip!
Hope you loved it when you finally cut into it, Marilyn!