The Best and Only Pie Crust Recipe {& Tutorial} You’ll Ever Need
This pie crust recipe is the best and only pie crust recipe you will ever need! The post has a step-by-step tutorial to help you become a pie-crust-making rockstar!
If making the perfect, flaky pie crust is the one thing holding you back from rockstar status in the kitchen, I totally have your back today.
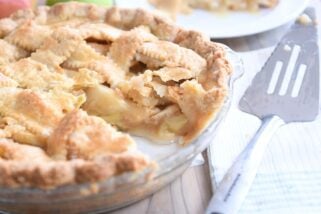
Today I’m sharing with you the most perfect, amazing pie crust I’ve ever made.
I’ve been perfecting this recipe for the last few months in order to share it with you. It is simple (no food processor or special tools required) and I truly believe it is fail-proof.
I’ve made it dozens of times and it never ceases to amaze me. In fact, I am 99.9% sure I’ll never use another pie crust recipe again because this one has truly changed my life. Dramatic? Oh just you wait. Your life is about to be changed, too.
The secret? Throw all you know and love about traditional pie crusts out the window because instead of that classic ice water drizzled in at the end, this recipe uses sour cream.
I know. I know! Pie crusts made with sour cream are not a new thing; they’ve been around forever (but the concept is new-ish to me).
And before you ask, I have no idea what the chemistry is behind the perfection, but it works.
Not only is the dough extremely easy to work with but the crust is buttery and flaky and simply the best in the entire universe.
Below, I have a handy-dandy tutorial for you. I’ve separated the tutorial out into main sections (i.e. Rolling, Crimping, etc.). You can click on the separate links to take you to a specific section.
Already have mixing the dough handled and need a little guide on crimping the edges? Don’t worry, I have a link for that.
Pretty sure you know how to roll it out just right but don’t know how to get it into the pie plate? There’s a link for that. Is trimming the edges a breeze but you’d like a little peek into blind baking? Link, link, link.
I am hoping that by sharing this tutorial and no-fail pie crust recipe now, it will instill in you a feverish desire to become a Great Pie Master (so I’m not alone in my obsession).
I’m a pie-making machine now that I’ve found this recipe. Seriously, I can’t be stopped. In fact, I have an unbaked pie crust all pretty and crimped sitting in a pie plate in the refrigerator just waiting to be used even though I have no specific plans for it yet.
Never any harm in keeping a pie crust ready to be used in an instant, I always say. I make pie crusts now when I’m bored. Just because I can. With this pie crust recipe and tutorial under your belt, you’ll be good to go for the holiday season. And now that I’ve shared it with you, my life is officially complete.
Update: a few extra notes: be careful not to measure the flour with a heavy hand (I use the spoon-and-sweep method, don’t shake the cup to level!) and it’s ok if you have to add more sour cream just do so gradually so you don’t end up with too much as it will make a gummy/dense crust. Also, keep in mind that the real key to ending up with a light, flaky pie crust instead of a tough pie crust is minimal handling of the dough in every step – from mixing to rolling. The more the dough is handled, the more those butter pieces break down which means they won’t create those lovely pockets of steam while baking which creates the flakiness.
Recipe Source: tested and perfected by me (Mel) after seeing the idea for it on The Kitchn
Mixing the Pie Dough | Rolling Out the Pie Crust | Putting the Pie Crust in the Pie Plate | Trimming and Crimping the Edge of the Pie Crust | Baking and Blind Baking |
Mixing the Pie Dough
Mixing the Pie Dough | Rolling Out the Pie Crust | Putting the Pie Crust in the Pie Plate | Trimming and Crimping the Edge of the Pie Crust | Baking and Blind Baking |
Rolling Out the Pie Crust
Mixing the Pie Dough | Rolling Out the Pie Crust | Putting the Pie Crust in the Pie Plate | Trimming and Crimping the Edge of the Pie Crust | Baking and Blind Baking |
Putting the Pie Crust in the Pie Plate
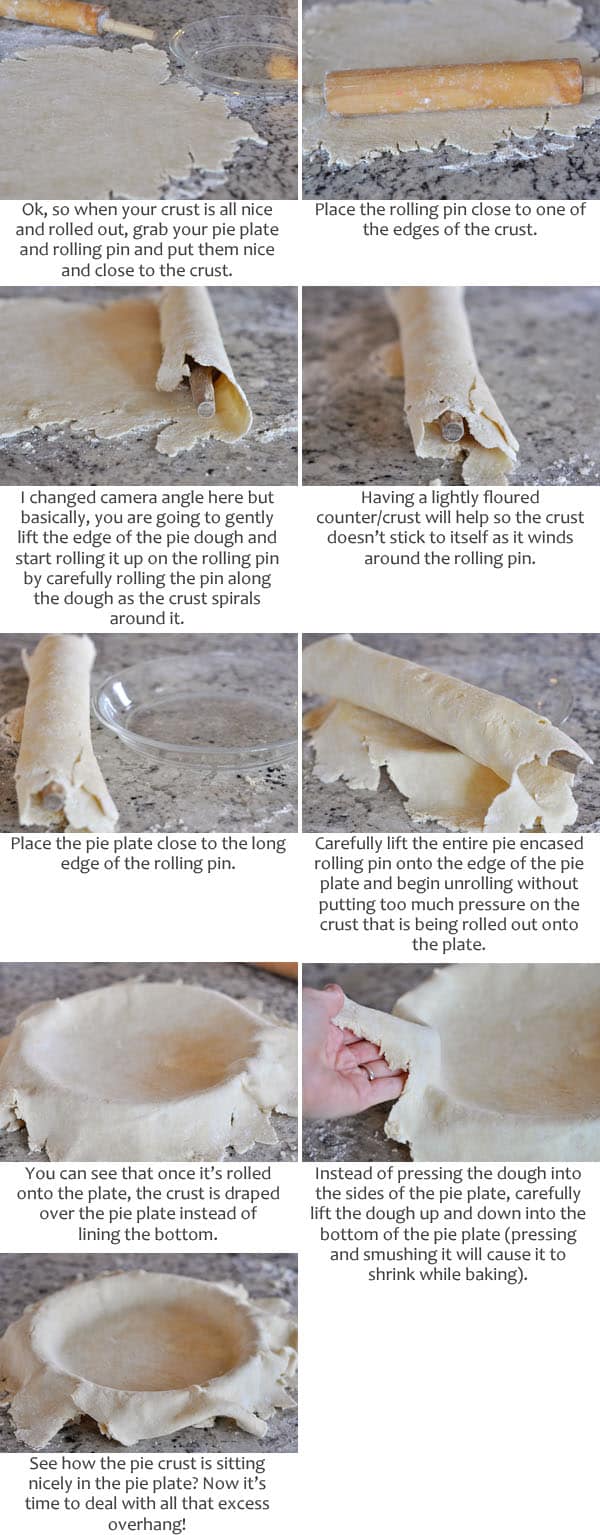
Mixing the Pie Dough | Rolling Out the Pie Crust | Putting the Pie Crust in the Pie Plate | Trimming and Crimping the Edge of the Pie Crust | Baking and Blind Baking |
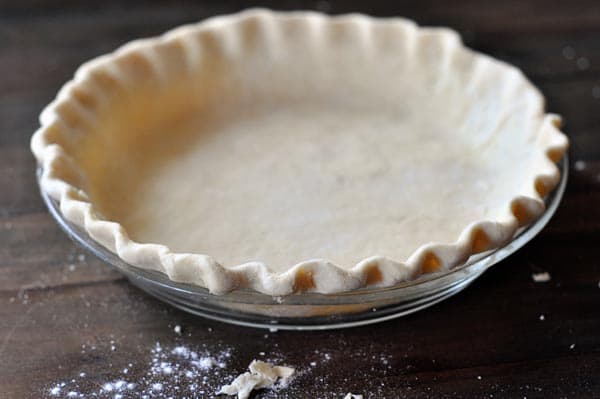
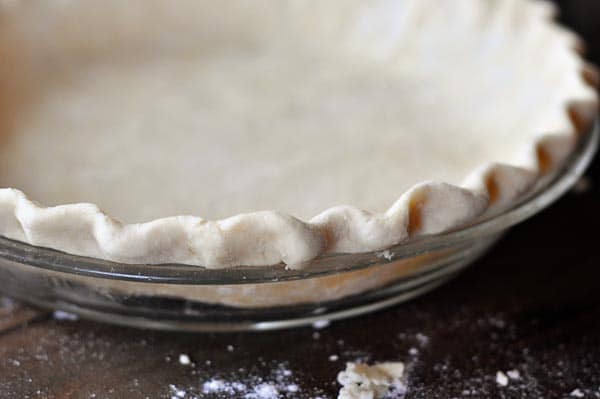
Trimming and Crimping the Edge of the Pie Crust
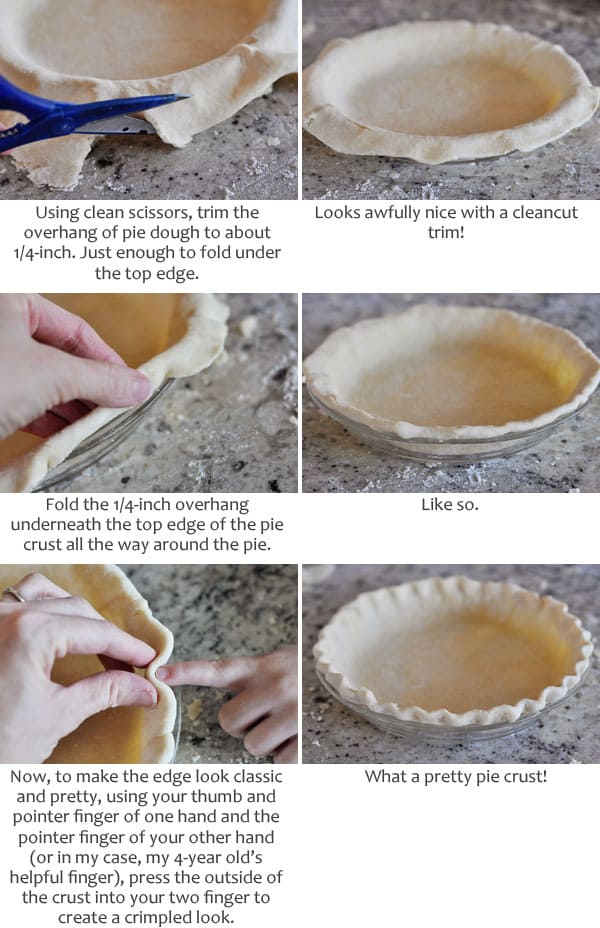
Mixing the Pie Dough | Rolling Out the Pie Crust | Putting the Pie Crust in the Pie Plate | Trimming and Crimping the Edge of the Pie Crust | Baking and Blind Baking |
Baking and Blind Baking
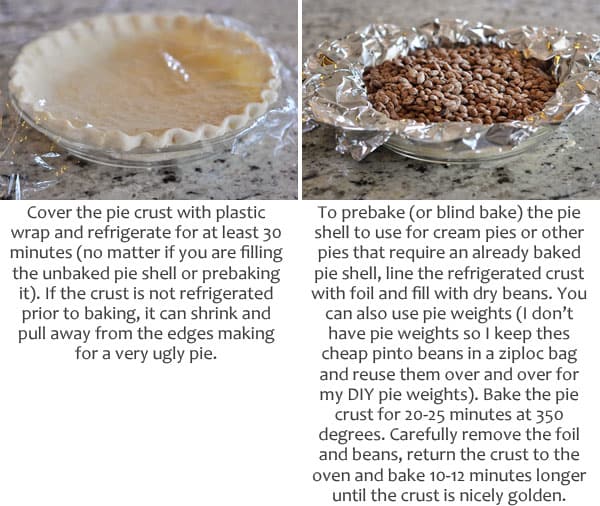
Mixing the Pie Dough | Rolling Out the Pie Crust | Putting the Pie Crust in the Pie Plate | Trimming and Crimping the Edge of the Pie Crust | Baking and Blind Baking |
The Perfect Pie Crust
Ingredients
- 1 ½ cups (213 g) unbleached all-purpose flour (see note)
- ¼ teaspoon salt
- 2 teaspoons granulated sugar
- 10 tablespoons (142) salted butter, frozen
- ½ cup (113 g) sour cream, not lowfat or light, plus an additional tablespoon or three if needed
Instructions
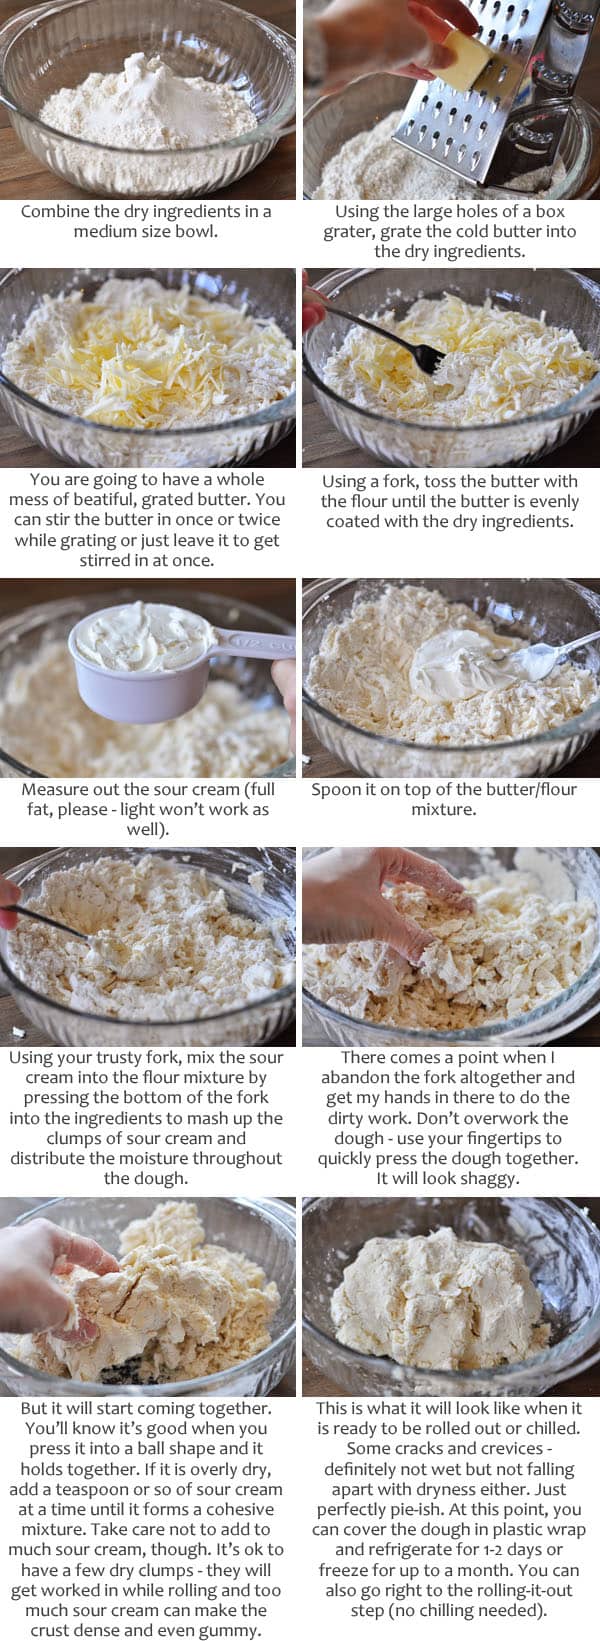
- In a medium bowl, lightly whisk together the flour, salt and sugar.
- Using the large holes of a box grater, grate the butter into the dry ingredients.
- With a fork, toss the butter and flour mixture until the butter pieces are all evenly coated with flour. Don’t break down the butter pieces in this step, just lightly toss until they are coated with flour.
- Spoon the sour cream into the bowl. Using the same fork, mix the sour cream into the butter/flour mixture by pressing the fork down into the sour cream in order to mash the large clumps of sour cream into the flour and butter. A commenter suggested using a pastry blender which will help incorporate the sour cream a bit better. The sour cream won’t mix in like a traditional pie crust with ice water. But take care not to overwork the dough trying to get the sour cream mixed in – if the butter pieces get too small and overprocessed, the crust will be tough.
- After a few turns with the fork, it is easiest to use your hands to pull the dough together. It will look a bit shaggy but as you press it together (quickly and firmly so the the butter pieces don’t melt), it should start to form a cohesive ball.
- If it still seems overly dry, add a teaspoon or so of sour cream at a time until it comes together.
- It’s ok if there are still a few dry spots or cracks in the dough. The mixture should not be overly wet or sticky. At the same time, it shouldn’t be falling apart either. It should hold together when pressed (see the pictures below). Many of you have had to add quite a bit more sour cream. That’s ok as long as the crust isn’t overly saturated (then it will be dense and gummy). Much of that depends on how you measure flour – if you pack the flour into your measuring cup, you’ll obviously need more sour cream (try to measure the flour with a light hand).
- At this point the dough can be rolled out on a lightly floured counter or it can also be pressed into a flat disc and wrapped in plastic to be refrigerated for 1-2 days or frozen for up to a month.
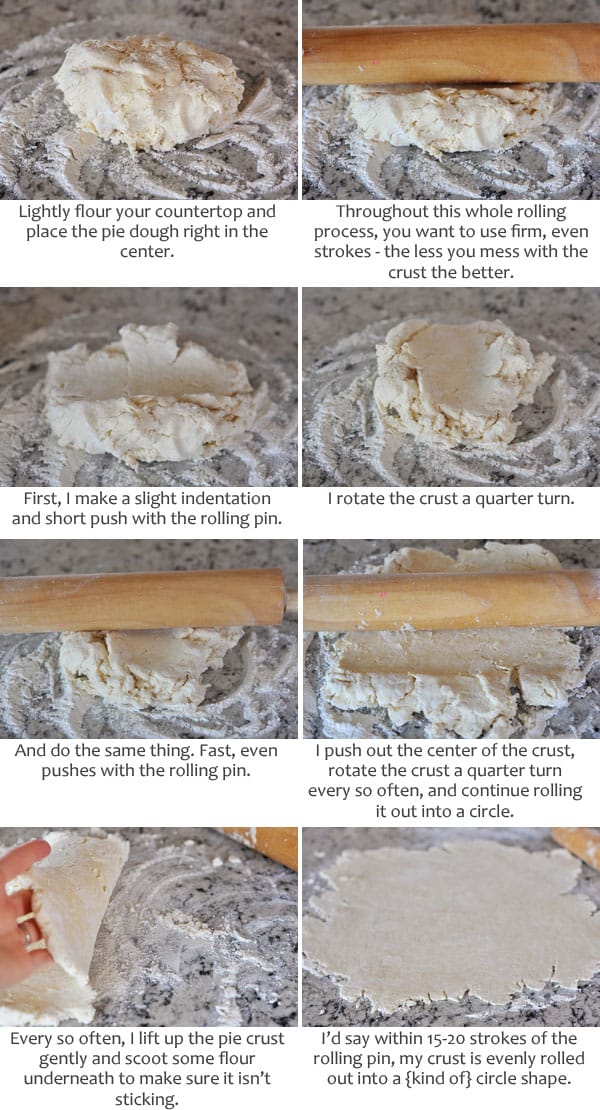
- To roll out, lightly flour your countertop and using firm, even strokes, roll from the center outward, turning the dough a quarter turn every few strokes. The less you mess with the dough the better – even rolling – so try not to overwork it. Roll it out to a thin crust as quickly as possible.
- Roll the dough over the rolling pin and unroll it onto the pie plate. Gently lift up the edges of the pie crust and settle it into the bottom of the pie plate without pressing or smushing.
- Trim the edges to within 1/4-inch. Fold the short overhang underneath the top edge of the pie plate and crimp all the way around.
- Cover with plastic wrap and refrigerate for 30 minutes before using. To blind bake (prebake the pie crust), line the refrigerated crust with foil and fill with dry beans or pie weights. Bake at 350 degrees for 20-25 minutes. Gently remove the foil and beans/weights and return to the oven to bake for another 10-12 minutes until nicely golden.


Watched the video twice. Made two of these – didn’t double the recipe, made them separately. After the half cup of sour cream was added, the first recipe was too dry and not sticking together when squeezed, so I added about 2 or so more tablespoons. It went from being dry and crumbly to being really probably too moist in about 1 second. (And YES, I DID push and fluff and use my hands to mix the sour cream in until I was sure the butter was going to melt, and YES I KEPT EVERYTHING COLD. I formed it into a plastic-wrapped disc and put in the fridge. The second recipe was dry and crumbly even after 6 T’s of sour cream which is NOT EASY to distribute evenly throughout the dough; I tried to “slide” it out onto the plastic wrap and it fell apart. Nevertheless I wrapped it too, and put in the fridge. I’m a bit disgusted with myself at this point, for not listening to the negative reviews, of which there are more than there should be if this recipe was really that simple. I guess I’ll try to roll them out tomorrow, but I’m not hopeful at all. What, 20 bucks for ingredients or so? and wasted time. I’ve made a few recipes off this site and they’ve been great, but maybe this one is an exception.
Can this be used for hand pies? Obviously, it could not be blind baked, but will it just ‘melt’ all over the pan?
I haven’t tried it for hand pies…so I can’t say for sure, but if the crust is well-chilled, I think it is worth a try!
I do appreciate having gram measurements. However, 1 cup of flour is 120 or 125 g so that 213 g for 1.5 cups is definitely too much.
That’s not necessarily the case – I test all my recipes using 140-142 grams of flour per cup. This is similar to the recommendations from America’s Test Kitchen. Other online sources use less weight per cup (King Arthur Flour uses around 120 g flour per cup). What matters most is using the amount given in a tested recipe. For my recipes, if you reduce the flour to 120 g per cup, the recipe isn’t likely to turn out correctly.
I’ve never made a pie crust before this weekend and I needed one to make a cinnamon pie for a pie contest. Well it was easy to make (thanks to Mel’s video tutorial), and tasted great! Plus my pie won 2nd place- thanks to this awesome crust recipe! Mel is my baking/cooking idol!
Way to go, Carlee! You’re amazing!!
I rarely make/eat pies. I suppose it’s that whole ice water nonsense and bleh taste.
However, THIS recipe tastes good, and it’s very easy to make. The only thing I had to adjust was the salt. Since I never have salted butter in my fridge, I used
1/2 a tsp. of sea salt.
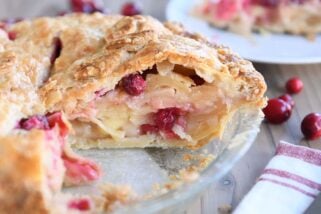
This is the only pie crust I use for my French leek tarte and for my Cornish pasties. * (And, any other savory recipe that calls for pie crust.)
Throw out all your other pie dough recipes, and use this one!
How would I change the baking method / time if I wanted to use the dough for hand held meat Pies? Obviously, I can’t blind bake them….
You should be able to roll out the dough and fill for hand pies and then bake on a parchment lined baking sheet until golden. For the proper time and temp, you might try googling other handheld meat pies.
I am pie crust challenged (they almost always slip into the dish on blind bake), and I don’t love the flavor of pie crust. Usually. This recipe does taste better than others! I found your video and step-by-step pictures very helpful, and added beans to fill the entire crust (instead of just pie weights on the bottom as I’ve previously done). My pumpkin pie crust was better with this method! I still wish I could maintain the pretty edge decoration as it bakes (mine gets melty), but this was a definite improvement, and I will keep working to perfect it. I’ve heard that crusts with a lower fat-to-flour ratio are better for keeping their shape. Have you found this to be true?
Yes, that is definitely true! Although sometimes the lower fat to flour means slightly less flakiness.
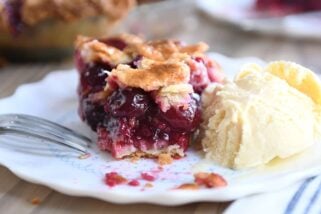
This is another amazing recipe! I was nervous using sour cream and no water but let me tell you it was so easy to put together and it rolled out really well. I baked up the scrapes with a little cinnamon and sugar and I could see all of the layers in the crust and it tastes wonderful. Thank you for sharing!
it’s wednesday night and I am trying this recipe for the first time. I already know I have to throw it away but I would like to know what went wrong for next time. The crust looks quite nice but there are pools of butter swimming on top. I handled the dough just as instructed. Not too much handling. It looked just like the pictures.
Also I was a bit confused reading between the chocolate pecan pie recipe (different heat and length for baking) and this pie crust with also a different length and temp.
Oh my gosh what a disaster. Signed up to make 8 pies for a fundraiser this weekend, and after searching the web, this pie crust recipe was surely “the one”. I watched the video several times. What I learned from my errors is that if the crust is not hanging together before it goes in for the chill, then its not going to hold together when rolling out. I tried adding more sour cream at first, but that was not helpful. I made this receipt 6 times, and not one turned out. This recipe did not escape my foolish ways. ! Exhausted and demoralized!
Same here!! I tried twice but am moving on.
Mel, as usual you never disappoint with your recipes! This crust is as you described and my now go-to crust! I made it with your apple crumb pie. OMG! You keep this up and I will be forced to send you a bill for the new clothes I will need to buy as I outgrow my others!! Haha jk no bill coming! I do plan to make the apple pie and a pumpkin pie for thanksgiving. I was wondering if it’s possible for convenience to freeze these for future use? I know you’ve kept them in frig but it would be nice to have one in hand. My husband has me making them a lot lately! Thanks for all of the great recipes!
Thanks, Carol! Yes, this pie crust freezes great!
If I was short on time/motivation and HAD to use a food processor to make this… how would I do it? Use it to grate the butter?
Yes, you could add the butter in pieces to the food processor and pulse with the dry ingredients until the butter is in pea-size or slightly larger pieces and then continue to pulse while adding the ice water until it just comes together.
Thank you!!
This crust turned out beautifully!! With the help of your tutorial, I changed my technique. Finally I have a crust that didn’t shrink! Thank you for identifying my mistake (pushing the crust into the edges instead of lifting it and letting it rest in place).
I know I can’t wait to try this pie crust with the sour cream sounds wonderful. Can I use my food processor to mix the pie crust do as I do with a traditional pie crust? Also, how do you store your beans for pie weights? I put mine in a jar with a lid and they smelled sour.
Yes, you could use a food processor for this recipe. I usually put my cooled beans in a freezer ziploc bag and seal.
My favorite pie since childhood is Banana Meringue, and my husband started a tradition last year of baking one for me for my birthday, but he’s less comfortable making the pie crust. I made and blind-baked this recipe today, and it was a great success! Thank you!
I used only 4 tbsp of butter and it turned out AMAZING. I was meaning to make two pies though and only had enough dough for one (even though I doubled the recipe).
All I had was light sour cream but I went for it anyway… I had to add probably 2 tablespoons extra to get it to come together. Am I going to ruin my chicken pot pie by attempting to bake it?! Wondering if I should pick a different pie or biscuit recipe or just go for it…
Hi Jenny, sorry for the delay in responding. Did you end up baking it with the light sour cream?
I did attempt! It didn’t turn out great, but I’m sure much of that was user-error 😉
I’m sorry, Mel, but I would not recommend this pie crust to anyone! I made it yesterday and it leaked grease on the bottom of my oven and smoke poured out of the oven and into the kitchen when I opened it up. My husband and I used a lot of elbow grease to clean the oven afterward and the pie itself tastes like smoke.
I am 73 years old and have been making pies for years and years. I just thought I would try this…but, so sorry I did. Actually, it’s not even flaky! I have tried a couple of your other recipes, tho, and liked them! I really hate giving a bad review!
Thanks for the this great recipe although I’m curious if anyone else had this issue or if you know what I may have done wrong…I’m made pie crusts for years with no issues and was excited to try this sour cream version. I made three crusts (a separate batch for each one) and they were the most beautiful looking crusts I had ever made UNTIL I put them in the oven. The fluting literally started to melt with some edges of the crust actually falling off. It happened on both pies. I chilled the crusts before baking and I’ve reread the recipe several times. Any ideas? I’m hoping that the pies will still taste good even if they don’t look so great. That’s what ice cream is for, right?