Homemade Bagels {New and Improved}
Make perfect homemade bagels at home with this easy step-by-step recipe. The bagels are easily customizable with your favorite toppings!
I originally published this recipe in 2011 and have since added new photos and additional recipes notes, as well as a few recipe enhancements, to make this recipe better than ever!

One reader, Nancy, commented: Thanks so much for this absolutely delicious recipe! Followed your recipe exactly, (used sesame seeds as the topping), and they are every bit as good as any bagel shop we’ve ever been to, and oh-so-much better than any grocery store brand. ⭐️⭐️⭐️⭐️⭐️
Why You’ll Love This Bagel Recipe
- The bagels are straightforward and easy to make at home – the recipe doesn’t require any overnight starters or lengthy instructions.
- The bagels are incredibly delicious with a perfect fluffy-chewy texture.
- It is very easy to customize the bagel toppings to your tastes.
- The baked bagels freeze extremely well, so you can make large batches and freeze for later breakfasts, snacks, or bagel cravings.
- This is the perfect recipe for beginner bread makers. SO MANY people have commented that they struggle making yeast doughs or they are brand new to breads or they are scared to make homemade bagels…but they tried this recipe and the bagels turned out amazing!

How to Shape Homemade Bagels
- Turn the dough out onto a lightly greased work surface and divide the dough into eight equal pieces, about 115 g/4 ounces each.
- Roll each piece of dough into a smooth, taut ball. Let the balls of dough rest for 30 minutes. This helps relax the gluten so that when they are shaped, the dough holds its shape without stubbornly springing back.
- Use your thumb to poke a hole through the very center of each ball then use both thumbs together to twirl and stretch the dough until the hole is 1 to 2 inches in diameter (the bagel will be around 4 inches across).
The most important thing you can remember when shaping homemade bagels is to let go of perfection! Not all of them will look the same, and some of them may have thin/thick spots. It’s ok! It gives the bagels personality…and they all taste delicious regardless of how they look.


Why are Bagels Boiled Before Baking?
There are several reasons why bagels need the necessary boiling step.
- Boiling the bagels helps develop the signature chewy texture. The steaming hot water cooks the very outside layer of the bagel allowing it to rise in the oven but not as much as it would without the water bath. This is what helps create the classic dense, chewy texture.
- The sweetener in the water (either sugar or honey) also helps the bagels develop a beautifully golden crust while baking.
Bagels that aren’t boiled prior to baking end up just simply posing as a quirky dinner roll with a hole in the center instead of the gloriously chewy, delicious bagel they were meant to be.


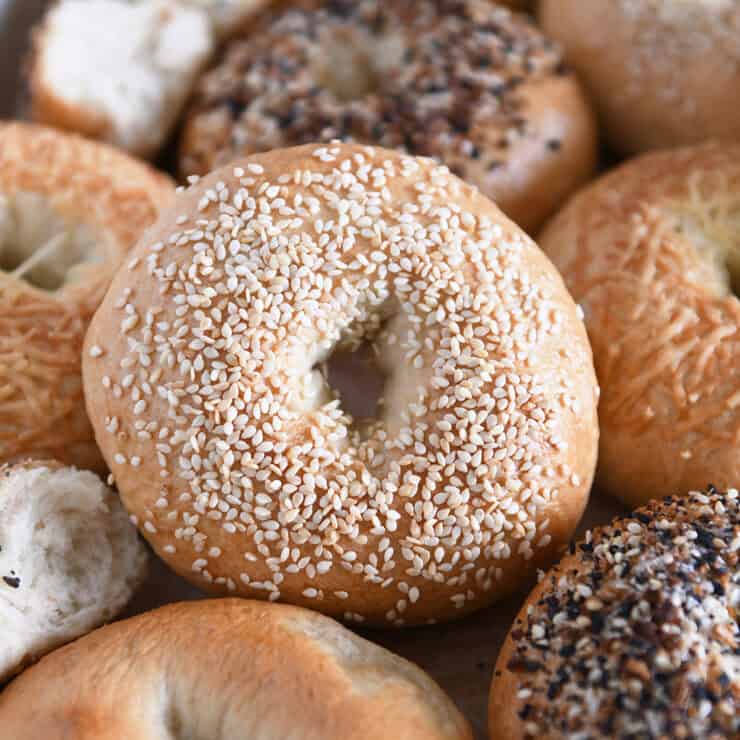
Best Bagel Toppings
To get bagel toppings to stick, brush the tops and the sides of each bagel with a simple egg wash (1 egg white + 1 tablespoon water). For maximum coverage, place the toppings in a shallow bowl and dip the bagels, turning to coat the top and sides. Or simply sprinkle them on top.
Our favorite bagel toppings are:
- Sesame seeds
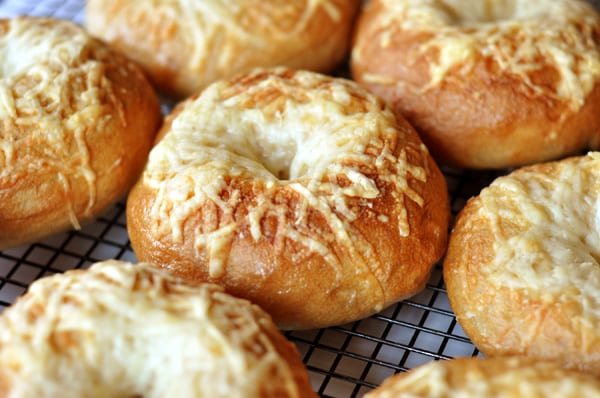
- Finely grated Asiago or Parmesan cheese
- Sesame seeds
- Coarse salt
- Cinnamon and sugar
Of course, you can also leave the bagels plain. If doing so, the egg wash is optional (but adding it will further help the golden brown crust to develop).


A Few Additional Tips
Making bagels at home is not hard, but it can be helpful to keep the following tips in mind:
- The dough for homemade bagels is stiffer than a dinner roll or sandwich bread dough. This is by intention. Because the bagels are boiled before baking, a lower hydration dough, like bagel dough, holds up to the boiling water bath without disintegrating and the result is a perfectly chewy bagel.
- I highly recommend investing in a kitchen scale {aff. link} and weighing ingredients, particularly dry ingredients like flour. If you measure your flour in cups, lightly fluff the flour, scoop in the cup and then level off.
- If you live in an excessively dry climate, you may want to start with 1/4 cup less flour and add remaining flour only if the dough is sticking to the sides and bottom of the bowl.
- Keep a timer going during the boiling step – it may seem counter intuitive, but boiling the bagels longer won’t result in a better bagel. They just need a minute or so per side, max.
Most of all, have fun with this recipe! This has been a favorite recipe of ours for over ten years. My kids love to help with shaping the bagels, choosing the toppings, and of course, devouring the bagels after they’ve baked and (barely) cooled.


Perfect Homemade Bagels
Ingredients
Dough:
- 1 tablespoon instant or rapid-rise yeast
- 4 cups (568 g) bread flour (see note)
- 2 teaspoons salt
- 1 tablespoon brown sugar
- 1 ½ cups warm water
Water Bath:
- 2 to 3 quarts water
- 2 tablespoons brown sugar
- 1 tablespoon granulated sugar (see note for honey option)
Egg Wash:
- 1 large egg white
- 1 tablespoon water
Optional Toppings:
- Sesame seeds, Everything Bagel seasoning, grated Parmesan or Asiago cheese, coarse salt, cinnamon and sugar, etc.
Instructions
- In the bowl of a stand mixer fitted with the dough hook, combine all of the dough ingredients and mix on low speed until the dough comes together. The dough will be fairly stiff (but shouldn't be dry).
- Increase the speed to medium and knead the dough for 10 minutes. This is a high-gluten dough and the long kneading time is necessary to develop the gluten.
- Place the dough in a lightly greased bowl and cover with lightly greased plastic wrap. Let the dough rise for 1 to 1 1/2 hours until noticeably puffy.
- Turn the dough out onto a lightly greased work surface and divide the dough into eight equal pieces, about 115 g/4 ounces each. Roll each piece of dough into a smooth, taut ball. Let the balls of dough rest for 30 minutes.
- Line two half sheet pans with parchment paper and lightly grease with cooking spray.
- Use your thumb to poke a hole through the very center of each ball then use both thumbs together to twirl and stretch the dough until the hole is 1 to 2 inches in diameter (the bagel will be around 4 inches across). Place the shaped bagels on one of the prepared baking sheets.
- For the water bath, add the water and sugars (or honey – see note) to a large, wide pan or pot and bring to a boil.
- Preheat oven to 425°F.
- Transfer the bagels, three or four at a time, to the simmering water. I like to gently re-stretch the center of the bagel if it has closed up while the bagels have rested. This is optional; if you do the same, make sure to stretch gently so as not to deflate and compress the bagel.
- Cook the bagels for 1 minute. Flip and cook for another minute. Use a wide spatula to lift each bagel up, letting the excess water drain back into the pot. Place the boiled bagels onto the prepared baking sheet, spacing them several inches apart. I bake six bagels per half sheet pan.
- Repeat with the remaining bagels.
- For the egg wash, whisk together the egg and water. Brush the top and sides of each bagel and then sprinkle with desired toppings: sesame seeds, everything bagel seasoning, cinnamon and sugar, coarse salt, grated Asiago or Parmesan cheese, or other toppings of choice. If leaving the bagels plain, the egg wash is optional.
- Bake the bagels for 20 to 25 minutes until golden brown. Remove the bagels from the oven, and transfer to a cooling rack to cool completely (don't let them cool completely on the baking sheet as they have a tendency to stick due to the sugar/water bath).
Notes
6 cups bread flour
1 tablespoon salt
1 tablespoon grown sugar
2 1/4 cups warm water
Recommended Products

Recipe Source: adapted slightly and expounded upon from King Arthur Flour
Recipe originally published April 2011; updated September 2025 with new photos, recipe notes, etc


These are killer. We love them. My husband loves jalapeño rounds with cheese on the top. I just like Parmesan or sesame seed. That chives cream cheese is where it’s at too.
These turned out awesome, I am so excited to have these in my repertoire!
I just finished making these and they were delicious and easier than I thought they would be. Yes, they take a little time (what bread doesn’t?), but the steps go quickly and they turn out great. Thanks!
Rohini – I’m not familiar with that kind of yeast. Does it say rapid rise or instant yeast anywhere on the bottle?
Can I use Fleischmann’s Pizza Crust Yeast to this, that is all I have right now?
My cute husband just made this, since he has a huge love of bagels, and I’m not feeling well, but I ate a few bites of a warm one from the oven and it’s pretty much amazing! Probably good I cant gobble them all up now!!
Katie – I use my Bosch electric stand mixer to make and knead the dough.
I just found this recipe and am excited to try it! Do you usually use a bread machine? It looks like a bread machine from the pics. I know that bagels are pretty motor-intensive so I was wondering what kind you use?
Thanks!
Oh my! Oh my! I just made these and they are fantastic! They are soft, yet chewy, and the outside is ever-so-slightly crispy. I am never buying bagels ever again … ever. Thanks for such a great recipe!
I’ve made these 3 or 4 times now. Once with the wheat flour variation, and the other times with white flour. They are THE YUMMIEST THINGS ON THE EARTH!! So much better than any store bought bagels I’ve found. My only question is: when you finish letting the dough balls rise and you poke a hole in them, does the dough do a weird deflating thing that leaves it a little wrinkly?? I don’t think the taste has been affected, but for some reason mine are having a weird texture on top because of that.
Lana – so glad you love these! As for the wrinkling issue – are your dough balls well covered? I know the recipe says to cover “lightly” but the reason they probably get wrinkly when you poke a hole through them is because the air has crusted the top of the dough a little bit (forming a bit of a skin) so when you poke the hole through that skin, it deflates the rest of the dough more than it would if the entire surface of the dough was soft. Does that make sense? Clear as mud? My recommendation would be to cover them so that there isn’t a lot of air flow around them as they puff up. If you really don’t think that’s the issue and that they are covered well enough…well, then, I’m stumped! The only other thing I can think of is maybe they need a bit more flour to hold their shape and not wrinkle down – bagel dough should be a bit stiffer than other yeast doughs. Let me know if you have any other questions!
I just found your site today through a link to your soft wrap bread. I will be making that for sure as my husband just discovered a love for felafel on his most recent deployment to Iraq and it sound just like what he described to me. But this bagel recipe is all for me. The bakery in our little town makes bagels that look just like these and they are amazing! Now the store bought bagels just seem so dense that I don’t care for them anymore. Looking forward to trying my hand at baking bread!
Hey Mel! Is it possible to leave your bagels in the boiling water for too long (or not long enough)? I made my first batch tonight, and they taste okay, however, the texture [on the outside] of a few of them is doughy. I also absent mindedly left them on the cookie sheet after they were done cooking which didnt help! My dough was also pretty sticky- not stiff like yours. I used my scale to measure, but I dont know if it is our altitude (Utah), the wet, rainy day or the flour I used …. I will definitely be trying these again though. I was almost there! 😀 Thanks!
Hi Barbi – yes, actually, leaving the bagels in the water for too long could make a difference (or not long enough). I think if they seemed overly doughy to you it might have been a combination of all the factors – rain and temperature and altitude can make a huge difference in baked goods. Even with the measurements (good for you for using a scale!) being at a high altitude, you may need to throw in a couple extra tablespoonfuls of flour to your baked goods.
Hi Melanie,
I am on round 2 of these bagels. I screwed up round 1 before the boiling phase so I am trying them again today!! 2 questions. Is it ok to put the dough to rise in a very slightly preheated oven? that is usually where I put my yeast breads to rise but maybe that isn’t the right place. our house is usually a little on the chilly side so I always worry the breads wont rise properly in a place that isn’t a little warm. second, at what point could I add in raisins, mini chocolate chips or cinnamon INTO the bagel. I would love to have bagels that have these ingredients IN them instead of just on top of them…thoughts??
thanks!
Melanie
Melanie – I never use a slightly preheated oven to rise my dough(s) because I have had bad luck with it – the dough gets a weird crust on it and it is never as fast as I want it to be. If it makes any difference, my house is always chilly, too – between 64 and 66 degrees and my dough rises just fine on the counter. Sometimes it takes longer than the suggested time but it always rises just fine. I’m not saying to not use the preheated oven, I just don’t have any really good advice for you on that point. If you want to add cinnamon or another dry ingredient like that, add it in with the other dry ingredients (flour, etc.). For raisins or chocolate chips, knead them in at the very end by hand after the dough has been kneaded most of the way already. Hope that helps. Let me know if you have any other questions!
I made these the other day and they turned out so yummy! We gobbled them up and I wished I had made a double batch like you suggested. I will definitely be making these again. Thank you for all your delicious recipes!
I made these this morning (as well as the refrigerator bran muffins…also yummy) and couldn’t believe how easy, fun and delcious they were! I made some into sunflower bagels and some into poppy seed but I just saw that someone else did cinnamon and sugar and I want to make another batch just to try those! I can’t see why I would ever buy bagels from the grocery store again! These were just fantastic! Thanks for the amazing step by step instructions!
I have a bit of a yeast bread dough…”disability” but I tried this recipe. I followed your instructions step by step. (pics are a great help) and, I DID IT! they turned out amazing! seriously. amazing. thanks so much for helping a girl out 😉
how’s that stink-free kiddo endeavor going? 🙂
i’ve never made bagels and to tell you the truth, i had no idea how they were made. thanks for the schoolin’. 🙂
You just make this look too easy 🙂 Now I have to try making them. I am not toatlly dough comfortable yet…
Melanie,
Consider mission #2 completed. Yesturday I was at Costco and was tempted to buy the Pillsbury crescent rolls that come in can because they were on sale but I remembered that yummy recipe of butter crescent rolls you recently posted and decided to make those instead. I filled them with chicken and kind of made chicken bakes out of them. They were so delicious, my whole family devoured them-and the remaining rolls. Thanks for all the great recipes and tips!
I did it. I made them. They were much better than I thought they were going to be. Slather on some cream cheese (even better yet, cream cheese AND Nutella) while warm, and they were delightful. I always thought bagels were beyond my abilities. Thanks for sharing this recipe.
They should make a doctorate program for chefs. Then you would have the title of Dr. Melanie, because you have conquered your field of specialty!!
I made these today….they are amazing!!! I made 2 plain, 2 with cheddar, 2 with poppy seed, and 2 with tastefully simple garlic garlic and parmesan cheese (this flavor was our favorite..it tasted like an everything bagel…only better).
Thanks for sharing!
Hi Mel – Thanks for the wonderful tutorial for the bagels. I’ve made them once before, with another recipe, and they tasted ok but weren’t as pretty as yours. I have a question, I’m in the middle of making these and the dough tastes really salty. Could the amount of salt be a tad bit off or does it get milder after the dough is cooked? I’ve tried many of your recipes and I have never been disappointed!!
Angie – to be honest, I’ve never tasted the unbaked yeast dough while making these so I don’t know if it is on the salty side. The baked bagels, in my opinion, aren’t overly salty – so I hope yours mellow while baking. Let me know how they turn out!
The bagels turned out amazing! Thanks for helping me over come my intimidation of bagels made from scratch. I see many years of bagel making from home in my future. I also can’t wait to see what other great bread recipes you will be sharing with us. Another one I have marked to try out is the Naan bread.
Thanks for sharing your recipe. I can’t wait to try your recipe. I love making bagels, but I haven’t done it in quite a while. Mine usually turn out well, but there are usually one or two that go rogue and end up deflating either right before or during baking. Any suggestions?
Wendy – I’m not exactly sure why that would be happening, to be honest. Perhaps it could be the bagel that ends up in the boiling water too long while the others are removed? I’m not sure!
What do you mean by gluten? Can you just buy gluten at the regular grocery store because I do not carry bread flour either. Love your site. Keep baking bread!
Hi Aimee – vital wheat gluten is sold in most average grocery stores (I’ve seen it everywhere from Walmart to our larger grocery stores) and is usually located near the other flours. I buy mine online at King Arthur Flour. Let me know if you have other questions!
Melanie – have you ever made mini bagels? I’m just wondering what the boiling time and baking time would be? Thanks!
Hi Stacy – I’ve never made mini bagels but love the idea. I’d probably cut the boiling time down to a minute each side and then watch the baking time – depending on the size, you may need to only bake for 10-ish minutes. Let me know if you try them out!
I am in the process of making these bagels 🙂 Here’s hoping I have success. I’ll let you know. Thanks for the step by step photos and all the amazing recipes you share. I haven’t had a recipe that wasn’t a success from your blog yet.
I’ve been wanting to make bagels for a while now! These look delicious, great tutorial.
I have always wanted to try bagels. I’ve been venturing into bread making a little more this year, so I’m sure the tutorial will be helpful! Thanks!
Those look so good! I love Asiago cheese bagels. I also like adding garlic to my asiago cheese bagels.
I couldn’t wait even one more day, had to make these today and they are awesome! I love the crunchy outside and soft chewy inside. My kids are major fans of bagels so I have lots of happy kids right now. They love bagels so much that they decided they wanted these bagels for our FHE treat instead of the usual sugary treat.
We love making homemade bagels! I made sweet potato ones this fall and those were amazing 🙂 But, I think blueberry or cinnamon raisin are on the top of our favorites list. These look wonderful — thanks for your tips.
I can’t wait to try these! The complete lack of good bagels might be the hardest thing about moving to TX from NJ. I so miss NYC bagels! I’m sure you’re doing an awesome job with your first goal, but non-smelly boys might be tough if you plan on letting them outdoors. My stepsons are 10 and 12, and I think they could win gold at the Olympics if “icky” was a sport! Good luck, though! I’m rooting for you. 🙂
I couldn’t wait another minute to try these so the bagels are in the oven as we speak….with cinnamon and sugar on top! Thanks for sharing!!!!
I have always been intimidated to make home-made bagels, until today! Your step-by-step tutorial is the best I have ever seen, Melanie! You are amazing! 🙂
We love bagels! I have been dying to make them from scratch for quite sometime but haven’t gotten around to it yet. I think that it is about time I change that! Thanks for the recipe and step-by-step photos!
this is so helpful! thank you! now ill have bagels to go with the cream cheese in my fridge!
This made my day! I have been looking for a bagel recipe and HERE IT IS! My only problem now is that yeast and I don’t get along at all… yet, but I’ll keep trying. I bet if I had a cool contraption like your handy dandy Bosch mixer it would like me better. Sadly, I don’t. Just my hands and they don’t work well with yeast. 🙁
I wonder if this recipe would do well with ALL whole wheat pastry flour, do you think?
AWESOME! as soon as hubby and i get through the low carbs phase of p90x, you can bet ill be making these! thanks for the tutorial.
Mel, these bagels look amazing and you make the process look so simple! Great photo tutorial, too. This will definitely come in handy for when I eventually get over my fear to try homemade bagels. Thanks for sharing and inspiring me with something new!
How long do these last without freezing? I can’t wait to make some but don’t want any going bad on me! Thanks!
Coralie – we eat these for about 2-3 days (by day 3 they taste best toasted).
Melanie,
What do you mean by “instant yeast”….I have looked for it in the grocery store and can’t find it. Does it go by a different name? This is different than active dry yeast right?
thanks,
melanie (jolyn B’s friend)
Melanie – instant yeast is also called rapid rise yeast. I know at Sam’s Club they carry the Fleischmann’s brand of instant yeast and the grocery stores in my area (which I assume are similar to your neck of the woods) have instant yeast in the little packets and in jars. Looking for “rapid rise” may help your search. Hope that helps a little!
When I pulled your website up, I was so excited to see your new bagel post! I’m trying to cut costs wherever possible, and have been slowly starting to make more bread items. Your step by step instructions make the process so much easier! Thank you!
This recipe is everything!!! We also loved the step-by-step instructions!
Have you ever made cinnamon raisin or blueberry bagels? Those are the faves around here. I imagine it would be relatively simple to add raisins or dried blueberries, but if anyone has measurements I’d love to hear them.
Rachel – I’ve never made either version so I don’t have any really great advice. I think with both you would probably want to knead in the raisins/fruit at the very end – and possibly add cinnamon with the other dry ingredients? Hmmm…just thoughts. Sorry!
Those look so good.
You never cease to amaze me! I just want one of YOUR bagels right now because I’m too tired to do anything at the moment. Maybe later this week though. Thank you, Mel! Your two goals in life are awesome. I know you’re doing a fine job on the second one, and am certain that you’re most likely nailing the first goal with just as much success.
I love bagels and have thought about trying to figure out how to make them at home – you really made it seem “easy” with the pictures and I appreciate that! I’m adding this to my “things to make” list – not sure when I’ll get to it but I will try it.
You made that look way too easy…and yummy!
This will be so fun to try! Thanks for the step by step instructions.