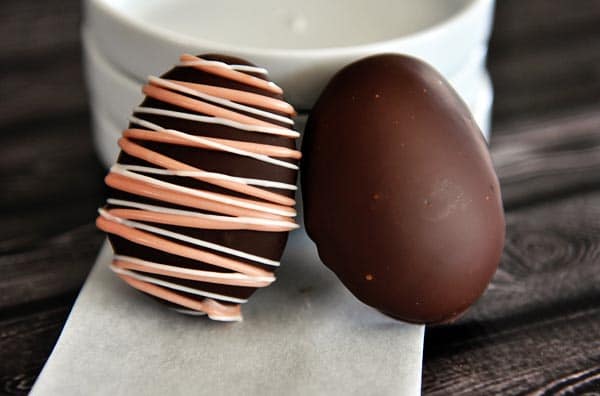
Homemade Marshmallow Easter Eggs
Check out these simple, homemade marshmallow eggs that include a step-by-step tutorial. Who knew making your own marshmallows could be so easy (and cute!)
I’m not 100% positive but these homemade marshmallow Easter eggs (chocolate-covered, no less) may just be one of the coolest things I’ve ever made. Ever.
I mean, homemade marshmallows. Homemade! Marshmallows!
I know some of you are total rock stars and have been doing homemade marshmallows for, like, centuries, but I’ve just never really seen the point.
Until I decided I wanted to make homemade marshmallows in an Easter egg shape and cover them with chocolate. Now that’s something I can totally get behind.
First of all, my Aunt Laurie is totally responsible for these babies. She’s famous for her marshmallow eggs in her Idaho town (hello, Rexburg!) and I’m guessing she makes hundreds of these every year.
So in other words, she’s a chocolate-covered homemade marshmallow Easter egg expert.
Is there really any other kind of expert to work toward? I think not.
I decided to try my own hand at the famed eggs this year and they are one of the funnest projects the kids and I have done together in the kitchen in a while.
Not to mention the fact that I have seriously been converted to the ridiculous goodness of homemade marshmallows. Heaven help me.
Truth: Homemade marshmallows are a bit sticky and can be messy (that’s kind of part of the fun, though, if you can just chill out for about an hour) and you definitely don’t want the kiddos in on the boiling sugar syrup action, but there is a lot they can do.
Pressing the egg molds into the flour, scooping out the marshmallow, taste testing. You know. That kind of stuff.
As excited as my kids were for these marshmallow eggs, I was the one over in the corner patting myself on the back for totally killing it in the rock star department.
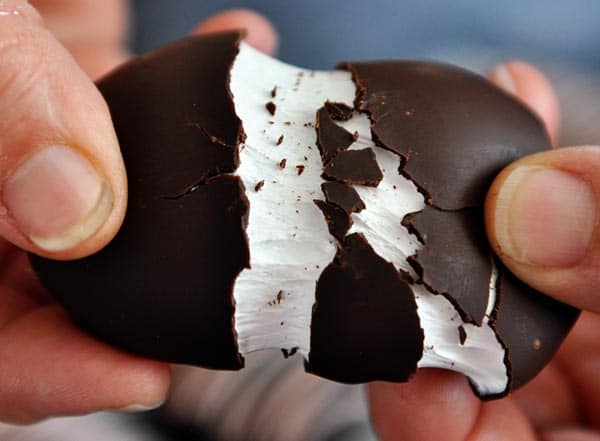
Not only are they cute as cute can be, this homemade marshmallow action is so delicious, it totally blows Peeps (if you like them, sorry) out of the water.
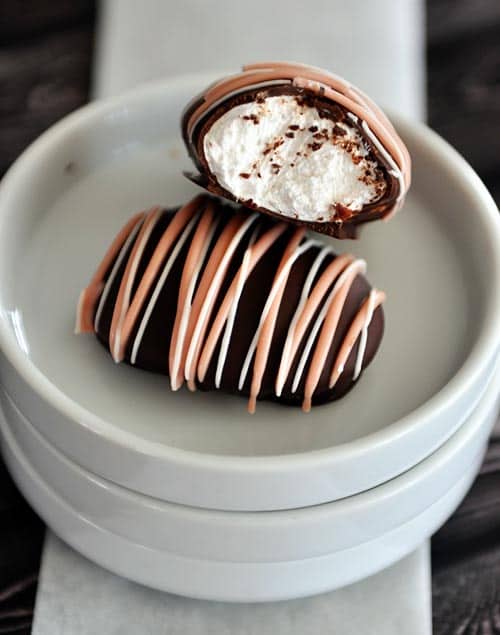
Of course the Ghirardelli bittersweet chocolate covering the insanely light and fluffy marshmallows doesn’t hurt either.
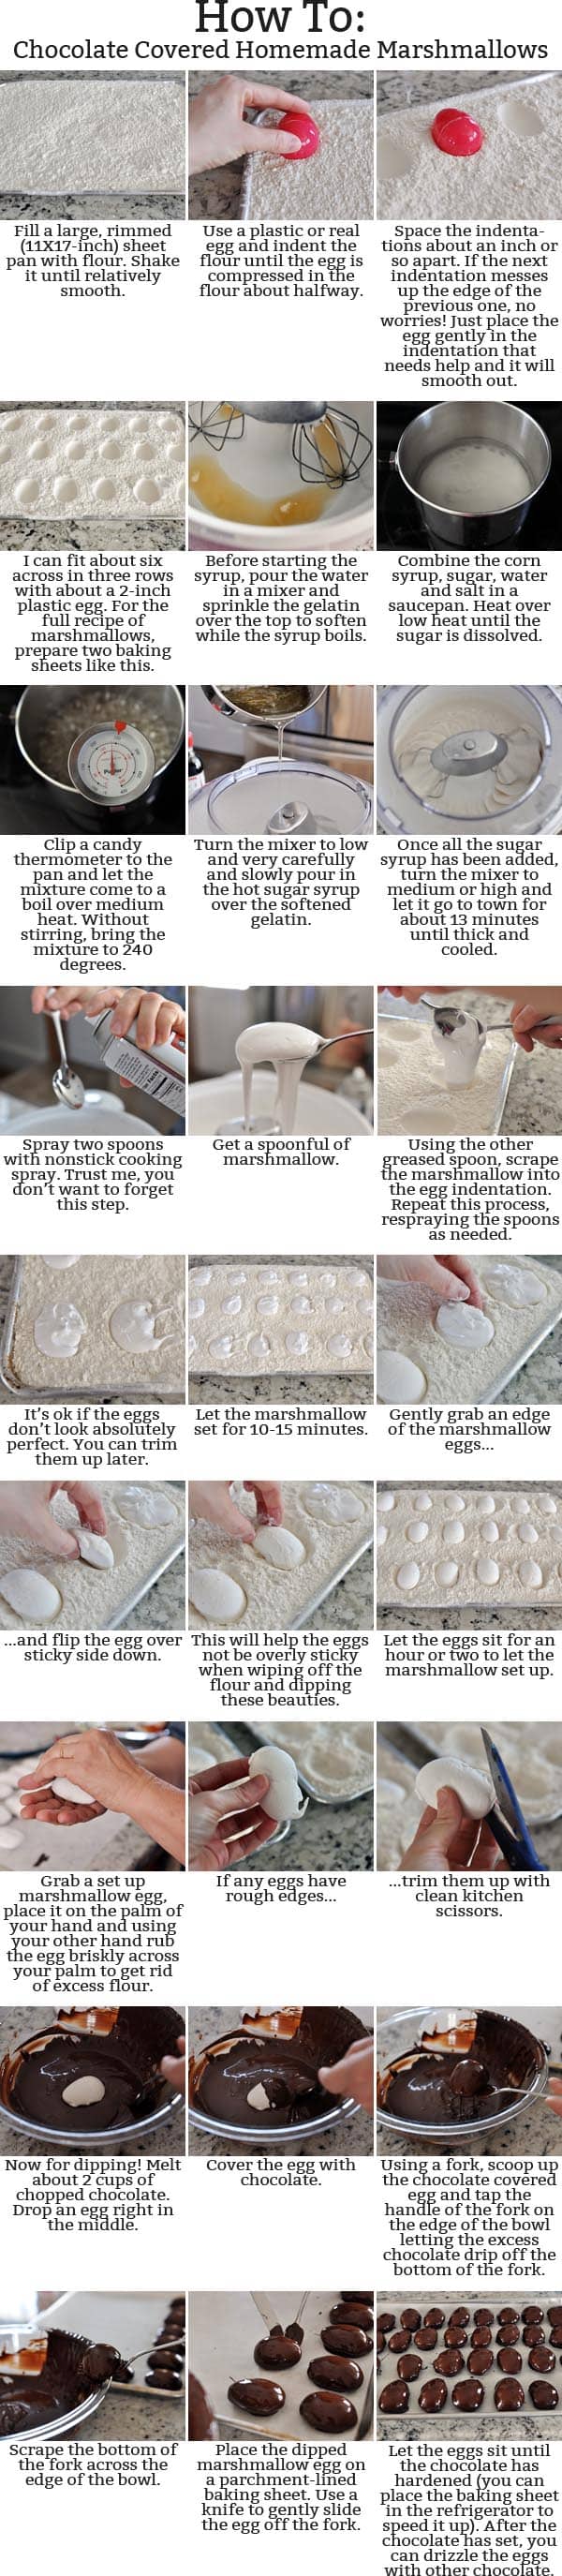
Because I love you and I don’t want you to be scared of this, I have a whole in-depth picture tutorial below (thanks to my lovely mom for being the hand model for this post).
But really, you probably don’t even need it. They are so simple.
If you can press egg shapes into flour, use a mixer to whip up marshmallows, and have the patience not to curse when strings of marshmallow may or may not end up in your hair, you are good to go.
Homemade marshmallows! Egg shaped! Covered in chocolate! It totally needs to be your thing this week.

Homemade Marshmallow Easter Eggs
Ingredients
Marshmallows:
- ½ cup cold water
- 3 envelopes unflavored gelatin
- 1 ½ cups (318 g) granulated sugar
- 1 cup light corn syrup
- ½ cup water
- ¼ teaspoon salt
- 1 tablespoon pure vanilla extract
Other:
- Lots of all-purpose flour
- 2 cups (340 g) chopped chocolate or good-quality chocolate chips for dipping
- Sprinkles or colored chocolate wafers for drizzling
Instructions
- To start, fill two large, rimmed baking sheets (11X17-inch) with flour, shaking to get a mostly even layer. Using a plastic Easter egg (you can also use a real egg or other egg-shape object for the mold), press lightly into the flour to make egg molds. Space the indentations about 1-2 inches apart. If the next indentation messes up the sides of the first indentation, don’t stress. Simply press the egg shape lightly into each indentation that needs the edges fixed a bit. Using a 2-inch (in length) plastic egg, I make about 6 indentations across in 3 rows for a total of 18 indentations for each sheet pan. Set the sheet pans carefully aside.
- For the marshmallows, pour the cold water into the bowl of an electric stand mixer fitted with the whisk attachment (you can do this without a stand mixer, but you’ll need to use an electric handheld mixer that won’t burn out after 10 or so minutes of mixing) and sprinkle the gelatin over the top, letting it soften.
- While the gelatin softens, combine the sugar, corn syrup, water, and salt in a medium saucepan and heat over medium-low heat until the sugar dissolves. Clip a candy thermometer to the side of the pan and increase the heat to medium. Let the mixture come to a boil and continue cooking without stirring until the syrup reaches 240 degrees F on the thermometer.
- Turn the mixer to low speed and (carefully!) pour the hot syrup into the mixer in a slow and steady stream. Once it has all been added, turn the mixer to medium or high and let the mixer whip the mixture for 10-13 minutes, until the mixture is cooled and is thick and fluffy. You don’t want it to mix quite as much as when making marshmallows that will be poured into a pan to later be cut into squares. The mixture should be slightly softer than that so that it molds to the egg indentations made in the flour. Mix in the vanilla extract.
- Grease two spoons with cooking spray and carefully scoop spoonfuls of the marshmallow mixture into the indentations in the flour (see the pictures below, if needed). Once all the egg molds are filled with marshmallow, let them sit for 10-15 minutes.
- Once slightly set, gently lift an edge of the marshmallow and carefully flip over so it is now sticky-side down in the flour. Don’t press on it or push it into the flour, just let it gently sit on the top of the flour.
- Let the marshmallows set for 1-2 hours (or up to overnight – covered loosely with plastic wrap).
- Take each marshmallow egg and rub it briskly with the palms of your hands to remove any excess flour. It’s ok if there is still a very light coating of flour on the egg – it won’t be noticeable after the egg is covered in chocolate. All the excess flour can be poured right back into the flour bag/container.
- Melt the chocolate over low heat or in the microwave on 50% power in 1-minute increments until melted and smooth. To prevent blooming (the white streaks in chocolate after it has set), stir in a bit of reserved finely chopped chocolate into the hot, melted chocolate to lower the temperature just a bit.
- One by one, drop a marshmallow egg into the chocolate. Using a fork, cover the egg in chocolate. Lift the egg up onto the fork and tap the handle of the fork on the edge of the bowl to let the excess chocolate fall through the tines of the fork into the bowl. Gently scrape the bottom of the fork on the edge of the bowl and then transfer the egg to a parchment or wax paper lined baking sheet, using the edge of a butter knife to help slide the egg off the fork onto the parchment.
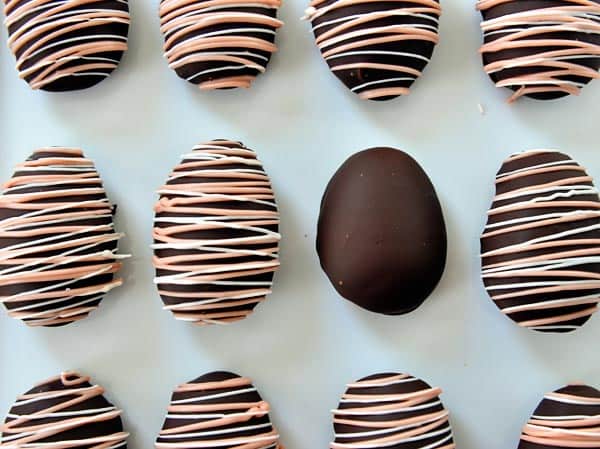
- Repeat with the remaining eggs. If using sprinkles, toss them lightly on the eggs while still wet with chocolate. Place the eggs in the refrigerator to let the chocolate set. After the chocolate has set, colored melting wafers or other chocolate can be drizzled over the eggs.
- Store in the refrigerator for up to a week.
Notes
Recommended Products
Recipe Source: adapted slightly from my Aunt Laurie (who is famous for her chocolate-covered marshmallow eggs!), marshmallow recipe from Ina Garten
Ok, wow! These were completely delicious and so much fun to make with my kiddos!! They had a ball getting completely covered by marshmallow and terrorizing each other while I contentedly dipped them in chocolate by myself. A fun Easter treat and SO much better than store bought marshies!!
I’d love to try this next Easter. I’ve made homemade mallows a couple times (yummy! But a project). Wouldn’t it be funny to use a peep for the mold instead of an egg? I wonder if they’d turn out decent or look…less lovely. Maybe a fake peep would work better
Thank you for the recipe. I had been buying chocolate covered Easter Eggs for my grandkids from a local candy store and their prices have gone through the roof!!! Now that I have made these once ….. it will be a yearly affair from now on. Thank you so much.
I stick a toothpick in the marshmallow and dip them that way, I have been making peanut butter balls for years and toothpicks are the way to go.
Happy Easter
Fun to make! Everything worked out well for me, except the chocolate. It was too thick and didn’t have a good dipping consistency.
The gelatin definitely has a smell to it!
We will be making these again next year, it may become a tradition!
Thanks, Mel, for the fun recipe.
I was very nervous about making these. I have never attempted making marshmallow before, but figured I would give it a shot! Thanks to your readers for their help. I went 8 minutes on my KitchenAid mixer, kept a close eye and went about 10 minutes total. Perfect! In and out the flour mold without any problems. Also pressed 3 almonds in each of the last dozen. Delicious and really fun to make. I used a pastry brush with stiff bristles to brush off the flour. That worked like a charm. That you for this recipe.
I would like to try these for Easter and was wondering if you have to store in the fridge
when your done?
No, they can stay at cool room temperature.
These look great but 36 eggs is just too many for my family. Do you think I can just cut all the ingredients in half and only make 18?
Yes, you definitely can!
I want to try these only I’d like to make them for Christmas just making them a different shape. I would love to add peppermint extract or peppermint oil to the marshmallow cream. Would this work?
I haven’t tried it, but it should work great!
I just want to say again how delicious these marshmallow eggs are. I made another batch after Easter to send a candy package to my boyfriend since he couldn’t visit for Easter. I have also finally finished and published my post detailing my experience making these and my modification without corn syrup, for anyone who is interested. Thank you for the wonderful recipe, Mel! 🙂
These were such a fun Easter activity!
It was around the time that I tasted the marshmallow while putting it in the molds that I was pretty sure that the eggs were going to be gross. I also swore a couple of times that there was NO WAY that these would be an Easter tradition. There are now a couple dozen adorable chocolate marshmallow eggs in my fridge, and we love them so much. The crunch of the chocolate, the contrast of the bittersweet Ghiradelli chocolate and the marshmallow, and the fact that they taste about a million times better than the Russell Stover ones at the supermarket are all reasons that this is, indeed, going to be an Easter tradition. Thanks, Mel!
I’m glad that in the end you liked them, Christin! Thanks for the review!
Thank you for including this in your Easter recipes email! I’ve been using your recipes for many years & somehow never noticed this one. Felt lucky we had gelatin & corn syrup on hand to make these today! Delicious & a new Easter tradition!
Thanks, Jessica!
These are delicious! Ever since I found this recipe about 5 years ago, I’ve made them every year for Easter. Instead of corn syrup I use a boiled sugar syrup. Do you mind if I post the recipe with my modifications and what I did on my blog? Of course I would credit you as the original author. I absolutely love marshmallow eggs, and soon it will be time to make them again this year.
Sure 🙂
Hi,
I looked up your receipt on marshmallow eggs and I want to give t a try.
My life has been forever changed, having discovered that one of my (genius) children put some of these in the freezer. They were amazing! I have now put all of our remaining chocolate marshmallow eggs in the freezer where hopefully no one else will discover them.
Also, this time I used a small (1 T) cookie scoop to portion the marshmallow and it worked great even without greasing. It was just about the perfect amount for each mold.
Whoa! Brilliance on all levels (freezing AND using a cookie scoop!)
Forgive me if it’s in the comments— how would you suggest adding a caramel base to these marshmallows? (ala See’s Scotch-mallows)
I was thinking maybe just make a pan of caramel and cut a piece to fit to the marshmallow and dip them together…?
Yes, I think that’s what I would do – pour the caramel into a shallow layer to harden and then cut strips to lay up against the marshmallow before dipping. Yum! Sounds delicious!
I have started using develived egg servers for my molds. A light spray and much easier then the flour molds.
What if the humidity is high when making these marshmallows
I’m not sure – you might need to add more powdered sugar.
Have you ever used a cookie cooling rack to place y
I piped mine into the egg forms in the flour. Recipe was easy to follow and the eggs were a big hit. I think I’ll make these every year. Thank you for sharing!
I don’t love the idea of raw flour on the marshmallow. Would powdered sugar work as well you think?
Sure, I think you could try that
I have been making marshmallow Easter eggs this way for thirty years and it has become an essential family tradition. Ten years ago my girls were diagnosed with celiac disease so I couldn’t use flour any more. I have used cornstarch and tapioca starch very successfully. Also, I have found that if your marshmallow mixture after beating is too stiff to settle nicely into the egg shapes you can microwave it for a few seconds to soften.
Hi, these were fantastic to make with my boys (5 & 7) for Easter. Usually we decorate traditional Easter eggs with the kids at our big family meal but this year I decorated one batch of these for the adults and left one batch blank (just dipped in chocolate). The blank ones went to the kids at our family gathering to decorate their own. They loved it and it kept them busy so the adults could visit without worrying about bowls of dye getting spilled, this could be our new tradition! Also, I don’t know if anyone else thought of this but, I put my baking sheets into large clean bags and then added the flour and made the molds. After removing the marshmallows I turned the bags inside out to capture the flour from the trays and just poured it back into my flour bin. Easiest clean up ever!
That’s a brilliant idea, Kathi!
If you are looking for an alternative to flour for the coating, my go to homemade marshmallow coating is a mix of half powdered sugar, half rice flour. The rice flour cuts the extra sweetness of the powdered sugar & provides a bit of structure, but the combo keeps it from feeling like you are getting flour taste in your sweets. 🙂
So I tried making these and the first batch was a disaster. The second batch I did 3 things differently after reading the comments.
1. I tested the thermometer. I have just moved from the east coast to SLC, which is a huge altitude difference. I had to take the sugar mixture off the stove 8 degrees lower.
2. I beat the mixture for a total of 8 minutes. I started checking it at 5 minutes. The first batch I eat it for 10 minutes before I put the vanilla in. This time I put it in at 5 minutes so when I saw the mixture thicken I was able to stop the beaters.
3. I got a few devil egg platters and sprayed it very lightly with Pam and then dusted it with flour. When putting in the mixture it was so easy to keep them separate and they popped out like a dream!
At the end I loved the result! Great recipe, and a big hit with my family!!!
Very smart idea about the deviled egg platters!
Just made these today with the kiddos…granted I did most of the work because it is kind of complicated for them. But they turned out great!! I used my Bosch on medium for 8 minutes and high for 2 minutes, and I do think I overbeat them slightly because they were a tad bit stiffer than I would have liked for the pouring process. I used 12 ounces of Nestle brand baking chocolate, and that was only enough to do 28 eggs. It was a rather thick chocolate, for those that preferred that. I used chocolate chips for the rest, and they turned out a lot worse than the baking chocolate ones. But they turned out so cute, and they are delicious! P.S. I have a pan of your Lion House rolls in my garage (it’s about 40 degrees in there) ready to rise and pop in the oven tomorrow morning for Easter with the in-laws. Can’t wait to taste them!
You are a rock star, Melanie!
Just a note for myself next year: used my Kitchenaid this year. 10 minutes on medium-high was a little too much. I should have stopped at 8. Also, I added 1 heaping Tbsp of Crisco to the melted Ghiradelli chocolate chips to make it thinner and easier to dip. LOVE this recipe. It’s our tradition 🙂
Have you tried silicon egg molds?
I saw a ad from Orson Gygi and Wilton.
I would think do something inside the mold would be a good idea.
I haven’t tried the silicon molds – but it sounds like an idea with promise.
These do look so good. And simple once you have the system down. Have you ever tried using flavored geletin?I amthinking starwberry, raspberry or orange. Thank you
I haven’t tried using flavored gelatin – sounds like a fun experiment!
Do you think it would work to use a ziploc bag with the corner cut off, and pipe the marshmallow into the egg shapes (instead of using two spoons)? Or is it too stiff for that?
I think the issue is that it would be way too sticky for a piping bag or ziploc bag. I don’t think it would pipe very well and could end up a little disaster-ish.
Wow. wow. wow. Perfect. And a forgiving recipe, as little hands were helping and things did not go as perfectly as they should have, but it turned out amazing. Will be making homemade marshmallow from now on.
I actually made 30 (3 x 5 in the flour pans) eggs and had enough for an 8 x 8 pan too.
Totally delicious!! Mine def. would have been better being whipped a few minutes less though – I did 10 minutes, but probably should’ve stopped at seven or eight, since it was a bit too firm to pour into the molds. Definitely going to become a yearly tradition though!!
Could I use any marshmallow recipe? I need this to be corn free.
I believe any homemade marshmallow recipe soft enough to spoon into the molds should work.
Have you ever tried to freeze these? I want to make some choc covered and then the rest in a plain pan to cut into squares for use later. Is it possible to freeze plain homemade marshmallows?
Also, have you tried adding in cocoa powder to make a chocolate creme?
Hi Heather – I haven’t tried either of those (freezing or adding cocoa powder). Sorry!
OK, just figured I’d ask. I will probably make a half batch then and skip the cocoa for the first attempt. Thanks for the reply!!!! I really appreciate it!
My sister and I get together and make marshmallow easter eggs every year. Our recipe doesn’t have corn syrup in it and they always turn out great. We also put in different flavourings . Our favorite is coconut but we have done peppermint, orange, strawberry, almond, cherry… Making these eggs is one of our favorite traditions. In fact we made four batches yesterday.
Hi Mel,
I’ve been wanting to buy a candy thermometer for some time (I usually just use my digital meat thermometer precariously balanced on the side of the saucepan, and a lot of wishful thinking!!) 😉
What brand do you use?
Hi Lisa – I have this one and swear by it:
http://www.amazon.com/CDN-DTC450-Digital-Candy-Thermometer/dp/B00279OPDU/ref=sr_1_1?ie=UTF8&qid=1428030360&sr=8-1&keywords=digital+candy+thermometer
Hi – These look great. We have a really small family. Do you think it would be possible to cut this recipe in half and still have great results?
Absolutely!
I can’t wait!! Have you ever tried the powdered sugar/cornstarch? Happy Easter and Thank you!!
I haven’t, Elizabeth – but I’m pretty sure some others in the comment thread have if you want to scroll through.
Powdered sugar and cornstarch would work because when you make straight homemade marshmallows that’s what you use to help dry them out so they don’t stick together.
Hi there, Im just wondering instead of using the flour as molds, couldnt you use an actual egg candy mold? Fill it with choc. let it set, then add the marshmallow filling followed by covering with more melted choc.?? Please let me know if you think this would work?!
Hi Lisa – sure, I think that could work. Just keep in mind the marshmallow filling is really sticky so you don’t want it touching the actual candy mold or else it could be a disaster getting the eggs out.
Hi mel. I want to tell you this: you know when you make something and you cant believe you did this? And you smile from ear to ear,and are so proud of yourself you want to share it with everyone, only to find out your the only one home? Well, thats what happened to me today. I made homemade marshmallows! They did not look like yours. More like blobs. But they taste like marshmallows! I thank you for step by step instructions. Not hard at all. The only thing I didnt like was trying not to spill the four putting it back. Thanks Mel.
I’m so proud of you, Joanne! Seriously!
Hi mel. This is going to be a “duh” question, can u save the flour to use for baking? I hate to see all that flour go to waste
Joanne – Yes. It doesn’t absorb any of the marshmallow so I dump it all back in my flour bin.
I was also wondering if it could be reused. Didn’t want to waste all of that…
My home-ec teacher in middle school taught us how to make these using this same method! I had forgotten all about them until last week.
I made them with my kids over the weekend, and we all had a great time, AND our Easter dinner company was super impressed with their homemade marshmallow egg favors. Thanks for the tutorial and rekindling memories!