BBQ Chicken Braid
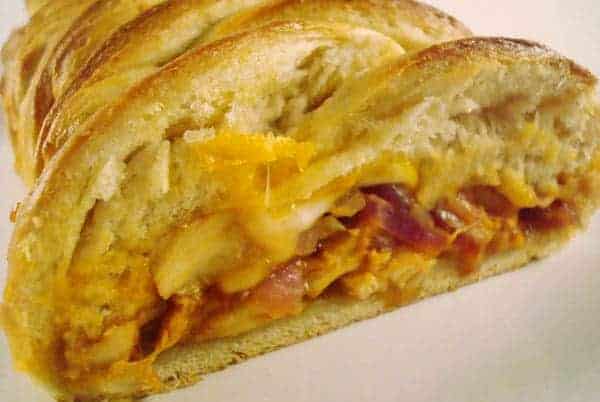
You can’t go wrong with this BBQ chicken braid. Melted cheese, chicken, and tangy barbecue sauce all wrapped up in chewy, soft bread. Yum.
A very popular meal around my house is soft roll or bread dough rolled out and filled with simple ingredients (usually diced ham and cheese) and then braided together and baked.
It is simple, filling and a unique way to change up the old grilled ham and cheese sandwich appearance.
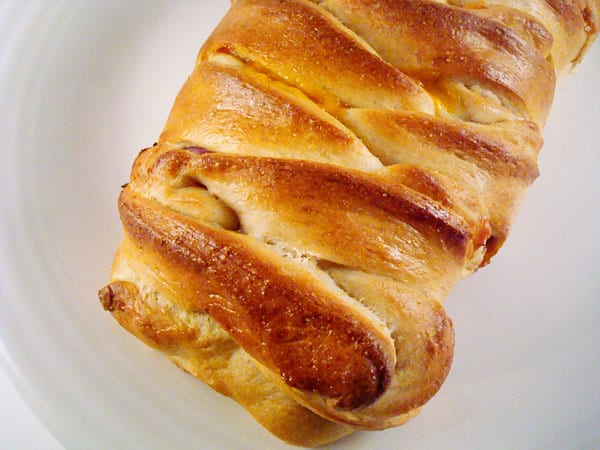
In an effort to be creative with what I usually stuff inside the braided bread, I decided to make a simple variation on BBQ Chicken Pizza and make a bread braid out of it.
Since we’ve been salivating over this new BBQ sauce, what better way to put it to use? An easy, filling, delicious meal that my kids love to help with.
This particular version turned out fantastic! How can you go wrong with melted cheese, tender chicken, spicy red onions and tangy barbecue sauce all wrapped up in chewy, soft bread?
I’ve included pictures below the recipe for a quick how-to on cutting the dough strips and braiding the bread. I promise it’s easy!
Two Years Ago: Mango Lassi

BBQ Chicken Braid
Ingredients
- 1 recipe French Bread Rolls
- 2 cups shredded cooked chicken
- 1 medium red onion, sliced into thin half moons
- 1 ½ cups barbecue sauce
- 1 cup shredded mozzarella cheese
- 1 cup shredded sharp cheddar cheese
Instructions
- Preheat the oven to 400 degrees.
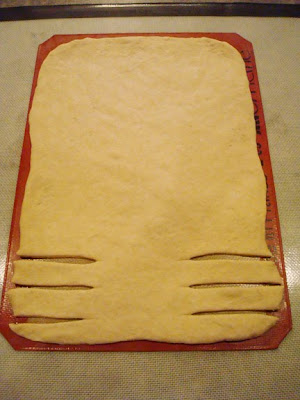
- After the french bread roll recipe has gone through the first rise, split the dough into two parts. Lightly cover one portion and set aside. Roll the other portion into about an 11X17-inch rectangle (I roll mine out directly on a silpat liner to make for easy transfer to the baking sheet and oven). Using a pizza cutter or knife, cut 1-inch wide strips in towards the center, starting on the long sides. There should be a solid strip about 3 inches wide down the center, with the cut strips forming a fringe down each side.
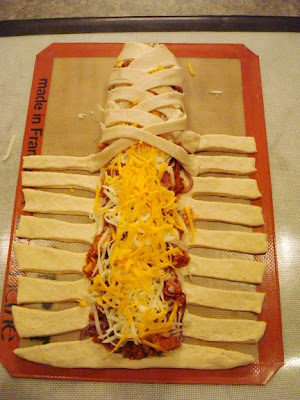
- Spread half of the barbecue sauce down the center strip. Top with the chicken, onions and cheese. Fold the side strips over filling, alternating strips from each side and pressing them into the dough on the opposite side, forming a braid. Pinch or twist to seal.
- Place the braid on a lined baking sheet (or simply transfer the silpat liner to a baking sheet) and let rest for 15 minutes. While it is resting, follow the same steps above for the second portion of dough.
- Bake the first braid for 15-20 minutes (while the second braid is resting), until golden brown and bread is baked through. Remove from oven and bake the second braid.
- Let the braids rest for 5 minutes. Using a serrated knife, cut braid into sections and serve warm.
Notes
Recommended Products
Recipe Source: My Kitchen Cafe
Braid How-To
With one half of the french bread roll recipe, flatten or roll the dough out to about 11X17 inches. I roll it out directly on my silpat baking mat for easy measuring and then transferring to a rimmed baking sheet. If you don’t have a silpat liner, use parchment paper or press the dough directly onto a lightly greased rimmed baking sheet.
After the dough is rolled out, start cutting strips along each side, leaving a wide strip, about 3-inches across, in the middle. I use my pizza cutter to speed through this step.
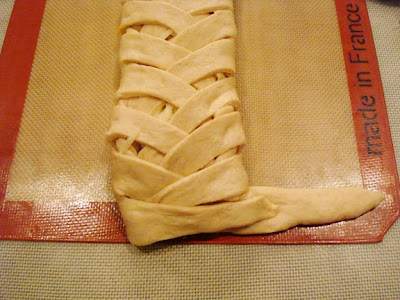
After the strips have been cut, layer all of the ingredients down the center strip and start braiding by folding alternate strips across and pressing them down to stick.
As you get to the end, you’ll likely be wondering how to finish this whole thing up.
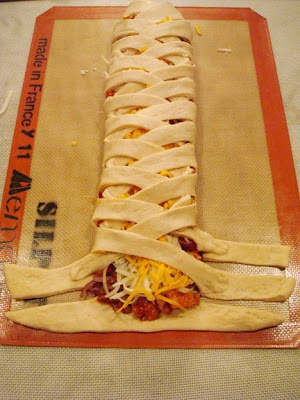
Keep braiding like normal until you have two final strips extending one from each side.
Fold one side over and press it into the other strip.
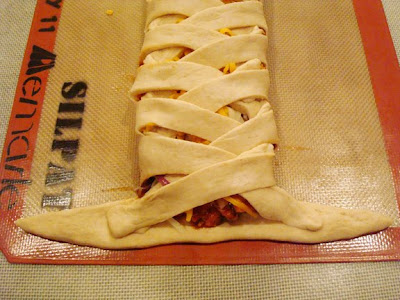
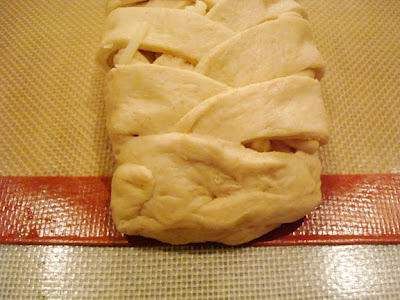
Grab the final extending strip and bring it over to lay across the bottom of the braid and gently press it into the dough on the other side. It won’t look perfect, but that’s ok.
Then, using your fingers, pinch the dough together to seal the long seam at the bottom of the braid and any other small seams you may see. It may look a bit lumpy but I promise you won’t care once it is baked to golden perfection.
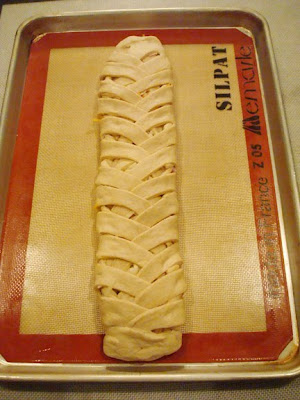
Finally, pick up the silpat or parchment paper and transfer it to the baking sheet. Ready to bake!







I tried to do it last week and until it did not look bad, I took the opportunity to put a lot of bacon too .. I just had trouble making the braid .. but I’m sure I’ll be able to do better next time
I just made these with ham and cheese, and THEN for the second one, I mixed cream cheese, butter, and a little sugar, then added raspberries- and when i pulled it out, topped it with a cream cheese/powdered sugar glaze– HOLY YUM!! Seriously. You have to try it!
That sounds amazing!!
Thank you! Just made it this evening, and the only step I added was to brush water along the tips of the braids, so they would stick when I fold them over. Work marvelously. To brown the top; brushing it with egg white/water mixture helps a lot.
YOU ROCK! I made this for three families last night. I had two raving texts this morning, my son informed me that his buddies loved his lunch. My own family finsihed a roll last night. Yep, this is going into my binder of recipes:)
This meal is 100% fabulous!
I’ve been wanting to try this for awhile but was in the middle of a move and just got around to it. I’m living in a foreign country and accidentally used baking powder instead of yeast (need to learn the language) and it still tasted good! Can’t wait to try it again with real yeast! My 4 year old son said thank you for making this yummy food 3 or 4 times throughout the dinner. I say that’s a success! Thanks for always having delicious recipes on your blog.
A little late to the party, but this sounds so yummy! I make a similiar bacon cheeseburger braid (ground beef, ketchup, mustard, relish, bacon, and cheese) but I am definitely making the BBQ chicken version this weekend! Thank you for the idea 🙂
Made this today using All Recipes Irresistible Whole Wheat Challah dough instead of the French bread dough… I baked chicken thighs with thyme, salt and pepper before shredding and used homemade barbeque sauce with extra garlic, ginger and onions…was delicious! (I used 2/3 of the Whole Wheat Challah dough in the Chicken Braid and 1/3 shaped and baked into a round loaf of delicious bread— let that rise for the second time while the Braid was baking. Worked great!) Thanks for a good recipe.
I’ve made this twice now. The second time for a few friends. Both times I didn’t add the onion and used Sweet Baby Ray’s BBQ sauce. It was really good both times and all our friends devoured both rolls! Thanks for the recipe!
This is coming a bit late, but I absolutely LOVE your site! I saw above that prepared french bread dough would work, but I’m wondering how a premade pizza dough would work. There’s a store by me that makes them fresh and without bad ingredients.
Hi Cheryl – I’ve never used premade pizza dough so I’m not exactly sure but if you can get it fresh and it’s similar to a dough you would make at home, I assume it would work just fine. Good luck!
Lacy – anything from a green salad, to fresh fruit and veggies would be great. It’s a pretty hearty meal so I’d go light on the side dishes. I often throw cottage cheese on the table or make a fresh fruit salad.
I’m going to make this later this week and was contemplating side dishes and what would go well with this particular dish. Do you have any suggestions as to what would go well with this dish?
Made this tonight for dinner, and it was so so good! The bread was so soft and chewy, and it looks beautiful, but was so simple! I can’t wait to try different toppings…I think maybe a chicken parm braid is next! Thanks for the great recipe, the pics were really helpful!
Would this work with a prepared french bread dough from the grocery store? Our kitchen is being remodeled and most of my applicances are stored away and counterspace is limited.
Thanks!
Carley – absolutely! I think that would work just fine. Good luck with your kitchen remodel.
If you are thinking about making this recipe, do it. It’s great for numerous reasons: It’s great for entertaining, it’s a lot easier than you might think and great for presentation – oh and it’s so versatile! While eating this tonight my husband and I were already trying to think of different fillings we want to try next with it.
For time sake, we used bottled BBQ sauce (bullseye brand) and pre made pizza dough.
Thanks for a no-fail recipe that will be a repeater in our home
Michelle – yes, I definitely think one of the braids is a good-sized meal for a family of five, especially with the other things you’ll be bringing. Good luck!
Mel, I am going to try this 100% from scratch (dough and BBQ sauce) and I’m a little nervous. Remember I’m in prego/path-of-least-resistance mode. But I’m thinking I might be able to take one of them to a friend, which would make it worth the effort. Do you think one of the braids is enough for a family of 5 if I made a couple of sides and dessert?
I wasn’t sure if my family would like this or not. I showed the picture to my 9 year old and she said, “hmmm not sure. Is it Mel’s?” Yes, it is. “Then YES,” she said. On my to do list this week!
Just made this dough this morning. I used 1/2 wheat flour, 1/2 white flour. What a delicious bread! It was so easy to make. 1/2 of the dough turned into a pepperoni, cheese braid (which was fabulous) and the other 1/2 became hamburger buns. You have changed my life Mel. Homemade bread for me!!!
Yum! I made it again and loved it even more. Possibly because my bread actually turned out this time. I LOVE that it makes two loaves, and with very little extra effort.
This was very easy and everyone enjoyed! I took the 2nd one to a friend who’s moving into a new house and her family loved it! Thank you so much for sharing and thank you for showing the braid technique!
PS – Love your name 😉 LOL!
I made this bread as an appetizer for Easter, and it was a huge hit!! I made 2 small loaves (I had to make one without cheese for my brother) to bring to Easter dinner, and have a third at home for dinner tonight–can’t wait!
Made this for dinner tonite! Wonderful! I was so proud of myself. Made the dough this morning and put it in the fridge after the first punch down. Put it together later. Yummy! We will be having this for leftovers this week. Served with a green salad.
Was FABULOUS! Ate one the first night- then froze the second (unbaked) – still on the parchment, wrapped snugly in foil, on a cookie sheet to keep it flat while freezing. Then a week later, took out from freezer and defrosted in fridge, let rise a short time on counter (was nervous leaving chicken out longer on counter at room temp so didn’t rise as much as the first one)- then baked as per instructions (needed a bit more time)- but was just as good as the first time! Just discarded foil, and lifted it using the parchment I made it on/froze it with onto a baking sheet and threw in oven. Kids highly impressed and now their fav meal! Thanks!
Made this tonight! Everyone loved it! Thanks so much! The best part was, I had everything on hand and made my first bread dough successfully!
Thanks so much,
Mallory
This is YUM-O
I made this tonight! It was a huge hit. I did not braid mine though. I just made it like a Stromboli. I will be making this again and will have to try some of your other recipes. I just found your site today through Moneysavingmom.com. I was in desperate need of something for dinner and I had all the ingredients for this! Thanks for a great recipe!
We are making the BBQ chicken braid and a sloppy joe braid…… My friend and I were wondering if you could make this into a breakfast braid with eggs,bacon,sausage, and cheese… Do you think the oven would burn the eggs before the bread is finished cooking… the braids are in the oven so we don’t know how they turned out but we will let you know!!!!
I made this tonight, Melanie and they turned out GREAT!! I changed the filling as we were having the braid WITH bbq chicken, so I stuffed one with sundried tomatoes from my own garden, pesto, feta and mozzarella; and I did the other with traditional pizza things like pepperoni, sauce, banana peppers and mozzarella.
I have a feeling my family will refuse sandwiches as supper food anymore, they’ll want braids instead! Thanks for sharing the recipe and technique!!
So how do you get your dough to be so shiny??? I love the french bread roll recipe and make it often, however, I don’t think they’re every shiny, like this braid, and your roll pictures.
Tracey – the pictures might make the rolls/braid look more shiny than they really are, to be honest. A lot of people will brush an egg wash over their rolls/bread before baking to give it a shiny appearance but I usually don’t do that so my guess is that in “real life” they don’t look as shiny as they do in the pictures.
Words can’t even describe how delicious this was. I was at a friends house and she taught me how to make it. So excited to make it again for my hubby! Thank you for all your wonderful recipes 🙂
Made this for dinner tonight – made the dough and sauce too. It was all just so so good!!
Thanks, Melissa!
Has anyone had success assembling the braid and freezing it? I want to have these stocked and ready to go! Thank you Mel and everyone for your suggestions!
If you are going to freeze it would you do it before or after you bake it?
Crystal – I would freeze it before baking. Then I would take it out of the freezer and let it thaw to room temperature and rise until slightly puffed (it will probably take several hours) – then bake as directed in the recipe. If you want a quicker option, you could freeze it after it has baked and then just reheat in the oven or microwave but I’m afraid it might dry out the bread that way. I’m not sure but either option is worth a try.
Oh, I linked to your post from my blog. I hope that is okay. ;D I think many others will like your recipes as much as I do. You have some pretty awesome “family” friendly recipes here. Thanks.
I love this! My family loved this too. I guess that’s what really counts. LOL It is so easy using the bread machine to make the dough . I have “stuffed” it with all kinds of different things now. Tonight, one will be your BBQ chicken and the 2nd with be pepperoni pizza for the kids. Next time, who knows, I’m thinking white sauce with shrimp, spinach and roasted garlic.
Thanks, Lee! I love this recipe because of it’s versatility, too. The shrimp version sounds delicious.
I keep all my favorite recipes in a binder…you are going to have your own section pretty soon! I tried this BBQ chicken braid yesterday and loved it. I am going to make it for my freezer meal swap next month so I LOVE the idea that this dough can be prepared the day ahead. One thing I did learn is that it is MUCH easier to complete the filling and braid if the dough is on parchment paper… it also allowed me to pick up the braid halfway through cooking and place it on the pizza stone to make the bottom crispier. I will put a little more salt in the dough next time though as I thought it could use a little more zing 🙂 Thank you for another no fail recipe! I didn’t try your BBQ sauce recipe this time but I will be sure to soon.
Amy M – glad you liked this recipe, also! Thanks for the tips.
OK so this is officially my go-to recipe when I want an easy crowd-pleaser! Since then I’ve made two aubergine pesto-chicken-mushroom-roast veg braids, and another two with homemade sunblushed tomatoes, feta cheese and fresh rosemary. Perfection each time! Thank you so much!
Krissie – I’m glad this is such a crowd pleaser! Your variations with the pesto, chicken ingredients sound amazing. And the feta and rosemary? Oh my, I wish I was at your house!