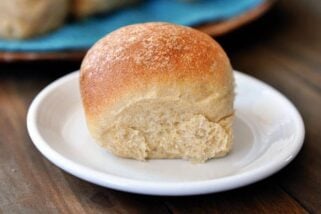
Chewy Italian Rolls {Step-by-Step}
These chewy Italian rolls are simple to prepare, yet produce the most delicious Italian bread right from your own kitchen!
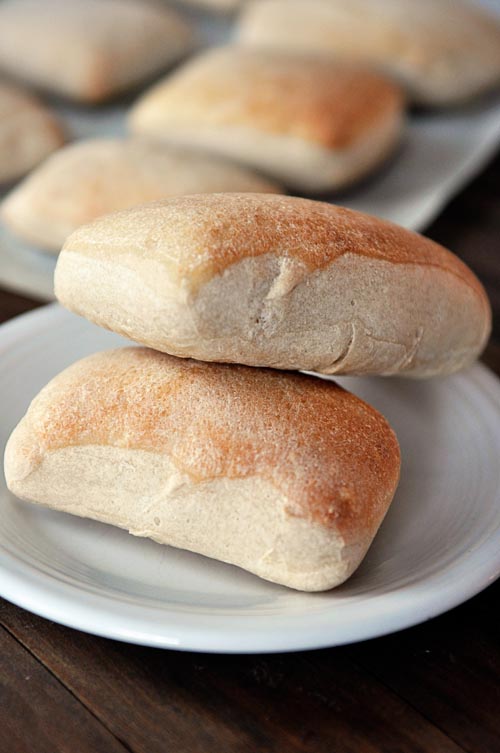
Think of these little chewy Italian rolls as the best kind of rustic Italian bread but in miniature form. Kind of like an easier ciabatta personalized into a roll just for you. My mind is spinning with the possibilities these rolls afford.
Can we just say: paninis galore, dipping into this shrimp scampi (we actually did that with these rolls and I about died and went to heaven), insane garlic or cheesy bread and about a million other options.
Making bread like this at home is incredibly rewarding. Whenever something like these amazing Italian rolls come out of my oven I feel like some kind of crazy awesome rock star killing it in the kitchen.
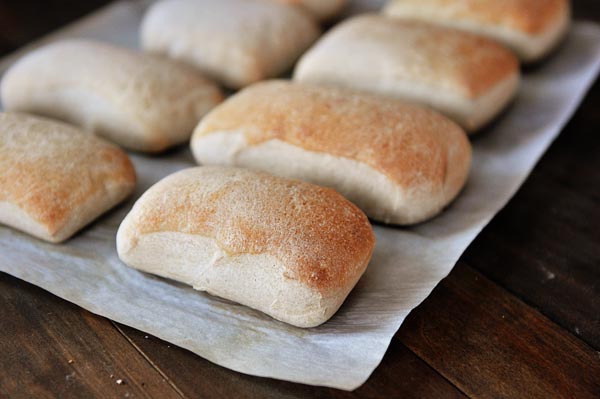
And because I know that it can be intimidating to make bread from scratch, like many of my other yeast bread recipes, I’ve included a step-by-step collage of pictures below the recipe to take a lot of the guesswork out of working with this yeast dough.
These rolls are simple and completely doable, I promise. The dough is uncomplicated and very forgiving. You’ll be dancing around your kitchen singing your own praises…for which I will never, never judge. Be proud, baby, be proud.
Keep in mind this dough starts with a biga (a strange word for a wet starter that needs to rest for 12-20 hours) so if you want hot, fresh Italian rolls, don’t start the recipe a couple hours before you need them or else you’ll end up with hockey puck rolls.
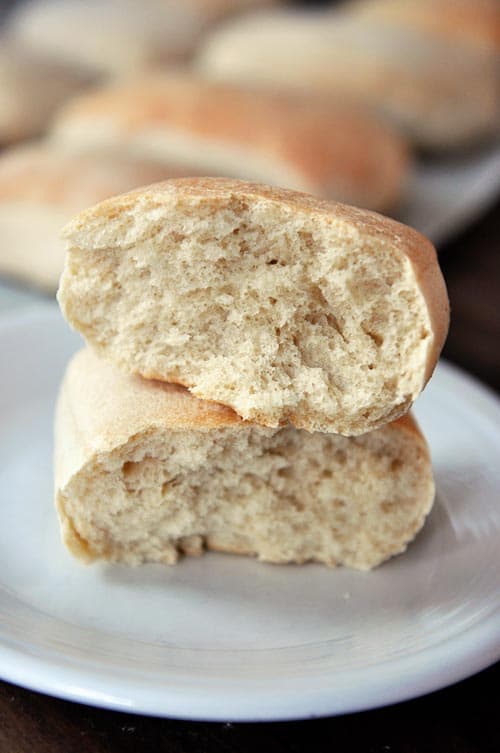
In my old Northern-Minnesota-basically-Southern-Canada-town, hockey puck anything was lauded and loved, but trust me, you don’t want these rolls to resemble hockey pucks. Soft and light and tender is the goal.
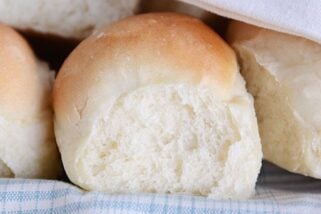
Plan ahead and you’ll be gifted with chewy, delicious Italian rolls. There will be no going back to normal life after you’ve experienced these heavenly little pillows.
FAQ for Chewy Italian Rolls
I use cooking spray (like Pam).
Try moving around your oven racks- mine usually brown better a bit higher in the oven. Also, don’t open the oven at all while they’re baking.
One Year Ago: Cowboy Spaghetti
Two Years Ago: Orange Cashew Rice {With Baked Tilapia}
Three Years Ago: Southwestern Chicken Barley Chili
Chewy Italian Rolls
Ingredients
Biga:
- 1 ½ cups (213 g) unbleached all-purpose flour
- ¼ cup (36 g) whole wheat flour, preferably white whole wheat
- 1 cup water
- ⅛ teaspoon instant yeast
Dough:
- Biga, from above
- 2 ½ cups (355 g) unbleached all-purpose flour
- ½ cup water
- 2 teaspoons salt
- ½ teaspoon instant yeast
Instructions
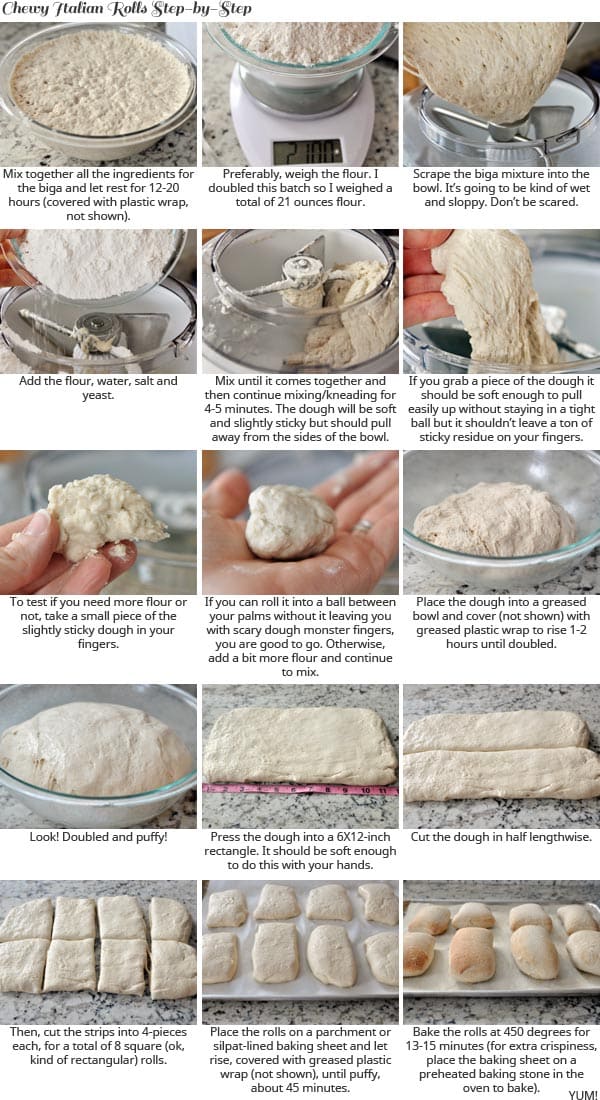
- For the biga, mix all of the ingredients together in a medium bowl until combined. Cover the bowl with greased plastic wrap and let it rest at room temperature for 12-20 hours until it is puffed and very bubbly (as long as it is really bubbly, don’t stress if it hasn’t puffed much).
- For the dough, scrape the biga into the bowl of an electric stand mixer fitted with dough hook. Add the flour, water, salt and instant yeast. Mix until combined. Continue mixing/kneading for 4-5 minutes, the dough will pull away from the sides of the bowl. The dough will be soft and slightly sticky but shouldn't leave a lot of residue on your fingers if you grab a bit of it. If it seems overly sticky and isn't pulling away from the sides of the bowl, add a couple tablespoons extra flour at a time until the texture looks and feels right.
- Place the dough into a greased bowl and cover with greased plastic wrap. Let rise for 1-2 hours until doubled in size.
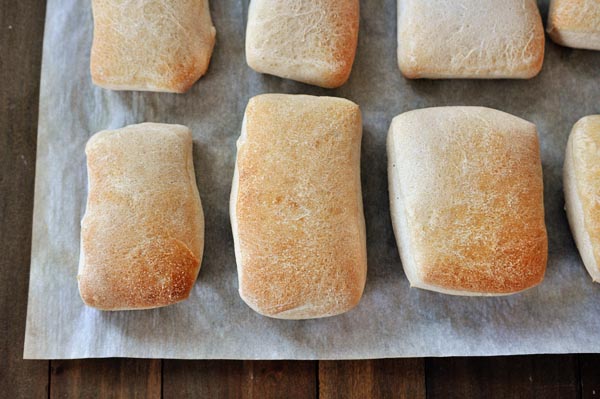
- Turn the dough onto a lightly greased countertop and press it into a 6 X 12-inch rectangle. Using a pizza cutter or bench scraper, cut the dough in half lengthwise (see pictures below). Then cut into 8 rectangular or square-ish rolls.
- Place the rolls onto a lined baking sheet, spacing 1-2 inches apart. Cover the rolls with greased plastic wrap and let them rise for 45 minutes or so until puffy.
- Preheat the oven to 450 degrees. Optional: put a baking stone in the oven while the oven preheats.
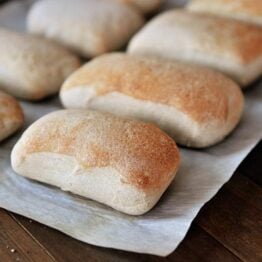
- Bake the rolls (placing the pan on the baking stone, if using) for 13-15 minutes until golden brown. Remove from the oven and let them cool completely on a cooling rack.
Notes
Recommended Products


Recipe Source: very lightly adapted (mostly just method) from King Arthur Flour

When you add the remaining ingredients to the biga, it is probably best to add the water first. It made me very nervous to add warm water to dry flour that had not yet been mixed with the biga. I was afraid I was going to make glue.
Hi,
I left my Biga for 22 hours and it deflated, is that going to ruin the rolls?
It is probably best to start over so the biga is active before using.
I am currently living in Africa where room temp is around 95 right now. Lol. Do I need to adjust anything on the biga step? Fewer hours on the counter, or place it in the fridge? Or maybe it will be fine to make this recipe as per instructions? I’d like to use these for French dip sandwiches with my leftover beef roast.
I’m not entirely sure, but I’m guessing you can use the lesser time for the biga (12 hours) and have shorter rising times overall!
Mixing:
I’ve made these 5 or 6 times. I can never get close to the amount of flour that’s supposed to be mixed in with the mature biga. I bought a Bosch mixer based on your recommendations and I really love it. When I get about a cup away from the 2 and a half cups called for in the recipe, the flour doesn’t get incorporated into the dough. It just stays in the bottom of the mixer bowl. I need to add a little water to get it to incorporate. You replied to someone else who had trouble that the dough may be under-floured. I can’t get more flour in. What am I doing wrong?
Baking:
My rolls never brown on the tops. I cook them on half-sheet pans over parchment. I’ve been baking them at 450 Fahrenheit with the oven in convection bake mode. I put water in a hot pan at the bottom of the oven. Any hints here?
Other:
I’ve been making your Easy French Bread a couple times a week and it always comes out great. I’ve made Baguettes, Flutes, and the “regular” sized loafs. They all come out perfect – well as good as I can shape the loaves…
Thanks for all the good recipes. Yours is my go to site for good food.
Hi Roger, when adding the flour to the Bosch for smaller batches of dough (like in this recipe), I recommend adding it all at once vs a little bit at a time. It tends to incorporate a bit better. For the browning issue, one thing I’ve noticed when my rolls aren’t browning is it helps to cook them on an oven rack placed a bit higher in the oven. Each oven is a little different, but my rolls brown best when I cook them above the halfway mark of the oven (in the top third of the oven or right below that) and if I don’t open the oven at all while they’re baking.
Let’s pretend that you made the biga and put all the rest of the ingredients and completely forgot to check the dough after the 1-2 hrs of rising… Could that be used like the biga or is it no good? Asking for a friend…
I’d totally use it!
I made this a while back and loved it and thought I’d start the biga tonight for another batch, but I don’t have any whole wheat flour on hand! Is that necessary for the recipe, or can I get away with all-propose?
All purpose will work!
Used this recipe for your smoked turkey brie and apple panini for a group and it was a hit! I made the bread a day in advance and kept them out in a plastic bag before assembling the sandwiches and thought they dried out considerably, though. Would it have been better to freeze and thaw?
I’m surprised they were so dry the next day…darn. Yes, freezing and thawing would probably keep them a touch more fresh tasting.
First of all, I absolutely love your blog. Almost everything I cook is from here. Thanks for perfecting so many amazing recipes! I Made these rolls today and they didn’t rise much at all. On the second rise they mostly spread instead of getting puffy after an hour of rising. They were only about 5/8″ thick when they were done. I made rolls with the same yeast a week ago with no problems, so I don’t think the yeast is old. I make bread about once a week and haven’t had this problem before. Any ideas on what could have gone wrong?
Hi Valerie – any chance they were underfloured? Sometimes rolls will spread instead of rise if there isn’t enough flour in the dough.
That may have been the case. It was my first time measuring flour with my new kitchen scale. Maybe I relied on the weight a little too much. I’ll have to try it again with a little more flour. Thanks for your help! Oh and I just made your chicken and dumpling soup for a very sick husband. It was amazing! And I usually don’t like chicken noodle or dumpling soup. Thanks for another winner recipe!
Just found your website and can’t wait to make this recipe! I was so happy to see the Bosch mixer in your pictures! I big puffy heart LOVE my Bosch mixer! I have had it for about 15 years and it has traveled to Indonesia and back with me (I lived there for 7 years and I am not exaggerating when I say that I used my Bosch multiple times every single day)!
Love this! I feel an instant kinship with other Bosch lovers. 🙂
I made this bread twice over the weekend trying two different techniques. The first technique was as you described and the second one was placing the bread into mini loaf pans weighing 3 oz per slot. The mini loaf pan was a success, as was the technique you listed. We had hamburgers and decided to make sliders with the fresh bread, AWESOME!! Thank you for another successful recipe!
Ok – so my husband requested these for Father’s Day after having had them last year on Father’s Day. He is a panini lover and this bread was fantastic for paninis! This year I used turkey, mozzarella, and tomato with some of your pesto inside the rolls, then brushed the outside of the roll with garlic olive oil. Sooo good! Thank you! I bet he will request paninis again next year. 🙂