Homemade Bagels {Step-by-Step}
Looking for homemade, from-scratch bagels that are as delicious as store bought? Check out this post for step-by-step instructions!
I have two main goals in life:
1) Raise non-smelly, sensitive, caring boys and 2) help everyone conquer making and baking yeast breads at home.
I love to make bread (in any form) and more than that, I love to eat it.
There is something about fresh bread that just does me in. And when I figure out I can make specialty breads at home that are just as delicious for a fraction of the cost…well, I’m sunk.
Over the next few weeks, I’ll be sharing some unique bread recipes that don’t necessarily follow the parameters of typical roll/bread dough. I’ll be including in-depth step-by-step instructions so you can make them right along with me. I am not a bread-making expert by any means, so let me emphasize that if I can make these, you can, too!
Today is bagel day. I wish every day could be bagel day since I love bagels oh so very much.
I have another recipe for bagels residing on this site. They are fantastic. And so is the recipe below. They both come from King Arthur Flour – the main difference in the recipes being that the old recipe requires a starter (flour, water, yeast mixed the night before and left to bubble overnight) which creates a bit more flavor in the bagels.
The recipe I’m sharing today creates equally delicious bagels but without having to think too far ahead. (Incidentally, you can use the step-by-step guide with either recipe, especially for the shaping/boiling part.)
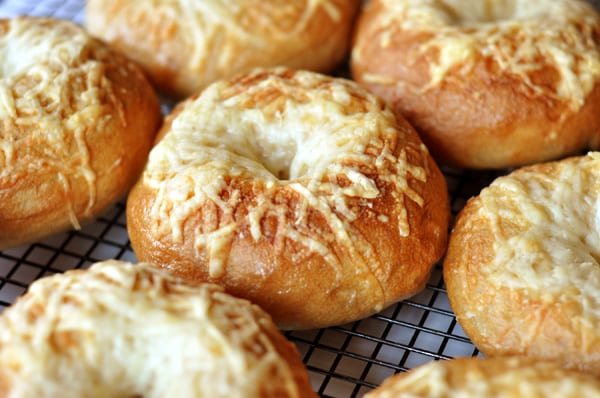
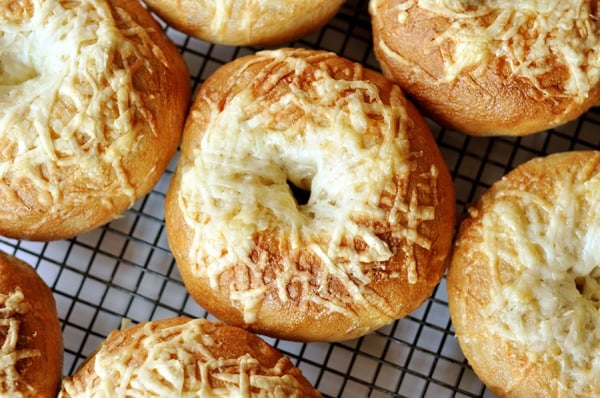
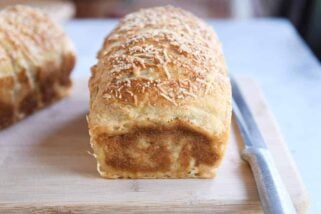
These bagels are dense and chewy and so magnificent with a slather of cream cheese that it is unspeakable. I always double the batch so we can have some to freeze and eat for breakfast/snacks. Asiago bagels are my dream bagel of choice and the kind pictured in this post, but the options are endless.
Who knew bagels could be so easy and fun to make at home (my kids love to help with the process – especially poking the holes part)?
I’m not sure that I can count the success of goal #1 yet, but if even one of you makes these and loves them as much as I do…well, I’ll consider my life mostly complete.
One Year Ago: Tender Pork Chops with Apples and Onions
Two Years Ago: Baby, Baby Cupcakes
Three Years Ago: Tacos Supreme

Homemade Bagels
Ingredients
Dough:
- 1 tablespoon instant yeast
- 4 cups (568 g) bread flour (see note for variations)
- 2 teaspoons salt
- 1 tablespoon brown sugar
- 1 ½ cups warm water
Water Bath:
- 2 quarts water
- 2 tablespoons brown sugar
- 1 tablespoon granulated sugar
Instructions
- Manual/Mixer Method: To make this dough by hand or in a mixer, combine all of the dough ingredients and knead vigorously, by hand for 10 to 15 minutes, or by machine on medium-low speed for about 10 minutes. Since a high-protein bread flour is used here (or a combination of all-purpose flour and gluten), it takes a bit more effort and time to develop the gluten. The dough will be stiffer than other soft yeast doughs but will still be pliable and smooth once it has finished kneading. It should be stiff and floured enough not to leave much residue on your fingers after pinching a piece but not so stiff that you can’t easily pinch off pieces of dough and work with it. Place the dough in a lightly greased bowl and cover with lightly greased plastic wrap. Set it aside to rise for 1 to 1 1/2 hours until it is noticeably puffy.
- Bread Machine Method: Place all of the dough ingredients in the pan of the machine, program the machine for Dough or Manual, and press Start. Check the dough after 10 minutes; it should be quite stiff, and won’t have formed a smooth ball. The dough will feel quite firm when you poke your finger into it. Allow the machine to complete its cycle, then complete bagels as instructed below.
- Transfer the puffed/risen dough to a work surface and divide the dough into eight equal pieces. Working with one piece at a time, roll it into a smooth, round ball. Place the balls on a lined or lightly greased baking tray and cover lightly. Let them rest for 30 minutes. They’ll puff up very slightly.
- Once they have rested, one-by-one, use your thumb to poke a hole through the center of each ball then twirl the dough and use your other fingers to stretch the hole until it is about 1 to 2 inches in diameter. The entire bagel will be around 4 inches across. Place the shaped bagels on a lined baking tray (the same one that you’ll bake them on).
- Prepare the water bath by heating the water and sugars to a very gentle boil in a large, wide-diameter pan. You can use a large pot or a deep straight-edged skillet. Preheat your oven to 425°F.
- Transfer the bagels, three or four at a time, to the simmering water. Increase the heat under the pan to bring the water back up to a gently simmering boil, if necessary. Cook the bagels for 2 minutes, flip them over using a wide spatula, and cook 1 minute more. Using a wide spatula, carefully remove the bagels from the water and place them back on the baking sheet. Repeat with the remaining bagels.
- Top the bagels with your desired ingredients. If you are going to use a dry topping, such as sesame seeds or poppy seeds, whisk together 1 egg white with 1 tablespoon water and brush each bagel with the mixture before topping heavily with sesame seeds, poppy seeds, etc. If using Asiago or another cheese, there is no need to brush the bagels with an egg white glaze, simply place the shredded cheese on the bagels.
- Bake the bagels for 20 to 25 minutes, or until they’re as deep brown as you like. Remove the bagels from the oven, and cool completely on a wire rack.
- I only bake one sheet of bagels at a time, even though I usually double the batch and have four sheets of bagels ready to be baked. The bagels that have been boiled, placed on the baking pans, topped with cheese and then sat and rested for 20-30 minutes while the other bagels baked – well…they actually turned out more rounded and golden brown than the ones that were baked right away. So there is no harm in boiling all the bagels at once and letting them hang out on the baking sheets while the other bagels bake.
Notes
Recommended Products

Recipe Source: adapted slightly and expounded upon from King Arthur Flour

Woooooooow! I only had access to all-purpose flour and these still turned out significantly softer and chewier than any store-bought brand so I can’t even imagine how they would turn out with the suggested bread flour or gluten added! I’ve missed quality bagels so much since moving to Asia so I’m so grateful for this recipe that is easy to follow and has such simple ingredients that are easy to find. Although I’ll have to find a different topping next time. Tried slices of swiss cheese and they just dried up and fell right off the bagels ;;
Maybe try turning the heat down a bit – otherwise, just cut the time, as long as they soften and turn translucent, they should be fine!
Can I make these, and then after boiling the dough balls, freeze them, and then when I need a few I can take them out of the freezer, let them de-thaw and then bake them??
I haven’t done that, but I believe others have – definitely worth a try!
Thanks so much for this recipe! Your blog has been and continues to be a lifesaver as a newlywed!
Thank you!
So easy !!! Love this recipe , i wish you could see the picture of my bagel !! Thanks:)
Is this recipe a high altitude baking recipe as is?
I found this recipe searching for a high altitude bagel making recipe. Will this recipe work as-is at 5280 feet? Thanks!
I’ve made these bagels both at high elevation and sea level – they turn out great either way!
Enfin une excellente recette! Merci
Hi. I’ve been looking for a good recipe for bagels and I can’t wait to try yours. The only thing is I can’t find bread flour nor the wheat gluten. Is there anything I can use as a substitute?
You can try all purpose flour, although the bagels may not be quite as chewy
These are the BEST bagel I’ve ever eaten. Husband asked me to make bagel because we live in timbuktu and there are NO good bagels for miles and miles. I knew that if I tried another one of your recipes it would be good and you would give me enough tips to do it all right (thanks for that by the way). Once again you’ve helped me be a super star in the yeast bread arena! Yay! Thanks so much for your recipes, but even more important, to a wanna-be baker, your extra efforts with step by step and videos.
Yay, Jane! I’m so happy the bagels were a success!
I just made these and they came out sooo delicious!!! Also following this recipe was super easy, thanks to the word directions and picture references!! Seriously, I can be a perfectionist when it comes to recipes so the pictures helped a lot!
The only issue I ran into was that my balls of dough didn’t turn out to be as smooth as the ones shown and I was too afraid to manhandle them too much, so the result was that my bagels ended up pretty “shaggy” looking, rather than smooth. I would probably serve the ones that I ended up with because they taste so amazing, but I’d be a little embarrassed by their slightly weird appearance. I do love breaking open a bagel when it has that smooth (almost crunchy) golden brown top. I think next time I will try rolling the dough balls more and see if it gets me the aesthetic I’m looking for!
Thank you so much for this recipe! It was super comprehensive and really great. It is now my go-to for bagels 🙂
I just wanted to pop in and say that I have enjoyed reading your blog. I enjoy your perspective on “Real Food”. Everyone and everything seems to have varying *rules* about any and every food. It’s nice to find a “moderate” in the kitchen arena. Thanks for the bagel pics; I’ve wanted to try for yrs but assumed it would be too tedious.
BTW: Do you have a “subscribe” button? I’ve scoured the page and can’t find it. It could be that you (a) don’t or (b) I’m beyond exhausted and can’t see the obvious in front of me.
Thank you!
Thank you, Julia! Are you wanting to subscribe to emails or through a feed reader?
Here’s the link to subscribe to email updates: https://madmimi.com/signups/108287/join
And here’s how to subscribe to feed reader: http://feeds.feedburner.com/melskitchencafe/NvNP
I made these today, darn I wanted to add a picture of them. I agree with the lady who said they tasted salty. Kinda like a pretzel. But hey, I like pretzels! Next time I will cut down the salt to half the amount. I loved the picture directions. Thanks
I know you have a zillion followers, because I am one of them. I made my own gravlax and wanted to make bagels to go with it. I was sad to see that I needed to make a starter a day ahead (according to King Arthur Flour). Then, I saw this post, and I followed your recipe. This was so easy! I made the dough with my Kitchen Aid, and the dough was easy to work with. These are baking as I type, and the aroma is making me anxious to eat these. Thank you for adapting my trust KAF recipe so it worked NOW!
Finishing my second time making these as I type. Love this recipe. Love bagels. Love the fact that I can make them and they are fantastic. I made an Everything topping for most of mine. Also made plain, and a few salt topped.
Great recipe, spent the past 18 years making bagels here in Pittsburgh. Add this. Before shaping the dough into bagels, run down to the nearest place that carries Hebrew National hot dogs, buy as many as you need if you double the recipe you can make 16 bagel dogs. Simply roll the dough into a rope and wrap around the dog. Egg wash, bake, and enjoy. See if you can buy some everything mix from the nearby bagel shop, and no, panera is not a bagel shop, nor do theymake or sell bagels.
Thanks for the step by step! I have made bagels (years) before but always did it by rolling little cylinders & attaching them to make rings, and they always rise poorly at that spot & come apart in boiling or baking. I’ll do it again with the thumb holes. Homemade is always better!
Thank God for bakeries!!!
Thanks so much for this absolutely delicious recipe! Followed your recipe exactly, (used sesame seeds as the topping), and they are every bit as good as any bagel shop we’ve ever been to, and oh-so-much better than any grocery store brand. Also, for anyone who might be hesitant to tackle something like this, they are incredibly fun to make! I think my favorite part is when you poke your thumb through the balls of dough and twirl to form the bagel…guess I’m easily amused 🙂 Can’t wait to try more recipes from your website!
Thank you for this fantastic recipe! I made my onion – poppy seed bagels today, and they are both gorgeous AND absolutely delicious. The only change I made was to add about 1 T baking soda to the boiling water, as another blogger suggested that it would enhance the exterior color.
Hi, I want to try these, but whenever I’v made bagels I’ve put poppy seeds and sesame seeds into the actual dough. It’s been a while though, so I can’t remember if you have to change anything about the recipe to accommodate for that? Would you recommend anything? Thanks!
You could definitely add poppy seeds or sesame seeds to the dough – add them in with the flour and let them knead with the dough.
I love this recipe. I have made bagels three days in a row this week, as I have been getting requests from family members to take them to work for their staff. It is so easy once you have made it a few times. All the people that are afraid to attempt this recipe,don’t feel intimidated. There is nothing better than a freshly made bagel. I have sesame seed,everything (mixture of seeds), cheese,jalapeño and cheese, chocolate chip,cinnamon raisin. This is my go to recipe every time. I am so glad I found it!
Made these Sat just bc we are running out of fun in the winter. So easy and yum. The kids loved them and said “much better than the store.” Which now has created a problem for me because they only want these! Luckily they are easy and worth it.=) Thanks!
I’ve read this over and over and thought how difficult this’ll be. But once you dive in, it’s so simple! They’re cooking in the oven as I write this. They smell amazing!!!
This is the first bagel recipe I’ve made taste and have the texture of a true NY style bagel. My family loves them, thank you! Question, can you prepare the dough the night before, store in the fridge, and then bake in the AM? If so, what step would you put them in fridge?
I haven’t tried that myself so I’m not exactly sure. I don’t know how the dough would be affected if they are refrigerated after they have boiled. You could refrigerate them overnight before the boiling step and then boil/bake in the morning.
still the best bagel recipe i made
thank you a lot
i did mine with mix of all-purpose flour and whole wheat
Your instructions are fabulous! THANK YOU! I always thought it would be too hard and too time consuming to tackle. I am a bread addict, and I think I could live on bagels. Gonna make these for sure!
Have you ever made egg bagels? Do you have a recipe for that?
I don’t have a recipe for egg bagels; never made them. Sorry!
So very delicious. I used all AP flour and 1 package traditional yeast. I just proofed the yeast in 1/4 cup warm water with a teaspoon of sugar then followed recipe as written. I also portioned out 12 instead of 8 as that size worked better for me. Thank you for this recipe!
thank you for this recipe mel. all of our frenz and fam love them. i’m going to try the whole wheat bagels for the first time and am having trouble figuring out the measurements. i usually do the 4 cups of bread flour. so instead would it be 3.5 cups of whole wheat flour? and 11 1/4 T of vital wheat gluten? and no bread flour? if so, is there an easier way to measure out the vital wheat gluten? thanks much, tricia
You can include bread flour if you like – I’ve never made a 100% whole wheat version but it’s worth a try. It would be something like 3 1/2 cups of whole wheat flour and 1/2 cup vital wheat gluten. But you can really experiment, a lot of the final flour amount will depend on the texture of the dough.
Hi! I have a question, how long would these bagels last for? a week or two in the fridge? I’d like to bake a few of them but I don’t know how long to store them or how to store them properly… Thank you!
p.s. I’m totally psyched to try this recipe out !!
Hi Ashley – I hope you love this recipe if you try it! I don’t recommend storing the bagels in the fridge – they tend to dry out there. They keep fairly well covered at room temp for a day or two but what I really like to do is once they are baked and cooled, slice them in half and freeze them. They defrost perfectly out of the refrigerator (a short spurt in the microwave or 20 or so minutes on the counter) and taste fresh, especially toasted. Good luck!
‘Wanted to let you know that I’d stumbled across your recipe and made them yesterday. They’re delicious! Thanks so much!!
Thanks, Dave!
You indicate in your note you used whole wheat flour, was that freshly milled? Would I need to do any other adaptions to make these myself?
Rebecca Del Piano – Yes, I use flour I’ve ground myself. If using freshly milled flour, just keep an eye on the texture of the dough to make sure it doesn’t get overfloured.
Hallo Mel, thank you so much for the step by step instructions, I never made bagels before, I knew bagels since my holiday few months ago in USA, I come from Indonesia but live in Germany. It’s not so familiar here. Finally found your website, I’ll try it right away.
Looks amazing!!! thanks for taking the time!!!
I was wondering, what happens if I can´t find gluten? can I still make the bagels?
Andrea – If you don’t have gluten you can try making them with 100% whole wheat or all-purpose flour but they might not be as chewy as if you used bread flour or added gluten. Good luck!
I am excited to try this recipe but I am gluten free. Do you think I can use gluten free all purpose flour for this?
Kate – I have not tried it with gluten free flour so you will have to experiment. It might be worth googling a gluten free bagel recipe and comparing. Good luck!
Wow! I made these today and already ate two. Amazing! Thanks for the recipe! Definitely a keeper!
Thanks Mel! I will try that!
Mel,
I made these today and they taste wonderful! My question (which is very similar to Lana’s question earlier) is that they deflate when I put the hole in them. However… they seem to be developing that type of crust you talked about when I was forming the balls. Weird huh? Do you think the dough needs more water? It was sticky at first, but then by the time I got the dough separated in to 8 pieces, they had already formed a crust (and I swear I’m not THAT slow!). Any ideas?? Thanks a million!
Tommie – this dough should actually be on the nonsticky side of the spectrum. Not tough and overfloured, but definitely a bit more stiff than roll dough so I don’t think you need more water. You can try spritzing the dough with a teensy bit of water if it does form a crust – do it right before rolling and it will help the dough to be uniformly smooth again. If they are deflating quite a bit when poking the hole in them then try letting them rise a bit longer after that to get puffy again. Let me know if you have more questions!
Very good made them today next time will 12 not 8 very big love them
My cousin and I tried your bagels today, some with cheese and some cinnamon crunch, we were blown away! They are delicious, thanks for sharing your fabulous recipe!
The result was AMAZING
It look amazing …i am doing the recipe right now … do you have an idea if i can make them with all purpose flour because bread flour is not avaliable all the time here and i cant find any store that sell gluten alone ? Thanks in advance
J. Hulegaard – if you want to add in ingredients to the dough, knead in the add-ins at the end after adding most of the flour.
How do you add ingredients into the bagel? I would like to make blueberry and strawberry bagels. Even cinnamon raisin. I use the breadmaker recipe, as I don’t have a mixer.
Chelsea – I have no idea how gluten free flour would fare in this recipe. Sorry! You’d have to experiment and try it out. I’ve made these at high and low altitude and haven’t made any adjustments when I’ve made them so unless there is a hidden secret, I think you should be good. Just judge the texture of the dough by feel versus how much flour you’ve added.
These look amazing! Do you know if I could use a gluten free flour instead? Would it work the same way as the bread flour? And what about any high altitude changes that might need to be made? Can’t wait to try them!!! 🙂
Amber, I’m not entirely sure why your dough would be wrinkly but a longer kneading time could definitely help the dough to become smooth and supple. Keep an eye on your flour amounts, too – an underfloured dough can have issues forming smooth, neat balls of dough. Good luck!
I made these today and they taste great. However mine did not look so pretty. When I tried to roll them into a smooth ball I couldn’t get all of the wrinkles out. So I figure there must be something not quite right with my dough. Do I need to add more water, knead longer? Any suggestions? Thanks for all your great recipes. My family hasn’t been down the bread aisle in weeks.
Hi Samantha – yes, these freeze beautifully! I freeze them all the time. I like to let them cool after baking and slice them prior to freezing.
This looks amazing. I love bagels and would love to try to make my own. What I’m wondering is if these would freeze well? It would be super handy if I could make a double batch and freeze the ones I won’t use right away but I didn’t know if they froze well or if they had a decent length of shelf life.