Tie-Dye Frosting for Cupcakes {a How-To}
Tie-Dye frosting for cupcakes is so cute and easy to do. Check out this post for a simple how-to. You will feel like a rock star!
Let it be known that in my house, these last couple months have been referred to as “The Summer of the Tie-Dye.” I’m not sure how it happened but we’ve decided to act like we live in the 80’s and it’s tie-dye crazy around here. Here’s official evidence…
A few notes about the picture below:
1) My boys coordinate to wear their beloved, homemade tie-dyed shirts the same day (we’re talking five days out of the week) and there are major tears when one of their shirts is in the dirty clothes and mom has to admit she hasn’t done laundry since yesterday because she isn’t a servant and she can’t help that boys love.to.get.dirty.
2) Please ignore the bedheads. It’s summer, people!
3) For the record, my boys tuck their shirts into their shorts on their own accord. They get their fashion sense from their dad, what can I say.
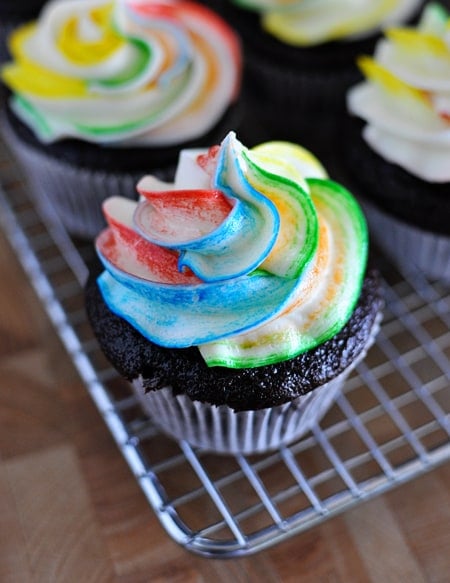
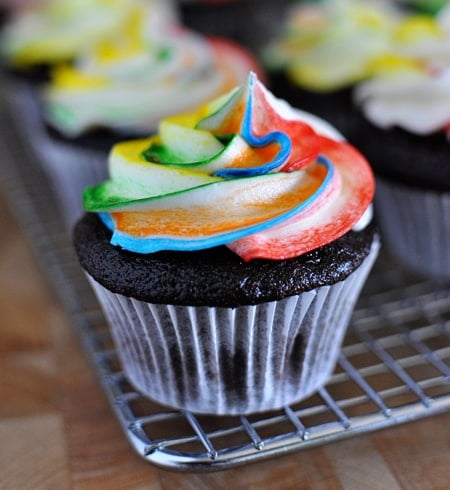
Since tie-dying is so “in” at our house, it wasn’t a surprise that my third eldest requested tie-dyed cupcakes on his birthday in June. Hmmm, what’s a mom to do with that request? FIND A WAY TO TIE-DYE FROSTING that’s what! And this is the closest thing to it. Granted, it looks a bit more like striped frosting or rainbow frosting, but my boys fully believed I had tie-dyed frosting and nominated me for some kind of cupcake froster of the year award, so I’m calling this tie-dyed frosting. Call it what you want – it’s cute, it’s easy to do, and it will get rave reviews.
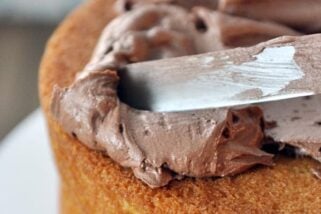
I used the chocolate cupcake from this recipe and stuck with my tried-and-true fantastic, simple buttercream. Other than that, it all boils down to the how-to, which I’ve documented below. And just a note, the way you see me filling the piping bag with frosting (using plastic wrap) is how I do it every time I frost anything (from cupcakes to cookies to cakes). It makes the cleanup so simple, you’ll be finding things to pipe frosting on just to fill a piping bag this way. Um, ok, so that’s probably just me…but trust me, it will revolutionize the way you frost.
Speaking of frosting the cupcakes, here’s a short video showing a quick how-to on getting those beautiful swirls of frosting on top of the cupcake. Check out the step-by-step tutorial at the end of the post for the actual tie-dyed frosting info.
You can tailor the colors in this tutorial to anything that will suit your theme – you could even do stripes of one single color to make, say, a pink and white tie-dyed frosted cupcake for a baby shower or something like that. The options are endless. What would be REALLY cool would be to make the cupcake itself tie-dyed with different colors of cake batter. But obviously I wasn’t on top of my game enough to plan for that. You should, though, and then you’ll be way cooler than me. Happy tie-dying!


Your boys are so cute! And what kid doesn’t love tie-dyed ANTTHING!
I made these yesterday and the icing itself is phenomenal, and now it looks awesome too! I’m going to do these for christmas and just alternate red and green stripes. Maybe for halloween too with black and orange.
i’ve awed many a person with tie-dyed frosting. they’re always a little disappointed when i tell them how i accomplished it. it’s like they thought i had some magic up my sleeve! 🙂
I was asked to make a large the dye peace sign cake. I am new to this and I’m always online trying to figure out how to do things I’ve never tried before. I just want to thank you for posting this how too. This was the easiest thing and it turned out fantastic. Everyone was trying to figure out how I did it. Woman ur a genius! !! Thanks again! Courtney
These look magical!
My favorite part of this recipe is your adorable boys with their tucked in shirts! LOVE it. They are real “men” in the making ……and definitley not punk boys! Ha Ha Love , Love!
This frosting is soo cool! What an awesome post.
Just in time for my daughter’s birthday!
I just love it– the recipe, the tutorial, and the PRICELESS picture of your precious boys!! Thank you for sharing.
Great site – love the pics of the boys. I am also the mom of four now grown boys…. this is like a trip down memory lane. Thanks for sharing!
After reading about the Tie-Dye frosting I came across these and thought of you. Here is the website
http://www.peoniesandpoppyseeds.com/2012/02/snacks-rainbow-cupcakes.html
Not quite tie-dye but I don’t think any kid would complain.
Holly – I definitely wouldn’t use the liquid – it wouldn’t stay in a line very well and I could see the colors running into each other. I’ve only ever used the gel but you could try the paste and see.
Thank You – Thank You – Thank You. You will make me a SUPER STAR with my Grandchildren! That Frosting just Screams F.U.N.!
I love it!
Do you have to use gel colours? What I mean is, could you use liquid or paste?
These are so pretty. I love the multi color frosting on your cupcake.
This is such a nifty idea! Thanks for sharing!
Ok, the way you fill up your piping bag is genius! I love it and can’t wait to do the same thing when I make birthday cupcakes in a few days.
Super cute cupcakes, and even cuter boys! Thank you for the tutorial, I never would have been able to follow without the pictures. 🙂
I’m so impressed. Smart-y-pants!
Oh my goodness, your boys are just darling! The cupcakes are so fun and I’m THRILLED to learn of your plastic-wrap-technique – it’s brilliant! Thanks Mel!
What a fun idea! I’m sure my boys would love it if I made these for their next playdate. One of my little guys wears glasses too. Our eye dr recommended some flexible frames, there’s Miraflex and Solo Bambini. They are great! They stay up, they don’t break, virtually indestructible for my crazy man. Sorry I don’t mean to preach but just thought I’d pass on a tip 🙂 No more broken frames at our house!
That picture of your boys is awesome! My husband is the second of five boys (only #6 is a girl) and I’m pretty sure they have a picture just like that. Other than perhaps the photo quality, if you put both pictures side by side, you would never know 20 years has passed!
We’ve had a strange tie-dye summer, too! At least we’ve time-traveled together, friend! 🙂 I may have to make these for a end-of-summer party! You rock!!
Barbara – I’m telling you, my brain is fried! Thanks for letting me know. I just made the video public so it should be good to go.
Cool idea! I can’t get the video to play however, when I click the play, it says this video is private. 🙁
That is SO cool…plus, I love the general, no-mess idea for filling a piping bag! Thanks for sharing!!!
Mel! You are awesome!!! I usually don’t comment on blogs, but yours is the BEST. You are my go-to for ANYTHING related to food. Thanks for being you!
Stacie – good question…and nice catch! You are right that starting in the center like the illustration shows will yield more of a rose shape. I was taking pics of both when I did this and messed up including the right ones. I’ll edit the tutorial later today with pics and diagram for the classic peak (basically you do the opposite and start on the outer edge of the cupcake and swirl in).
Hi Mel,
What an ah-hah moment for me about putting the frosting into the plastic wrap before the piping bag…can’t wait for my next piping project! I have the same question as Stacie, though: your pix look like you started on the outside and ended in the center (hence the nice peak in the middle). Am I missing something?
Amazing! I’ll have to try this sometime. And I’m so glad that my son isn’t the only tie-dye-loving boy out there :).
Brilliant! You make it look so easy. Can’t wait to try this.
Cute boys! Love the picture. I am thinking this techinique might be fun for the pinewood derby coming up next month here. I think I’m going to volunteer myself to make refreshments. (Am I insane?)
This is such a great idea! I love the picture of your boys! 🙂
If you start in the center and work your way out, how are you getting that nice peak in the center?
I love hos fun these are! My son would be in heaven if I made some of these for him, so I’ll definitely have to try these out. 🙂
This is a great idea, the bag will clean up so much easier. We love your recipes and my hubby’s shift at the firehall has tried out plenty of them, all successfully. These cupcakes will be next on the list for this coming week I think.
LOVE the pic! How cute and handsome those boys are! My 4 yo wears glasses too, so darn cute!
This is so great! My boys would love it! We also tie-dyed shirts this summer and they wear them every possible chance they get. Your shirts turned out a lot better than ours though.
You are brilliant! I love your method for getting frosting into the piping bag! That’s one of the main reasons I don’t pipe more often–it’s such a pain to get the frosting in the bag. Thank you for sharing!
Your boys are precious. I love that picture!
I love the tucked in shirts. It looks very neat. 4 handsome boys!!! My boys wore them like that.
Cute cupcakes.
So cute! I can’t believe you came up with it yourself. I would have had no idea where to begin.
Cute boys too! (I have three of them, and my summer has been plenty busy, but, alas, tye-die free until now.)
You are so awesome! And yes, you found a way to make it look like tie-dye! Your boys are so fun! Too bad you’re not in our ward or my four boys could play with yours! Thanks for sharing. I have a birthday for my almost three year old and he’d love this!
Thanks for the tutorial!
Ooops…I meant TIE dyed! 😉
Oh my gosh…I love this! Your boys are so cute in their tucked in tye dyed shirts, Mel! 🙂
I love tie dye too and love wearing my tie-dyed shirts! The cupcakes look fun – O will have to try out that frosting technique. Thanks for the tutorial!
Your 80´s summer is cracking me up; the pic of your boys is great, I wonder what they will think of it in 20 years…lol
Perfect tutorial for this frosting. When everything else fails, use tie-dye frosting!
You’re such a good mama! And look at all those darling little boys! So sweet 🙂
If I have all boys, will you teach me how to deal? 😉 You & Budget Gourmet Mom have 4! I can’t believe it!
Gorgeous and inspiring! I have made Tie-Dye cupcakes for a Girl Scout Tie-Dye event. I tinted the divided vanilla cupcake batter with different Wilton gel tints. We put a spoonful of each of the colors into a cupcake liner and used a toothpick to swirl the colors (hard to keep my kids from fully mixing them together completely, which would yield a weird muddy color).
Love your recipes, thanks!