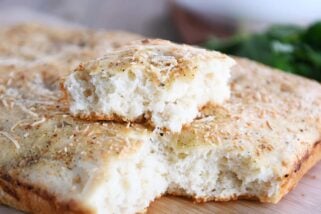
Homemade Ciabatta Bread {And The Best Garlic Bread On Earth}
This homemade ciabatta bread is slightly crispy on the outside with a deliciously tender, airy crumb and it’s a lot cheaper to make at home.
What is ciabatta bread and why on earth should you make your own? Excellent questions…
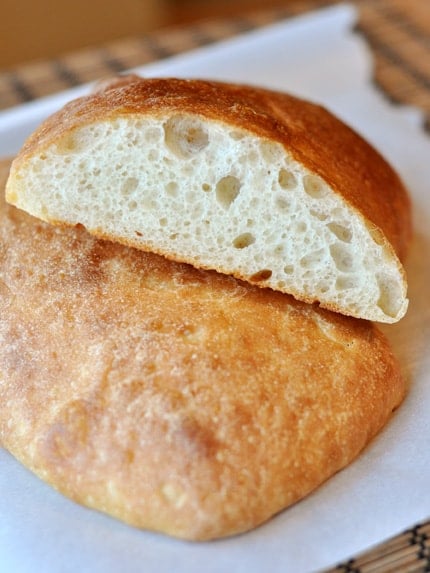
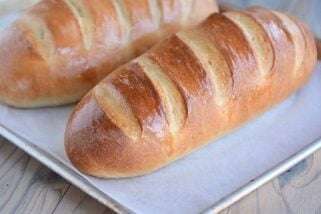
First of all, ciabatta is an Italian bread that is long and flat-ish, somewhat in the shape of a slipper (which is what the word “ciabatta” literally translates to).

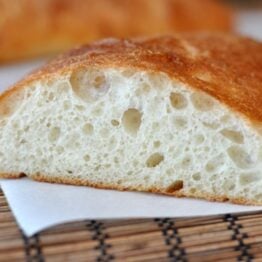
It is slightly crispy on the outside with a deliciously tender and airy crumb. I can personally eat an entire loaf myself, that’s how much I love the almighty ciabatta.
Now why should you make it yourself? It’s a heck of a lot cheaper than buying it from a bakery, first of all, if you can even find an authentic bakery to buy it from (which I cannot). And the main reason for making it? Two words:
Panini
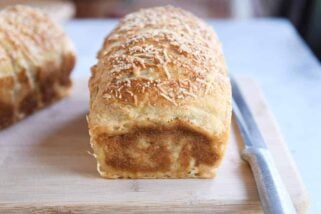
Garlic Bread
Ok, that was officially three. But really, there is no better bread to panini out of than ciabatta, in my opinion. And for the record, this ciabatta makes the most to-die for garlic bread known on the earth (see the details below the recipe).
Seriously. I’ve done my research. I know this to be true.
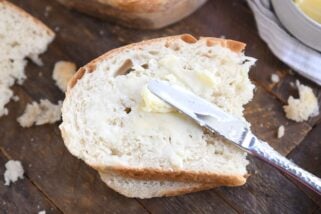
If either of those options don’t get you excited, don’t worry, I usually make this when we want to tear off hunks in a non-civilized manner and dip them into the drippings of a buttery garlic shrimp scampi or something equally delightful.
So make it already! I’ve included step-by-step photos, just like I did with the bagels, and if you can prepare yourself to forget what a normal yeast dough should feel and look like and accept the fact that you may have crazy-dough-hands-and-fingers at some point or another, well, then, you’ll do just fine making it.
Recipe Source: from King Arthur Flour

Homemade Ciabatta Bread
Ingredients
Overnight starter:
- 1 ½ cups (213 g) unbleached or regular all-purpose flour
- 1 cup cool water
- 1/16 teaspoon instant yeast
Dough:
- All of the starter, from above
- 1 teaspoon instant yeast
- 1 ½ cups (213 g) unbleached or regular all-purpose flour
- 1 ¼ teaspoons salt
- 1 teaspoon sugar
- 1 tablespoon nonfat dry milk
- ¼ cup lukewarm water
- 2 tablespoons olive oil
Topping for Garlic Bread:
- 1 medium head of garlic, cloves separated and peeled (about 15 medium cloves) and finely minced
- ½ cup (113 g) butter, melted
- ⅓ cup olive oil
- Pinch 1/16 teaspoon of salt
- 1 cup freshly grated Parmesan cheese
- Snipped fresh parsley, for garnish (optional)
Instructions
- For the starter: Mix the starter ingredients in a small bowl until well combined. Cover the starter and let it rest at room temperature overnight, or for up to 15 hours. It will become bubbly and puffy.
- For the bread: Place all of the dough ingredients, including the starter, into the bowl of your mixer and beat at medium speed, using the flat/paddle beater, for 7 minutes (scraping the bowl as needed). As it starts to mix, it will be very wet and sticky. After mixing for 7 minutes, the dough will be smooth, soft, shiny, and elastic. Alternatively, knead the dough ingredients in your bread machine using the dough cycle.
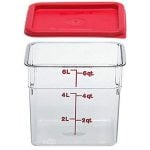
- Using greased or lightly oiled hands, transfer the dough to a greased bowl or other rising container, cover it, and let it rise for 2 hours, deflating it halfway through, and then recovering and letting it rise another hour. If you’re using a bread machine, allow it to rise for an additional hour after the dough cycle has ended.
- Lightly grease your work surface/counter, and a half-sheet baking pan (18″ x 13″) or similar large baking sheet or line it with parchment or a silpat liner. Grease your hands, as well.
- Very gently turn the dough out of the bowl onto your work surface; you don’t want to deflate it. It’ll lose a bit of volume, but don’t actively punch it down. Using a bowl scraper, bench knife, or your fingers, divide the dough in half. You should have two fat logs, each about 10″ long x 4″ wide.
- Handling the dough gently, transfer each piece to the baking sheet, laying them down crosswise on the sheet. Position them about 2 1/2″ from the edge of the pan, leaving about 4″ between them. Lightly cover the dough with heavily oiled plastic wrap or a proof cover, and allow it to rise for 60 to 90 minutes. Midway through, gently but firmly dimple the dough with your fingers, making fairly deep pockets. Towards the end of the rising time, preheat the oven to 425°F.
- Spritz the risen loaves with lukewarm water. You’ll see that the dimples have filled in somewhat, but haven’t entirely disappeared. Bake the loaves until they are golden brown, about 18 to 20 minutes. Remove them from the oven, and cool on a rack.
- To make garlic bread: Prepare the topping by combining the minced garlic cloves, melted butter, olive oil and a pinch of salt in a small bowl. Cut the loaves in half lengthwise, like you’re going to make giant sandwiches. Spread the cut halves with the garlic mixture. Bake the bread in a preheated 400°F oven for about 10 minutes, or until the topping is bubbly and the edges of the bread are starting to brown. Remove the bread from the oven, and sprinkle it immediately with the grated Parmesan and parsley, if desired. Cut in crosswise slices to serve.


This is a great candidate for “recipes the world forgot”- it is SO delicious and deserves to be spotlighted! Don’t be scared off by the long recipe time- it is dead easy and each active step is super quick. It’s perfect summer bread- makes a “too hot to cook” dinner of sandwiches extra special, and because the bake time is so short, doesn’t really heat up the house. I had forgotten how (worryingly!) slack the dough is, but the ciabatta baked up beautifully with a gorgeous airy crumb.
Two things I did differently this time- instead of the 1/16 tsp yeast in the biga I used about a cup of unfed sourdough starter (otherwise as written, started the night before). My (lazy! inexact!) starter is a haphazard proportion, but generally on the looser side. The biga was not as bubbly as yours in the morning, but by the end of the two hour rise I had great lift, and the end product has great flavor (and rose beautifully in that slightly flatter ciabatta way). The second thing- rather than have to transfer the dough from the counter to the baking sheet- I just oiled my baking sheet well and gently poured the dough directly on the sheet, before dividing in half and nudging apart into two long loaves. I cannot emphasize enough how wet this dough is- the less you have to try and shape it the better, in my book.
If the loaves make it until dinner I am looking forward to some great sandwiches! Thanks for another winner, Mel!
Made this recipe and bread was delicious. Finished both loaves in 2 days!
So it turned out pretty good, but wasn’t sure it rose enough. Since I didn’t have any dry milk powder, I had replaced the 1/4 cup water with 1/4 cup scaled milk (someone’s tip below). So maybe that was why.
If you have a different tip for substituting the dry milk powder I am all ears!
Just an FYI, I tried another Ciabatta recipe from another site, as it was different that yours and looked interesting to me. Remind me not to use other site’s recipes, it turned out awful. Thank you again for all your awesome recipes.
WOW! This bread is incredibly delicious. I doubled it and made the garlic toast exactly as written and my family loved it! Will be making again and again. Thank you!!
I am now making my own sour dough starter, what would be the amount of starter would I need to make this.
Honestly, I’m not sure, Nicole – you might need to compare it with some sourdough ciabatta recipes online and see if there’s a good amount to start with. Sorry I’m not more help!
Hi
Is it possible to get good results without an electric mixer?
Thanks
Alok
I’m not sure, I’ve never made it without a mixer; I think for this particular recipe, a stand mixer is important.
It might be possible by wetting your hands with water and folding and resting 4 times during the 2 hour time slot. I have made ciabatta without using a mixer. Check youtube.
Can I use whole wheat or light whole wheat partly say half or 1/3?
I haven’t tried that in this recipe, but you could definitely experiment!
Hello Mel, for the starter, you say 1/16 teaspoon yeast, how much would that be? I can’t even imagine an amount so small! Is that correct? Thank you!
It’s just a pinch, really. You could do 1/2 of a 1/4-teaspoon measure for a visual (although that’s technically 1/8, but it should be fine).
Can you use home milled soft white wheat flour instead?
You can definitely try – the most wheat flour I’ve used is 50% in this recipe.
Hi Mel, i saw you made this in your Bosch, did you use the amount called for in the recipe or did you double?
I usually just do the amount called for in the recipe.
I tried making this with 100% whole wheat bread flour and the loaves ended up really flat. They had fairly nice holes, but they spread out during the last rise and were flat. I would suggest trying an actual whole wheat ciabatta recipe if you are going to use whole wheat flour. I think that the dough was too wet with the whole wheat flour, so they spread out.
I’ve been grinding my own flour for a while now, and have read in some of your bread recipes that you do too. What’s your thought on using freshly ground flour for this?
There are a few bread recipes on my site I haven’t had great luck subbing in freshly ground whole wheat flour and this is one. It may be that when I tried it, I used 100% whole wheat flour – perhaps subbing 50% whole wheat (I prefer white whole wheat) would work better?
Is the paddle attachment used is the same as the one you would use to beat cream cheese?
I’m not really sure – it’s the attachment shaped a little like a diamond and completely empty in the center.
Thanks for posting this recipe! I have a tip for those who do not have powdered milk to make this recipe. I looked around and found that for 1 TBSP powdered milk, replace 1/4 cup water with 1/4 cup liquid milk. Some people also recommended scalding the milk, which I did. I made this yesterday, measuring the 1/4 cup milk, putting it in a saucepan, stirring it until boiling. Then let it cool. A little bit evaporated, so I added a bit of water to get 1/4 cup liquid. It turned out great!
Is there any chance this could be made with part whole wheat flour? I’m guessing not, because of the gluten structure, but thought I would ask and see if you’ve ever tried it!
I haven’t tried this one with any wheat flour because the dough is fairly particular; having said that, I always think it’s worth a try – especially if it’s only part wheat flour.
Mel – was just recently introduced to your website and I have been highly impressed and so has my family! Thanks for sharing your gift with the rest of us. Question about the started? I thought about starting it this morning, what is the shortest amt of time it needs to sit? Also, do you recommend one of your roll recipes to be used as hamburger buns? Thx
Hi Michelle – I would say to try and let the starter rest for at least 8 hours. And my favorite roll to use for hamburger buns is this French Bread roll recipe or the Fluffy Whole Wheat rolls (basically same recipe, but one uses all whole wheat flour).
I made this yesterday for Thanksgiving, (yeah, we were thankful a day late!) and this spread more than it raised. I know what went wrong, (I needed a bit more flour and a tiny bit more yeast as I used active dry,) but I wanted to mention that I was still able to use it in your stuffing recipe and it turned out great! My guests never will know that I used bread that was about as tall as a large crouton! Haha!
This is what I love about homemade bread; no matter how bad you mess it up, there is almost always something you can do with it!
This is the most complicated dough I have EVER worked with…I mean I guess I’m a newbie…but not to cooking/baking….this dough looks like pancake batter! I’m pretty frustrated…should I have added more flour? I used my scale, but there’s no way it should be this sticky…I had to scope the dripping dough with my hands to put it on the sheet
Sarah – This dough is unlike any bread dough I’ve ever worked with and is quite sticky which is why an electric mixer with a paddle attachment is key. I’m sorry it was frustrating! It sounds like it was close to the texture it should be though.
Just thought I would add here, it turned out despite the consistency of the dough and tasted incredible. I ended up trying to make it again since I still suspected that the dough was not quite right (seriously you shoulda seen it! It didn’t rise & there for sure was no way to dimple it)…..the second time around I decided not to use my scale and just measure it as I normally do….that seemed to do the trick. So I don’t know if my scale was off or what. But just wanted to say thanks for the recipe, I love expanding my bread recipes. 😉
FINALLy!!!!!!! a fantastic ciabatta bread
THANK YOU SO MUCH !!!!!!!!
Mel, last week, first time I tried your recipes and got fantastic result! My husband and I loved it- I can’t stop thinking to bake something else soon. Also in one of your recipe you have used 00 flour. What was that for? Thank you so much for your delicious recipes.
Aqila
Aqila – what recipe did you see 00 flour? I can’t recall using that.
Awesome recipe and awesome website!! I’ve made this recipe several times now with great success. I’ve started substituting straight sourdough starter for the sponge. As the sponge calls for 6.25 ounces of flour and 8 ounces of water, I use 14.25 ounces of 66% hydrated sourdough and because there is yeast in the final recipe, I do not feed my starter first for an extra tangy flavour : )
This looks amazing. I just had a question. how much should I dimple the dough and how deep should I make the dimples.
Thx
Kim – it doesn’t really matter, just press the tips of your fingers in all over, probably every 1/2-inch or so. Maybe closer. I press about halfway through the dough.