Tie-Dye Frosting for Cupcakes {a How-To}
Tie-Dye frosting for cupcakes is so cute and easy to do. Check out this post for a simple how-to. You will feel like a rock star!
Let it be known that in my house, these last couple months have been referred to as “The Summer of the Tie-Dye.” I’m not sure how it happened but we’ve decided to act like we live in the 80’s and it’s tie-dye crazy around here. Here’s official evidence…
A few notes about the picture below:
1) My boys coordinate to wear their beloved, homemade tie-dyed shirts the same day (we’re talking five days out of the week) and there are major tears when one of their shirts is in the dirty clothes and mom has to admit she hasn’t done laundry since yesterday because she isn’t a servant and she can’t help that boys love.to.get.dirty.
2) Please ignore the bedheads. It’s summer, people!
3) For the record, my boys tuck their shirts into their shorts on their own accord. They get their fashion sense from their dad, what can I say.
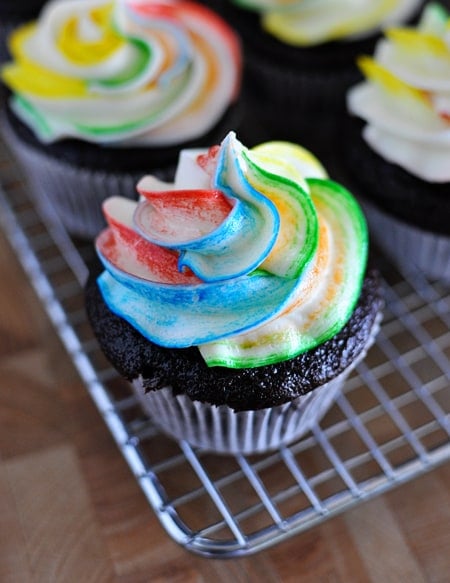
Since tie-dying is so “in” at our house, it wasn’t a surprise that my third eldest requested tie-dyed cupcakes on his birthday in June. Hmmm, what’s a mom to do with that request? FIND A WAY TO TIE-DYE FROSTING that’s what! And this is the closest thing to it. Granted, it looks a bit more like striped frosting or rainbow frosting, but my boys fully believed I had tie-dyed frosting and nominated me for some kind of cupcake froster of the year award, so I’m calling this tie-dyed frosting. Call it what you want – it’s cute, it’s easy to do, and it will get rave reviews.
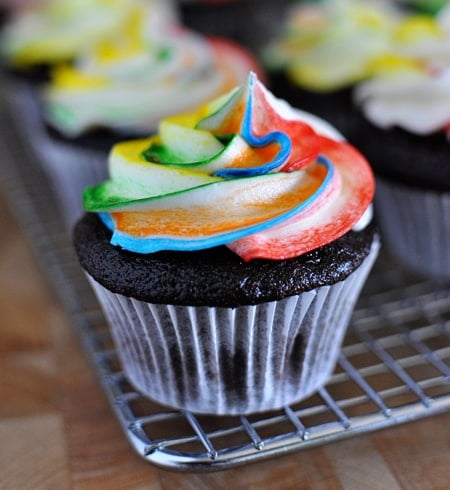
I used the chocolate cupcake from this recipe and stuck with my tried-and-true fantastic, simple buttercream. Other than that, it all boils down to the how-to, which I’ve documented below. And just a note, the way you see me filling the piping bag with frosting (using plastic wrap) is how I do it every time I frost anything (from cupcakes to cookies to cakes). It makes the cleanup so simple, you’ll be finding things to pipe frosting on just to fill a piping bag this way. Um, ok, so that’s probably just me…but trust me, it will revolutionize the way you frost.
Speaking of frosting the cupcakes, here’s a short video showing a quick how-to on getting those beautiful swirls of frosting on top of the cupcake. Check out the step-by-step tutorial at the end of the post for the actual tie-dyed frosting info.
You can tailor the colors in this tutorial to anything that will suit your theme – you could even do stripes of one single color to make, say, a pink and white tie-dyed frosted cupcake for a baby shower or something like that. The options are endless. What would be REALLY cool would be to make the cupcake itself tie-dyed with different colors of cake batter. But obviously I wasn’t on top of my game enough to plan for that. You should, though, and then you’ll be way cooler than me. Happy tie-dying!


I meant tie dye frosting, of course!
Thank you for the very specific directions with pictures! My daughter-in-law is a tie dye fanatic so I wanted to top her mini bundt birthday cakes with toe dye frosting. This was easy and fun to make!
I was making cupcakes for a 13 year old who loves tie-dye so I was excited when I found Wilton’s tie-dye cupcake holders. Then, I happened upon your post on Pinterest and wondered if I could do it as well- I followed your instructions exactly except I didn’t have any plastic wrap, but modified a ziplock bag and it worked like a charm, They came out perfectly! No frosting to clean out of my pastry – bag-a bonus!! Thanks for a great post…plan to use blue and red for the 4th.
Do you think these could be made ahead of time, like the night before, or would the frosting run?
Hi Vicki – I’ve made them the night before and they’ve worked out great.
Very cool! What icing TIP # are you using?
Ooops! Never mind…I see a 1M 🙂
Hi. I love your page. I’m gonna try your Magical flour frosting for a cake and was thinking to give this tie dye effect. Do you think it will work or should I go for buttercream.
Yes, I think it would work.
I am just sitting here with my head in my hands and laughing. This frosting into the bag technique is genius. Where have I been?? Thank you so much for these instructions. I am going to try it this afternoon with my granddaughter.
Unlike most of the people here, I am just a teenage boy, but whenever my mother says to make something, this is where I go. Thanks, I get a kick out of these recipes, especially this one.
Hi there, these look amazing! The videos and how to’s look great too, I never really use piping as it always gets messy and annoying, but seeing how you used the cling film and the clip is genius! I can’t wait to try it myself. Much love to you and your beautiful family from Ireland 🙂
Hi, I also never comment on blogs, but I have to tell you I’m crazy about you, you beautiful family and your totally yummy recipies!! Thank you for your enthusiasm and detailed tutorial above, I am very impressed! I made your other frosting(flour cooked one) and wow! I was using it for a birthday cake and everyone thought it was so delicious, tastes like pastry creme but no eggs!! my cousins children are allergic so was perfect! Perfect! I have pinned lots of your recipies and cant wait to try them. Again, thank you and God Bless x
Abssolutely brilliant! In so many ways 🙂 so glad I found this right before my daughters rainbow theme bday. Thank you soo much. Your boys are adorable.
Awesome!
Thank you for posting this. I’ve always thought it looked like a daunting task to make rainbow frosting, but this turned out to be so simple and turned out beautifully! Thank you!
WOW WOW WOW I just made the tie-dye frosting to go ontop of my tie-dye cupcakes and i am so excited at how well this method works you are so clever
Omg! It looks so cool I am going to try it on my cake
I love you and all your ideas, Mel! Finally got around to using this tie-dye method and I love it!! Might just be my new favorite (and SIMPLE) way to decorate cupcakes! Thank you for sharing!
seriously, you are the COOLEST! what a good mom, and this is the best idea ever!!! i am totally trying it, so easy. p.s. i can’t STAND cleaning out those reusable frosting bags so your saran wrap tip is totally priceless.
Hi! Lovely post!
In fact, this inspired me to do a blog post of my own featuring this dish that I have matched with an outfit! I’ve just started my food/fashion blog called Gourmet Sartorialist and It’s a pretty random concept, but i’d love for you to have a look! 🙂
http://www.netcommads.wordpress.com
Anyway, keep up the great work! I’ll be watching.