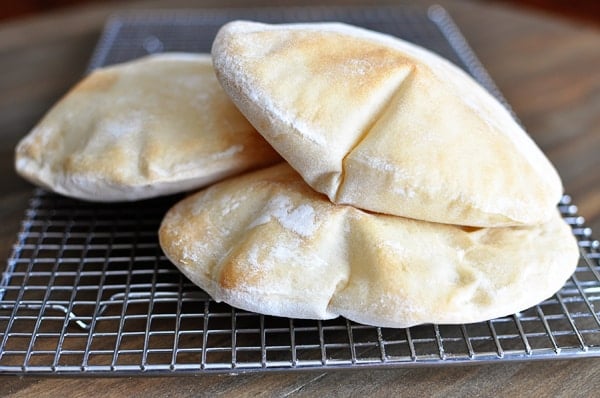
Homemade Pita Bread
Pita bread is surprisingly easy to make at home; in this post, you’ll get all the tips and tricks to make the pita breads puff perfectly!
I think the puffing aspect of pita bread is what scares the bejeebies out of most people who think they might, at some point in their life, want to try making pita bread on their own at home.
Or maybe that’s just me since I’m pretty sure most normal people don’t go around obsessing about the pitfalls of pita bread.
I had these epic nightmares of what would happen when all of my children had their faces pressed to the lighted oven door to watch the at-home science experiment of how pitas puff to make perfect little pockets…and I subsequently envisioned their dejected expressions when the pitas.did.not.puff.
Because I was sure that would happen and that vision was definitely not going to win me mother-of-the-year award.
Oh wait, that actually did happen. See? Non-puffing pitas are a serious bummer.
However, I was forced to revisit the pita bread conundrum when I came across a chicken recipe I had to try immediately (which I’ll be sharing on Friday) and which called for pita bread.
I couldn’t bring myself to ruin a deliciously inviting meal with the cardboard-variety pitas I’ve spied (and yes bought) at the store on past occasions.
So I took a deep breath.
Embarked on some deep meditation to calm my inner angst.
And I made pitas.
And let me tell you, they were so wonderfully successful that I am kicking myself for not making them before.
Yes, yes, there were a few that refused to puff. But thankfully there were enough that did magically puff to appease the four little grubby faces watching in amazement.
The trick with pitas, I learned after making a triple batch, is that a) they need to be rolled out as evenly as possible (overly thin or thick spots in the same pita round make for trouble when puffing) and b) the top of the pita dough needs to be a tad bit moist (no dry dough!) in order to perform the puff.
Seriously, pita bread is one of the easiest yeast doughs to make.
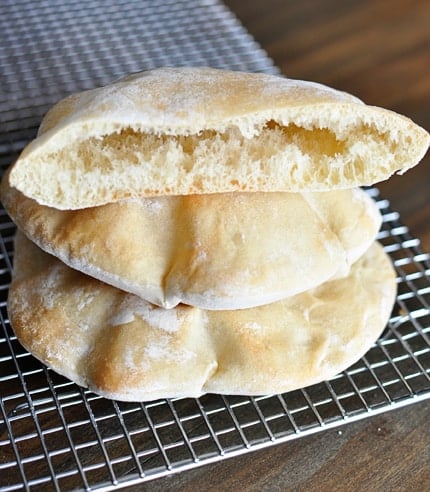
And how could you not feel superhuman when you’ve just created a piece of bread that has a pocket inside of it for goodness sakes.
That alone is worth the effort to make them.
A.pocket.in.bread. It’s revolutionary, I tell you.
One Year Ago: Grilled Rosemary Buttermilk Chicken
Two Years Ago: BBQ Pulled Pork Sandwiches {Slow Cooker}
Three Years Ago: Chipotle Chicken Tacos
Homemade Pita Bread
Ingredients
- 1 tablespoon instant yeast
- 1 ¼ cups warm water
- 1 teaspoon salt
- 3 to 3 ½ cups (426 to 497 g) all-purpose flour (see note)
Instructions
- In the bowl of a stand mixer or in a large bowl (if mixing by hand), combine the water, yeast, salt and 1 1/2 cups flour. Beat to form a soft batter-like consistency. Add additional flour until the dough starts to come together. It may look rough and shaggy at first but as it continues kneading, it will come together. Add enough flour to form a soft dough that clears the sides of the bowl (but is still slightly tacky to the touch – see the note above) and knead for 4-5 minutes with an electric mixer or 8-9 minutes by hand until the dough is smooth and elastic.
- Turn the dough onto a lightly floured countertop and divide the dough into six equal pieces. Roll the dough pieces into a ball shape. Lightly cover the balls of dough and let them rest for 10-15 minutes. Roll each dough ball into a thin disc, about 1/4-inch thick. Do your best to keep an even thickness throughout the entire disc of dough since this helps the dough puff in the oven (among other things). Let the pita rounds rest, lightly covered, for 30-40 minutes until they are slightly puffed.
- While the pita rounds are resting, preheat the oven to 425 degrees F. There are two methods for baking the pita bread. 1) Use a baking stone. Preheat the stone in the oven for 30-40 minutes (while the pita rounds are resting). When ready to bake, gently lift a pita disc, with your fingers or a large spatula, and flip it onto the hot baking stone (if your stone is large enough you can bake more than one at a time). Flip the dough so that the side that was resting on the counter is now facing up. You want the the side that has been exposed to air (the dry side) to be down on the baking stone and the side that is more doughy and moist to be facing up – this helps the pita puff up. If you bake one or two and they aren’t puffing, spritz the top of the pita round with a light mist of water before baking. 2) If you don’t have a baking stone, preheat the oven like normal and then when the pitas have rested, gently flip two of them onto a large, rimmed baking sheet lined with parchment paper. Again, make sure you flip them so the side that was resting on the counter is now facing up. Spritz with water, if needed.
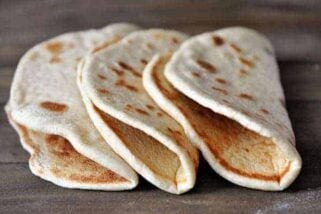
- Bake the pitas for 10 minutes, until they are starting to brown very lightly on top and they have puffed several inches high. Keep in mind, though, that it won’t be unusual to have some pitas that just refuse to puff. Still take them out after 10 minutes – they will make great flatbreads and will still taste delicious even if they don’t have the magical pocket inside. The trick to great pita puffing is to roll the pita evenly and to make sure the dough isn’t dry on top when it goes in the oven (hence the reason for flipping the pita onto the baking stone or baking sheet). Don’t get discouraged if your pitas don’t all puff. I had some non-puffers and we made little pizzas out of them and/or used them to roll around the filling instead of stuffing inside the pita. The baked and cooled pitas can be frozen or stored covered at room temperature for 1-2 days.
Notes
Recommended Products

Recipe Source: adapted slightly from Under the High Chair, found via Pinterest


What do you put the rising pitas on? I tried a cookie sheet, a baking mat & Parchment paper..they stuck on all of them. It flattens their “puff” and mishapes them, let alone makes them all uneven.
Try dusting parchment paper (on a sheet pan) with flour and place the rising pitas on the lightly dusted flour surface.
I cannot imagine that I made pita’s! This is a great recipe and so easy to follow and if I can add everyone came out puffed!
Thanks for sharing and I am making the Slow Cooker Roasted Garlic Beef Sandwiches (2nd time it was a hit) and everyone wants pita’s now…even though I ❤ the French bread rolls…..my guess it will be both.
Thanks again
Way to go, Dawn!
I love this recipe. I made it many times and it always comes out perfect. Lately I’ve added half a tablespoon of sugar, I like it with a hint of sweetness, but you can definitely do without it.
Hi, thank you for this recipe. I made a few adjustments – I used instant yeast and baked them on a non stick pan. They rose beautifully and I’m so grateful for your help. Thank you!
I forgot to mention that where I live, pita bread is very expensive. This recipe has been so great, I can literally make 4 -6 batches for the price I’d pay for one batch at the store.
I forgot to add the question : why do you think they are white, and how can I fix that?
Thank you
Shani
You can try moving the oven rack to a higher position or increasing the baking temperature.
Hi
I made the pita and it is fast and successful. Your pita in the picture have such a nice light brown around and top of pita. Mine is white (but ready). Only the bottom have browned (I made them in a stone) thanks
Shani
I made these for lunch and we stuffed them with homemade tzatziki sauce! It turned out really good.
Recipe came out perfect! I’ll never buy pita again!
What type of attachment did you use on your stand mixer? A paddle or dough hook? I’m excited to try this!!
The dough hook.
I wish you showed pictures of your progress. Regarding kneading dough and how you flatten it as well. Didn’t puff up exactly like yours. The taste was good but like I said it didn’t turn out like yours.
I made two batches- both came out like frisbees- nothing like yours. So disappointed
I find that whenever I’m trying a new recipe it always takes a couple tries before it comes out the way it should!
So I have to admit…I made the dough and I started thinking “no other recipe I found is this fast. Most of them make a giant ball of dough and let it rise for an hour” so I freaked out and made a different recipe but still kept these to the side. The other recipe I made that required rising for over an hour, didn’t turn out! Yours turned out perfectly! They actually puffed in the oven whereas the others didn’t. I saved those for flatbread sandwiches but I definitely won’t doubt you again! Thank you for the recipe and I’m saving it for future use!
This recipe is foolproof. I made a successful batch of pitas, only 2 didn’t puff. Thank you.
I had so much fun with this recipe. Some of mine did not rise but most did. We used them for a hamburger bun. Taste is great. Ones that did not rise are great as nana bread. Also good with almond butter. Thanks Mel
Can I use original active yeast. Unfortunately I don’t have any instant yeast. Thanks for your help.
Yes! Proof the same amount of active dry yeast in about 1/4 cup warm water with a pinch of sugar until bubbling and foamy and then use it in the recipe (and decrease the other liquid in the recipe by 1/4 cup).
I followed the recipe to a T. N they turned out perfect.
I rolled on floured parchment for step 2. Great texture and taste!
Just made these and they turned out great! I actually made a half recipe, and was nervous that the measurements might get funky but had no problems with it. I don’t have a pizza stone, but I preheated a baking sheet and flipped the pitas onto that. To my surprise, they actually puffed up beautifully! Can’t wait to stuff these with all sorts of yummy things 🙂
Thank you so much for this recipe. I made them for dinner last night and they turned so good. My family and I enjoyed them.
I live at 7000 feet above sea level and I have had such a hard time finding a pita recipe that would rise..until now! Yay. I reduced the rise times a bit and they came out beautifully. I really appreciate the detail in your recipe. I think the parchment paper and the spritz of water were the trick! Thank you!
can we cook them on skillet?
Yes, probably – I haven’t tried it but I’d recommend a piping hot cast iron skillet.
I’d like to use this for communion bread, and have a few congregants who are gluten intolerant. Any suggestion about making this gluten free? Thank you, Mel
Hi Lynda – I don’t know the best way to make this bread gluten free. Usually with yeast breads it’s not as easy as replacing the all-purpose flour with gluten free flour. You might be better off google searching a gluten free pita recipe so that it has been tried and tested!
Just made these this morning . They are amazing !!! I made the dough in the food processor , other wise I followed the instructions exactly . I baked them on a baking stone lined with parchment paper. They look exactly like the picture . Used them for lunch stuffed with turkey and veggies
2 questions
Can I use bread machine yeast ?
Can I make the dough in a bread machine and take out as soon as the mixing kneading cycle is finished ? Then follow the rest of your instructions
Thanks
Yes, you should be able to use bread machine yeast. I don’t know how the quantity of dough would work in a bread machine – I don’t own one and so much depends on the size of the bread machine, but if the dough fits, it should work.
Surprisingly not that hard to make and I got to blend the dough in my Ninja!
My pita did not puff up was kind of dense. Was beautiful as it raise from the 40min after it was shape into disk. Don’t know where it went wrong I follow directions.
I almost cried when they were in the oven. I couldn’t believe how good they turned out. I definitely need to work on the shape but wow. Super easy. Although I used dry yeast instead of instant yeast so I left them to rise for more than two hours. Mainly because my daughter wouldn’t sleep so I couldn’t leave her.
I’m for sure making them again and I’m following you on instagram. Thank you so much. Your note about the amount of flour needed is really helpful. Keep up the good work
Thanks, Leyla! I’m so happy these worked out for you!
How much sugar do i use to go with the amount of yeast called for in this recipe?
i do not see any, or does instant yeast already have sugar in it? please let me know
i really would like to make pita bread in my stand mixer with a dough hook attachment.
my e-mail address is midnight0675@frontier.com
You don’t need any sugar for this recipe!
These look good.
But I think 1 teaspoon of salt
Is too much salt for bread of
Any kind. I think I will cut salt
To 1/4 teaspoon instead.
Who knew making pita’s was so simple! I totally agree that I’ve always steered clear because the pouff made it seem like it would be impossible, suuuper excited to try these now!
So excited! My pitas are rising, the very first time. I tried once in the past using another recipe and they only rose partially.
E
Three cups of flour produces only 6 pitas? I can believe it, just want to check that’s what it really yields!
That’s how many I make, but you can definitely make them smaller! 🙂
Turned out great and thanks for all the tips!
Excellent recipe, tastes and looks just like the ones I used to buy at the “Middle East bakery” I had nearby in the neighborhood I moved away from some time ago! I highly recommend this recipe!!!
They were perfect! I’ve tried a different recipe with little success and can attest that this recipe puffed perfectly each time.
How do you keep them from tearing when you open them
If they are warm, that helps.
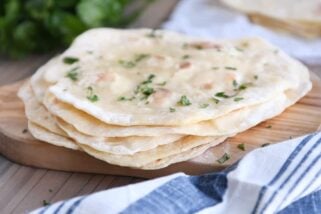
I made them yesterday, and they came out perfect, I added some rosemary on top for a different flavor (I recommend). They all puffed up flawless, I let them brown a little bit more in the oven so they came out with a great crunch. I guess I was a little scared because it was the second time trying to make this recipe, but at the end I was glad they came out great.
These worked perfectly! All mine puffed with only a cookie sheet, no stone, made with about 70% whole wheat and they still came out exactly like they should.
I made these this morning…first time making pita. They all puffed and are delicious! Thanks for a great recipe!
First try and they were great!
These taste great, but my pita stuck to the counter so badly that I literally mutilated them trying to get them off. I’m pretty sure this is why they didn’t rise, but I’m not 100% sure. Should I add more flour to the recipe/on the counter next time?
Hi Sarah – sorry to hear the pitas stuck so badly. Did you read through the comment thread? Several people have given great suggestions on the sticking/puffing issue. Sounds like a lot of people have luck flipping the pitas off of the parchment paper (I’d suggest coating the parchment with nonstick cooking spray). If the dough itself was really sticky, you might also try adding a bit more flour. Good luck!
not one puffed
I made them. I have a nice crunch on mine and love them. Thank you. It’s my first time making them and they turned out amazing.
Made these tonight for my first time ever and they all puffed up! I had active yeast and I followed the suggestions of one of the commenters below who used it also. Thanks for the recipe!!
Made these last night with whole wheat flour. Did the extra kneading, as suggested in the notes and they all puffed and tasted awesome. Only thing I want to check was that both sides of the pocket were not eventhickness like in the picture. The top puffed side was more like paper thin and the bottom was soft and bready. Wondering, what I did wrong….
Thanks in advance
I’m not sure, Prerna – possibly due to how thick or thin they were rolled, but I’m not positive.
Hi. Did try this. However each one went half puffy and half flat. Taste was good so no complaints on it. Maybe more kneading and rolling out time
Hi Mel. Amazing recipe!! Pitas were amazing, perfect actually. My husband and my son loved them. They tasted amazing and much better then the store bought. Thank you so much.
I just found this recipe and tried my first pitas tonight. Most puffed to some extent and all had some sort of pocket—yay! I think my biggest problem was the transfer. I’ll try a parchment flip next time. My favorite part was watching the moment of the puff! Pitas will definitely be a frequent baking routine from now on.