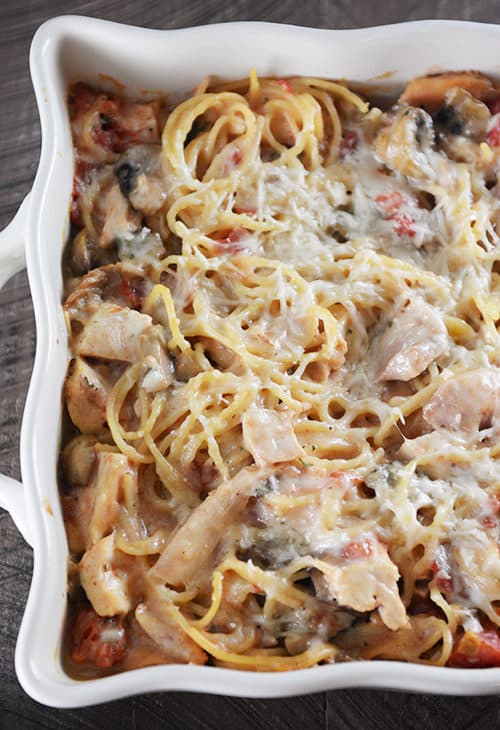
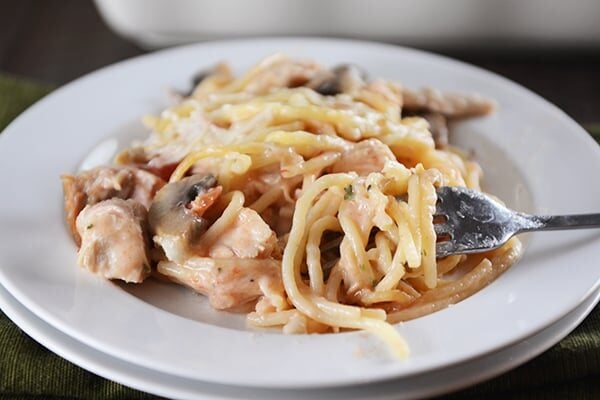
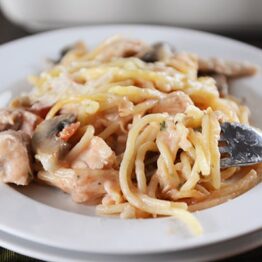
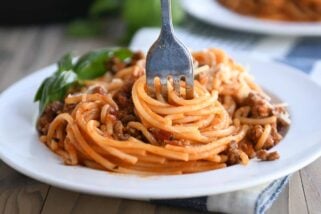
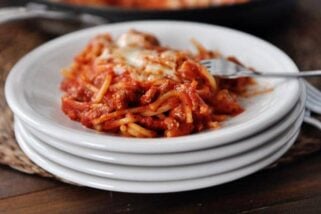
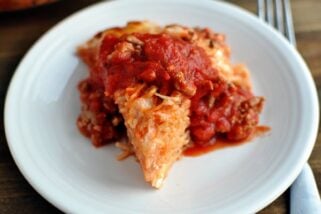
Baked Garlic and Fontina Spaghetti
Take dinner up a notch with this delicious baked spaghetti that can be made ahead of time. The garlic and fontina add incredible flavor!
This baked spaghetti. It is unreal.
Tested and made in anticipation of our upcoming Valentine’s family candlelight dinner (one of the kids’ favorite traditions of all times), I’m not sure we’ll actually end up serving it for that yearly event seeing as how we may end up eating it a dozen times before the holiday.
Honestly, we can’t stop. It’s so delicious.
Not difficult in the least, it’s still a tiny step above your average Tuesday night dinner (at least in this house) but the few extra minutes of prep are worth it for a special occasion or if you find yourself with the hankering for a better-than-restaurant dinner.
Plus, it can be assembled ahead of time to be baked whenever (forever!). This meal is sure to win you lots and lots of friends (if that’s what you are after – if you are a homebody like me, it will win you lots and lots of scrumptious dinner nights to look forward to without involving outsiders).
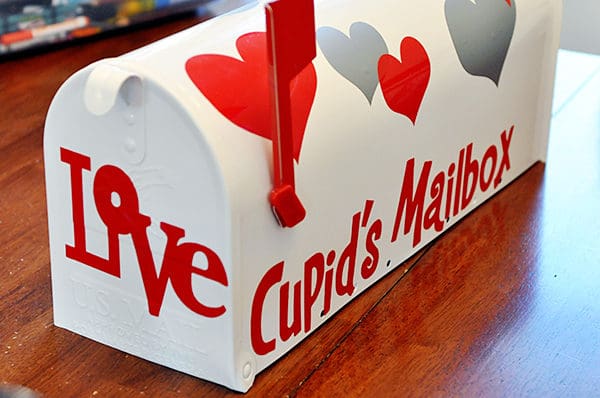
On a somewhat unrelated note, since V-day is approaching quickly and furiously, I wanted to give a few quick, brief details on another favorite family tradition since many of you asked about it last year. Cupid’s Mailbox.
Or in other words, that time of year when mom writes sappy love notes that cause a lot of eye rolling.
It’s not anything over-the-top but it’s something my kids start talking about for months leading up to the event (yes, even preempting Christmas excitement at times).
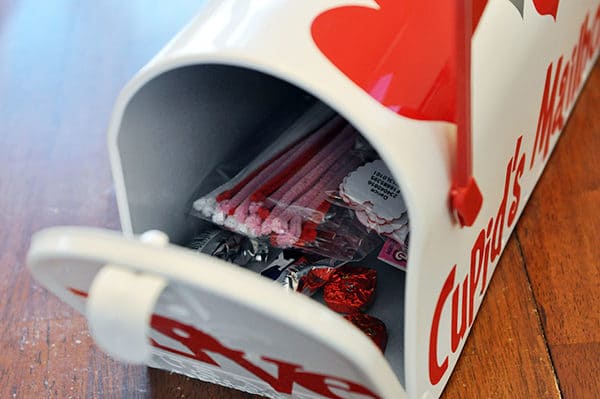
I think it’s a mix of chocolate, usually a Valentine’s pencil thrown in there and lots and lots of notes from mom, dad, and occasionally a brother (this year, I’m pretty sure little sis is going to be filling up that mailbox with the hundreds of special drawings she does every day that normally she insists on passing out to the neighbors, UPS man and random strangers).
Keep in mind that I like to cook. Food’s ma thing and I have never claimed to be a craft blogger (my husband’s kind of rolling on the floor laughing right now).
I’m pretty sure I snagged this idea off of Pinterest years ago. Basically, it’s as simple as decorating a mailbox (I used a full-size white one I got from Home Depot) with Valentine-ish stickers/vinyl and then leaving messages, treats, small toys, love notes, poems (etc, etc) the days leading up to Valentine’s Day.
I usually start about five days before. Each day the boys rush downstairs in the morning and one of them gets to open the mailbox and distribute the mail.
One of the highlights is definitely the day Brian draws a funny cartoon on paper and writes them a note. They’ve kept all of his notes over the years in their little collection boxes hidden in the deep, dark recesses of the scary undersides of their beds and they love to pull them out and giggle at their funny dad.
On the last day, there’s the grand finale of surprises.
In years past, it’s been calendars to hang on their wall (for some reason it was, like, the hit of the century those calendars) and this year it’s a Star Wars t-shirt or maybe a wooden initial for their name they can paint.
I can’t remember. Target sucked me in the night I went shopping for mailbox items and I very well might have bought all the things. I have a talent for forgetting what exactly I’ve bought at Target when I walk through the doors and enter that strange vortex of unaccountability.
Anyway, that’s it. It’s a fun way to shower the kids with a little extra love the week of Valentine’s Day; I spend weeks thinking of funny poems to write them and every single year I realize I think I’m waaaaaay funnier than they do. Story of my life.
What To Serve With This:
Roasted Broccoli
Autumn Pear Salad with Maple Balsamic Dressing or another green salad
Divine Breadsticks
One Year Ago: Curried Lentil and Sausage Soup with Toasted Almonds
Two Years Ago: Classic Crème Brulee
Three Years Ago: Classic Coleslaw
Baked Garlic and Fontina Chicken Spaghetti
Ingredients
Noodles:
- 12 ounces (340 g) spaghetti
- 1-2 tablespoons olive oil for tossing the noodles
Sauce:
- 1 tablespoon butter
- 1 tablespoon olive oil
- ½ cup chopped yellow or white onion
- 8 ounces (227 g) baby bella mushrooms, sliced
- 4 cloves garlic, finely minced or pressed through a garlic press
- ⅓ cup all-purpose flour
- 1 teaspoon coarse kosher salt
- ¼ teaspoon coarse ground black pepper
- ½ teaspoon crushed red pepper flakes, more or less to taste, but don’t leave it out completely as it adds great flavor!
- 2 cups low-sodium chicken broth
- 1 cup milk
- 1 (14-ounce) can diced tomatoes, undrained
- 1 cup (114 g) shredded mozzarella cheese (see note)
- 1 cup (114 g) shredded fontina cheese
- 2-3 tablespoons chopped fresh parsley
- 3 cups more or less cooked, chopped chicken (see note)
- ½ cup (57 g) grated Asiago cheese
- ¼ cup (29 g) freshly grated Parmesan cheese
Instructions
- Preheat the oven to 350 degrees F. Lightly grease a 9X13-inch glass or ceramic dish with cooking spray and set aside.
- Cook the pasta in a large pot of salted boiling water a few minutes short of al dente (the noodles will finish cooking in the oven). Drain and toss with a tablespoon of olive oil to prevent sticking and set aside.
- In a large, nonstick 12-inch skillet, heat the butter and olive oil until rippling and hot. Add the onion and mushrooms and cook for 6-7 minutes, until the onions are translucent and the mushrooms are golden and have given up most of their liquid. Stir in the garlic and cook for 30 seconds or so until fragrant
- Sprinkle the flour over the onions and mushrooms along with the salt, pepper and red pepper flakes. Whisk or stir constantly for a minute or so over medium heat. The mixture will be a bit crumbly; that’s ok.
- Gradually add the chicken broth and milk, whisking quickly and constantly to avoid lumps. Stir, bringing the mixture to a simmer, and cook until slightly thickened, 4-5 minutes. Add the diced tomatoes and heat through.
- Remove the skillet from the heat and stir in the mozzarella and fontina cheeses, one handful at a time, until the cheese is melted and the sauce is smooth and creamy. Stir in the parsley and add any additional salt and pepper to taste, if needed. Add the cooked chicken and stir to combine.
- Toss the sauce and cooked pasta together and spread evenly in the prepared dish. Sprinkle the Asiago and Parmesan cheeses over the top. Cover the dish with lightly greased aluminum foil and cook for 20 minutes. Uncover and bake for 15 minutes more, until the edges are golden and bubbling.
- Let the casserole rest for for 10 minutes or so before serving.
Notes
Recommended Products
Recipe Source: from Mel’s Kitchen Cafe
Thanks again for such an incredible dish!
If we were to half the dish, what size pan would you recommend, and for how long would you bake it?
Thanks in advance!
Hi Ross, I’d recommend a 9X9 inch pan and I think the baking time should be right about the same!
Perfect! Thanks Mel!!
My wife and I have been making this for a long time, thank you so much for an AMAZING recipe!
Question – would it be completely crazy to try with ground beef instead of chicken? We were thinking of giving it a shot but wanted your thoughts first.
You could definitely try that! It would obviously have a different flavor vibe, but if that’s what you have on hand, I think it could work!
Just to tag on to my older comment – I have not gotten a chance to try this with ground beef yet.
But only because the original version is just SO good that my wife and I decided it’s not worth messing with!
This has been our #1 favorite recipe in our rotation for a few years now. Thank you so much Mel!!
Thank you, Ross!
Another wonderful recipe. What a beautiful, flavorful sauce with all of that cheese and garlic goodness. This was a perfect way to use up leftover roast chicken. Also, this was my first experience with Fontina and it will not be my last. My husband fell in love with this cheese.
I’m wondering if I could use a different pasta than spaghetti? Thanks so much!
This was absolutely delicious. The 4 different cheeses really give it a rich, rounded out flavor, not to mention the onions, garlic, and mushrooms adding to that flavor. We will make this many times over!
AMAZING!!!! Thank you for another delicious recipe!!
This is a fantastic recipe! I substituted half of the pasta with spaghetti squash and reduced the liquid ( broth and milk) and it turned out perfect!! Thanks, Mel!
This meal is very, very delicious, thanks for the recipe!! Just wanted to note that I doubled this recipe and froze one of them. I baked it the other day and found it was still quite delicious, but I think the sauce suffered a bit in the freezer so probably wouldn’t freeze again in case anyone else is wondering how it freezes! (the kids still completely devoured it though)
This really is delicious! I have made it a few times now and we fight over leftovers (which is saying something for me…because I hate leftovers typically.) Most recently it made a birthday dinner appearance for my little one’s special day. Thanks for another keeper!
Could this be made with shrimp instead?
Could certainly try, but I’d add the shrimp toward the end so it doesn’t get overcooked.
Have you tried making this with shrimp instead? I want to try not sure if they would get funny tho.
Hi Kathy – I haven’t tried shrimp but I’m afraid it might get overcooked.
Awwww Mel, I just have to say that you are one incredible woman….that’s all!
So am I able to freeze this? And if so do I cook it first and than freeze?
I have frozen it before I’ve baked it and it’s worked pretty well.
I made this with whole wheat pasta and it was still amazingly delicious. Eating the leftovers for lunch right now. I use the De Cecco brand whole wheat spaghetti and find that it has a texture pretty close to regular pasta. In this dish, it was indistinguishable from regular pasta. I boiled the spaghetti all the way to al dente before baking (instead of a few minutes short of al dente) because I think it’s always better to err on the side of overcooking whole wheat pasta. Undercooking makes for a gritty texture. It came out perfect!!!
This was amazing. As soon as I saw the recipe I knew I had to try it. It was absolutely delicious and I used your recipe for shredded chicken as well. Thank you again for another delicious recipe, every recipe I’ve tried always turns amazing.
Can you cook this in a dutch oven? Going to try making it tomorrow! 🙂
I’ve only made it in a baking pan but you could definitely experiment. Good luck!
Mel- I love your recipes. I made the Baked Garlic and Fontina Chicken Spaghetti- it was INCREDIBLE!! My husband was amazed at the depth of flavor. This will be a go-to for company. So easy and so good! Thank you!!
Glad you loved it, Georgia! Thank you!
Thanks for sharing this recipe! We made it last week and everyone loved it. Had to make a few modifications according to what cheeses were available in our supermarket and the fact that my kids won’t eat mushrooms if they can see them… It was really nice, and made enough for a few more lunches during the week. Yum!!
Planning on making this for Valentines with this salad on the side. I’m excited to try it.
http://www.onceuponachef.com/2010/03/big-italian-salad.html
Making this right now! Looks so good. So, I noticed that a lot of your recipes call for 12 oz of pasta and I have never seen a box of 12 oz of pasta! Store brand or Barilla. Just curious, is that how they come in ID or are you just not dumping in the whole box? 🙂 THANKS!
Hi Chelsea – I usually just add 3/4 of the package. It’s a bit of a pain to have a bit leftover but in some recipes, the full 16 ounces is too much (makes a dry pasta). Some dinner nights I’ll make pasta and cook up all our little bits for smorgasbord of different types of pasta.
I usually do the 16 oz and up the rest of the ingredients, and make a mini casserole for the freezer or to give to someone. I can’t stand partial boxes of pasta, ha!
Cooked pasta freezes really well. I freeze it in individual bags with the air squeezed out. Defrost in microwave for a minute or two….quick meal.
Hi Mel, as always thank you for your most delicious meals! I wanted to make this recipe ahead of time to take with us out of town to a cabin. If I were to prepare this meal 2 days in advance do you think I should just refrigerate it or prepare it and freeze it? Also, several people in the family are anti-mushrooms. I was going to omit them and put in some sauted asparagus and red pepper pieces instead. Does that sound like a good idea to you?
The substitutions sound good! If it is two days ahead of time, I’d probably just refrigerate but make sure the pasta is cooked al dente before assembling so it doesn’t get too soggy (you might even consider making just a tad bit more of the sauce, I’m a little worried that two days in the fridge may dry it out a bit).
As Monday night is pasta night at our house I’m going to try this tonight and am really excited about it!
Hi again…sorry should have asked before, I went to Michaels looking for vinyl stickers and I was so overwhelmed(plus they were about to close) but I didn’t see any stickers labeled “vinyl”. Can you tell me if you made them or where you got them? Are the letters vinyl and the hearts stickers? Can I just use stickers? I like the way your letters are siZed perfectly. I did find the mailbox though! Sorry to be a bother!
Hi Jen – no bother at all. I cut mine from vinyl but I’ve seen vinyl cutouts at Hobby Lobby. They don’t necessarily need to be vinyl, though. I keep the stickers on year round since it’s 100% a valentine’s mailbox so probably any sticker would work if you don’t plan on removing them.
I tried to post this earlier, so forgive me if it posts twice. I love your idea of the mailbox and it’s right up my alley! You said you got it at home depot. I was wondering if you knew if it was also at michaels, ac moore, or jo ann fabric. I was comparing prices on Amazon for $25 so I wasn’t sure if that was accurate. Also, do you give each of your gifts the same gift or something different? Do you give your husband something? I wasn’t sure if you wrote their names on the gifts in the mailboxes somehow. I only have one (3 year old) that will be getting stuff but I have twin four month olds that will be wanting things next year:) Thanks Mel!
One more question about the mailbox. Do you put different things in for each kid or do they all get the same thing? Do you put things in for your husband? Was wondering how to label who gets what. Right now the only one opening it will be my 3 year old, but I have 4 month old twin boys that will soon enough be joining in the fun. Thanks!
Ok I’m so doing Cupids mailbox…what a great idea! It’s right up my alley and I know my three year old will love opening it each morning. So you said Home Depot, but do you know if ac Moore, michaels, or Jo Ann fabrics might sell them? How much was it? I’m wondering if the Amazon prices of $25 are accurate. Thanks Mel!
Hi Jen – it’s been several years but I think I remember the original price was right around $20 (and I might have had a coupon – sorry I can’t really remember!). Usually each day there’s something in there for each kid even if it’s the same thing (like five packages of fruit snacks labeled with their name and a poem or something like that). I don’t put something in there for Brian every day but he usually gets a little something a couple of the days (kind of depends on if I planned ahead or not although he’s good with fruit snacks, too). The kids like opening it up and seeing what’s for them specifically so I try to label each one individually even if it’s the same thing. Does that help?
Yes! Thank you! And sorry for the multiple posts, I didn’t see them coming up on my computer. Feel free to delete the ones below!
Hello! Love your mailbox idea (AND the recipe!) Any suggestions where to get vinyl stickers? Truly enjoy your daily emails…inspire me with new ideas! Thank you!
Hi Donna – Hobby Lobby and other craft stores have a lot of vinyl sticker type things for Valentines Day; that’d be a good place to start!
Hello! Love your mailbox idea (AND the recipe!) Any suggestions where to get vinyl stickers? Truly enjoy your daily emails…inspire me with new ideas! Thank you!
We’ve done the fancy valentines dinner (always your recipes) for a few years now with our boys. I’m so not crafty but love th mailbox idea and lately the boys are grumpy about school. Giving it a try and printing out this recipe. Your blog/recipes is the best out there!!!!!
I made these last night and it was SOOOOOOOOOOOOO good!! I love baked spaghetti!! So much!!
hahahahaha!!! I am dying- “strange vortex of unaccountability”!!! Love it, because it is so real. Thanks for the mailbox idea- I am putting that on my list to get. We have enjoyed the fancy family dinner for the past few years- such a great way to celebrate love! Thank you for making our homes more fun!
I just love your candlelight dinner Valentine’s tradition! This will be our 3rd year in a row. Next year our new son will be here to join us! Thinking I might do stuffed shells this year.
I think I speak for thousands of us when I say this, ” I LOVE YOU SO MUCH, MEL!!!!”
So sweet, thank you, Amy!
I’ll second that.
You are so wonderful! And i think you are funny 🙂
I also have not been getting the photos!! I miss seeing the fantastic food pictures and the pictures of your beautiful family. Thanks for always giving me that push to cook when it has been along day.
Lynn
Sorry about that, Lynn! If you check back here, will you let me know what email client you are using (google, yahoo, outlook, hotmail, etc)? There’s a link in many email providers that says “always display images” or “show images” (it should be above the text of the email – here’s a helpful document that will show you how to troubleshoot). I don’t know for sure that’s the issue but it’s a good first step while I do some further digging.
I very much enjoy getting the daily email with recipe suggestions. Being a “senior” I have been cooking for way too many years and really appreciate some “new” suggestions or ways to tweak old standby’s. However, in the past couple of weeks (I think) I don’t get the photos any longer. It’s only the little blue (?) box until I scroll down to the recipe itself and then I can find the photo. (I use a Mac) Have you changed something, as I used to get the photos? Thanks for posting this, nonetheless.
That’s odd, Marne – you should still be able to see the photos (I haven’t changed anything). Let me do some digging and figure out what may be happening.
Same here… No photos. I view all emails on my iPhone. Recipe looks amazing!!!
Thanks Marcella. I’m looking into it!
Same for me. I also view the emails on my phone and only the last photo (at most) shows up for me. I made this tonight and it was so delicious!
Looks delicious – question- is there a way i can get the pasta to not clump together or dry out if i plan to prepare early and serve at a party later? Will this recipe stay moist for a little while?
Hi Susan, as long as you are assembling the dish fully to refrigerate, the pasta shouldn’t dry out (especially if you cook the pasta a few minutes short of al dente).
“Vortex of unaccountability!!” And I thought I was the only one!!! I love your mailbox idea! Now that I’m not pregnant and have slightly more energy because of it, I think I’ll be taking a trip to the good old home depot, and the vinyl sticker aisle of the craft store!
Can’t wait to make this dish!! Mouth is currently watering:) Happy February!!
First, the spaghetti sounds downright delicious, and second, your kids sound strangely familiar! Lots of eye rolling when I tell jokes, but man! I’m funny! Or not. Then 10 minutes later, my husband tells the same joke, and they are all rolling on the floor howling. So not fair.
I love the valentine mailbox idea. It’s a memory your children will fondly treasure forever! I wish I had done that when my kids were little. I always gave them candy and a card. Boring. The special candlelight dinner is a wonderful memory maker too!