Homemade Peppermint Patties
Cute, delicious, and perfect for the holidays, these homemade peppermint patties are so easy to make (video tutorial included in post!).
Homemade peppermint patties have been on my bucket list of things to make for years.
They are my mom’s favorite treat. (I’m pretty sure she keeps them in the freezer because apparently frozen peppermint patties are delightful and are harder to find for unsuspecting treat-seeking souls)

Turns out, making homemade peppermint patties is actually pretty darn easy.
The peppermint dough for the filling is wonderfully easy to work with and if you have a spare fork and butter knife handy, the dipping is a breeze, too.
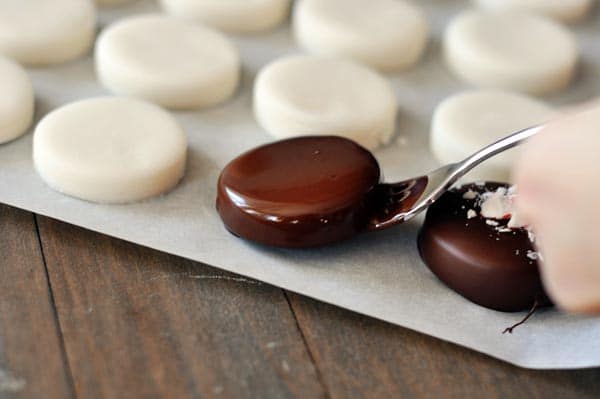
I kept these refrigerated, as the recipe states, and even though it makes a bazillion, after gifting some to nether parts of our neighborhood, we had no trouble devouring the rest.
The white center is creamy and sweet and the rich dark chocolate cuts the minty mintness perfectly. Personally, I preferred the ones not topped with crushed mint candies but I’ll leave that up to you (the sprinkle of candy definitely helps out the pretty factor).
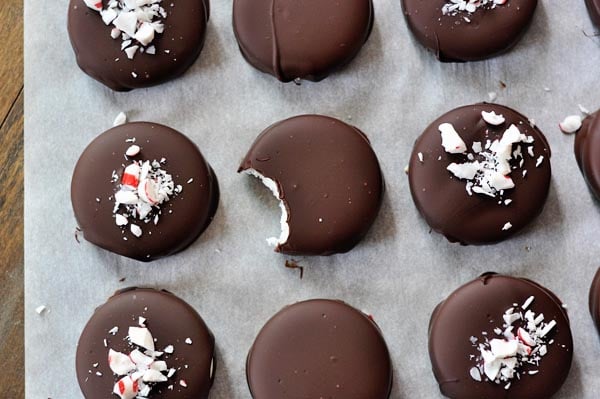
How to Package Homemade Peppermint Patties
To package these, I stuff a square of parchment into the bottom and up the sides of a cute tin bucket, fill it up with peppermint patties and tie the handle with a bit of twine.
I have found the tin buckets at Hobby Lobby, Oriental Trading has them for about $9/dozen and Amazon has a variety to offer also.
If you don’t want to use tin buckets, these little peppermint patties would do just fine in a treat bag (like the ones used for the caramel popcorn).

Homemade Peppermint Patty FAQ’s
They will keep about a week well-covered in the refrigerator (maybe a bit longer, although they taste the best/freshest within a week in my opinion). The peppermint patties can be frozen for longer – probably a month or so.
Shortening or another mild flavored, creamy, solid oil.
They are fine at cool room temperature, but keep longer and taste best if they are refrigerated.
The amount of powdered sugar is correct, but make sure you measure with a light hand (if you weigh your ingredients, it will be about 30 ounces). If the measuring cup is packed with dense powdered sugar, it will be too much. Fluff the powdered sugar in the bag/container, scoop in the measuring cup and then level off with a straight edge.
I haven’t tried that but many people in the comments have said they roll the peppermint patty dough into a log before refrigerating and then cut with a serrated knife or dental floss before dipping.
I haven’t tried subbing another ingredient, but you could experiment with honey or another sweet syrup (if it is dark colored, keep in mind it will lessen the bright whiteness of the peppermint patties. For the evaporated milk, you could try using half and half.
One Year Ago: Chocolate Shortbread Fingers
Two Years Ago: Chile Lime Popcorn
Three Years Ago: Root Beer Float Fudge

Homemade Peppermint Patties
Ingredients
- 7 ½ cups (855 g) powdered sugar, sifted
- ⅓ cup evaporated milk
- ⅓ cup light corn syrup
- 3 tablespoons extra-virgin or refined coconut oil, softened or melted
- ¼ teaspoon food-grade peppermint essential oil or 1 teaspoon peppermint extract (see note)
- 1 ½ pounds (680 g) bittersweet or semisweet baking chocolate, chopped
- Crushed peppermint candies for sprinkling, optional
Instructions
- In a large mixing bowl, beat together the sugar, milk, corn syrup, coconut oil and peppermint on low speed until combined. Shape the dough into two round circles, cover in plastic wrap and refrigerate for 30 minutes.
- Sprinkle a liberal amount of powdered sugar on a clean countertop or on a piece of parchment paper. Unwrap one disk of dough and place it on the counter or parchment. Sprinkle the top with powdered sugar, too. Roll the peppermint patty dough to about 1/4-inch thick and cut into rounds with about a 1 7/8-inch or similar-sized cutter.
- Reroll the scraps until all of the dough is used. Repeat with second disk of dough. Place the rounds on a parchment-lined baking sheet and freeze until firm, about 30 minutes or overnight.
- Melt the chocolate (I use the microwave on 50% power and cook for 1-minute increments, stirring in between; I melt until it is mostly melted but there are still a few small lumps of chocolate – I stir these in until fully melted. This will help to avoid blooming on the set chocolate.)
- Using a fork, dip the frozen patty rounds one-by-one into the chocolate. Tap the handle of the fork on the side of the bowl to drizzle off the excess chocolate, scrape the bottom of the fork on the edge of the bowl and gently place the dipped patties on parchment-lined baking sheets using a butter knife to gently slide the patty off the fork if needed.
- Sprinkle the dipped patties with crushed mints, if using. Let the chocolate set, about an hour. Store patties in the refrigerator.
Notes
Recommended Products
Recipe Source: adapted from Cuisine at Home December 2013 (used coconut oil instead of shortening)


My family loved these!!! Easy to make and tasted great. They have become a regular item on my cookie trays.
Oils and corn syrup? I have found that one can of sweetened condensed can replace all of them. Just sugar, peppermint and the sweetened condensed milk. it is easier to mix together, it is cheaper and it tastes great.
I’ve been making these for years! I just made a batch, using my shamrock cookie cutter for a St. Paddy’s party coming up.
A few things I’ve learned over the years:
Melt the coconut oil before measuring out
INCREASE the extract amount – I use 1 tablespoon! Everyone loves them and I’ve never heard it’s ‘too’ minty
If the mix is crumbly – keep beating it until it forms a ball (like pie crust)
I use Trader Joe’s “Pounder Plus” bars in dark chocolate to coat. You’ll need a bar and a half, maybe a little less, to cover all of these
Play with the flavors! I’ve used coconut extract w/ toasted coconut flakes, orange extract with orange zest, freeze-dried raspberry/strawberry/banana….the list is endless.
Use different cookie cutters for different holidays.
This recipe is just so fun and easy. They freeze well, you can make ahead of time, so many pluses!
These were amazing!!! I made them as little holiday gifts for my coworkers and they were a huge hit. I don’t normally review recipes but I have some tips and tricks for this one and thought it was so good that I’d share my thoughts.
1) I was worried about the powdered sugar measurement situation since so many people had trouble with it, so I measured it using a food scale like she suggests. This was perfect and my “dough” was exactly the right texture.
2) I had a lot of trouble getting the chocolate on these, I think in large part because I decided to make them cute Christmas shapes (candy cane, stocking, and tree) rather than circles. The fork method from the recipe just meant that they floated on top of the chocolate (also tried a masher utensil and had the same result).
Our most successful method that we tried was putting the patties in our air fryer basket with the solid tray underneath, pouring chocolate over each patty with a ladle, then freezing and pushing the patties out of the basket after they’d frozen. This worked fine, though it limited our output and the bottoms weren’t coated with chocolate. The patties did soften very quickly once the warm chocolate was on them so there wasn’t much ability to move them around.
3) I did the chocolate in a double boiler with two pans, and added a bit of grated paraffin wax in hopes that the finished product would be less melty at room temp. I think it worked and I didn’t have any problems with the chocolate blooming. The chocolate texture looked really nice.
4) I added crushed candy canes to mine and I think that really made them look festive and hid their many visual imperfections. 🙂
5) I am confused as to why you don’t want to melt the coconut oil before you add it to the powder mixture. I ended up with some chunks of solid coconut oil that I had to dig out of the dough. I will probably melt it next time.
I used regular (non-refined) coconut oil and didn’t notice a problematic taste once I’d removed the chunks.
6) I ended up adding a bit more peppermint oil (which I was able to find at Michael’s in the candymaking aisle) than the recipe calls for, but was honestly shocked at how little you need to add to get a minty taste at all!! Be super careful with the peppermint flavor!
7) The dough gets sticky pretty quickly once you roll it out and it comes closer to room temp. I ended up putting more powdered sugar on the counter than I would have thought I’d needed, but the dough kept sticking. It can also crack once it gets too dry so it’s a delicate balance.
Overall I LOVED this recipe and will absolutely make it again. Got told by several people that these were way better than York, so that was nice.
Thanks for the thorough review, Meg! Super helpful. You can definitely melt the coconut oil. I will edit that in the recipe. I posted this recipe over a decade ago and I’ve learned a lot as I’ve continued to make these (including that same coconut oil tip). Thanks for taking the time to detail your experience!
Hi
Can the dough be made ahead of time and placed in freezer to make a couple days later?
Yes!
Can I make dough ahead of time and freeze for later
Bruh these were savagely good.
Can you use chocolate chips? Thanks
Different brands of chocolate chips melt differently (some better than others); I prefer Guittard or Ghirardelli when melting chocolate chips.
This looks delicious! Thank you for sharing!
simple syrup can work as a sub for the corn syrup I use this recipe:
Total Time: 10 min
Prep: 5 min
Cook: 5 min
Yield:2 1/3 cups
Ingredients
2 1/2 cups sugar
Full 1 cup water
½ of a lemon, juiced (about 2 Tbsp)
Directions
Combine all 3 ingredients in a nonreactive 2-quart heavy-bottomed saucepan over medium-high heat and bring to a boil. All the sugar crystals should completely dissolve. Remove from the heat and pour into a clean medium-size bowl. Let cool completely before using. If you are short on time, you can cool the syrup over an ice bath. Simple syrup can be stored in the refrigerator, indefinitely, if kept in an airtight container.
Recipe courtesy of Jacques Torres Chocolate, MrChocolate
Note: Can increase the sugar content up to 3 cups for firmer syrup. Let boil 5 min.