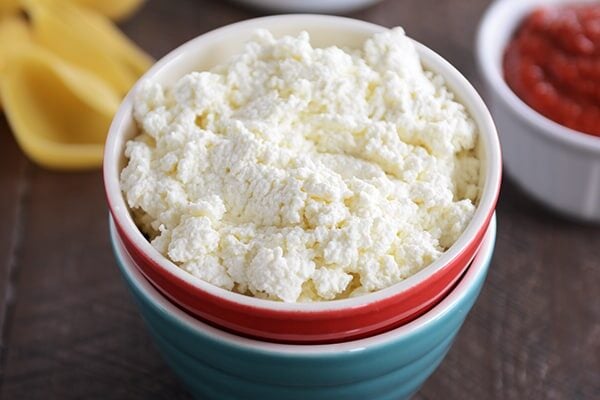
Homemade Ricotta Cheese {In Under an Hour}
Get the step-by-step tutorial to make creamy homemade ricotta cheese in an hour! It’s easier than you can possibly imagine and the results are amazing.
Homemade ricotta cheese is one of those things that I almost hate introducing (assuming you haven’t delved into the creamy world of homemade ricotta yet) because once you make it, you may never be able to go back to the often-gritty, compact, chunky store-bought stuff, and I don’t want you giving me the stink eye for destroying all of your convenient grocery store dreams.

I’m sorry for today. Kind of. Well, actually, not really. But let me tell you why before you think me a cold-hearted soul.
The reason I’m not genuinely apologetic is because
a) hopefully you know me well enough by now to know that obviously buying store-bought ricotta cheese will not make you a lazy, bad, terrible, dishonorable person (if it does, then let’s start a club) and
b) homemade ricotta is so easy (and I mean that in a very honest “easy” way, not a 15-step, 20-ingredient, slightly misleading “easy” way) that you’ll be wondering where it’s been all your life.
Have you ever made homemade yogurt? Yeah, ricotta cheese is about a billion times faster and simpler, plus most of the process is you just standing around watching it all happen.
I don’t make homemade ricotta cheese every time a recipe calls for it (is this the time we should decide on an official name for our club?), but every time I do, I speak to my inner person and tell her that she really should put this on the regular rotation.
Alas, life seems to have a way of, well, getting in the way and so instead of firing slothful inner persons, I just relax knowing that homemade ricotta is only a few minutes away the next time I can swing it.
Homemade ricotta cheese is so much creamier than your average, store-bought version (even the whole milk variety), and if you give it a whirl in a blender after it’s strained and chilled, it’s almost other-worldly in it’s luscious soft creaminess.
Consider today’s post a friendly warning (think of me as the kindly middle school teacher strongly hinting that you might want to study up on all the continents) for what’s to come Friday.
You might want to have a batch of this handy. I won’t be giving you a pop quiz on the world’s greatest land masses but you’ll be glad you listened and obeyed. Trust me.
A quick note about equipment: other than a pot and spoon, using an instant-read thermometer will come in very handy (and alleviate any temperature guesswork). Also, I use my nut milk strainer bag thingy for straining the ricotta cheese (and homemade yogurt, too). It works like a dream (and washes up easily for reuse) but you can also use cheesecloth inside a colander.
One Year Ago: Shrimp and Mango Lettuce Wraps {20-Minute Meal}
Two Years Ago: Swirled Peanut Butter and Nutella Stuffed Chocolate Chip Cookies
Three Years Ago: Mini Taco Cups
Homemade Ricotta Cheese
Ingredients
- 8 cups milk, 2% or above for creamier ricotta
- 1 cup heavy cream
- 1 teaspoon coarse kosher salt
- ⅓ cup distilled white vinegar
Instructions
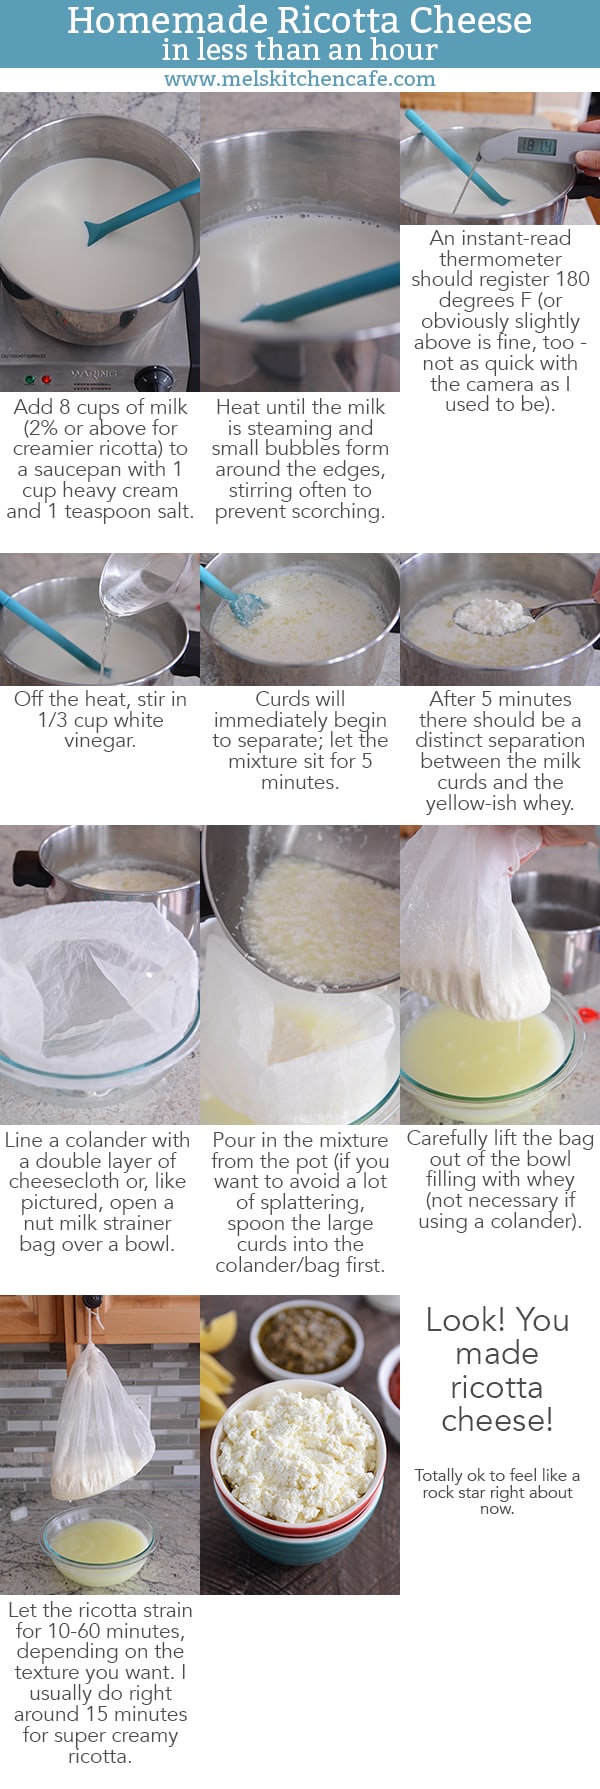
- Combine the milk, heavy cream, and salt in a medium pot. Heat on medium, stirring occasionally to prevent scorching (you can kick up the heat to speed up the process if you don’t mind stirring attentively the whole time), until the milk is steaming just below a simmer and registers 180 degrees F on an instant-read thermometer.
- Off the heat, stir in the vinegar. Immediately, the milk will start to separate. Let the mixture sit for 5-10 minutes.
- Line a colander with a double layer of cheesecloth (coffee filters work great, too, if you stagger them or they are large enough) or open a nut milk strainer bag over a large bowl. Spoon in the large curds first if you want to avoid splatters and follow it up by pouring in the rest of the mixture.
- If using a nut milk bag, carefully lift it up and out of the bowl and hang it so it can continue to drip into the bowl. Let the ricotta strain for 10-60 minutes, depending on the texture you are after. I usually go with right around 15 minutes for super creamy ricotta.
- Scrape the ricotta out of the colander or bag; use immediately or refrigerate up to a week or so.

Can’t believe how easy this recipe is. I’ll never buy ricotta again. When you make the manicotti revipe do you double the ricotta recipe. I only got 2 cups and recipe calls for 3. Maybe I drained mine too long
Hi Kim, it definitely does depend on draining time, but I’ll often double this just to be sure I have enough.
I love this recipe and have made it many times. Thanks for introducing it to me!
As an aside, how long should whey keep in the fridge? I made a double batch and now have about eight cups of whey I’m not sure what to do with.
Whey can usually keep a week or two. I’ve also read that it can be frozen? But I haven’t tried that. It’s good used in smoothies (and isn’t very noticeable).
Mel can I use 1/3 cup lemon juice instead of vinegar?
Hi Lisa, I haven’t tried making this ricotta cheese with lemon juice and I don’t want to lead you astray – so I’m not totally sure? The acidity is needed to separate the curds, so it’s possible the lemon juice will work just fine.
Could you add whey to your sourdough? I use your recipe but I’m not sure if the acidity will affect the starter. Let me know if you’ve done it or if i need to use it with yeasted dough.
That’s a good question – I’m afraid I don’t know as I haven’t tried it. Sorry!
I just attempted to make cottage cheese in the instant pot with some slightly sour whole milk. The milk heated to 180 then curdled on it’s own.
But the curds were very tiny which reminded me of this recipe so I finished it off as ricotta cheese adding the salt and cream after straining. It’s so delicious! And I feel very accomplished.
Thank you, Mel, for another useful recipe.
I make this all the time and it is my go to ricotta recipe. The best thing that is simple but will totally impress family and friends. Thank you so much for sharing. I’d be lost without you!!
I just attempted ricotta exactly as you describe. My last two batches were perfect and I agree about making your own. it is heavenly. Then today. just did not work! Happens. Who knows why.
My question is. What do I do with 2 litres of warmed up milk and cream with vinegar added?
Hi Karen, I’m honestly not sure what can be done – you can try reprocessing it (making sure it’s at a full simmer before adding more vinegar) but I don’t know if that will work.
i fed my sweet potatos. they havent died
This blows store-bought ricotta out of the water, the flavor is so much better! Definitely worth an hour of time. Especially when used in your manicotti recipe, mmmmm, so delicious!
10/10 never buying store bought again. Strained mine for about 30 min (aimed for 15 but then ran all over the house giving samples), and it is incredible. Light but still flavorful, fluffy curds that melt in your mouth. Made this in advance for the baked manicotti (which I’ve made multiple times and LOVE), and I’m really looking forward to dinner tomorrow night.
Hi! I’ve been making ricotta for a few years, but always found it to be somewhat of a pain so I decided to try your method after just searching your site and happily finding that you had a recipe. Your method was so much easier than the way I used and it’s DELICIOUS! Thank you too for the tip on the nut bag! I had never heard of them and again, WAY easier and much less lost cheese I think (compared to the cheese cloth layers where cheese got ‘stuck’ between layers. So thank you very much for both!
I could wax eloquent for a looooong time about how fast, easy and fabulously divine this ricotta cheese is. I cannot keep my snitching fingers away! So glad I felt like a kitchen adventure today! Instructions and pictures were spot on. I used 4 cups whole milk and 4 cups 2%. Drained for about 20 minutes. Also forgot the salt—do not panic. Just stirred it in with the finished cheese and it tastes marvelous. Thanks AGAIN for another fantastic recipe making me feel like a kitchen rockstar. For reals.
Oh my goodness, I am so amazed I made this cheese all by myself… I ordered the bag and thermometer on amazon and they made it so easy.
I made the Manicotti for dinner and my husband was thrilled. Thank you so much for sharing your talents with us, everything you post is delicious. I just used the jar Prego due to lack of time but I’d love to try making your sauce as well. The lasagna noodle is by far easier than the darn noodles that rip while trying to stuff. You are a genius!!!
Can you use the extra ricotta juice stuff for anything?
You could google some ideas – I usually just discard it.
This recipe exceeded my expectations. I’ve never really liked store bought ricotta. I usually sub cottage cheese for it in recipes. That’s why it took me so long to try it. Homemade ricotta is so different! I had a bunch of 1% milk to use up so that’s what I used and it still turned out great. I’m really impressed that it was so easy and so delicious!
Hey Mel, this is such a fabulous recipe! I made it the other day for the stuffed shells and needed to make two recipes to have enough. Which was great cuz then I had extra and immensely enjoyed the leftovers with crackers. But I was curious if I could double the recipe successfully, or if it just needs to be made twice. I know cheese recipes can be finicky! Thanks!
You should note a warning to not taste test this before using in a recipe because I COULD NOT STOP picking off little curds and dying a little from each bite! I barely had enough left for the recipe because of my lack of self discipline. SO perfectly delicious. 🙂 I used it for the stuffed shells and it was loved by our whole table, including neighbor kids!
This turned out delicious!! I let it sit for the whole 10 minutes before I drained it. It was ready in about 15 minutes. Very creamy and delicious. Thank you so much for the recipe.
If your milk doesn’t separate and look like the pictures then re heat it to atleast 180 degrees and add another 1/3 cup of venigar. It curds right up!
We are not big milk drinkers but always have canned milk on hand. Has anyone tried using canned evaporated milk? Just wondering whether to pick up milk when I get the cream at the store.
My Ricotta cheese turned out perfectly. Thank you for the great recipe!
I JUST FOUND YOUR RECIPE…I AM DELIGHTED…..LIVE ON A SAILBOAT AND ARE IN PANAMA AT THIS TIME AND CANNOT FIND RICOTTA OR COTTAGE CHEESE. THANKS FOR THE RECIPE…..CAN HARDLY WAIT TO TRY IT.
So. Reading through the comments I’m not quite sure what to do if it doesn’t separate. Super bummed to make it according to recipe. Whole milk. 182 degrees on instant thermometer. And nothin! Totally liquid, barely separated. Could I try reheating it? Putting it in the fridge making it cooler before trying to strain it? Adding more vinegar? What are your thoughts?
Alright. Haha! I’m going to post a possible solution to my own question, just in case it helps someone else out. I really didn’t want to waste all those ingredients, so I figured, what the heck! Maybe it needs more heat! So. I went ahead and put it back on the heat, and that really helped the separation process. It blubbed once or twice and I quickly turned off the heat. I thought maybe some of the vinegar might’ve cooked or heated out, possibly? Maybe that’s a thing? So I added a little more vinegar, just a couple tablespoons. And then waited again. And it definitely formed thicker usable curds! Not as pretty as yours pictured Mel, but useable! I was worried about it making it turn bad or something by cooking it again so I tasted it and it was really yummy! Actually surprisingly so! Haha! Way yummier than it looks. Haha! And I’m not gonna like guzzle the whey or anything, but I really can’t wait to find recipes to use it in! It was surprisingly yummy too! Now. I’m seriously hoping this isn’t false information that actually can create some terrible chemical reaction that causes the food to be dangerous or something. Eehhh.. I have no idea why you need to remove the mixture from heat before adding the vinegar or how the whole process works really. But for what its worth, this DID seem to work when I tried to salvage it this way and became yummy cheese! So from someone who doesn’t actually know what she’s doing, maybe this could help someone else who’s not sure what they’re doing either! Haha! Thanks so much for the recipe Mel! It really was so yummy! I can’t wait to try it in your shells recipe!
I’m glad you persevered and figured this out. Thanks for the details, Stacey!
Can I use only heavy cream?
I haven’t tried that so I’m not sure, sorry.
Just tried this for the first time and can I just say – that was so cool! So much easier than I expected and so tasty! I don’t usually love ricotta – but I love this. Thank you!
For those of you having problems: Do not use UHT (Ultra High Temp) milk. That is the kind that comes in a box and not refrigerated. Also 2% Milk doesn’t work very well either.
Use Whole Milk.
I have used Powdered Milk also with good results.
Make sure you get to 180 to 200 degrees. Do not let the milk boil.
Can you use the home made ricotta to make lasagna?
Yes!
Help Please – This looks so delicious but I must be doing something wrong. I’ve tried to make twice and never get any curds. Just a soupy white mess. Got any ideas?
Hi Teri – what kind of milk are you using?
My household, excepting myself, does not like ricotta cheese. That is, until I found this recipe. The texture is slightly different and being able to choose your own consistency makes all the difference in the world. I used store bought lactaid whole milk and heavy cream treated with Lactase, to create a lactose free ricotta. Thank you for the recipe that everyone enjoys and with a couple quickie modifications meets everyone’s allergy needs.
Looks so good. Do you use organic milk or regular (non organic) pasteurized milk?
I use *regular* milk
Can I use buttermilk instead of heavy cream
can you make it in a double boiler to avoid the scorching? thanks
Could definitely try…
I followed this recipe (but using whole milk so it would be creamy), but it barely separated. I did use the thermometer and stirred until 180 degrees. What happened? I was so excited to try this to make my husband his cannolis. There is some slush sitting in the nut milk bag but I doubt it will magically strain out into curds. Now what?
Did it separate even a little? If so, it might be ok.
I have a recipe that calls for firm ricotta. How long do I let the ricotta drain to make it firm?
I’m not really sure what the definition of “firm” ricotta is, but if you let it drain overnight, that would probably help.
That is so amazing and easy. The cost of cheese is nut’s. So thank you very much. I love learning how to do all these things on my own rather then buying from the food store.
Hi can you provide nutritional information? It was completely delicious but so filling! I am doing Keto and want to figure out the macros.
I don’t calculate nutrition info, but you could definitely use an online nutritional calculator to figure it out!
Hi! Wondered if you have ever tried freezing this? I have made ricotta before, and plan to again, with your recipe. I wondered if you could double or triple the recipe and freeze for later. I imagine it would need a run in a food processor for a bit to bring back the creaminess, but wondered if you had ever tried it.
I haven’t tried freezing – sorry!
How long does this cheese stay fresh? I’m making it for 30 people for a party. Want to make it ahead of time but not too long.
Probably a couple of days in the fridge.
Hi Mel,
Yesterday I made some ricotta cheese (I was making a lasagna) but it failed dismally. I was using another recipe and it did not give the temperature the milk should register, but nevertheless I followed the recipe carefully.
I didn’t have an abundance of normal milk, so I used the long life variety, could that have been the case? It just did not have or create the curds even though I used 5 large lemons giving me over 1 cup for one litre of milk.
I will make it again, but this time I will use your very clear recipe. I would love to know if it was the long life milk that failed my ricotta recipe.
Thank you,
Gisele
I am not familiar with what long life milk is, but it may have been what made a difference…sorry I’m not more help!
I think the long life milk is the “ultra pasteurized” . I only use it for cooking, but it is good 2, 3 months!!
Mine did not separate. It only appeared slightly curdled. No big curds or clearer colored whey. All stayed very creamy. I followed the recipe so don’t know why it didn’t work!?
Easy recipe, tastes great.
how much does this make?
2 cups. The yield is right above the recipe title :).
Much better flavor thsn the store bought.
Made it- easy as can be! We didn’t get quite the same yield …probably 1.5 cups instead of 2. But it was delicious!
Mel, Have you ever made ricotta cheese using the whey leftover from homemade yogurt?
I haven’t…