The Best Homemade Glazed Donuts
I have tried a million homemade donut recipes, so believe me when I say: these really are the best homemade glazed donuts on the planet. They are so delicious! TONS of step-by-step pictures and tips and tricks for foolproof homemade donuts!
As promised, finally (!!), here is the recipe you’ve been waiting for. The best homemade glazed donuts on the planet. And that is literally one thousand percent no exaggeration.
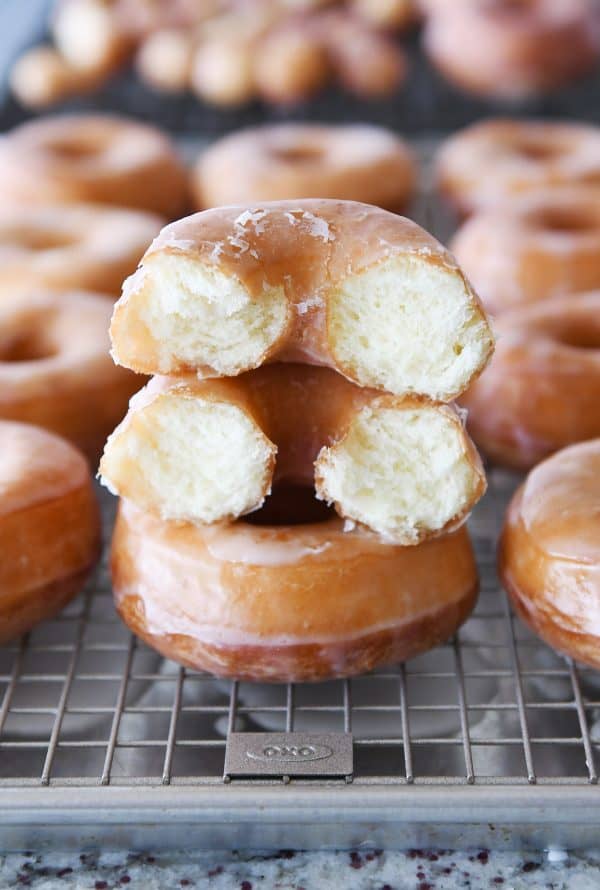
I posted about these babies on my Instagram stories a couple of weeks ago when my daughter and I made them, and I couldn’t believe how many of you went crazy. Some of you even demanded the recipe be posted within the hour.
Listen, I can’t blame you. I really can’t.
It took me a few weeks longer than an hour to get this recipe posted, but I promise it is worth the wait. I’ve made so many homemade donut recipes in the past, and after making this recipe dozens of times, my family and I agree: it is definitely the best homemade donut recipe ever.
What makes these homemade donuts better than the other 1,583 recipes out there?
They are light and fluffy and totally melt-in-your-mouth delicious.
I’ve made a lot of homemade donut recipes that are fluffy and thick, but they have a chewy, bready quality that is more reminiscent of a bagel than a donut. Others have been bland and dense…or just mediocre. And let me tell you, no one wants to go to all the work of homemade donuts just for a mediocre result!
These donuts are buttery soft with an ethereal squishy factor (yes, that’s a thing) that makes them next-level amazing.
Granted, homemade donuts aren’t necessarily an every day type of recipe, but once you have this tried-and-true recipe in your back pocket, there’s a certain peace that will descend on your life just knowing it’s there when you need it.
My handsome taste testers agree. Homemade donuts are where it’s at.

Because I want to ensure 100% complete foolproof success, I’m including tons of tips and tricks in this post to make these homemade donuts easy and absolutely perfect.
You will feel like a rock star, I promise.
Ok, let’s get started.
Making Homemade Donut Dough
I highly recommend an electric stand mixer for this homemade donut dough. I don’t think the same result can be achieved through hand mixing, unfortunately.
I’m using a Bosch mixer {aff. link} that has a center drive shaft. I haven’t made the dough in my Kitchen Aid (because I use my Bosch for almost all things dough-related), but it should convert just fine to another type of stand mixer.
Into the mixer, add the flour, sugar, yeast, eggs and milk.
A couple of notes:
- it’s important to use cold or room temp milk (not warm milk) – when you add the butter in a later step, the colder dough allows a rustic “laminating” effect that gives an amazing texture to the donuts
- I use instant yeast in the recipe – see the notes below the recipe to use active dry yeast
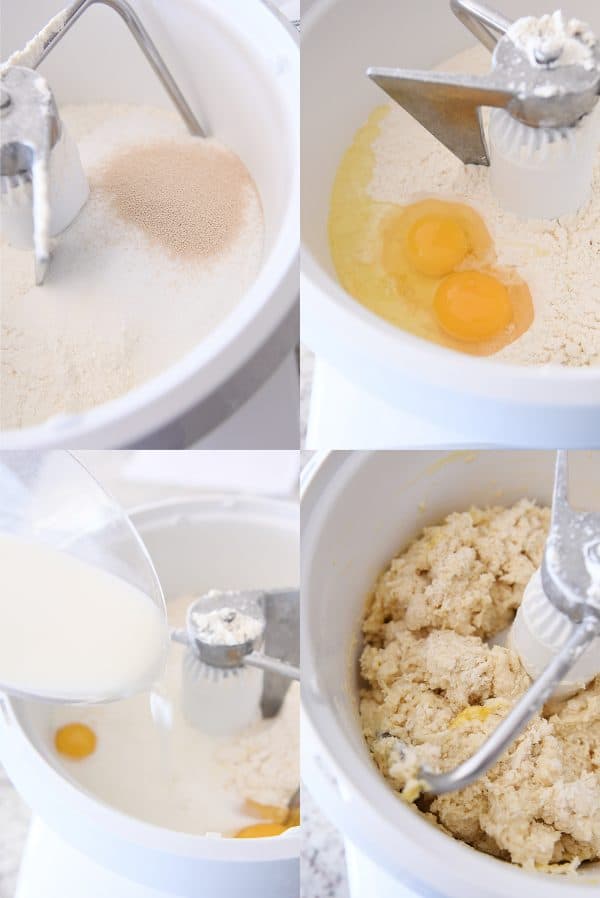
The dough will come together in kind of a shaggy mess. After it comes together, add the salt.
Continue mixing until the dough smooths out a bit. It will be on the thicker, stodgier side of things. That’s ok!
Add the butter a piece at a time
With the mixer running, add the softened butter a piece at a time. Almost instantly, you’ll notice the dough softening and stretching out as it mixes.
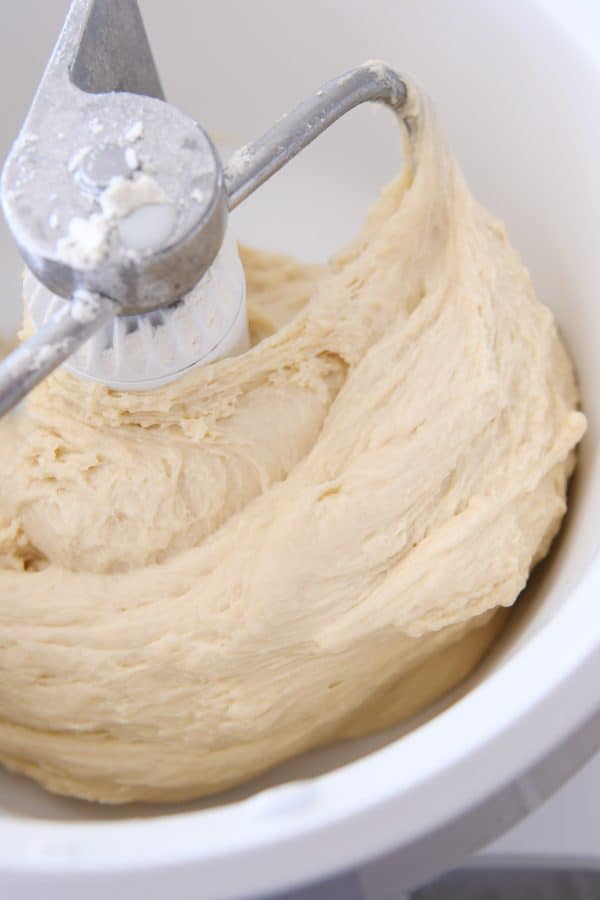
Once all the butter is added, the dough will be very soft. Very, very soft. You might be worried it’s too soft. It’s not, I promise.
Continue mixing/kneading on medium low or medium speed for 10-12 minutes. Scrape down the sides of the bowl, if needed. As the dough mixes, it will start to come together into a more solid (but still soft) mass of dough.
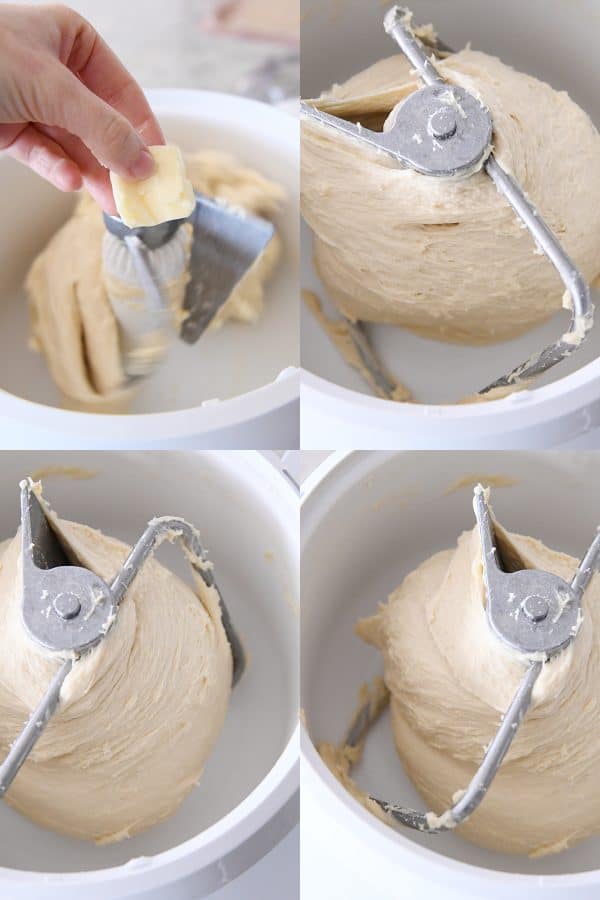
It’s ok if the dough clings to the middle of the mixer (in a Bosch). In a Kitchen Aid, it might be sticking to the bottom and sides of the bowl.
You’ll know the dough is done mixing if, when you stop the mixer, you can grab a handful of dough and pull it up into a silky, stretchy ribbon. When you let it go, there shouldn’t be a whole lot of residue on your fingers.
Even though the dough may not have fully cleared the sides or middle of the bowl, you’ll know it is done mixing if it is very smooth and very soft, but not overly sticky.
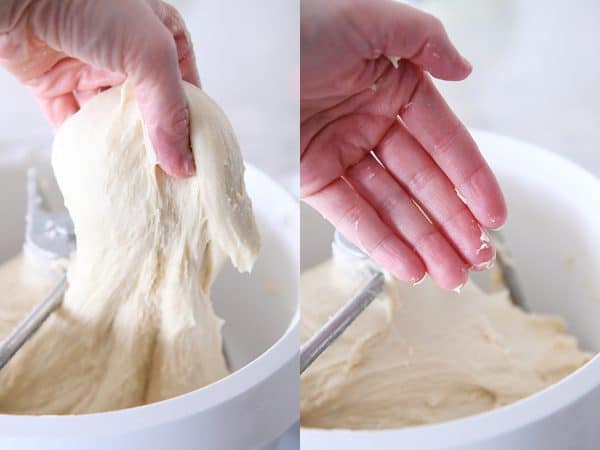
When to add more flour
Resist the urge, if at all possible, to add more flour to the dough.
I know I’m being a broken record right now, but even if the dough hasn’t fully cleared the sides, bottom or middle of the bowl, if it has kneaded for 10-12 minutes and doesn’t leave a lot of residue on your fingers, it’s good to go! As it rests in the refrigerator, it sturdies up a whole lot more.
Only add more flour (1/4 cup or so) if the dough is extremely wet and coats your hands and fingers in a sticky mess.
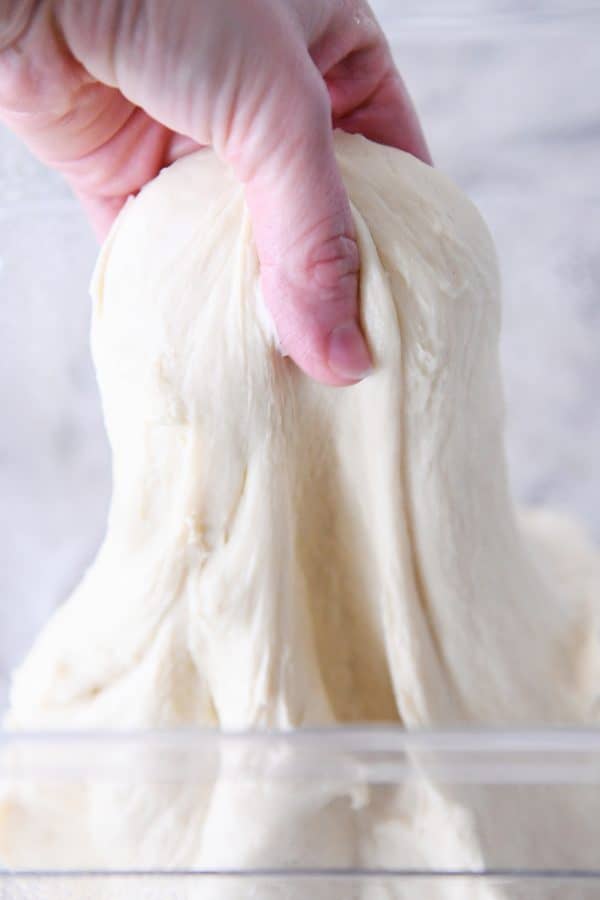
Homemade donut dough is amazing
I can’t get over the texture of this dough.
It is absolutely luscious. And it’s a total dream to work with because it is so soft and smooth.
Pile the dough into a lightly greased container, cover, and put it in the refrigerator for at least 8-12 hours (and up to 24 hours).
The cold rise is important. I’ve tried rising and frying the donuts same day, and I do not recommend. The texture of the donuts is worlds better when allowed to rest overnight in the refrigerator.
Let’s all agree to not seek the path of least resistance. We can persevere together through the longer wait knowing that the best donuts in the world come to those who are patient.
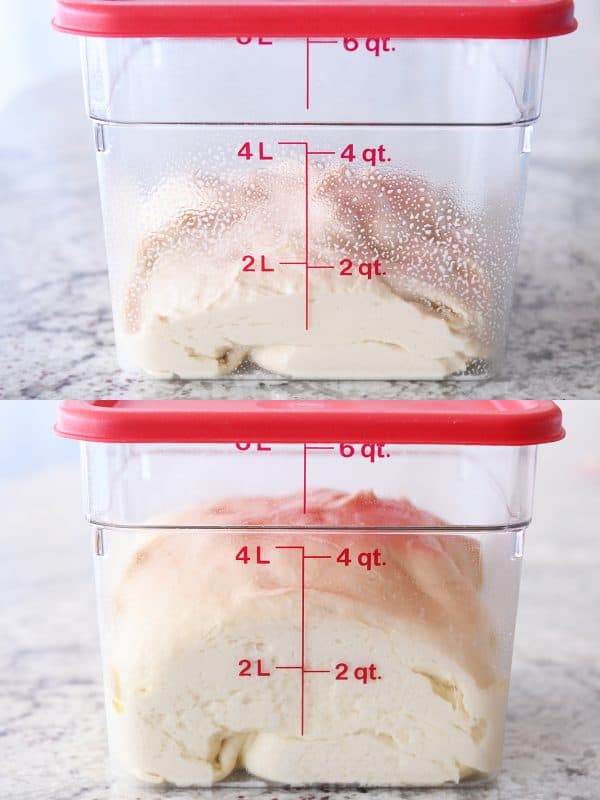
The dough will rise noticeably in the refrigerator.
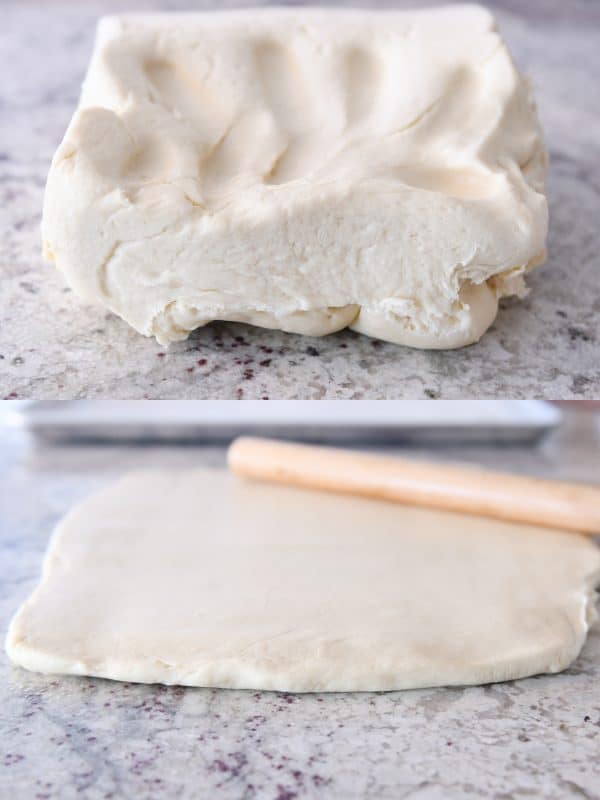
The best part? The homemade donut dough rolls out like a dream straight from the refrigerator.
Roll it out to about 1/4-inch thick or maybe just slightly thicker. It’s not rocket science.
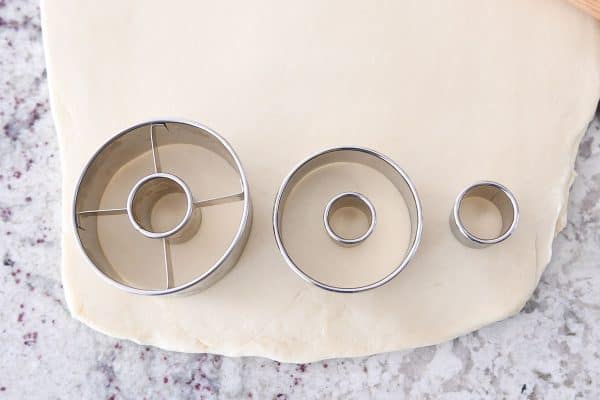
The best tools for cutting out donuts
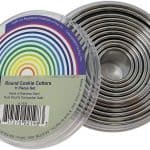
There are a lot of options out there when it comes to donut cutters. My personal preference is to use a set of varying-sized round cutters {aff. link} so that the excess dough can be cut into donut holes.
The donut cutters (like the one pictured below on the far left) with the donut hole center attached {aff. link} are great, but a) they’re a bit larger than I like my donuts to be overall and b) the donut hole center doesn’t detach which makes cutting extra donut holes a little tricky.
My recommendation is to use a 3-inch round donut cutter and a separate 3/4- or 1-inch donut hole center.
Cut the donuts as close together as you can to maximize the donut dough.
Rerolled donut dough just isn’t the same (I’ll show and tell you why in a second).
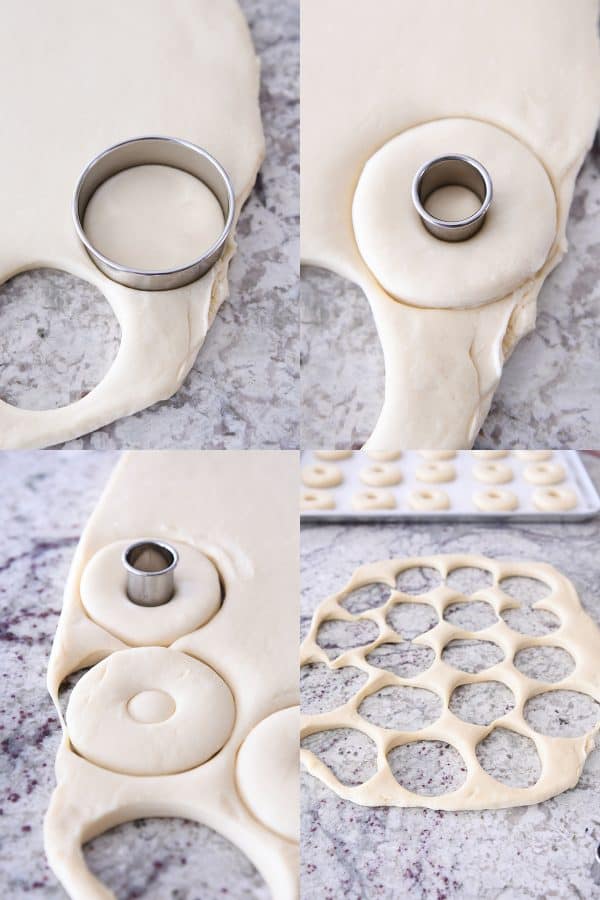
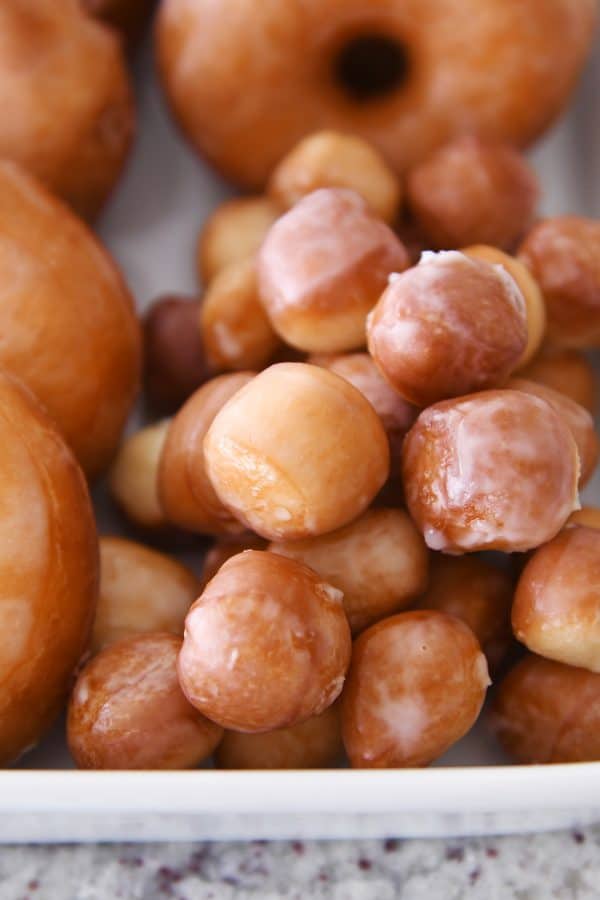
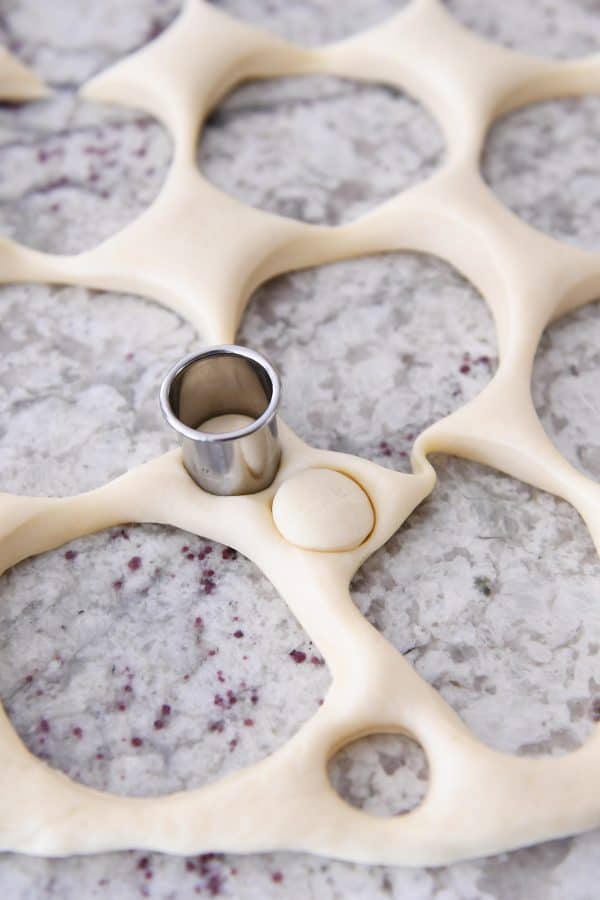
When all of the larger donuts have been cut, I like to go through the leftover dough and cut as many donut holes as I can get out of the remaining dough.
Our family is strictly divided between those that prefer large and in charge donuts vs those that go for the donut holes all day long.
Either way, I never have enough donut holes. #teenagers So I try to get as many as I can out of the dough. They are cute and totally irresistible.
Should you reroll donut dough?
Once you can’t possibly cut any more donuts or donut holes out of the dough, you have a couple choices:
- toss the remaining dough (this makes me sad)
- cut the dough into wrangly little rustic strips and fry those babies up
- gather the dough into a mass of scraps and reroll
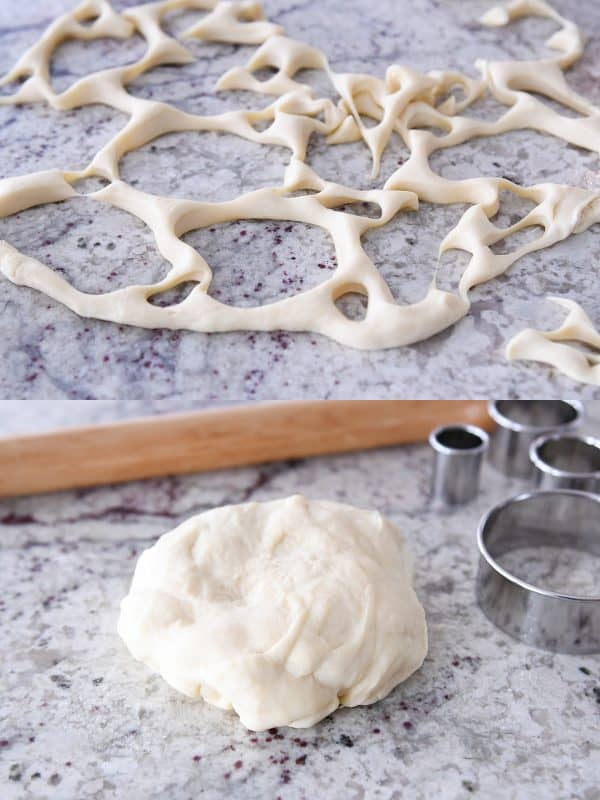
If you decide to reroll the dough, I have two main recommendations for you.
FIRST, once the dough has been gathered together, let it rest for 15-20 minutes before rerolling. This relaxes the gluten in the dough, which means the dough will be less likely to spring back as you roll it out. And if you’ve had that happen, you know how irritating it is.
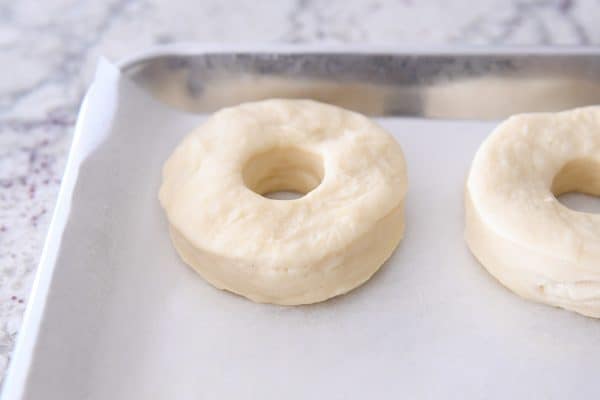
SECOND, lower your expectations for donuts that are produced from a rerolled batch of dough. They will never be quite as awesome as the ones rolled from the first go-round.
You can see from the picture below that no matter how lovingly you reroll the dough, the donuts are bumpier, lumpier and not quite as pretty.
Make Apple Fritters from the Donut Scraps
UPDATE: so many of you let me know here and on social media that the only way to go with donut scraps (say no to rerolling!) is to make apple fritters out of them.
I had to try! Especially after my cousin-in-law Tami reported back with her exact process. They turned out AMAZING! Several of my kids said they liked them even better than the actual donuts.
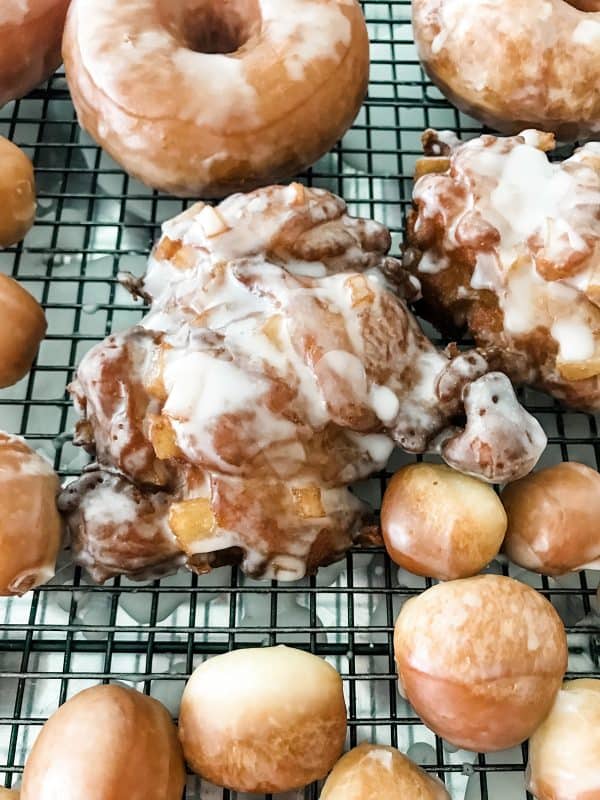
Here’s my apple fritter process:
- cut out all the regular donuts like normal
- don’t cut out any extra donut holes from the scraps
- chop all the scraps into small little nubbins with bench scraper, probably 1/2-inch pieces or a little smaller
- finely chop about 2 large apples (right around 2 cups chopped apples) and toss with a squeeze of lemon juice, 1/3 cup brown sugar and 1 1/2 teaspoons cinnamon
- toss all the dough pieces and apples together in a bowl
- scoop out small handfuls of dough and apples (it’s going to seem weird, like it will never stick together) and gently form it into balls, set them on a greased baking sheet, and press gently to flatten into a thick disc-shape
- let the fritters rise and puff a bit
- fry the fritters last (since little bits of apples invariably fall out into the oil – spoiler alert: those little bits are super tasty)
- glaze with powdered sugar on one side after they cool
Ok, back to the regular (delicious) donuts!
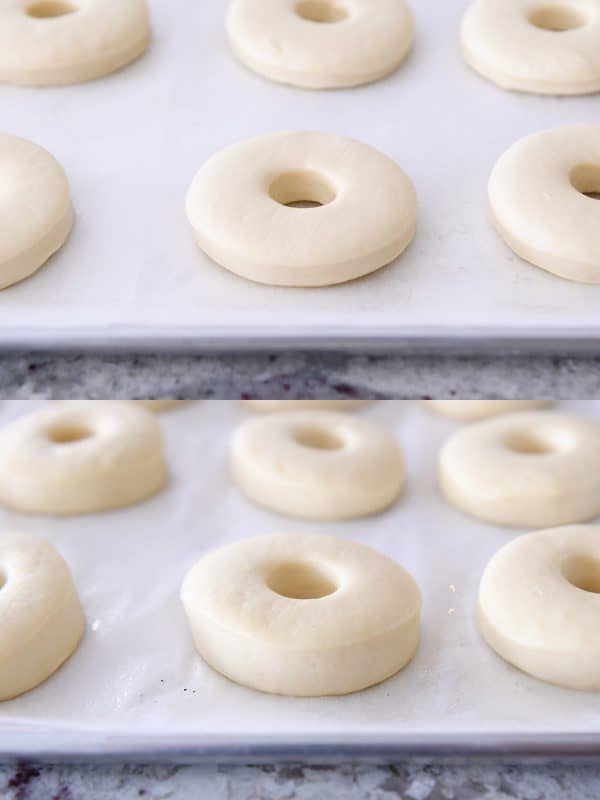
Let all the cut out donuts and donuts hole rest and rise on greased parchment-lined baking sheets until noticeably puffy.
I’m not sure if you need to go for a full out double, but they should look pretty darn fat and happy.
How to cook homemade donuts
Heat about 2-3 inches of vegetable oil in a heavy pot on the stove (or in an electric deep fryer according to manufacturer directions) until the oil reaches between 350 and 360 degrees F.
*The electric deep fryer I have is a Hamilton Beach model that’s no longer available, but below in the recipe card, I’ve linked to a similar model.
The more slowly the oil heats up, the better so the donuts will cook evenly without burning.
The donuts will be very soft after rising. Gently pick them up off the baking sheets so they don’t stretch too much, and lower them carefully but quickly into the hot oil.
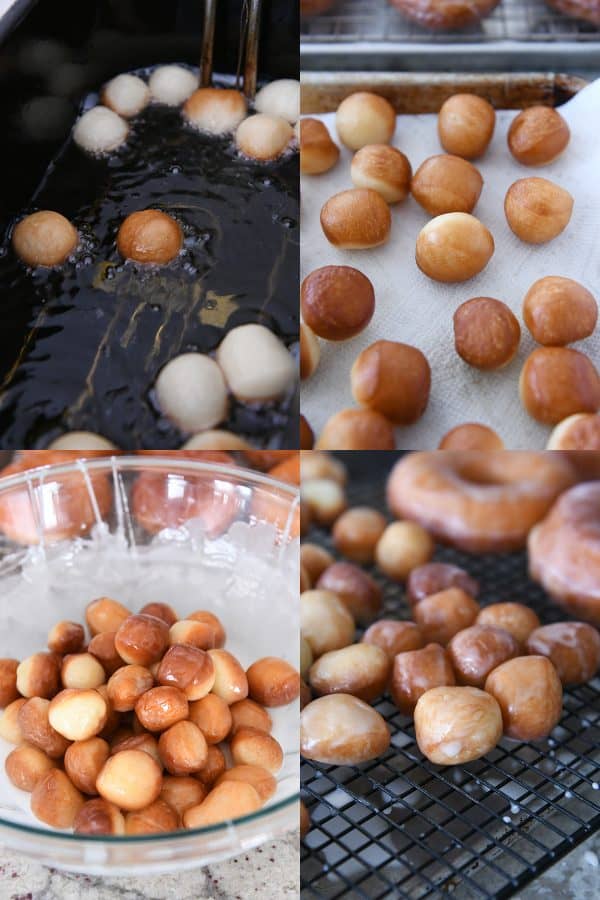
Cook for about 60-90 seconds per side until golden. I use kitchen tongs for flipping and removing.
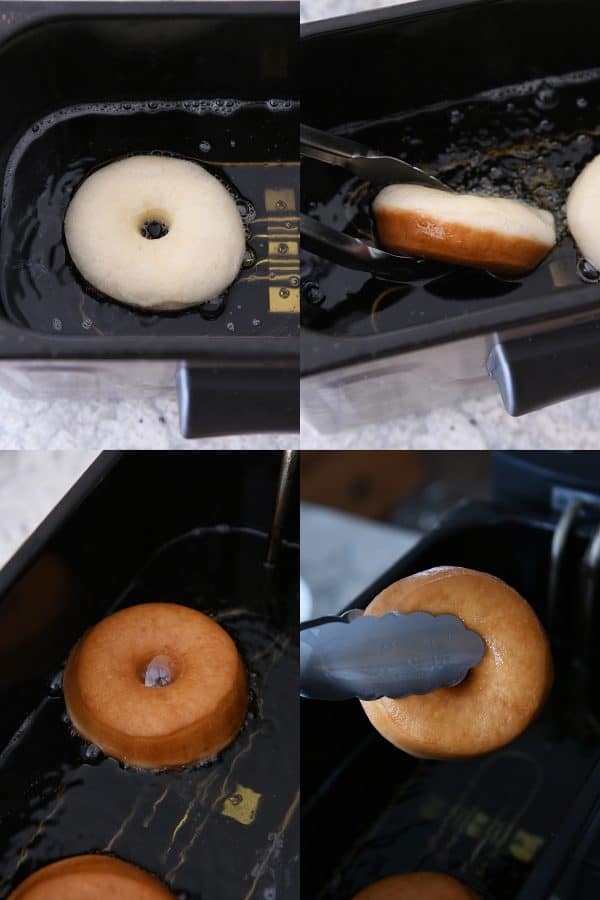
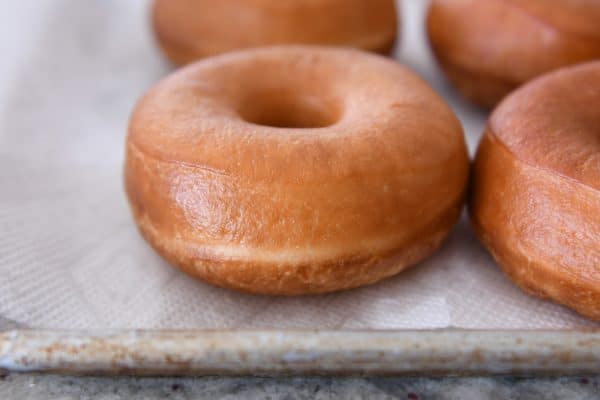
Transfer the donuts to a paper towel-lined baking sheet and let them cool until just warm before glazing.
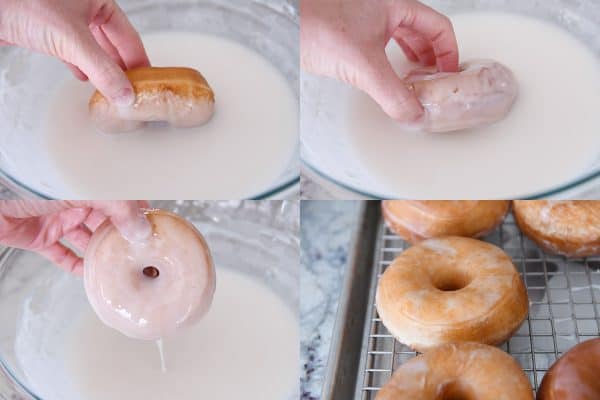
If they are piping hot, all that essential and delicious glaze will slide right off.
Sidenote: you can see that my donuts have a tiny little line-ridge at the top. It happens every single time I make them, and I think it’s related to the cooking spray used on the pans as the donuts rise. Also, the bottoms of my donuts are always slightly more bumpy and rustic looking than the tops. Again, I think it’s related to possibly the cooking spray and how the donuts rise. And I don’t even bother stressing about it. If the donuts are puffy and fluffy and soft and luscious, I don’t fuss about the looks at all.
The same goes for the donut holes. Let them rise until puffy and pretty much doubled in size.
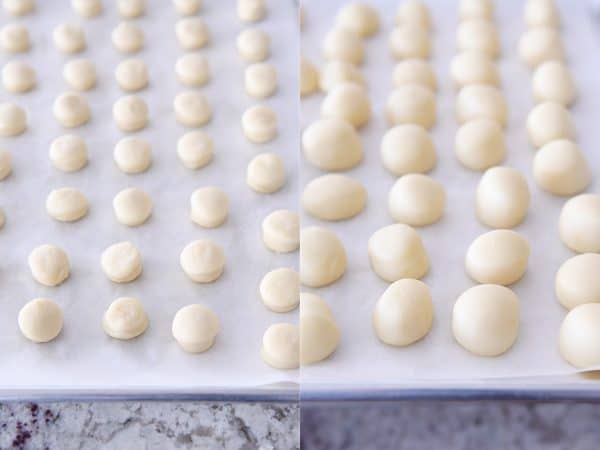
And then carefully drop the donut holes in the hot oil.
Can I vent for a sec about donut holes?
I’m going to be very honest here. Cooking donut holes is the bane of my existence.
Yes, they’re cute. Yes, they’re highly sought after. Yes, you can get glares from angsty teenagers for talking bad about them (the donut holes, not the teenagers).
But they’re a pain to fry. Some of them turn over just fine, while others just bob, golden side down in the hot oil refusing to bathe their white bellies in the blistering bubbles.
I’ve tried every trick in the book to get donut holes to cook evenly, and I’ve given up. The truth is, no one in my family cares that some of them have lily white undersides. They’re still delicious.
So basically, don’t stress. I’ve learned that donut holes just have a mind of their own, and we’re NOT going to let their stubborn tendencies ruin our day.
Glazing donut holes
When it comes to glazing donut holes, forget the one-by-one pampered treatment.
I toss them all in the bowl with the glaze until evenly covered and then transfer them to a wire rack.
So there you have it!
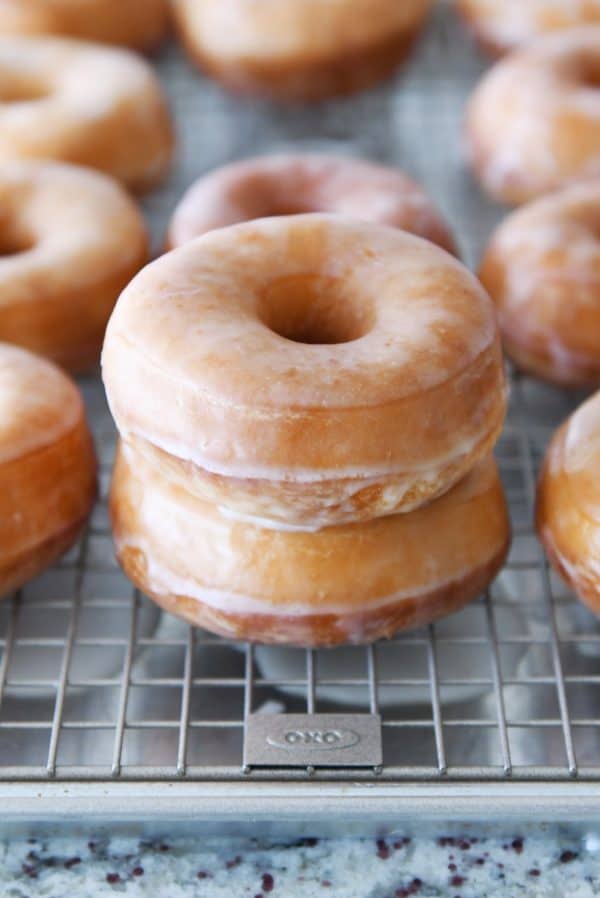
Homemade donuts. And not just any homemade donuts. The BEST homemade glazed donuts on the planet.
Other than some day possibly posting a spudnut (potato donut) recipe like the ones my mom made all the time growing up, I can’t see myself ever relying on another homemade donut recipe.
These are my family’s favorite donuts.
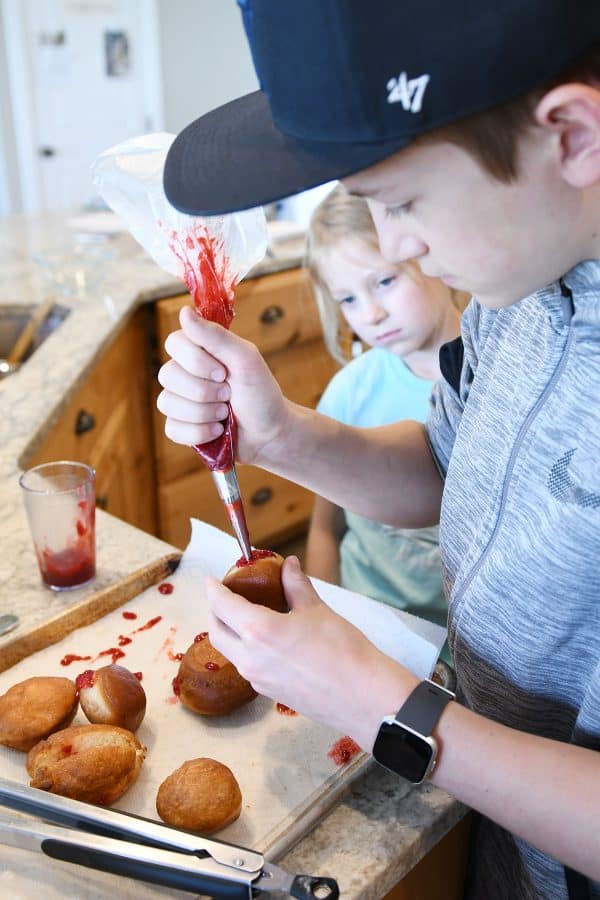
They beg for them (my daughter just had a birthday and wanted a cake made out of stacked homemade donuts instead of a birthday cake), and my 14-year old has started asking for a portion of the dough so he can perfect The Perfect Jelly Donut. He’s close. My floor is also very sticky.
Let me know any questions you might have!
I’m happy to troubleshoot issues or comments or concerns (except for the ones that tell me donuts aren’t healthy – noted!). 🙂
Feel free to experiment with different glazes and frostings. Chocolate frosted donut with sprinkles, I’m looking at you!
Most of all, have fun with the homemade donut making process.
If your donuts don’t come out looking picture perfect, that means you are doing just fine! Perfection is highly annoying anyway. And it just means you have a reason to make them again…and again…and again!

One Year Ago: Amazing Instant Pot Creamy “Baked” Ziti
Two Years Ago: Double Chocolate Salted Caramel Muffins
Three Years Ago: Instant Pot Indian Vegetable Rice
Four Years Ago: Amazing Cinnamon Chip Scones {Best Basic Scone Recipe}
Five Years Ago: Amazing Key Lime Cheesecake
Six Years Ago: Oatmeal Peanut Butter Chocolate Chip Bars
Seven Years Ago: Creamy Tuscan Pasta Sauce {Quick 20-Minute Dinner}
Eight Years Ago: Crab and Goat Cheese Ravioli

The Best Homemade Glazed Donuts
Ingredients
Donuts:
- 7 cups (994 g) all-purpose flour (see updated note!)
- ¾ cup (159 g) granulated sugar
- 1 ½ teaspoons instant yeast (see note for active dry yeast)
- 2 cups cold milk, I use 2%
- 2 large eggs
- 1 ½ teaspoons salt
- ¾ cup (170 g) salted butter, cut into tablespoon-size pieces and softened to room temp
- 2 to 3 quarts vegetable oil, for frying
Glaze:
- 6 cups (684 g) powdered sugar
- ¾ cup hot water (see note)
- ¼ teaspoon vanilla extract
- Pinch salt
Instructions
- In the bowl of an electric stand mixer fitted with the dough hook, add the flour (see note!), sugar, yeast, milk, eggs and mix until combined. The dough will look a little shaggy, that’s ok. Add the salt and continue mixing until well combined and the texture looks fairly smooth, 2-3 minutes. Let rest for 5 minutes.
- With the mixer running on medium low, add the butter a piece at a time until all the butter has been added and is incorporated into the dough. The dough will have softened considerably and may be sticking to the middle or sides of the bowl. Scrape down the middle and sides as needed.
- Knead the dough on medium speed for 10-12 minutes. Start the kneading time after the last of the butter has been added. The dough will be very sticky but as it kneads, it should come together better. Scrape down the sides of the bowl if needed.
- You’ll know the dough is done mixing if you can pull up a handful and it stretches easily. It will be very soft. And it may even be sticking to the sides or middle a bit (depending on the mixer you have), but it shouldn’t leave very much residue on your fingers when you pull a handful up. If it is wet and sticky, add 1/4 cup more flour and mix for a few more minutes (resist the urge to add this flour if at all possible unless your dough is a sticky mess).
- Transfer the dough to a greased container. Cover and refrigerate for at least 8 hours or up to 24 hours. The dough should double in the refrigerator. UPDATE: a lot of you have reported back that your dough didn’t rise much in the refrigerator overnight, but the donuts still turned out amazing – so if your dough doesn’t rise, don’t give up. Also, place your container of dough on a middle rack where it might not be as cold.
- Immediately out of the refrigerator, roll the chilled dough on a lightly greased countertop to about 1/4-inch thick (or slightly thicker). It should be about a 12X16-inch rectangle. Line half sheet pans with parchment paper and lightly grease the parchment.
- Cut the donuts and donut holes with a 3-inch donut cutter (with a 1-inch center) and place them on the prepared pans. Cut any excess dough into donut holes. Reroll scraps, if desired (donuts will be bumpier and not quite as tender – it helps to let the combined rerolled scraps rest for 15-20 minutes before rerolling to relax the gluten so the dough doesn’t spring back while rolling).
- Let the donuts rise, uncovered, until noticeably puffy. I warm my oven to 140 degrees. Turn it off and place the sheet pans of donuts inside to rise for 20 minutes or so. On the counter, it may take 1-2 hours for the donuts to rise.
- Place a double layer of paper towels on a half sheet pan.
- Heat oil in a heavy pot to at least 2-inches deep or in an electric deep fryer following the manufacturers directions to 350 degrees F (or 365 degrees for darker donuts).
- Gently pick up the puffy donuts so they don’t stretch and quickly place them in the hot oil (the bottoms of the risen donuts will be very soft from rising on the greased parchment; the donuts fry best with less air bubbles if they are placed in the oil SOFT SIDE UP). Don’t overcrowd the pot or the oil temperature will fall too quickly.
- Cook the donuts until golden brown on the bottom, about 1 to 1 1/2 minutes. Flip with tongs and continue cooking for another minute or so until golden. Lift the donuts out of the oil with the tongs, drain any excess oil, and transfer the cooked donuts to the paper towel lined baking sheet. (Donut holes should cook in about half the time)
- Let the oil come back to temperature before adding subsequent batches of donuts or donut holes.
- Prepare the glaze by whisking all the ingredients together until smooth. See the note below for thinning out the glaze. Place a wire cooling rack over a half sheet pan.
- Let the donuts cool until just warm to the touch before dipping fully in the glaze (if the donuts are too warm, the glaze will drip almost completely off). Place the glazed donuts on the wire rack so excess glaze can drip on the sheet pan below.
- For donut holes, I toss a couple dozen of them in the glaze at the same time, roll them around with my hands until evenly coated, and then transfer them to the wire rack.
- Once the glaze is set on the donuts, they can be transferred to a plate or other serving dish. The donuts are best served fresh but can be reheated the next day – a quick 12-15 second zap in the microwave has them tasting *mostly* fresh.
Notes
Recipe Source: from Mel’s Kitchen Cafe (inspiration from many sources such as The Bread Ahead Cookbook – aff. link – America’s Test Kitchen, and many recipes found online)
Disclaimer: I am a participant in the Amazon Services LLC Associates Program, an affiliate advertising program designed to provide a means for me to earn fees by linking to Amazon.com and affiliated sites. As an Amazon Associate I earn from qualifying purchases.



Best homemade recipe and better tasting than store bought .
Great recipe. Best homemade recipe and better tasting than store bought .
Delicious!! Here are some suggestions. If using a kitchen aid mixer, half the recipe! ( I had to mix by hand because my mixer was getting pretty hot). They still turned out- but mixing the butter got pretty messy- but it’s doable! My dough did not rise at all in the fridge-but they still had a great texture. I also dipped mine in melted chocolate ( divine!) and made a raspberry glaze by adding some strained raspberries to the glaze. Surprisingly I preferred the donuts to the donut holes! Thanks for another rock star recipe!
My dough rose beautifully…after reading about the dough not rising n I woke up and it’s beautiful..I can’t wait to eat them.
Donuts are my kryptonite. I’ve been baking for more than 40 years, and this IS the best homemade donut recipe I’ve tried. It was easy to put together and the dough responded exactly as you said. Donuts and holes fried up perfectly – amazing texture – not full of air like Dunkin. Gonna try jelly donuts next. And thanks for all the pictures and additional info and tips – very helpful.
A lot of work- but so much better than store bought! Yum!
I made these dairy free by subbing water for the milk and coconut oil for the butter. They were still divine!!
To make it easier to get the doughnuts into the oil after the second prove just cut the parchment that they prove on into little squares and put the whole combo (doughnut + parchment) into the oil. The parchment will separate from the dough and you can remove it without disturbing/distorting your dough.
Hello in 2023 and from Norway! So i just made these yesterday/today. Here Are my thoughts.
1. this dough is amazing to work with! Love that.
2. i wish it tasted a bit more? Of what im not sure. But i might do some further research into spices of some sort. But still very delish!
3. i did freeze the leftovers as we ended up with hella more donuts than we thought. LOL. So i might remember to update if they freeze/unfreeze well.
As I am Norwegian we have slight differences in measurment, this is what i used.
* 994 g hvetemel
* 159 g sukker
* 2 1/4 ts gjær (søtbakst)
* 4-5dl melk
* 2 L (LARGE ikke liter) egg
* 1 ½ ts salt
* 170 g meieri smør, romtemp, i biter
* 2-3L olje nøytral
In case any other Norwegians is considering
I used all the flour, and 5DL 3,8% milk. (As we dont have 2%)
I mixed the yeast with milk because i honestly was not sure if it was ady or iy. Either way it worked out. I used a Kenwood machine, with the dough hook, worked very well. The dough rose great in the fridge as well. I used an cola glass and a buttercream tip/nozzle for the holes as i didnt have a donut cutter. It worked great as well.
Making and waiting for the dough, as well as frying seemed like a lot, and scary. But it really wasnt. Thanks for a great recipe, and also Hello from a new follower!
Forgot to leave a review!
Mel, I just have to tell you that it’s been a tradition on my kids’ birthdays to make them donuts. This has become THE birthday donut recipe! It’s so perfect because we do a mix of apple fritters, donut holes and standard donuts (some with vanilla glaze and some chocolate). With the master recipe you can end up with such a variety and they are DELICIOUS!!!!
I love my Bosch
Hoping someone might see this and give me some guidance. My littlest guy is turning 10 on the 21st and he loves doughnuts almost more than he loves me! I want to make a gigantic doughnut for his cake, and I don’t want it to be a doughnut shaped cake. Do you think I could make a huge doughnut using this recipe? I’m just not sure how long it would take to fry up, any suggestions? Thanks to anyone who might see this and have some ideas!
I know this is a year late, but maybe you’ll be trying your idea again this year lol. As long as you roll it out to the regular thickness, I think this recipe specifies 1/4″, then frying time should be similar, maybe a little longer if you aren’t cutting a hole out of the center. I would suggest just giving it a few tries and then adjust based on results. I definitely wouldn’t try manipulating a giant doughnut into hot oil, just put the doughnut and the parchment paper it is proving on into the oil and the paper will separate and you can remove it.
They look delicious and it looked like it worked really well! It just tastes a bit more cakey than donut. How can I fix that for next time? Thanks!
Absolutely fantastic! I used a kitchenaid and had no issues! Just make sure you fluff your flour before you measure and knead it for the amount prescribed. These were the fluffiest, lightest, homemade donuts I’ve ever made (or eaten)!
I was definitely a skeptic. I bake all the time and go through Sam’s Club yeast packs in a couple of months. I looked through lots of recipes and when I saw that I could make the dough and leave it in the fridge overnight I was sold. Then I saw that you used a Bosch mixer and was super excited! I feel like most people don’t know they exist. Iactually have both a Bosch and large kitchen aid and have specific things I like to use each for.
So onto the recipe. I have made these twice now. The whole dough making process is so stinking easy and it by far the most beautiful dough I’ve every made! I had to resist the urge to sit and play with it. The only modifications I made is using unsalted butter and compensating for the extra salt and I use whole milk. Otherwise I followed your recipe to a T. The first time my dough didn’t rise at all in the fridge, but it rolled out beautifully and puffed up some with an hour rest on the counter. They fried up beautifully and everyone raved over them. I made them for my husband for Father’s Day since warm Krispy Kreme glazed donuts are his favorite and the closest shop is a 40 minute drive. I shared a dozen with my Dad and brothers and sisters as well and there were complaints that there were barely any apple fritters. While I was still frying the donuts my husband was inquiring about the next time I could make more.
So I just used this for the second time. This time I doubled to l the recipe and got a little braver. All my experience with yeast is that it needs time to be active and throwing the dough straight into the fridge without letting it start working might keep it from doing its job in the fridge. This time I let the dough rest on the counter top for 30 minutes before putting it in the fridge. While it didn’t double, the dough did rise in the fridge this time. It still comes out of the fridge very stiff but it rolls easily, cuts beautifully, and puffed up perfectly! I fry mine in olive oil in an electric skillet and everything goes so smoothly. I cut mine more spaced out intentionally allowing for more apple fritters to be made. I even cut a dozen into hearts and filled them with raspberry preserves. Everything came out even better this time. Even with a double batch only one dozen of the plain glazed were left at the end of the day. I wish I could leave a photo with this so you could see how beautiful they are!
Thank you so much for such a wonderful recipe! We’ve already planned our next donut day.
Wanted to check in quickly and say that I made these in my KitchenAide mixer yesterday and they turned out perfectly. The dough was definitely different than anything I’ve ever made before, very stiff and difficult to mix at first, but I trusted the process and all turned out beautifully. One of the most exciting baking experiences I’ve had in a long time…it was like magic for our whole family to watch them rise, then fry up and then be so unbelievably light and delicious. Such a treat!! Thank you.
Simply the gold standard in doughnuts. I added a teaspoon of Buttery Sweet Dough flavoring to my liquid ingredients and it completely replicated the bakery flavor that I love and long for so much. I’m in China and tasting these light ethereal doughnuts made me miss home a little less.
Thanks for this recipe. You are a superstar.
These are truly amazing! We are so excited to have this recipe that actually produces what we expected… a warm, soft, raised donut like the Krispy Kreme right off the belt in the factory. I did make the fritters as well and I’m torn between the two- they are equally delicious. This is my first time with this recipe so I did learn some things as I went along. I have a kitchen aid mixer and I was close to the actual grams in flower but didn’t use all of it- maybe 1/2 cup shy. So I do agree that if you use a kitchen aid you may use less flour. I halved the recipe and this is not a problem, however I still ended up with 20 donuts and 5 fritters! I think I may have rolled my dough too thin, but it didn’t seem to effect the final result. I also did not get much rise in my dough overnight in the frig, despite the fact that I turned up my frig to 40- again this didn’t seem to effect the result. I didn’t have a donut cutter, so I used an Easter egg cookie cutter. I was glad I did- who needs a hole anyway. Now I can fill a few if I like. I found that flipping the donuts during the fry time made for a more rounded appearance. I hope that anyone reading this will see that this recipe is quite forgiving and adaptable and so no need to be intimidated Husband ate 9 immediately so obviously this one is a keeper!! Thanks Mel!
Just wanted to clarify…flipping during frying- I meant flipping a few times rather than just once
Mel…question… I keep a sourdough starter in my frig. Any suggestions on how to use in this recipe? I’d love to try a sourdough version.
Thanks again!!
Hi Shoby – worth a try! When I use sourdough discard in dough recipes, for every cup of sourdough starter I use, I decrease the flour by 1/2 cup and the liquid by 1/2 cup.
7 cups of King Arthur flour is 840g! Maybe the weight measurement is what’s throwing some people off. My dough is a very stiff mass right now. I will stick this dough in the fridge to see how it comes out but am going to start all over again starting at 5 cups of flour by weight and only increasing up to 840g max if necessary.
I don’t use the same grams-per-cup of flour that King Arthur Flour uses to test their recipes. I use 142 grams per cup (for flour) – different sources use varying weights of flour per cup. America’s Test Kitchen uses closer to the 140-145 grams per cup and I find that works better for me and that’s how I test my recipes. It’s totally ok to try decreasing the flour in this recipe, but I just wanted to make sure to clarify the flour weight. 🙂
Great donut recipe!!! Light, fluffy the doughnut plain is even good. Bad recipes in the past..so glade I started researching and found this one. These doughnuts are 110% better than the last ones. Thank you for sharing.
Update,
Needed an additional 1/2 cup flour.
Still not sure what the purpose of placing the dough in the fridge overnight. The butter solidified therefore I had zero rise.
I immediately formed the donuts once out of the fridge.
I then placed them in the oven with light on. After three and a half hours I achieved a decent rise. For best results, I fried at 325°. The donuts turned out extremely light with a fluffy interior and a slight crisp to the exterior. Awesome flavor and texture can’t wait to try again.
3/4 cups of butter will solidify in the fridge.
There will be no rise regardless what shelf it’s placed on. My dough came out of the fridge firm just as a laminate dough would.
Awesome recipe! It is possible to do it all by hands of someone is wondering. Lots of kneading but totally worth it! You’ll have to knead the butter into the dough until the right constancy Thank you!!
Just made these and they are delicious!
If I wanted to make them ahead of time for a party do they store well? And if so what’s the best way to store them-refrigerator, on counter? Any tips would be appreciated!
I think these are best eaten within an hour of making – day old (or older) donuts usually aren’t that great and it’s hard to reheat them so they taste fresh again.
Made this recipe but because I don’t care for sweet donut dough, decreased the sugar. With regard to donuts not rising well, decreasing sugar might help. Then refrain from frying until an indent remains in the shaped donut. Fried in peanut oil 2 minutes each side, flipped again and fried 30 seconds each side. Ideal temp was 310F.
Just made these for Chanuka and they are amazing!!! Melt in your mouth delicious. My family is devouring them. Thank u!
As we were frying these, we did some in oil and some in the air fryer. The ones in the air fryer definitely had a more cakey texture but were still delicious! For the air fryer, 5 minutes at 350 degrees seemed to be our best bet.
Thanks for posting this. I’m going to try them this way.
I finally made these for the first time last night (well, made the dough two nights ago and finished them last night). Hands down the best homemade donut I’ve ever had. I followed the directions pretty exactly since it was my first time and I’m glad I did. Mine turned out just slightly darker than yours, but I blame my husband. He insisted on turning the pan higher than 350 – closer to 400 because the temperature of the oil would drop when the dough was put in. They still turned out great, and I love my husband so much, but I don’t always love cooking with him! I am a recipe follower and he is not. Alas, even being a little dark, the texture was amazingly soft and yummy.
So- I made these yesterday and I was pleasantly surprised but I do have a bit of info for those of you using kitchen aid mixers. I noticed that unlike the center kneading mixers, ours don’t grab the bottom of the bowl nearly as well. They also suggest 3-5 speed setting for the dough hook. This leads to SEVERELY under kneaded (hope that’s the right way to say it) dough. I used the weight measurement for the full 7 cups and after it was all mixed in together- I did the 12 minutes on medium speed, to no avail. I scraped the dough up, flipped it over, then cranked it up to 12 and held on for dear life. It was like a wild bull ride. It bucked and bucked…. But after about 5 minutes of this, I got the stretchiest most luscious dough I’ve ever made. I kid you not these puppies fluffed up mega big in the fridge too!!!! When they were cooked they were HUGE!!!! So soft, so chewy! Oh wow!
Worth noting: I added a sprinkle of nutmeg to the dough, and I used bread flour. Not as light and melty as a Krispy Kreme for sure, but it was a very very lovely donut shop donut! Everyone’s begging me to make more!! It’s chewy and soft- not super dense! It’s wonderful!
Thank you so much for your helpful comment, Holly. I’m so ready to strangle my kitchenaid for that very reason, but instead I’ll give it one more chance following your tips. God bless.
Hi, do you think I can use wheaten starch + soy flour instead some amount of flour? Have you tried already? I think it should be even more delicious and melting in the mounth . But I dont know how much to use… thank you 🙂
I haven’t tried that, sorry!
I had a similar roly poly problem with cake donut holes. Once they’ve been in the oil for 60 seconds or so, and won’t stay flipped, you can use a spider to hold them under in the oil. Worked great.
I can’t wait to try your recipe.
This is a great recipe thanks for sharing. And they came out great, so delicious! I made two small adjustments, I add about two tbsp more sugar because I like a sweet dough. And I added an extra 1/2 tsp of yeast. I used my bread machine, and I let the dough rise in the refrigerator to double it’s size. The shaped donuts also doubled in size for the second rise. Everything came out just like you described. Thanks
Made these today, despite dough not rising at all overnight they were amazing! My only issue was the oil getting too hot (used a pot) and burning the last batch or 2? Any tips for preventing this? Thank you! Also – is the degree number for rising in the oven Fahrenheit as it doesn’t specify?
Yes, it is Fahrenheit. What kind of pot/pan are you using to heat the oil? Stainless or cast iron or something else?
I can’t believe it, but my donuts turned out the first time I made them! I have a Kitchen Aid, so I started out with 5 1/4 c of flour like the notes said, but I ended up having to add another cup and a half or so. So next time, I will just use the 7 c of flour the recipe recommends. Also, the dough rises a lot in the fridge, so don’t put it in too small of a container! My dough popped the lid off the container.
Hi Mel! I’ve made this recipe a few times, including the apple fritters with scraps and they are delicious and the dough is a dream to work with. I love the butter add at the end. I had a bit of an epiphany last night – have you tried using this dough for anything other than donuts? I’d like to try them as cinnamon rolls or as a base for a cinnamon chip bread (desperately seeking a recipe similar to what my kids used to get at Great Harvest when we lived close to one).
I did a brief search online and found that this type of dough is close to what would make a brioche loaf. I am going to move forward with my experimentation but I thought I’d check in with you to see if you’ve gone before me in this endeavor. 🙂
I’m new to your blog and I have enjoyed spending my limited free time scrolling through and finding new recipes to try. Thank you for your hard work and attention to detail in descriptions (also gram measurements!).
Hi Maggie! Fantastic idea to use this dough as something other than donuts! I haven’t tried it, but I love the idea. If you have time and can report back, I’d love to know how it goes!
This recipe is AMAZING! The donut dough was one of the best doughs that I have ever worked with. The donuts rose beautifully and fried up perfectly. I topped some of mine with maple glaze, some with a chocolate glaze, and some with cinnamon sugar. I also saved one so that I could make an ‘Everything’ donut, which is pretty much a donut topped with everything bagel seasoning and filled with herb and garlic cream cheese. SO delicious! Another GREAT recipe Mel!
I was wondering about the instant yeast measurement in your recipe. It says 1 1/2 teaspoons. A package of yeast it 2 1/4 teaspoons. Do I really only need 1 1/2 teaspoons of yeast for 7 cups of flour?
I use 1 1/2 teaspoons for the recipe. You could try using more to see how it works, but I haven’t tried it with an increased amount of yeast.
This recipe has a slow long ferment period, which allows the smaller yeast quantity to do its work … usually more yeast is used for a quick ferment ….
Hi Mel
Just finished making these and they turned out great! The only problem I had was after the donuts were cut and risen, transferring them to the oil proved to be problematic. They deflated wherever I tried to pick them up. Same thing when I tried scooping them with a spatula. Any ideas why and how to avoid it in the future?
Hi Kelly, that could happen if the doughnuts have over risen (the longer they rise, the more fragile they’ll be as they’re moved).
You know these were a hit when you make them for friends and they say “These are better than Tim Horton’s donuts!” haha! Thank you from Canada, for this amazing recipe!
Also, I fried these in coconut oil and they turned out delicious!
I was looking for a recipe for Baked, not fried, donuts and my friend left your website as where she found it. If you do have a recipe for baked ones would you please send it to me in my e-mail. tinab710@verizon.net. Thank you.
Donuts turned out!!!!!!
Hi Mel!
I have a 7-qt KitchenAid mixer and I have a large bread maker with a dough setting. Do you think the bread maker would be able to handle the dough better than the KA? Thanks in advance for any input!
I don’t have a bread maker so I’m not sure (since I don’t know the capacity or how it handles doughs like this). I’m sorry I’m not more help! I think others have used a kitchen aid with good results but it might be worth a try in the bread maker.
Initially, my dough would not rise AT ALL. Not in the fridge, or the counter, or after I had cut them and let them sit in a warm place for an hour-nothing! Saddened by my lack of success, I decided to cook them anyway. And I was floored to see them puff up and cook both in a matter of seconds in the oil! After I picked my jaw off the floor, and resumed cooking donuts I realized that these were a game changer. So perfectly perfect and chewy… and drool…. i sampled way too many, and now I have heartburn, but it was so worth it. Thank you Thank you Thank you
Thank you so much for this recipe!! I have tried several other donut recipes and this one has been THE BEST!!! The last time I made them, I used a blueberry glaze that was amazing. Thanks again Mel!!
These are amazing! I followed the recipe exactly and had a great rise and fabulous donuts! Thanks so much!
Hi there mel, please tell me how much in metric measurements is 12 tblsp of butter?
Thank you
14 gram per tbsp
Hi from Malaysia! I’d love to try this recipe and wanted to ask which brand of all purpose flour You used, from my understanding different brands have varying protein contents which may affect dough consistency and just wanted to be sure before I try. Thank you for all your fantastic tips
I use a brand from Costco called Natural Way Mills.
Can these be made in an air fryer instead of deep frying in oil?
I haven’t tried that, but you could experiment!