Homemade Ricotta Cheese {In Under an Hour}
Get the step-by-step tutorial to make creamy homemade ricotta cheese in an hour! It’s easier than you can possibly imagine and the results are amazing.
Homemade ricotta cheese is one of those things that I almost hate introducing (assuming you haven’t delved into the creamy world of homemade ricotta yet) because once you make it, you may never be able to go back to the often-gritty, compact, chunky store-bought stuff, and I don’t want you giving me the stink eye for destroying all of your convenient grocery store dreams.

I’m sorry for today. Kind of. Well, actually, not really. But let me tell you why before you think me a cold-hearted soul.
The reason I’m not genuinely apologetic is because
a) hopefully you know me well enough by now to know that obviously buying store-bought ricotta cheese will not make you a lazy, bad, terrible, dishonorable person (if it does, then let’s start a club) and
b) homemade ricotta is so easy (and I mean that in a very honest “easy” way, not a 15-step, 20-ingredient, slightly misleading “easy” way) that you’ll be wondering where it’s been all your life.
Have you ever made homemade yogurt? Yeah, ricotta cheese is about a billion times faster and simpler, plus most of the process is you just standing around watching it all happen.
I don’t make homemade ricotta cheese every time a recipe calls for it (is this the time we should decide on an official name for our club?), but every time I do, I speak to my inner person and tell her that she really should put this on the regular rotation.
Alas, life seems to have a way of, well, getting in the way and so instead of firing slothful inner persons, I just relax knowing that homemade ricotta is only a few minutes away the next time I can swing it.
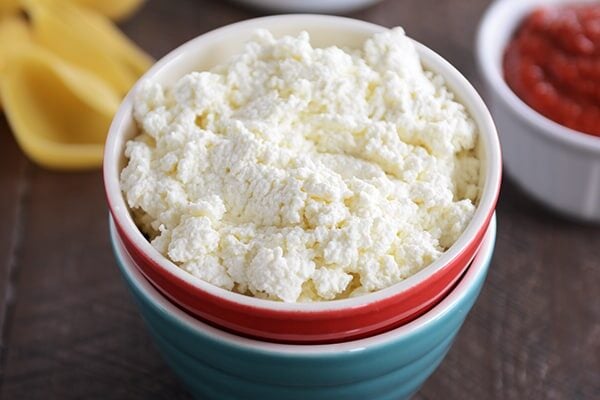
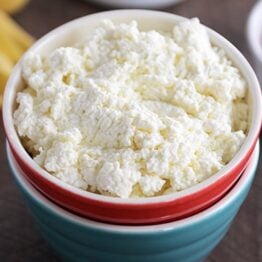
Homemade ricotta cheese is so much creamier than your average, store-bought version (even the whole milk variety), and if you give it a whirl in a blender after it’s strained and chilled, it’s almost other-worldly in it’s luscious soft creaminess.
Consider today’s post a friendly warning (think of me as the kindly middle school teacher strongly hinting that you might want to study up on all the continents) for what’s to come Friday.
You might want to have a batch of this handy. I won’t be giving you a pop quiz on the world’s greatest land masses but you’ll be glad you listened and obeyed. Trust me.
A quick note about equipment: other than a pot and spoon, using an instant-read thermometer will come in very handy (and alleviate any temperature guesswork). Also, I use my nut milk strainer bag thingy for straining the ricotta cheese (and homemade yogurt, too). It works like a dream (and washes up easily for reuse) but you can also use cheesecloth inside a colander.
One Year Ago: Shrimp and Mango Lettuce Wraps {20-Minute Meal}
Two Years Ago: Swirled Peanut Butter and Nutella Stuffed Chocolate Chip Cookies
Three Years Ago: Mini Taco Cups
Homemade Ricotta Cheese
Ingredients
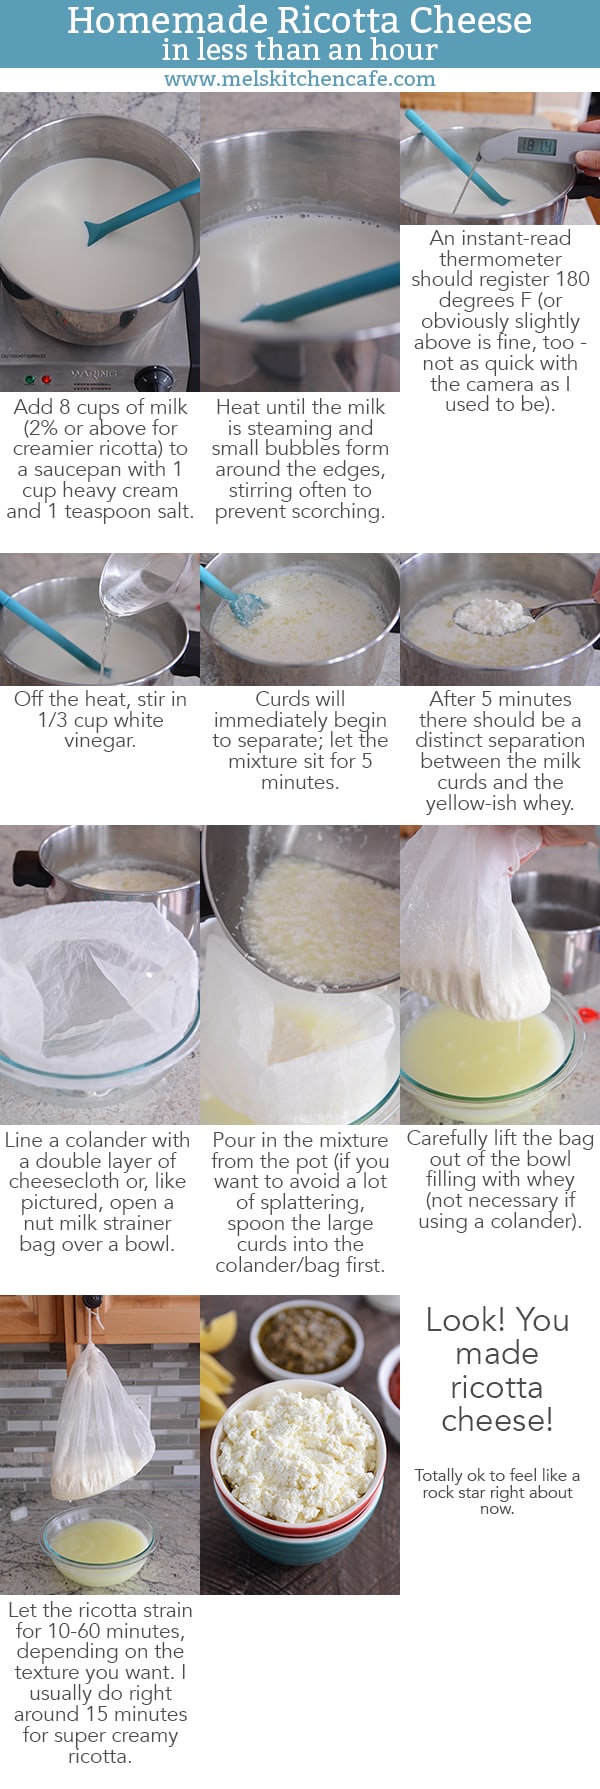
- 8 cups milk, 2% or above for creamier ricotta
- 1 cup heavy cream
- 1 teaspoon coarse kosher salt
- ⅓ cup distilled white vinegar
Instructions
- Combine the milk, heavy cream, and salt in a medium pot. Heat on medium, stirring occasionally to prevent scorching (you can kick up the heat to speed up the process if you don’t mind stirring attentively the whole time), until the milk is steaming just below a simmer and registers 180 degrees F on an instant-read thermometer.
- Off the heat, stir in the vinegar. Immediately, the milk will start to separate. Let the mixture sit for 5-10 minutes.
- Line a colander with a double layer of cheesecloth (coffee filters work great, too, if you stagger them or they are large enough) or open a nut milk strainer bag over a large bowl. Spoon in the large curds first if you want to avoid splatters and follow it up by pouring in the rest of the mixture.
- If using a nut milk bag, carefully lift it up and out of the bowl and hang it so it can continue to drip into the bowl. Let the ricotta strain for 10-60 minutes, depending on the texture you are after. I usually go with right around 15 minutes for super creamy ricotta.
- Scrape the ricotta out of the colander or bag; use immediately or refrigerate up to a week or so.

I started making this about a year ago and you’re right – – I can never go back to store bought! My husband, who travels a lot for work and frequently eats at high end restaurants, says the cheesy shells with this ricotta is the best he’s tasted, so thanks, Mel!
This is my favorite recipe!!! I use it every time I make lasagna!!!!
How much ricotta is produced?
About two cups (the yield is right up there above the recipe title).
How much ricotta does this recipe yield?
2 cups (the yield is right above the recipe title).
OMG!! This was a life altering experience. I followed directions to a T because I really wanted this to work out. And BAM, it did! The best way to describe this cheese is to say it’s the fresh-mozzarella equivalent to ricotta cheese. Does that make sense? Anyways, I may never buy ricotta at the store again.
Thank you for this recipe! I have made this ricotta two times now and I can hardly keep around. It us perfect! It’s creamy and rich. Next time, I’m doubling the recipe. My husband says it’s better than the local Italian Deli. Big smile here. 🙂
Thanks! I have never made ricotta before. I can’t wait to try!
Hi Mel,
I’m a teacher so over Christmas break I “relax” by cooking and baking. This year I tried so many of your recipes, but the biggest hit was homemade ricotta that I used to make spinach stuffed shells for Christmas Eve dinner. I felt like such a rock star making my own ricotta. Your directions were flawless; the nut milk bag worked great! Thanks for your constant cooking/baking inspirations! Deb
I love this! Thanks, Deb!
Thank you for this recipe! Odd question, but do you think it will work using Fairlife whole milk? This milk has half the amount of sugar as compared to normal milk. Not sure if that will change things. Don’t want to waste it, but that’s all I have.
Thank you!
Good question but I can’t say for sure since I haven’t used that milk specifically.
So kind of random comment… I made this ricotta and used in the stuffed shells and loved it!!! Then a few days later we went to a science day thing with our kids and one of the activities was learning to make plastic… I was a little disturbed when it was the same exact ingredients and way of making the ricotta cheese!!! Haha!! I of course then had to research online and did find this method in both cheese making and natural plastic making! Kind of weird! It was so good though that I don’t think that weird random fact will sway me from making it again 🙂
Ew. That’s kind of gross. 🙂
I have never made ricotta before. When I made it today the milk didn’t separate from the whey. I did follow the directions and made sure the milk was at 180 degrees. Any suggestions of what I might have done wrong?
That’s odd, Merilee. Not sure why it didn’t separate. What kind of milk did you use (whole, 2%, etc)?
I definitely feel like a rockstar in the kitchen. I can’t believe I made homemade ricotta! And it was easy, and sooo good! Thank you!
Oh! Never ever throw away liquids after making cheese. It contains loads of nutrients and what was the most surprising for me – it contains much more calcium than ricotta cheese itself. You can use it smoothies, instead of water when making bread or instead of lemon juice in salad dressings.
Ahhhhh, I dumped the whey without thinking 🙁 Next time I’ll save it. I even had the nut milk bag from way back when you suggested it! Worked great. Can I ask how you clean it?? I didn’t see any directions on the bag and I hadn’t used it yet…
Can you tell what can be done with the leftover watery substance? Thanks.
I def want to try this!
I use leftover whey in pancakes (in the place of buttermilk) and in my homemade bread (subbing it in for the water), among other things.
I wanted to comment about my experience. The first time I made it, I don’t think it was hot enough. I adjusted the 180 degrees based off my altitude, but I must have adjusted too much. I only got about 1/2-3/4c. of curds and my leftover “whey” was not yellow, it still looked like milk. But I was in a rush, so I just threw it in the fridge. The next day I reheated it and added a few tablespoons more vinegar. It worked amazing. Just how it should. The flavor is incredible. So if anyone else manages to mess it up the first time, don’t give up!
Oh Mel, you’ve done it again. Take something that seems outside the realm of possible and make it totally doable. See that mountain? Squash! What about that Star? Got it! Thank you for the inspiration! (and I am totally making the stuffed pasta tonight too. Can’t wait).
Ha! You make me laugh! So happy you rocked the ricotta.
And if you have an Instant Pot Duo this can be even easier by using the boil function of the yogurt setting. Set it and walk away….it will beep when it’s done and reached 180. sO EASY!!!
Thank you!!!
Thanks! I was just wondering if I could use my instant pot.
This was so easy & so delicious!
Great recipe when you cannot make real ricotta. Ricotta is actually a whey cheese, but this using the whole milk is nice when you have not made real cheese and have the whey on hand.
Hi Mel! I love your blog and always check here first for recipes and recommendations! I am making this tonight (straining currently!!) but I think I will have some leftover. How long will extra keep and what is the best storage method? Thanks!
Hi Chris – I’d store in an airtight container and I think it should be good for 1-2 weeks (especially if the milk you used in the recipe was fresh).
Hello Mel,
I was wondering if there is anything to use the leftover liquid from the ricotta cheese when you are done it do you just throw it out?
Thank you for this special recipe, it’s so nice to know its so easy to make something so fabulous!!
Thank you!
Connie
Hi Connie – I talk a little bit about it in the notes of the recipe but I use the leftover whey for a lot of buttermilk substitutes and in our pancakes/waffles, things like that. There are lots of uses for it!
wow….very nice recipe. Thanks for sharing it.
Can you add more heavy cream and use 1% milk? Another way to put it… if you need 1 cup of whole milk, can you use 3/4 cup of 1% milk and 1/4% heavy cream?
I think so – this recipe is pretty adaptable that way.
Do you think if I’m using fresh, raw milk with the cream still in it do I need to add cream?
Love your site!!! Thank you for your time!
Probably not, Chrystalyn…let me know how it works out if you try it.
I found Ina Gartens recipe years ago and love it. Will try your recipe and get myself a nut milk bag too! I could eat homemade warm ricotta by the spoonful:-)
How do you keep your bag so nice and white? After so many batches of yogurt and almond milk, mine are yellowed and stiff
Hey Marci – hmmm, I’m not sure. I wash it out right away after using and use really hot soapy water. That’s it, I’m afraid.
Maybe it has something to do with me being really lazy and doing a quick rinse in the sink and then throwing them in the washer
Making homemade ricotta has been on my to do list for about 10 years now! It seems like a no brainer since I have a about 1200 milk cows out my back door! You gave me the nudge I needed and I can’t wait to try this!
Hi..this is the same way we make paneer…in fact my mom is just now making it in the kitchen with fresh milk.what a coincidence.the more the fat in milk..the better paneer.and we use citric acid granules for making it or lime juice
Mel- this looks so easy! I am wondering if I can make something similar using kefir? Instead of using vinegar, what if I just simmer the kefir and the curds will separate from the whey? I make homemade kefir and am trying to find more recipes for it. Also, for what other things do you use whey?
Worth a try! I culture our own milk kefir daily, too, but haven’t thought of trying to make ricotta with it. Definitely an intriguing idea!
I’m looking forward to making ricotta this weekend–but now I am completely intrigued about making your own kefir and would love some of your great straightforward directions.
Hi Sarah – we love milk kefir! We’ve been culturing our own milk kefir for a year or so now; I got a milk kefir start from someone that had extra (it grows every day and you end up having surplus) and started that way. I make a pint every day – it takes about 24 hours to culture and then I strain the kefir away from the grains each morning (if I have extra grains, I feed them to our dogs or chickens) and put the kefir grains in one pint jar and fill with milk and cover with a coffee filter + rubber band (this sits out for 24 hours until I strain again; I never put it in the fridge unless I’m going on vacation or need a kefir break) and put the strained kefir in another pint jar, put on a lid and let it 2nd ferment for 12 hours before refrigerating. We mostly use our kefir for smoothies (we have one every morning and it’s probably just placebo but we hardly get sick since we’ve started doing it – kefir has billions of probiotics) and also I use kefir in place of buttermilk/milk for pancakes and waffles. It sounds complicated but it’s become a super easy routine. I always have surplus kefir grains if you want me to send you some in the mail (I’ve done that for my sister and several friends).
Oh Please post about kefir with pics! If I don’t have a neighbor with a start, where is a good place to buy one?
There are several places online including this blog (my friend has ordered from here with good results): http://www.culturedfoodlife.com/store/product/donnas-kefir-grains/
If you simmer the kefir, you are making a different type of cheese, which is very delicious, called tvorog, quark or farmer’s cheese. Tvorog is a necessity in much eastern european cooking, like cheese pierogies and sirnaya Pascha (a sweet cheese dessert served only on Orthodox Easter.
Making ricotta in the Instant Pot is a snap! My recipe only calls for 2-3 T of vinegar. Is your ricotta “tart” with 1/3 cup vinegar? It looks yummy!
Good to know! I’m going to try it! Do you use all the same amounts, just less vinegar?
Nope, not tart at all.
I’ve made “ricotta” like this before, and didn’t love it. I don’t love storebought ricotta either, so maybe I’m just not a fan. But it’s the texture that turns me off, so I thought your suggestion of blending it for a smoother texture was great. I’ll try again. And blending may improve the texture of storebought ricotta too. So smart!
Do you think you could use an Instant Pot for the scalding part? Like the beginning of making yogurt? Looks like it’s supposed to come to the same temp?
Ah, that’s a nice idea! I’d say try it for sure…I don’t see why it wouldn’t work.
Love this! I had to make homemade ricotta when we lived in Germany and now that we are stateside I can’t go back to store bought. We make half this batch and toss a smashed clove of garlic in during the rise in heat phase and steep phases, then pull it out before straining. Lucious spread on crusty bread with a little sprinkle of sea salt and fresh parsley.
This recipe sounds interesting to try, but I have a two part question. What is a nut milk strainer, and do you find them?
I linked to it above in the post – it’s basically a fine mesh bag that’s used to strain/make almond milk but I use it to strain yogurt and other things like this ricotta cheese.
I love homemade ricotta cheese! I use fabric like a gauze or cloth diapers (old-fashioned kind, without print) instead. They work really well!
I have made my own ricotta for a few years now (when I get the chance, the big tub at Costco is so cheap & convenient). The recipe I use only uses 3 Tbsp of vinegar & that works fine. Fresh homemade ricotta is so sweet & creamy. It is truly amazing in a white 4 cheese lasagne (no tomato in sight, just noodles & cheese, and lots of it)
Just a little trick for anyone who would like to try this, but doesn’t have a thermometer, 180F is the temperature that milk starts to simmer at, so if the milk is starting to simmer you are good to go. I strain mine in a jelly bag.
Don’t throw out the whey left over from making your ricotta. Use it in any recipe that calls for buttermilk. I know the purists are all shaking their fingers at me right now in total disbelief saying “No, No, No, it is not whey you have added acid to it!” We just won’t tell them that we save it to use in muffins, cakes, waffles & pancakes. I might not use it in a buttermilk syrup recipe, but for baking it works great.
Thanks for posting this & reminding me I haven’t made a batch for quite a while. Off to the store to buy some whipping cream & whole milk.
I agree, Jackie – we use the leftover “whey” in tons of things!
Would love that 4 cheese white lasagna recipe!!!
Hi Mel, Do you think you could use a double boiler and skip the stirring part?
I should clarify that . . . skip the stirring while waiting for the milk to get up to 180.
Certainly worth a try! I don’t actually own a double boiler so I haven’t tried it; report back if you do!
My husband and I made this a few years ago when we were planning on making lasagna on a Sunday and forgot ricotta at the store the night before. It was so fun and easy, and greatly satisfying to know we made it on our own!
Paige
http://thehappyflammily.com
We did this when I lived in China and wanted to make Lasagna. It is fantastic!
One of my favorite breakfasts is ricotta with berries, almonds, and a drizzle of honey. I’ll bet it is tons better with homemade ricotta.
Hi Mel. First: I LOVE IT when you share recipes for “Make Your Own”. Because I trust your opinions, I do not feel the need to look further! Thank you SO much for your dedication and diligence in your food blog. It is truly a blessing. Second: Your post led me to search your “instant-read thermometer”…the ThermaPen. I am pretty sure I MUST have one. This is just a heads up. On ThermoWorks official web site, they have a warning regarding ordering from Amazon, eBay & other sites. They say they are jacking up prices, etc. etc. FYI, ThermoWorks offers a new Thermapen MK4 for $99. I am not sure how it compares to the pricey alternative on Amazon for $159 that your wonderful link provided. I just thought I would send information your way, and if indeed the MK4 is just a newer option, you might consider linking to ThermoWorks instead of Amazon.
Thanks for the insight into that thermometer, Sherri! I really do love my Thermapen (expensive but it has been worth it for me). I’ll change the link!
I had someone teach me once that if you want it to be like cottage cheese, just add sour cream or plain yogurt (I like a combination of both) to the curds. Then you can throw in some diced fruit and eat it for breakfast. Yum!
I apologize if this is a stupid question but do you use distilled white vinegar or white wine vinegar?
Distilled. Good question, though – I’ll edit the recipe to include that.
This looks wonderful; I can’t wait to try it in my recipes. Mel, I’m such a fan of yours just for the recipes but how you have the print function so it is easy and only one page makes you a Rock Star in my thinking. Awesome.
Thanks, Jan!
Hi Mel. I love your blog.
I just wanted to say that this recipe does not make ricotta . . . it makes paneer. When an acid is added to milk, it splits into the curds and whey. The curds part makes a soft cheese called paneer. If you take your recipe above and press it for an hour, you’ve got paneer. To make ricotta, you have to, somehow, coagulate the proteins in that leftover whey [1] (which you seem to throw away). But hey, names are just names. If it works in a recipe, I say, use it!
[1] https://en.wikipedia.org/wiki/Ricotta
My friend Sujoo made delicious paneer this way too – it was very firm like block cheese. This method is definitely the cheater way of making homemade ricotta. But it works for me. 🙂 Thanks for chiming in.
Actually, if you read this post again, you will find out Mel encourages us not to throw out the whey as it is useful in pancakes & bread making, etc. 🙂
Well I wish I’d known it was this easy to make at Christmas time when I drove all over the city looking for ricotta to make fillings for my crepes. Looking forward to seeing what’s on tap for Friday.
Mel, I love your writing! Reallyl I’ve never been tempted before to make ricotta at home, but you’ve convinced me to give it a try.And now I’ll be all ready for Friday’s pop quiz.
I’ve always wanted to make my own ricotta and have never actually done it. I think today is the day! Thanks for the step-by-step, it’s given me confidence. 😉
I just made ricotta this week for the first time! My sister bought me a kit which uses citric acid rather than vinegar. But oh my gosh, homemade ricotta is SO much more delicious than I could have ever dreamed! I was eating spoonfuls of it after it strained. And I froze the whey in 1cup portions for later use. Everyone should try to make their own ricotta!
I’ve made this before (using lemon juice instead of vinegar) and just let it drain longer and pressed it to make paneer, which I then cubed, fried and put atop this soup: http://www.101cookbooks.com/archives/green-lentil-soup-with-curried-brown-butter-recipe.html. Pure deliciousness.
Paneer is the best! I have a version of that recipe on my site and can only imagine how delicious it is with paneer.
Thanks for posting this recipe. Can’t wait to try it!!