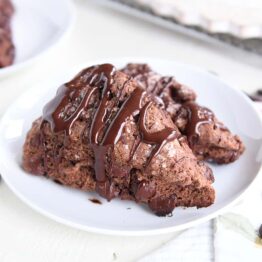
Triple Chocolate Scones
Ultra-chocolatey and super flaky and tender, these triple chocolate scones are fantastic. Bonus: they are super easy to make! And that chocolate drizzle is heavenly.
These triple chocolate scones have been a long time in coming, and they are 100% worth the wait.
Taking notes from this tried-and-true scone recipe, it took a few (ok, a lot) of test runs to get these just right. No one around here ended up being too sad at being forced to eat another test batch of pure chocolate decadent heaven.
If homemade scones seem intimidating, let me assure you with all the confidence in my lazy soul: they are easy. Like, really easy.
And they are perfect for all the chocolate lovers in your life. Seriously, why aren’t we all making scones more often??
Scones vs Scones
I grew up thinking a scone was a piece of flat bread dough fried in oil and then smothered in butter and honey (or cinnamon and sugar).
I didn’t even know such a thing as the classy baked scone existed until I was in my 20’s.
And I’m pretty sure in my ignorance, I argued with at least 3 1/2 college roommates back in the day about what constituted a “real” scone. Spoiler alert: these girls also regularly wore slacks and heels, grew up on the east coast, and were majoring in things like art theory, so it’s no surprise they won the argument and probably spent a great deal of time rolling their eyes at my hillbilly scone theories.
Although initially stubborn (and kind of intimidated), I have since fallen in love with the simple baked scone.
Cutting in the Butter
These chocolate scones are incredibly easy. They are a one bowl wonder. And they come together fast.
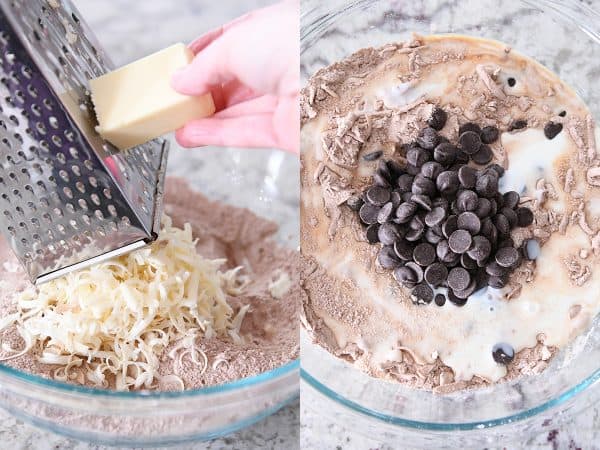
After the dry ingredients are whisked together, the butter needs to be cut in.
Normally, this is a process I despise. But here are two great hacks:
- Use a food processor (makes such quick work of the process) OR
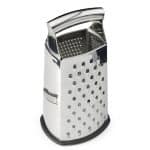
- Grab a box grater and grate the cold butter on the large holes (if you work fast, the butter doesn’t melt in your fingers)
The grating-the-butter trick is my favorite. It’s easy and fast. Of course you can also use a classic pastry blender or two butter knives. You just want the butter in small, pea-size pieces.
How to mix scone dough
After the butter strands are coated with the dry ingredients, toss in the chocolate chips (dark! yum!) and add the buttermilk and vanilla.
Start mixing the dough with a rubber spatula until it comes together in shaggy pieces. Don’t over mix! Literally the mixing process should take under a minute.
If scone dough is mixed too much or too vigorously, the scones will be tough and dry.

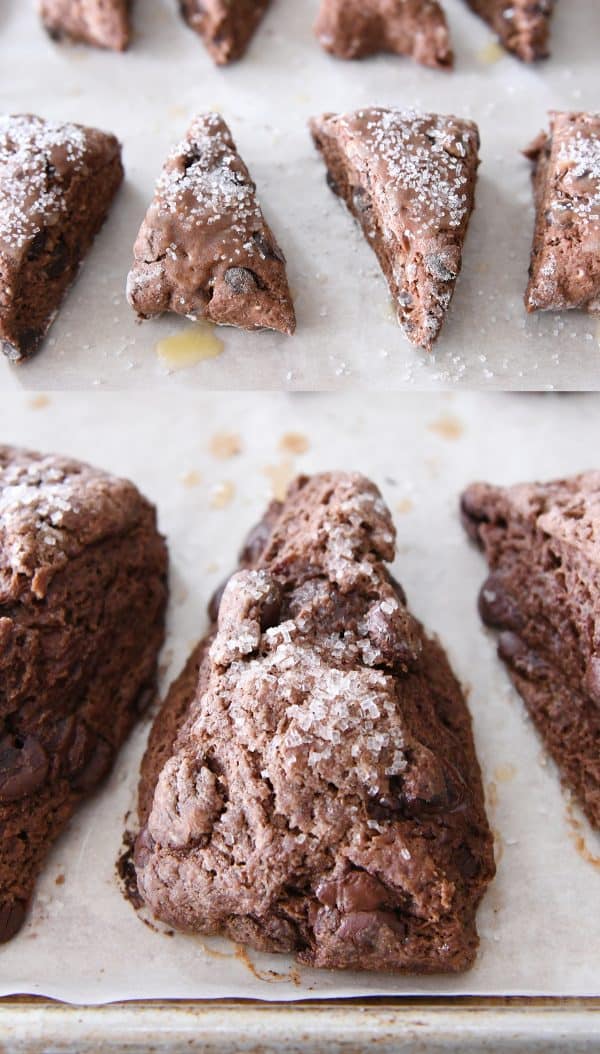
When the dough looks clumpy with a few minimal dry spots, turn it onto a lightly floured surface and pat into a long rectangle.
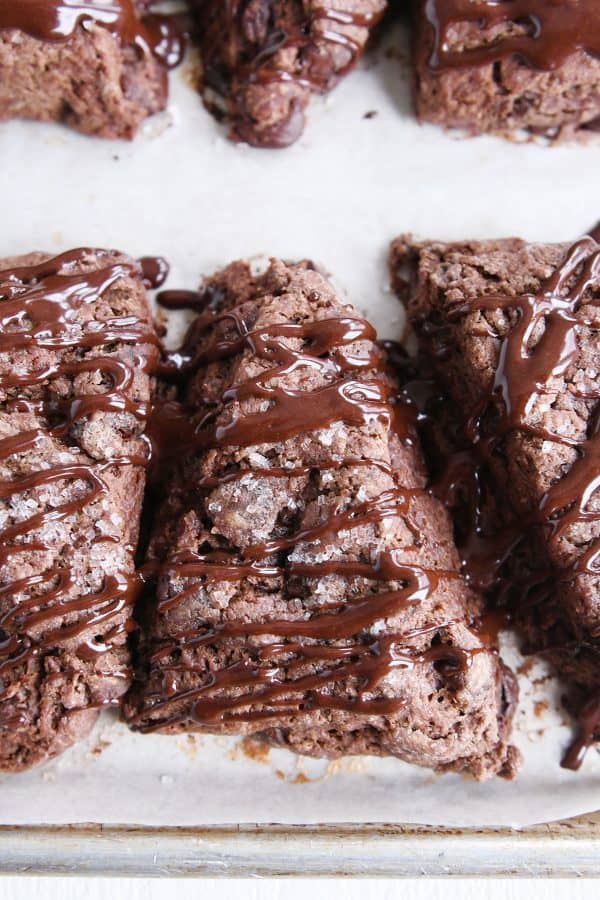
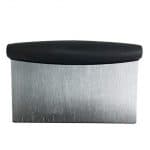
Use a sharp knife or bench knife (my favorite kitchen tool ever) and cut into 12-14 triangle wedges. There’s no real magic number.
Cut them small. Cut them honkin’ big. It’s your choice. Follow your heart.

Don’t Over bake
Place the scones on a parchment lined half sheet pan.
Brush with butter and sprinkle with sugar.
Coarse sugar, if you have it. It adds the most insanely delightful crunchy sweetness on the top of the scones.
Then bake until just set. If you aren’t sure about doneness, err on the side of underbaking just slightly. Over baking the scones will make them dry.
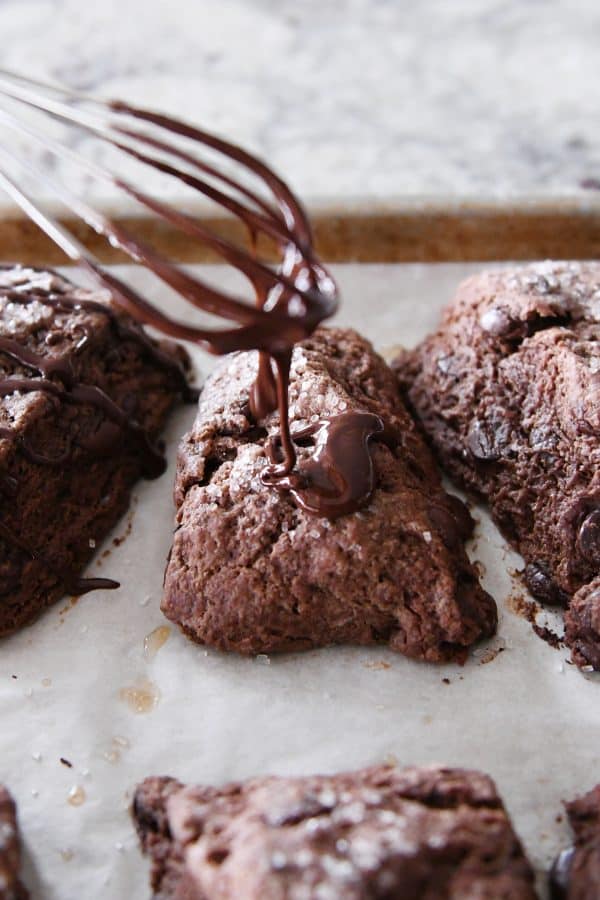
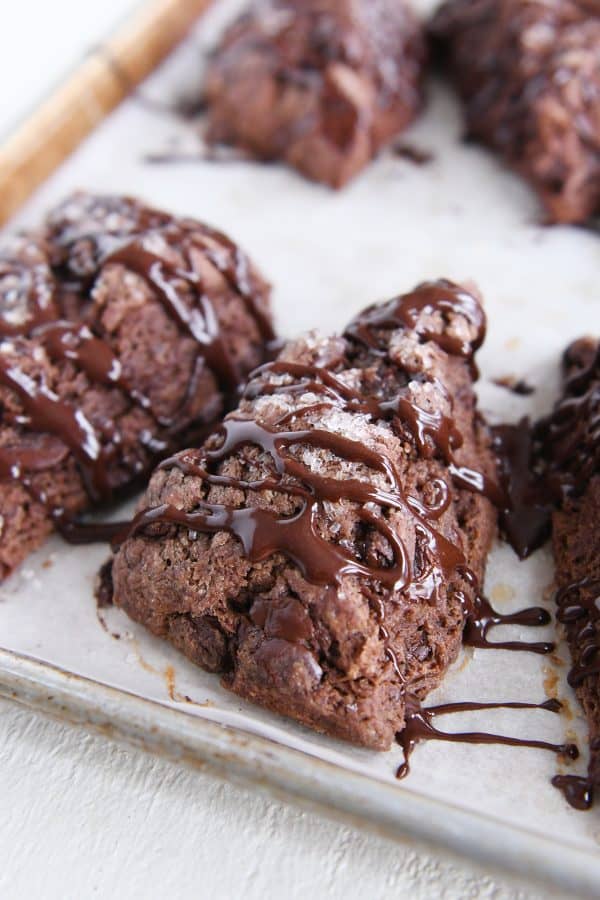
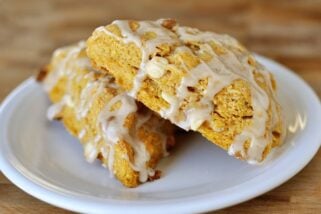
The Glaze
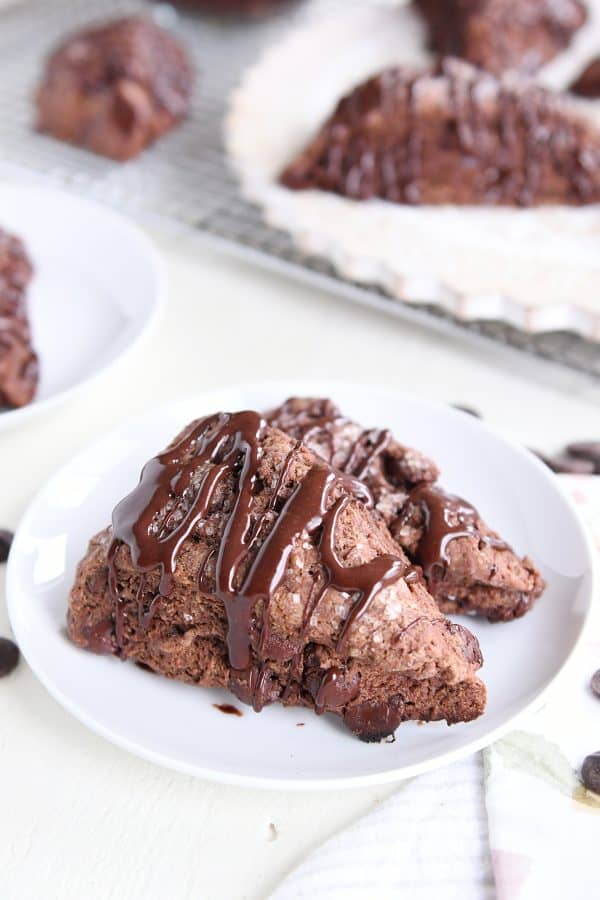
When the scones have cooled to room temperature or slightly warm-ish, drizzle those babies with the decadent chocolate glaze.
I go for the ol’ whip the glaze around with the whisk trick. But you can get fancy and pour the glaze in a bag, snip the corner, and start creating some scone art.
Tipping Scones
If your scones tip or “warp” while baking, never fear. It can be due to a lot of different things like mixing, how the dry and wet ingredients are measured, etc.
This scone recipe and the one it originated from have a slightly higher butter-to-flour ratio because I like my scones ultra-flaky and super soft and tender.
Because of that, they might twist or tip just a bit while baking, but I consider it a small price to pay for the perfect scone.
Sidenote: this scone dough works great baked in a mini or regular scone pan.
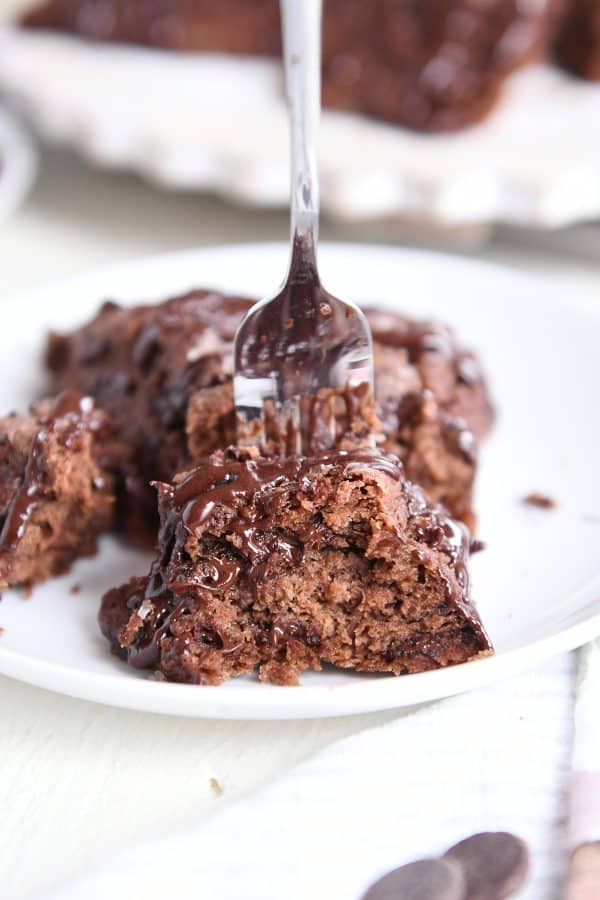
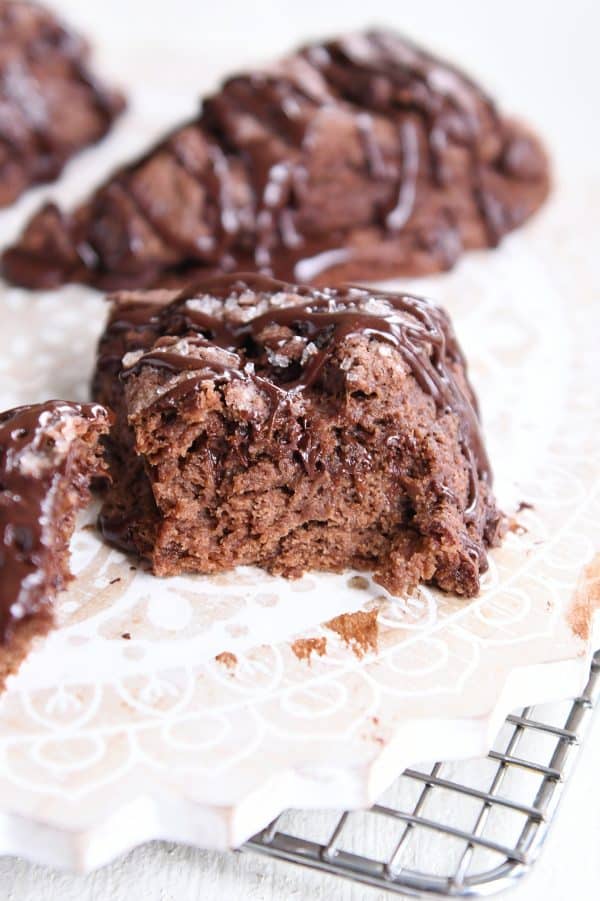
These triple chocolate scones are divine.
My favorite way to eat them is to pop one (or more…) in the microwave and heat for just 15-20 seconds. Just enough to give that glaze and the chocolate chips a very sultry, melty vibe that is irresistible.
Doing this makes even two-day old scones taste fresh as the day they were born.
You’ll either love or hate me for that information.
One Year Ago: Easy Sugar Cookie Bars
Two Years Ago: Quick and Easy Egg Roll Skillet Meal
Three Years Ago: One-Bowl Fudgy Brownie Cookies
Four Years Ago: White Velvet Sugar Cookies
Five Years Ago: Russian Cream with Berries
Six Years Ago: Classic Strawberry Shortcake {With a Decadent Chocolate Version}
Seven Years Ago: No-Bake Berry Yogurt Cheesecakes
Triple Chocolate Scones
Ingredients
Scones:
- 3 cups (426 g) all-purpose flour
- ½ cup (43 g) natural unsweetened cocoa powder (see note)
- ¾ cup (159 g) granulated sugar
- 2 teaspoons baking powder
- ½ teaspoon baking soda
- ½ teaspoon salt
- ¾ cup (170 g) cold salted butter
- 1 cup (170 g) semisweet or dark chocolate chips, regular or mini size
- 1 ¼ cups buttermilk (see note)
- 1 teaspoon vanilla extract
- 2 tablespoons (28 g) butter, melted
- Coarse sugar, for sprinkling (see note)
Glaze:
- ¼ cup (21 g) cocoa powder
- ¾ cup (86 g) powdered sugar
- 2-3 tablespoons milk or cream
Instructions
- Preheat the oven to 400 degrees F. Line a half sheet pan with parchment paper and set aside.
- For the scones: in a large bowl, whisk together the flour, cocoa powder, sugar, baking powder, baking soda and salt. Using the large holes of a box grater, grate the butter into the dry ingredients. Toss to combine so the butter pieces are evenly coated with dry ingredients.
- (An alternative to the box grater is to cut the butter into pieces, add to the dry ingredients and then cut in with a pastry blender or two butter knives until butter is in pea-size pieces. The dough can also be mixed in a food processor.)
- Add the chocolate chips; toss to combine. Add the buttermilk and vanilla extract.
- Mix with a rubber spatula until the dough starts to come together. Don’t over mix! A few dry spots are ok. To test, press a handful of dough together. If it clumps together, it’s good to go. If it’s falling apart, add a few more tablespoons buttermilk.
- Turn the dough onto a lightly floured surface and pat into a long rectangle, about 15X3-inches. Cut into 10-12 triangle wedges.
- Place on a baking sheet about 1/2-inch apart. Brush with melted butter and sprinkle with sugar.
- Bake for 12-15 minutes until just set and no longer doughy (err on the side of under baking just slightly if you aren’t sure).
- Let the scones cool until lightly warm or room temperature.
- For the glaze: whisk together the cocoa powder and powdered sugar. Add the milk or cream and whisk until a thick but pourable glaze forms, thinning with additional milk, if needed.
- Drizzle scones with glaze. Serve scones at room temperature or lightly warmed up.
Notes
Recommended Products

Recipe Source: from Mel’s Kitchen Cafe (adapted from this favorite scone recipe)


My daughter and I lived making these together and they turned out amazing!
These are simply AMAZING!!! I think you are the Queen of scone recipes, Mel! Thank you!!
Will this work using low fat milk? I can’t have all that fat.
Can definitely try!
These turned out great! Your scone recipes are the best. I love the tanginess from the buttermilk. What I always do is make scones the night before and freeze them for the next morning. They baked up great from frozen, and they just required a few extra minutes.
L mske the scones but some rise nice and some slide to the side dont no y but it was delisicious
I made these using Plant Based Butter (Country Crock) and dairy free half and half to make these with dairy free Chocolate Chips and WOW! They were SO good!
I had to go dairy free within the last 7 months and it has been a NIGHTMARE as I grew up with dairy and suddenly have to go No dairy…. (think about that, no chocolate. No cheese… no cream cheese….)
I thought my life was ending. But I have made adjustments (grudgingly) and had to see if I could still bake dairy free….
Because of this recipe, it reignited my passion to bake and allowed me to share with my family. I made 2 different batches and didn’t tell them which was which (dairy free and dairy filled) and they liked them both!
I am SO grateful for such a WONDERFUL and delicious recipe! I will be trying more in future thanks to you!
These are so good! They turned out really soft and moist, which I didn’t expect. So rich and chocolatey and just perfect!
These were delicious! The recipe made so many my family ate them all day for a yummy snack.
Thanks for letting me know, Grace!
We loved these!
I formed the dough and froze them on Thursday and then baked (an extra 5-ish minutes) from frozen on Saturday and Sunday morning, so they were nice and fresh! I added valentine sprinkles to the glaze for the holiday 🙂
Valentine’s sprinkles. So cute!!
I made these for a Valentine’s Day breakfast. I did half whole wheat flour and I cut the scones out with a heart shaped cookie cutter before baking which worked great. They were super yummy!
What a cute idea to cut them into heart shape, Kiersten!
Super Yummy! Comes together easy. My husband gave it 10 fingers up! Fun to make! Thank you Mel for yummy goodness!
The sweet/salty ratio was perfect. They made for perfect valentine breakfast treats. I made them the night before and am excited to try them warmed up the next day.
Thanks, Jessica…so happy you liked them!
Mine turned out with a zucchini brownie texture – probably from over mixing – but they’re still delicious so I’m not questioning too much! I also lost ambition to make the chocolate sauce, so I smeared Nutella on top
I have never in my life had a raging fire in my oven! The butter, even with a large pan to catch any drippings was all over the oven melting from the scones. Smoke every where and then it burst into flames. Scary! My daughter said she has terrible problems with your pie crust with the grated butter doing the same thing. What are we doing wrong? Anyone else had this problem? Our entire house is completely smoked up. I’m 56 and have never had this happen!
Oh boy, that sounds awful, Laurie! Do you mind letting me know what elevation you live at? High elevation can wreak a bit of havoc on baking recipes and I wonder if that might be the cause?
We’re at 422 feet elevation.
What kind of baking pan were you using?
How is this even possible? I don’t understand how the butter oozed out of the pan and into the oven. It sounds like you even used a large pan with edges. Did you mis-measure?
Will try weekend look great
Am I losing my mind or did you post somewhere about Top Ten chocolate desserts to make for Valentine’s Day? I can’t find it anywhere now, and my husband says I must have been dreaming.
Mel sent out an email last week with those top ten chocolate desserts! It wasn’t a dream!! 🙂
Not dreaming. I received one in my email from subscribing to the newsletter.
Thanks Janna and Kelly for helping Brittany. Brittany, they’re right – they were sent out in an email. I can resend it to you if you can’t find it. Just let me know!
Found it! I had to manually look through all my emails, my gmail wasn’t finding it in a search no matter the search term. All’s well that ends well, hooray!
These were moist and delicious!
Glad you liked them!!
AMAZING!!!! Did my normal trick to make scones gluten free, add an egg and subtract 1/4 cup of the liquid (buttermilk for this recipe). Gluten free flour works best with an egg. My family was hesitant about the richness from the double chocolate (I don’t know where they came from!) but were won over!
Thanks for including the gluten free details, Carla! So helpful!!
have never seen this much chocolate in a scone, and I love it, much more so than in a cake, for some reason the texture of a scone pairs much better for me than in a cake!
I can’t disagree!
I woke up this morning wanting to make orange scones and then I saw that you posted this so chocolate scones it was! I made them. Loved them. So did my kids. Great after school snack.
Thanks, Christine! Now you have me thinking that these might be really delicious as a chocolate-orange scone??
Yes, PLEASE, Mel, love a chocolate-orange combo!! What would you suggest?
Orange rind of course, what else??
Definitely some orange zest in the batter and in the glaze – and then I’d probably suggest some orange extract somewhere along the line to amp up the orange flavor.
I WILL be making these scones!!! I love every single recipe I try of yours Mel… thank you! Heading out of town for a few days this week but have buttermilk in my fridge so wondering if you’ve ever frozen these before? If so would you freeze them before you bake them or after?
I haven’t frozen this particular recipe, but I HAVE frozen other scone recipes, and they work great frozen before or after baking!
I made these yesterday. They were so good! Everyone loved them, except for the 2 year old who just picked out the chocolate chips and ate them.
Thank you, Juliana! Glad everyone liked them (can’t blame the 2-year old, haha)
Hi Mel! I made these last night and although they tasted great the dough seemed to flatten out/melt in the oven and they came out more like a cake/brownie than a flaky, crumbly scone texture. Any idea what I might have done wrong? I grated the butter into the flour as quickly as possible and tried to not work the batter too much as I know keeping those butter bits in tact is important for the right texture. I appreciate any insight! Thank you for years of great recipes 🙂
Hi Holly, you might be able to get away with less buttermilk. Elevation and humidity can make a little bit of a difference with the moisture of doughs like this. If you try to make them again, try them with 1 cup buttermilk.
Thank you I’ll try that next time!
The email was barely open before I knew these needed to be made! They were so easy to make and oh.my.goodness! These are delicious! Mine are a bit more on the “rustic” side but no one complained because the oh so chocolatey taste was phenomenal!
Thanks for making them so fast and checking back in to let me know what you thought, Lisa!
Mel- we have your banana chocolate chip scones like every week! That being said, I really struggled with this scone dough…it was just so dry! I weighed all of my ingredients but I had to add lots of extra buttermilk to get it to come together and it was super thick! What am I doing wrong?
Hi Megan, hmmm, I’m not sure. When I tested this recipe I increased the buttermilk (from the original cinnamon chip scones) so I’m surprised the dough was dry, but I’d love to help figure out why and how to fix it. Do you live at high elevation or in a really dry climate? Do you know how much extra buttermilk you had to add?
I have had the same thing with this recipe, I usually add 4-6 tablespoons more buttermilk and I weighed all the ingredients too. But they turn out so yummy, I just always plan to add more buttermilk. 🙂
Yum!!! Can’t wait to try these. I’ve made your buttermilk biscuits many times, and last week when I made your cinnamon chip scones I was wondering…would the melted butter stirred into cold buttermilk trick used in your biscuits also work for scones too? What do you think? I know I’m lazy and just looking for a shortcut 🙂
That’s a great idea, Lindsay. I haven’t tried it, but it’s worth a try!
These look AMAZING. I love making King Arthur’s cream scones lately (just so easy to throw in heavy cream – though maybe not healthy!) if you haven’t tried them you should! I always add chocolate chips. But I’m to have to try this version soon.
Thanks, Anna! I’ve made that recipe before and they are really good!
Oh my!! I am sure my husband would love these. Can’t get enough chocolate for him.
I did not leave a comment on your post about Holli. I sat and read with tears this touching post. This was so heart felt.
Thank you, Charlotte. All of the comments on that post have touched my heart in ways I didn’t realize I needed.
This looks amazing and I can’t wait to try it as my favourite scone recipe ever is your recipe for Chocolate Chip Banana Scones. I like the idea of making that recipe double chocolate – do you think that would work? I could add cocoa powder but not sure how that would impact the recipe overall – would I need to add more buttermilk? Thanks!
Hi Joan, I *think* you could, but you would want to decrease the flour amount for the amount of cocoa powder you use. (So if you use 1/3 cup cocoa powder, decrease the flour by about that same amount)
These look AMAZING! I’ll have to make these soon…..Maybe Valentine’s Day! Thanks Mel! Love all your stuff
They’d be perfect for Valentine’s day!
I was the same as you! Didn’t know about the “real” kind of scones until I was an adult! And I honestly haven’t ever had one. These are looking like the ones I’m going to have to make to break me into the world of “real” scones, they look delicious! Speaking of the kind of scones that you would make for Navajo tacos or to drizzle honey on, I haven’t seen a recipe for those kind on your site (I’ve looked several times), do you have a recipe you like to use for those? I’ve tried many recipes but haven’t found THE one yet. Great tasting ones that the dough is super sticky and hard to work with or ones that the dough is great to work with but it’s just ok tasting once it’s done… that’s about how the recipes have been for me ha! Any suggestions?
Hey Misty, to be honest, I haven’t made fry bread like that in at least a decade and a half, but my in-laws make those types of “scones” all the time. Let me try and find the recipe and I’ll post it here in the comments.
This is our favorite fry bread recipe! You can try and see how you like it 🙂
https://www.cookingclassy.com/moms-navajo-tacos-and-indian-fry-bread/