Buttery, Flaky Make-Ahead Overnight Crescent Dinner Rolls {No Kneading/No Stand Mixer}
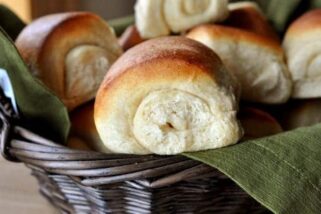
These make-ahead overnight dinner rolls are just might be the crescent roll to end all crescent rolls. Butter, flaky, and SO delicious, they are easy as can be – no kneading or stand mixer required!
I know I sound a little redundant lately.
But seriously, you guys, I am so ridiculously excited about this recipe today!
I guess it’s safe to give the disclaimer, better late than never, that I’m probably going to be annoyingly excited about every recipe I post on this blog.
Because as you know by now, I don’t post filler recipes, and I most definitely don’t post just for the sake of cranking out content to please the search engine and imaginary food blogger gods.
Ain’t nobody got time for that.
But what I DO have time for is finally sharing with you this incredible, and yes, life-changing, roll recipe.
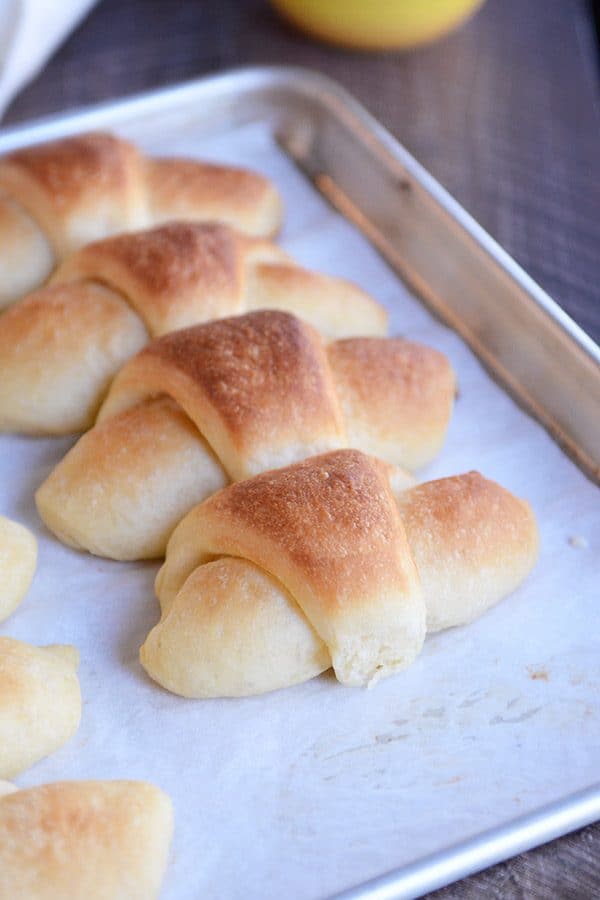
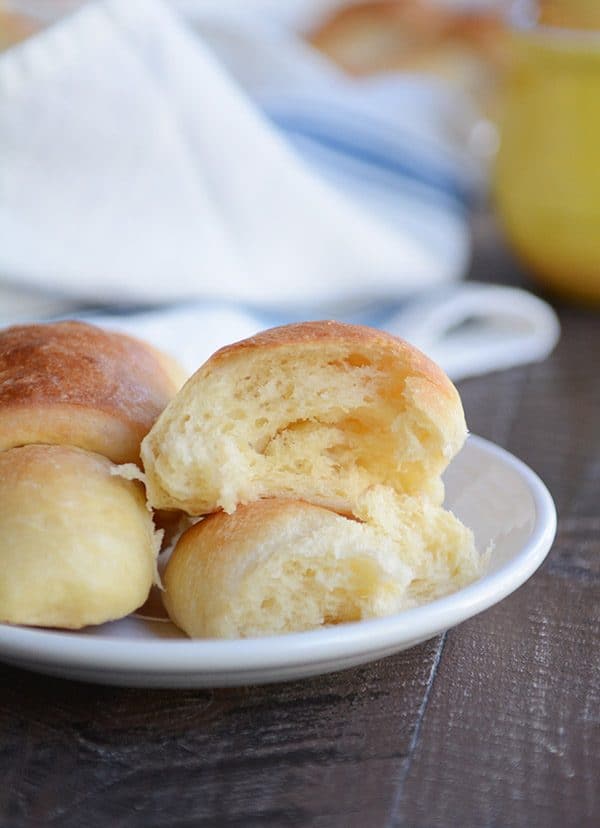
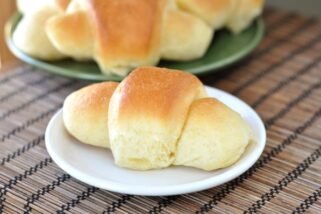
It is make-aheadable. It is easy (no stand mixer or kneading required). And the cute, little crescent rolls are buttery, flaky, tender and PERFECT.
Yes, perfect.
My sweet (made via blogging) friend, Jolie, sent me this recipe months ago. It’s her mom’s crescent roll recipe.
And I was intrigued from the start!
The dough is definitely not your traditional yeast dinner roll dough.
First and foremost, as I already mentioned, you don’t need a stand mixer or dough hook or special kneading equipment for this recipe.
Just a good, old-fashioned bowl and fork. Or maybe a spatula or spoon if you want to get all crazy.
It reminds me a little of the dough in these overnight cinnamon and sugar twists. The ingredients are different, but the method is a lot the same.
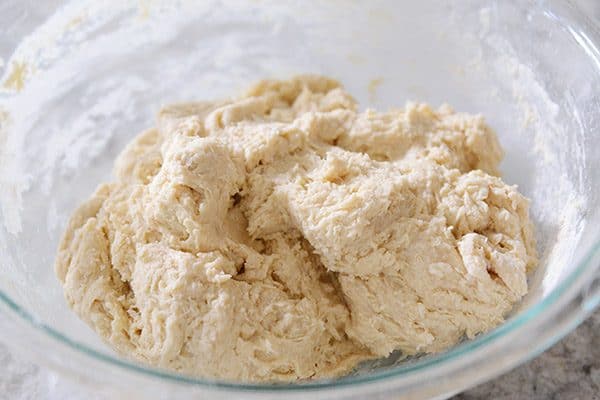
You mix up a rather unusual (ok, let’s call it what it is: lumpy) dough and refrigerate it for at least four hours, but up to four days (believe it)!
Magic happens while that dough rests. Lovely, lovely crescent roll magic.
The chilled dough rolls out like a dream.
And before you know it, you’ll have buttery crescent rolls rising on a baking sheet just biding their time until they are baked to flaky, golden perfection.
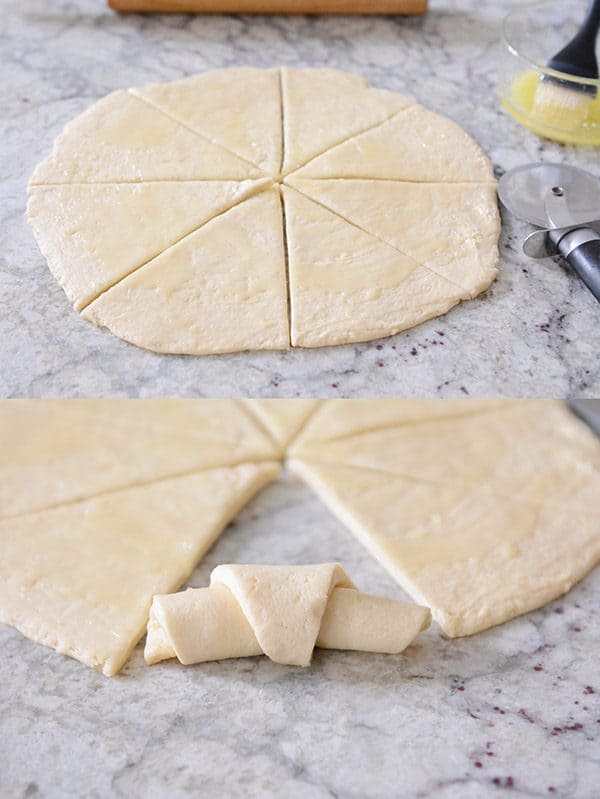
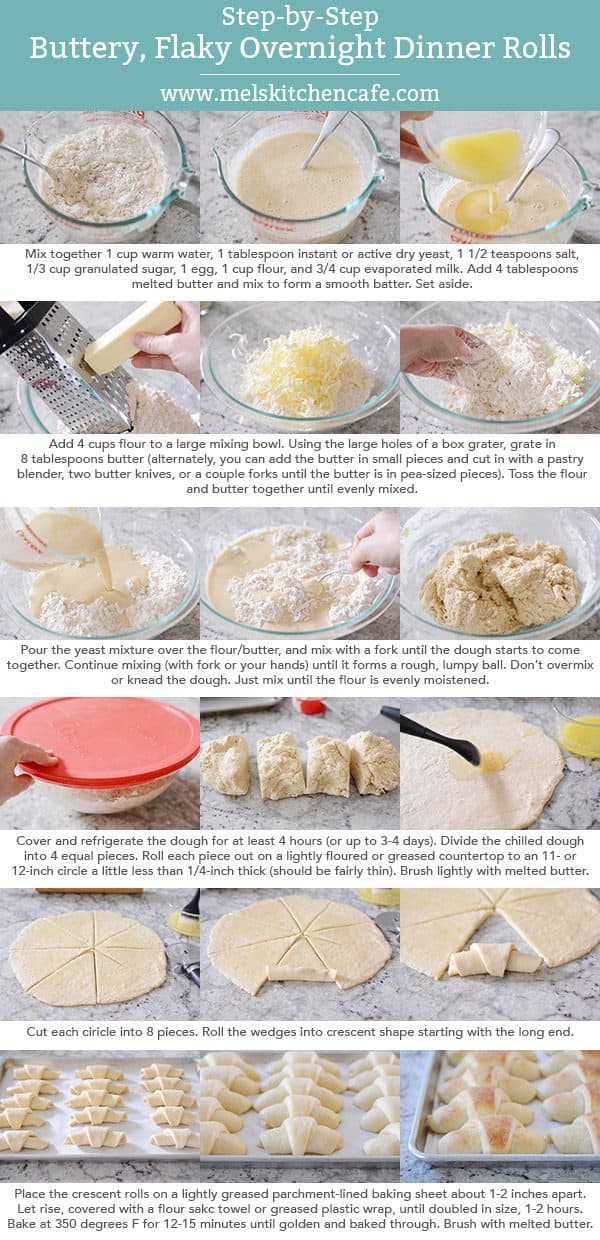
Even though the recipe is simple as can be, I’ve included a quick-glance picture tutorial below.
Just to take some of the guesswork out of the dough mixing, in particular, since it doesn’t exactly follow textbook yeast dough rules.
Honestly, these are one of my family’s favorite, new roll recipes.
And even though I am right there with them (snagging one or five straight off the baking sheet), I can’t help but love them because they are so simple.
The overnight factor is huge when you need a delicious, warm dinner roll without going to hardly any work the day of (details in the recipe and notes section how to make this happen).
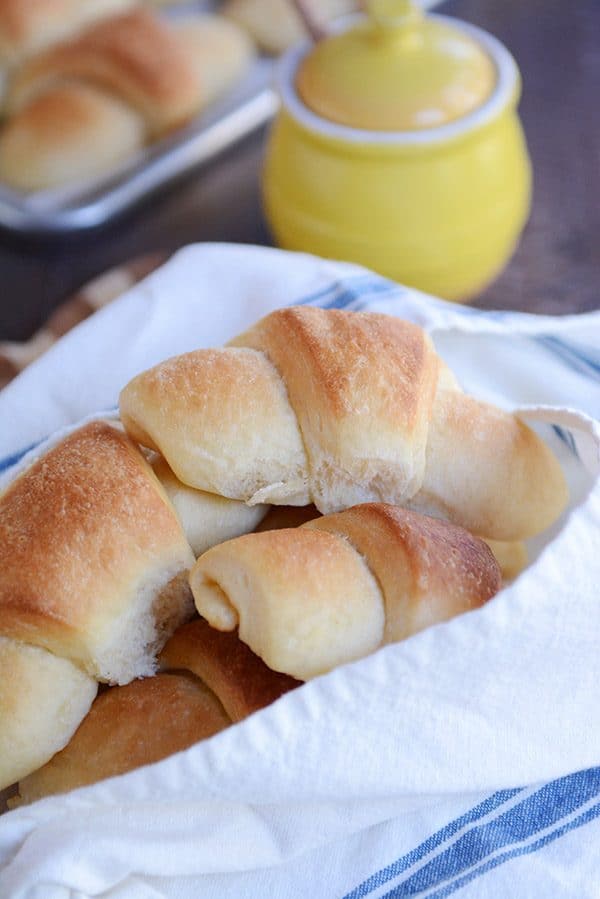
Looking for the perfect roll recipe for Thanksgiving?
Or maybe another upcoming holiday menu?
Or just because you need overnight dinner rolls in your life? A very valid reason, in my book.
I hope these buttery, flaky, crescent numbers make the cut.
One Year Ago: Skillet Honey Garlic Chicken {20-Minute Meal}
Two Years Ago: Chocolate Cream Pudding Pie with Graham Cracker Crust
Three Years Ago: Warm Russian Tea
Four Years Ago: Healthy Applesauce Carrot Muffins {a.k.a. Carrot Cake Muffins}
Five Years Ago: Whole Wheat Blender Pancakes
Make-Ahead Buttery, Flaky Overnight Crescent Dinner Rolls
Ingredients
- 1 cup warm water
- ¾ cup evaporated milk
- ⅓ cup (71 g) granulated sugar
- 1 tablespoon instant or active dry yeast
- 1 ½ teaspoons salt
- 1 large egg
- 1 cup + 4 cups all-purpose flour
- ¼ cup (57 g) salted butter, melted
- ½ cup (113 g) salted butter, chilled
- Melted butter for brushing dough and baked rolls
Instructions
- In a medium bowl or 4-cup liquid measuring cup, whisk together the water, evaporated milk, sugar, yeast, salt, egg, and 1 cup of the flour. Add the melted butter and mix until a smooth batter forms. Set aside.
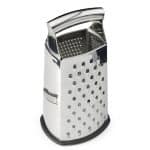
- In a large bowl, add the remaining 4 cups flour. Using the large holes of a box grater, grate the 1/2 cup chilled butter into the flour. Toss the flour and butter together until evenly combined. Alternately, you can cut the butter into cubes and cut it into the flour using a pastry blender or two butter knives (or forks) until the butter is in pea-sized pieces.
- Pour the yeast mixture over the flour/butter and use a fork or spatula to mix until the dough starts to come together. Mix just until the dough forms a rough, lumpy ball and the flour is evenly moistened (see tutorial above).
- Cover the bowl and refrigerate the dough for at least 4 hours and up to 3-4 days.
- When ready to make rolls, divide the chilled dough into 4 equal pieces. Roll each piece (or one at a time, depending on how many rolls you want to make – the remaining dough can go back in the fridge) into an 11- or 12-inch circle about 1/4-inch thick or slightly less than. It should be fairly thin. Brush the dough circle with a tablespoon or two of melted butter.
- Cut the circle into 8 equal pieces. Roll each wedge into a crescent shape starting at the wide end. Place the rolls on a parchment-lined baking sheet a few inches apart. Cover lightly with a towel or greased plastic wrap and let rise until doubled in size, about 2 hours.
- Preheat the oven to 350 degrees F. Bake the rolls for 12-15 minutes until golden and baked through. Out of the oven, brush the tops with melted butter, if desired.
Notes
Recommended Products
Recipe Source: from Mel’s Kitchen Cafe (adapted slightly from Jolie, a cute MKC reader, who sent me her mom’s crescent roll recipe – I reduced the butter in the dough by half, grated butter into the flour, rolled them slightly different)


I made these for our Thanksgiving dinner and I honestly think they may be the best rolls I have ever had. They were light and flaky and buttery. And were quite easy to make as well! As I was eating them I was imagining a chocolate or fruity filling in them to make them into a breakfast treat! So after I finish writing this I am going to look for a filling I can add to the other half of the dough that I have left. Thanks so much for this recipe. I know it will be one that I will go back to again and again!
Thanks, Rebekah! I also have a few ideas up my sleeve to transition these to a sweet roll. Someone commented they made fabulous cinnamon rolls!
Mel! These were so good! And easy to make. Loved them. I mentioned to my husband that you have another crescent roll recipe and he looked at me and said (very seriously) “please don’t change this recipe” . Score! Thanks Mel. Happy Thanksgiving
Haha, I love that! Glad you enjoyed them; thanks for taking the time to let me know!
Best rolls I have ever made! And sooooo easy!
Yay, yay!
I decided to make these for Thanksgiving and they were awesome! Much easier than the version I’ve always made. Thank you! I don’t comment often but use your recipes all the time and recommend your site to many!
Thanks for taking the time to comment and let me know, Brooke!
First time making rolls, but your recipes rarely fail me. Very well received, nice and buttery and very easy to make.
It probably was a huge gamble to try these out for our Thanksgiving guests without having a backup plan, but boy did I hit the jackpot. Hooray for such an easy roll that tastes great and can be made in advance!!! Love your cranberry sauce, too, Mel (and I have never liked cranberry sauce…I just made it because my dad does, but even I thought your recipe was yummy)! Oh, and your coconut cream pie has been my favorite for several years now. It was a hit again today. I wasn’t in charge of meat this year, but have made a few of your ham and turkey recipes. You pretty much make all our holiday meals yummier. Thank you!
Thank you, cute Lindsey!
These rolls are the easiest, yummiest crescent rolls ever! My only problem was that they disappeared FAST. Next time, I will have to double the recipe!
Glad they were a hit, Lisa!
I did a test batch to see if I wanted to serve them for Thanksgiving. They came out perfect very light and fluffy. Couldn’t ask for anything more for the little amount of work. I froze the butter and grated it and I had the flour refrigerated. That way it incorporated very easy without any big clumps. Thanks for the great recipe.
Thanks for reporting back, David!
I don’t have a bowl that has a lid with it? Is it ok to just keep it in a large mixing bowl and cover it with press and seal wrap? Then maybe aluminum foil over the top of that too?
Yes! That will work great. Or just every day plastic wrap.
Have you tried using bread flour or should you just stick with all purpose flour? I always use bread flour for my go to yeast roll recipe. I can’t wait to try this recipe! Thanks!
I haven’t tried bread flour, Patti, so I’m not sure how it would fare – good luck if you try it!
Hi Mel – I’m intrigued by the make-ahead ease of this recipe and am considering using this recipe for Thanksgiving. I’ve made a number of your yeast bread recipes before, all with great success, and so I’m trusting your recommendation! Here’s my question if you have any advice in this area:
I’ll be bringing the rolls to my uncle’s house (about 40 minutes away) for dinner at 2:30. I’ll probably make and shape them the day before and then take them out to rise Thursday morning. Do you think they’ll manage okay unbaked in the car, even if it’s cold out? There should be time to pop them into the oven there before we eat. Or would you recommend partially or fully baking them at home and then just warming there? Thanks for any tips you can offer!
Well personally I get a little nervous traveling with unbaked rolls – worrying if they’ll overrise before we get there or deflate in the bumpy car ride, etc. If you can manage those factors, I think it would be fine to take them unbaked (especially if you have time to take them straight out of the fridge, into the car, then let them rise on the ride and continue to rise at the destination before baking). But I also think it would work fine to completely bake them at home and serve them when you get there. Good luck!
Um…these were the most amazing, delicious, flakey, tender, EASY specimens to ever come out of my kitchen!
Yay, yay! Thanks, Katie!
I just put my dough in the fridge… crossing my fingers I did it right. One question…should the yield be 32 since it’s 4 circles of 8 slices?
Haha, good catch on my math error! Yes, you are right, 32 rolls. 🙂
Mel: Completely random question….I am in the process of building my beach house (yay!) and I love love love the counter tops shown in your pics for this recipe (which, btw, I plan on trying along with your apple crumble pie for Thanksgiving this year). What type of stone is it? And do you remember the name of the stone? You know, a cook’s kitchen is her (or his) castle!
Thanks again for responding to this random question!!!
Hi Leah – so fun about a beach house! Our countertops are granite and the name is Bianco Romano. 🙂
Thank you! Have a wonderful holiday!
Hi Mel – we live at about 7600 feet elevation in Western Colorado-wondering if I should adjust ingredients for that?
Honestly, I’m not sure. I haven’t tried these at high elevation like that, but just based on when I used to live at 6,000 feet, I’d probably add a few more tablespoons flour.
Mel,
Hello! I love your blog and go to it often.
I tried to email you but it did not work…. so here it is. It is at least related to rolls. 🙂
I have a question about freezing rolls and wanted to get your take on it. I have a couple of go to roll recipes that I love and my kids LOVE. I get the responsibility of making rolls among other things for thanksgiving this year! I love making rolls, however this year I am running a half marathon on Thanksgiving morning. So I am hoping to simplify Thanksgiving morning. My running partner gave me a freezer roll recipe that she loves. I made those but they were not nearly as good as our favorites. Do you think I could just make our roll favorite recipe and freeze them after the first rise and after they have been shaped (this is what the other freezer roll recipes have done). Is there something different or special about a freezer roll recipe verses a regular roll recipe? I really am hoping for no rolling or shaping on Thanksgiving. And at the same time Thanksgiving rolls are a big deal (hence running the half marathon so I can have a free roll pass) Any help you can give would be great!
Thanks!
April
That’s a great question, April. I haven’t ever seen a recipe that’s a specific “freezer roll” recipe but *most* roll recipes do quite well being frozen. So I make the dough, let it rise, shape it and put it on a sheet pan (usually parchment lined) and then freeze (once the rolls are frozen completely, you can pop them off the tray and put them in a ziploc bag). Then the rolls can be thawed similar to rhodes roll dough – placed back on the tray (if you took them off) and thawed, covered with greased plastic wrap, for probably 5-7 hours? Kind of depends on the size of the roll. Once they’ve thawed and risen, you can bake them like normal. Good luck with your half marathon!
How do you think these would do as cinnamon rolls?
Intriguing idea! I think they could be very delicious!
These rolls turned out so great! Had 1/2 as regular rolls and 1/2 as cinnamon. SO good!! And so easy! I’ve been trying to break out of the quick bread arena and work more with yeast and this was the perfect opportunity. Thanks!!
Thanks for checking in to let me know that, Patti!
Is grating/pastry blending in the 2nd part of the butter super important? What would happen if I just melted it w/ the rest or softened it? You mentioned you changed the recipe, so wondering if that’s how the original was.
The original still has the butter cut into the flour in pieces – it’s pretty important to the recipe so that the rolls are flaky and tender (those butter pieces, whether grated or just cut in with forks or a pastry blender) act similar to a pie crust. As the rolls bake in the oven, the butter pieces melt and the water in the butter evaporates making the rolls flaky and super tender. So I don’t think adding in melted or softened butter would have the same effect.
I’m back to report they were everything you said they’d be! Super easy (definitely a great recipe for beginners!), and so, so delicious! I forgot to butter the first circle after rolling them out (even with the melted butter right there! Sheesh.), so I unrolled them, buttered them, and rolled them back up. Those were probably the ones that unrolled in the oven. 😉 We had four 11yo boys joining us for dinner and the rolls were gone so fast! My family can’t decide if these will be our Thanksgiving rolls or if we should have our go-to make-ahead rolls. What a quandary! 😉 So, so good, Mel! Buttery, flaky, mmmmm…. 🙂
Thanks for reporting back! So happy they worked out and were a hit with those 11-year old boys. 🙂
They are definitely both a delicious option!
I’m back! I actually kept one circle-worth of dough in the fridge overnight when I first made them just so I could see how they’d compare doing the overnight method. Same! Awesome. Also, I nearly died seeing myself quoted in the newsletter by my favorite food blogger! That was a fun surprise! 🙂
Haha, you are so cute! I’m glad the 2nd round was equally as delicious!
I already have 2 crescent rolls recipes, but I’m intrigued by this one and will try it out next week for Thanksgiving. I’m trying the apple crumb pie and your sour cream pie crust. Oh, AND the boiled-shredded-baked ham. So, everything new I’m trying this year is from your your blog! Also making sour cream lemon pie and a jello recipe that is a family tradition. And a pumpkin pie (though I actually prefer pumpkin cheesecake to pumpkin pie) BTW, I’m looking forward to your gift guides. Hope to see them soon, especially one for games!
Such a yummy lineup for the big day, Holly! And that game gift guide is going up tomorrow!
Wahoo! Can’t wait!
Please tell me–how do roll your dough in such a nice circle. I try and try and can’t do it!
I don’t know if I have any magic secrets other than starting with it in a disc shape (I mold the piece I’m going to roll into a circle) and rolling from the center out – rotating the circle of dough about 90 degrees every so often.
Ok, I’ll give it a try! Thanks for the tip!
I must know what oven you have. Your bread is always perfectly browned on top. I’m beyond frustrated with my current oven.
Hey Sherry – I have an electric Maytag oven (with a split oven). One thing I’ve found to get better browning is to move the oven rack to slightly above the center position and increase the oven temp by 25 degrees if your rolls/bread aren’t browning.
Oh man, its hard to imagine these being better than your cornmeal crescent roll (je adore!), but I will have to try them to see!!
Would this dough work to use for making chicken pillows? I’ve never made crescent roll dough, so I’m excited to try it out.
Yes! I think it would work great. In fact, I’m totally using it for chicken pillows for my husband’s birthday in a few weeks. It’s his birthday meal request. 🙂
I’m gonna make these right now!! How many rolls does the recipe yield? If I double, do I need to change anything?
The yield is right above the recipe title; it makes 36 rolls. And no, you shouldn’t need to change anything if you double the recipe.
Oh wow, those look amazing. I really love your cornmeal crescent rolls, but these are intriguing. There is a lot of butter–I can’t imagine that the original recipe was double this amount. No wonder they are yummy. I will definitely have to try these soon.
Crescent rolls are something I’ve long wanted to try making but have been overwhelmed by the process. These look much more doable!
I’m going to make these! I was going to do a test run of the cornmeal rolls, but the ease of the dough on these have swayed me over!
Also, a BIG thank you for sharing step-by-step instruction photos and notes. I’m a big visual learner, and sometimes I cook like Amelia Bedhelia. Photos help take the guesswork and scariness out of yeast breads!
Haha, your Amelia Bedelia comment had me laughing out loud. 🙂
Mel, I’m so glad these made the cut for your blog! They are just the best rolls ever! (And I’m so amazed by the commenter above who said she’s used this recipe for years since I have NEVER found anyone else who did!)
I read a few of the comments asking about making ahead and freezing. Although I haven’t frozen the dough, I’ve made them and frozen the baked rolls. I just figure I’ll do the mess of rolling and shaping once, and then pull them out as desired. If you slightly under bake, then you can brown them quite nicely after freezing.
And they are perfect for a meal like Thanksgiving—make them a couple days ahead and then all you have to do is roll and shape and rise the day of. Sometimes, if we aren’t having a lot of people, I’ll do half the dough for Thanksgiving and use the rest a day or two later for really fresh rolls with leftovers.
All that said—these tend to be my special rolls, since they require more fridge time. I use the buttery cornmeal ones frequently as well!
Thanks for adding your two cents about the freezing part, Jolie! So happy you sent this recipe to me. I think people are going to LOVE them!
Although, I’m still loyal to the full butter amount and cutting in the butter 😉 I always cut the butter a bit bigger than grating would do—my recipe called for “kidney-bean sized” chunks. I think it aids in the flakiness of the rolls. I also always make 48 rolls with this recipe—my circles are a bit bigger and then I roll them with more layers. But your tweaks look they yielded some happy rolls and happy eaters!
Ok, what roll recipe are YOU making for Thanksgiving?! I want the best one! Cornmeal one, this one, another one?????
I’m making these ones (the ones I posted today)!
These look amazing Mel, thanks! What ratio of wheat flour do you think would still yield good results? (Freshly ground…?)
Hmmmm, good question, I kind of knew someone would ask me that! And I haven’t actually subbed in any wheat flour (yet). I think you could probably try half wheat flour (so 2 to 2 1/2 cups), but measure it with a very light hand since it is more dense than white flour. If you have a scale, I’d probably only do about 4 to 4 1/4 ounces for each cup of wheat flour you use.
Guess what’s in the fridge to have with dinner tonight? I’m so excited!!
Yay, yay!! I’m so excited. Let me know what you think!
I have a question – with regular crescent rolls you dont need to rise after shaping your dough. would this be possible with this dough. I have to admit i am a last minute cook so if i was making this dough while easy not sure if i have the time to wait for another hour to 2 to let the dough rise.
Has anyone tested what happens?
Do you mean storebought crescent rolls? These homemade rolls are much softer and puffier…probably due to that 2nd rise. You could probably skip it if you don’t mind the rolls being less light and fluffy. I also included some notes below the recipe of how you could shape and refrigerate the rolls overnight and just pop them out of the fridge in the morning to rise for a few hours before baking. Maybe that would help?
Do you know any reasoning behind the evaporated milk? Just want to make them without having to run to the store,,,
Hey Stella – I tried this recipe with regular milk and it didn’t work (rolls were tough and kind of dense with a weird texture). Since evaporated milk is basically milk that’s been boiled down until the water content is reduced…you might try scalding or boiling 1%, 2% or whole milk on the stovetop to see if that will help approximate the same properties of evaporated milk (just let it cool to room temperature before using).
Mel- these look amazing!!! Your other buttery cresecnt roll is my favorite! I’m still so new to gluten free baking- I don’t know enough about yeast and proofing and all that stuff. Dare I ask if you think this might work with a standard all purpose gluten free flour? (Fingers crossed!!) Thanks a million!
That’s a really great question – and I honestly don’t know! My inclination is to say that it may not work exactly like all-purpose flour, but I also think anything is worth a try if you are up for an experiment!
I’ll report back! Thank you!
I’d love to hear how they turn out! I had the same question!
Same here!
I just made a gluten-free batch of these today. They turned out so delicious! I used Cup4Cup gluten-free flour (I think this type works the best for rolls because of the powdered milk). I followed the recipe the same, the only caution would probably be to add most of the flour and then add extra if it seems too wet until it’s not too sticky. I’m so glad I tried it because I have missed these rolls so much!!
That’s amazing, Whitney! Thanks for detailing your experience for others!
Do you think it would work to make the dough and freeze it -and then thaw it, roll it up and bake it? I love anything I can do ahead in batches.
Instead of freezing the big batch of dough, I’d probably get to the shaping part and freeze the rolls after they’ve been shaped. But that’s just me (I don’t always like the texture of yeast dough after it has been frozen and thawed in one big mass vs freezing the smaller, shaped rolls).
I’ve always been so intimidated by yeast breads, but I think I need to give these a try! Anything that can rest for more than 24 hrs is usually something I can do!
Mel this year is my first year doing rolls for thanksgiving and I’ve never done rolls before. Is this a good beginner recipe?
YES! This is the perfect recipe for beginners because it doesn’t require any kneading time or worrying about the exact texture and consistency of a more classic yeast dough. I’m pointing everyone to this recipe who is a newbie roll maker! Plus, the rolls are so fabulous, it’s perfect for expert roll makers, too. 🙂
Hi! These crescent rolls look amazing! Do you know if the salt and sugar content can be reduced? I was just put in a low salt or no salt diet and my daughter has to watch carbs so any reduction would be great! Any ideas ? Thank you !
Sure, you could definitely play around with both of those amounts…I haven’t reduced either, but it should work out ok (just keep in mind the rolls might have a bit less flavor if reducing the salt and/or sugar).
Forgot to mention: I can make Cinnamon Raisin Bread (can’t taste the whole wheat flour, but it adds fiber) with my recipe for refrig crescent rolls, so your recipe would make 2 loaves……..
grease/flour loaf pan(s)
divide your dough recipe in half
on lightly floured surface, roll dough into two 10×10 inch squares
sprinkle with cinnamon sugar, then with raisins
roll up tightly, pinch/seal edges
Place in prepared loaf pan(s)
Cover with plastic wrap, let raise about 1 and 1/2 hours
Bake in preheated 350 degrees oven
27 to 35 minutes (not sure of time when baking 2 loaves)
NOTE: also use my crescent dough for dinners and desserts such as……..sloppy joe braid, taco ladder, pizza braid, garlic chicken pizza pie, sausage calzone, ham cheese spirals, chicken crescent pockets, apple pie braid, fruit dessert pizza, holiday brunch bake……any recipe that calls for refrigerated crescent dough.
Thanks, Janet!
I’m going have to run out and buy some evaorated milk. These look light and flaky. It’s just me and hubby and we could but shouldn’t eat them all. Do you think they can be frozen before baking?
Hi Ursula – I haven’t tried it, but I suspect these would freeze great before baking!
How long can you keep them in the fridge? Could you freeze the dough? I only need a dozen? They sound so easy.
Eileen, you could cut her recipe into 4ths and make just one batch, or half her recipe and make 12 bigger crescents…..bake longer
Hi Eileen – you can definitely halve the recipe OR make the full batch and freeze the rolls once they are shaped (but unbaked).
Also, the dough will be fine in the refrigerator for up to four days (and honestly, probably a few days longer than that, too).
Your recipe will help a lot of people, especially those new to making rolls.
I created a similar recipe several years ago that has part whole wheat flour. It makes the equivalent of 2 cans refrigerated crescent rolls or one large sheet of dough. Love that I can have crescent rolls/dough for so much less than buying the canned, and I know the ingredients used, no preservatives. My recipe uses just water, but reading over yours, I might add a couple of Tablespoons dry milk to the flour to compare results.
Does this double well or am I better off making separate batches?
I haven’t doubled it, but I suspect it would do just fine as long as your bowl is large enough!
Another recipe to try! If I only need 16 rolls, do you know if it’s ok just to half the entire recipe?
Thanks
Yes, you could halve the recipe OR make the full batch and only use half the dough and keep the other half in the fridge for another time.
Eeeek! They look amazing! I can’t wait to make them!
Hope you love them!
Don’t you just hate it when you give a perfectly good recipe and then someone comes along and asks if you can change it? I love the idea of doing ahead and baking later, and am wondering if I could shape them more into a dinner roll for sandwiches? I’m having BBQ turkey for a large family thanksgiving, and would like a roll they can either eat on the side or use for a sandwich. Thanks Mel!!
Haha, I’m used to it! 🙂 I actually don’t know if these would fare very well as classic round dinner rolls – mostly because of the texture of the dough (and I think it might be hard to get a nice round ball shape), but hey, I believe almost anything is worth a try. Good luck if you experiment!
I was all set to make the cornmeal crescents from awhile ago…… until i saw these.
now what………… I am all about make ahead this year because of my work schedule, so these will probably win out.
Yeah, I think you should definitely make these, Barb – they are amazing!
These rolls look deliciously mouth-watering! I really appreciate your step-by-step illustration! Thanks for sharing the recipe, Mel!
Thanks, Deb!
My aunt gave me this recipe over 50 yrs ago and have beers making for special dinners ever since. It is delish! Always compliments.
That’s awesome!