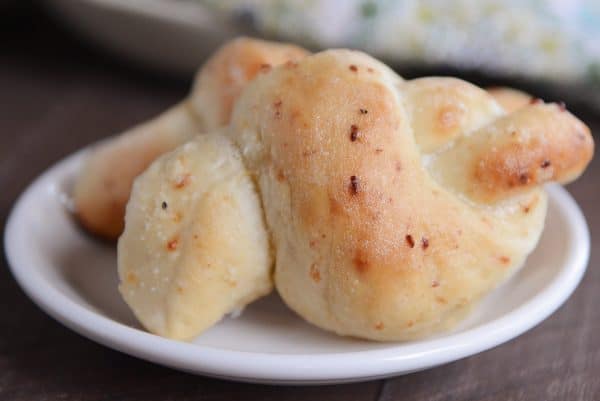
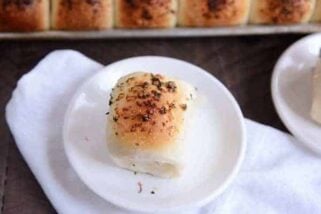
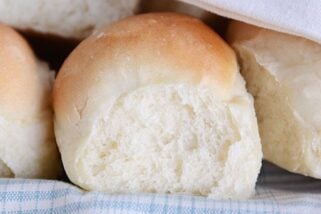
Easy Parmesan Breadstick Knots
These easy Parmesan breadsticks knots are buttery, fluffy, and so good! Easily some of the best bread to ever come out of my kitchen.
There are four simple tips that make these homemade breadstick knots absolutely incredible, and I’m sharing them with you today!

Four Tips to Make the Best Bread of Your Life
The dough for these Parmesan breadstick knots is very easy and straightforward (it originates from these divine 1-hour breadsticks).
What sets them apart from the crowd are these four tips:
- swapping out all-purpose flour for bread flour (result: insanely fluffy and chewy bread)
- adding freshly grated Parmesan cheese to the dough (result: delicious, punchy flavor)
- forming the breadsticks into knots (result: puffy, thick breadstick knots)
- liberally brushing with butter hot out of the oven (result: BUTTER 😍 need I say more?)


How to Shape Parmesan Breadstick Knots
Forming the breadsticks into knots is super simple.
- Portion the dough into 12 pieces (about 2.75 to 3 ounces each).
- Roll each piece into a thick breadstick shape about 6 inches in length.
- Lift one end over the other creating a loop.
- Bring the end through the loop forming a knot.


Don’t stress if your knots don’t look perfect! Most imperfections go the way of the world once the breadsticks rise and bake. And I promise, they’ll taste phenomenal no matter how they look.
Here’s a quick 30-second video tutorial for an additional visual, if you need it ⬇️⬇️:
Best Bread in the Whole World
These easy Parmesan breadstick knots are incredible. Like, they are one of our most oft-made bread recipes.
They are fast. They are easy.
They are gorgeous. And they are amazingly delicious.
Plus, they pretty much can be served with anything. Pasta, soup, pot roast. You name it.
My daughter loves them so much that she often makes a batch just for herself and then strategically hides them from her brothers so she can take one or two in her school lunches all week.

Rave Reviews
If you’re looking for the perfect carrot cake – moist, fluffy, EASY – to make for a crowd, this is it!
⭐️⭐️⭐️⭐️⭐️ Divine. Perfection. So easy. SO yummy. Making these makes me look like a domestic goddess, all thanks to Mel. -Katie S.
⭐️⭐️⭐️⭐️⭐️ What?!?!? Absolutely incredible bread in under an hour?!?! Perfection! So fluffy and flavorful. My husband (who is not a bread-guy) ate 4 of them….and would have continued, but he ruefully excised himself from the table so that he wouldn’t have to face the temptation of more. Sooo good! Make these!!!! -Maichael
⭐️⭐️⭐️⭐️⭐️ Just had these with lasagna! Sooooo good!!! -Alisha O.
If you haven’t tried these breadstick knots yet, make them ASAP! I promise you won’t regret it.


Parmesan Breadstick Knots
Ingredients
- 1 ½ cups warm water
- 2 tablespoons granulated sugar or honey
- 1 tablespoon instant yeast (see note for active dry yeast)
- ¾ teaspoon salt
- 1 teaspoon garlic powder
- 3 to 3 ½ cups (426 to 497 g) bread flour or all-purpose flour
- ½ cup (57 g) finely grated Parmesan cheese (freshly grated is best)
- 3 tablespoons salted butter, melted
Instructions
- In the bowl of a stand mixer fitted with the dough hook, combine the water, sugar or honey, yeast, salt, garlic powder, and 1 cup of the flour. Mix to combine. With the mixer on low speed, add the cheese and then gradually add the flour until the dough forms a ball and clears the sides of the bowl.
- The dough should be soft and slightly tacky to the touch. Knead for 4 to 5 minutes. If the dough starts clinging to the sides of the bowl (or the center column of a Bosch mixer), add additional flour, as needed. Take care not to over flour the dough.
- Cover the bowl and let the dough rest for 10 to 15 minute (or up to an hour; it's totally fine if the dough doubles in size).
- Spread the melted butter on a half sheet pan (11X17-inch rimmed baking sheet).
- Turn the dough out onto a lightly greased countertop and cut the dough into 12 even pieces, about 2.75 to 3 ounces each.
- Roll each piece into a thick strip about 6 inches in length. Lift one end over the other creating a loop. Bring the end through the loop forming a knot. See the pictures in the post for a visual.
- Place the breadstick knots an inch or so apart on the prepared baking sheet. Let them rest until noticeably puffy, anywhere from 15 to 30 minutes.
- Preheat the oven to 400 degrees F.
- Bake the breadsticks for 15-16 minutes until golden. Brush with additional melted butter out of the oven, if desired (not necessary, but delicious).
Notes
Recommended Products


Recipe Source: from Mel’s Kitchen Cafe (originally published in my 2016 eCookbook – no longer for sale)


I don’t know what it is about these that makes them so amazing, but they are SO delicious! My whole family loves them and I don’t even want to admit how many I have eaten in one sitting. Ha ha!
Ha, you and me both!
These Parmesan knots are INCREDIBLE in every way!!! They taste amazing and are SO EASY to make! I have made them countless times and will continue making them! They are eaten so quickly and I love serving my family such delicious food. Thank you for the yummiest recipe ❤️
So happy to hear that – thanks, Julie!
Excellent!! Easy to make and my family devoured them all!
I’ve had my eye on this recipe for a while and I’m so delighted that I finally made it. OMG, if you’re debating if you should be lazy or try this recipe. . .Get in the kitchen now and make these! It’s such an easy recipe, the dough is so easy to work with and the result makes everyone who tries them think you are the greatest baker in America! Light, fluffy, full of flavor. They simply vanish; another win for sure! Thanks Mel!!!
Thanks, Nina – happy you loved this recipe!
Go to recipe when I need quick and yummy rolls, turn out delicious every time!
I’ve made this recipe 4 times in the last month, and these knots have been a big hit every time. My sister in law and husband at 4 in one sitting. I did make 18 rolls instead of 12 to make them a tad bit smaller. Thank you for such a delicious recipe and also easy to make.
Thanks for letting me know they have been such a hit for you and those you make them for!
These look amazing! Can they be made using gluten free flour (like Pamela’s)??
Unfortunately, subbing gluten free flour for all purpose flour in yeast bread recipes doesn’t work out. You might have better luck searching up a breadstick recipe specifically created for gluten free flour.
We like the garlic knots from the grocery freezer aisle. These are better and easy to make!
These were so fast and easy to make and so yummy! That butter on the bottom, oh man, couldn’t stop eating them. And the couple that were leftover, I was shocked that two days later they were still fresh! Will make them again for sure.
Fast, flavorful and fluffy! YUM!
Just so good. Quick and easy too! My husband and I kept looking at each other saying “oh my gosh these are good!”
Yay, Whitney! Glad you both loved them!
The dough was super sticky and I couldn’t seem to get it to go into a knot. We just did them as regular breadsticks and they turned out great.
Is a stand mixer absolutely necessary?
You can definitely mix and knead the dough by hand if you don’t have a stand mixer.
Excellent! Very easy for a bread making beginner. I will definitely be making one repeat.
Glad you loved these, Pam!
Every recipe I’ve ever made from Mel is always fantastic. This is no exception. Made twice now and gobbled up both times. Thanks, Mel!
Can’t wait to try these! Do you think this recipe can be halved?
Yes, absolutely!
Divine. Perfection. So easy. SO yummy. Making these makes me look like a domestic goddess, all thanks to Mel.
Haha…no way! Take all the credit for yourself! You’re amazing! So happy you loved these. They are the epitome of carb goodness.
What?!?!? Absolutely incredible bread in under an hour?!?! I was bummed because I hadn’t thought to make bread with ample time before dinner, but then I saw how quick this recipe was so I decided to give it a try. Perfection! So fluffy and flavorful. My husband (who is not a bread-guy) ate 4 of them….and would have continued, but he ruefully excised himself from the table so that he wouldn’t have to face the temptation of more. Sooo good! Make these!!!!
Ps: dinner was Mel’s one pot tomato basil pasta…another family favorite. Thanks, Mel!
Haha, that made me chuckle! Good self-control on your husband’s part!
If made the original recipe many times but tonight I used a low carb bread flour. Turned out excellent! Everyone loved them.
Just had these with lasagna! Sooooo good!!!
Am I correct the first proofing is only 10-15 minutes
Yes, that is correct.
I made these into garlic knots the other day. I made the dough without Parmesan cheese and with 1/2 all-purpose flour and 1/2 white wheat flour. (Not opposed to Parmesan – just didn’t have any. Also not opposed to all all-purpose flour but I ran out.) I cut the dough into strips and then cut in half horizontally so they were smaller. Tied in a rough knot and let rise on the buttered pan. While they baked, I melted about half a stick of butter and added about 1/4 cup fresh minced garlic and some dried parsley. After baking, I threw all of the knots into a big metal bowl with the melted butter mixture and gently mixed it all up. So much easier than brushing each knot with the butter. My local pizzeria does this so I copied their technique for getting all that buttery garlicky goodness on every inch. Worked so great! Served with homemade marinara. Amazing!
Delicious! I’ve made them several times with whole wheat flour and italian spices.
10/10! Why have I not made these sooner?!!!
My family loves these!! They’re so tasty, and I LOVE that they come together so quickly. Another favorite! I refer people to your website all the time, because I’m so grateful to have a source of recipes that are consistent and always delicious. (Especially young brides!) I’m about to experiment with a sweet version in hopes of generating a fast breakfast bread. If you have any suggestions, I’d certainly welcome them!
Thank you so much, Tabitha! Let me know how the sweet version turns out!
It worked great! I upped the sugar, swapped cinnamon for the garlic, and mozzarella for the Parmesan. (You couldn’t taste the cheese in them at all after baking.) We brushed the tops with warm maple syrup and sprinkled them with cinnamon and sugar. Being based on a breadstick recipe, they are more hefty than cinnamon rolls. No one seemed to mind, though! They disappeared in a hurry.
Just want to say WOW!!! All your recipe’s are amazing but this one was fabulous! The garlic wasn’t overpowering but had the perfect amount of garlic! They came out so fluffy and took almost no time at all! Even my 2 year old son help roll out each dough knot! Thanks Mel!!
After trying my hand at your breadsticks, I was amazed at the simplicity and deliciousness and immediately shared with my friends and subscribed to your website. My family usually treats ourselves with the oven bag of “three cheese garlic knots” from the Walmart bakery, which are quite expensive, so when I saw you had a recipe I knew I had to try it! And they did “knot” disappoint 🙂 a bag of 8 from the store costs almost 4 dollars and can be very greasy but your recipe made 16 of the same size and much better quality! I personally used a third cup of parmesan, and put some garlic seasoning and parsley in the melted butter I brushed them with, and I’m definitely getting the mom of the year award. Thank you so much for all you do!
Perfect texture and I didn’t mess them up. New bread recipe every night during COVID-19 this week. This was a keeper! So much flavor that I didn’t even slather them in butter…the best part is the crispy, buttery bottoms.
Could I place shaped roils in fridge for a day to bake later.
I haven’t tried that specifically with this recipe, but it should work pretty well!
Just about to make these- again. My ten year old and I make these into pepperoni rolls, and they are one of his favorite things. Dough as written, but form a bun around a chunk of pepperoni instead of forming a knot. Easy and yummy, great sandwich alternative during the school year… Thanks for the super recipe, Mel!
Great idea, Rebecca!
Where do you put in the garlic powder? I’m not seeing it in the directions.
It is in step #1 with the flour and other ingredients.
YUM!! These were great! I made a triple batch because I trust your recipes so much. We devoured some, froze some after baking, and froze some before baking. I’ll report back after trying both frozen types. I’m also giving some to a friend who doesn’t like to bake, but loves your recipes through me.
Wanted to report back about freezing. These freeze great! The cooked before freezing were great. Freezing the dough worked great too, but I would recommend using parchment paper to avoid sticking to pan. I let them thaw and rise about 2 1/2 hours and then baked as normal. Fantastic!
Thanks, Tammy!
These were yummy! Mine got really puffy in the oven and almost lost their shape. Is that because they had too long of a second rest? (30 min).
Possibly – or it could be that a bit more flour will help them hold their shape better but if the dough wasn’t overly sticky, it’s probably the rising.
I made these tonight and they were absolutely delish! I was a bit worried because I was making them last-minute and we were having company over, which totally adds to the pressure of doing it right. But my husband assured me, “if it’s from Mel’s, it will be fine!” And he was right! I love the the dough itself has the flavoring, not just the butter topping. I’ll definitely be printing this one out to save for later!
I needed a last minute contribution to a potluck and these were amazing. They got rave reviews. I easily doubled the recipe in my Bosch for lots of yumminess to share!
I made these last night and everyone in the family loved them! I loved that they were so quick to make. Next time I’ll brush them with a salty garlic butter (rather than plain butter) to give the crust even more flavor. Thank you for a fantastic addition to my bread recipes!!
Wow, these are so light and delicious that I’ve already eaten enough to break my New Year resolutions! Very easy, also. Great instructions! Thank you and Happy New Year!
This looks so yummy! love it
Thanks for sharing such a wonderful recipe.
If you are freezing before baking, would you let the knots rise before or after you freeze them?
I would let them rise after freezing and thawing.
My 10 year old loves to help cook and with little guidance has made these knots twice. We love the taste and the ease of making them. Thanks!
That is amazing! Tell your 10- year old that I am super impressed!
I made these on Sunday to go with our spaghetti dinner and they were so easy and delicious! I had a lot leftover since there’s only 2 of us and they reheat beautifully too. thanks
Thanks, Beth!
Mel, what should the texture of these knots be? I tried them today(my first attempt at homemade yeast rolls ;). Anyway, mine are rather dense & chewy. Taste ok, but not sure this was the desired result. Thanks!
If using bread flour, they will definitely be chewy, but they should be more light and fluffy than dense. Do you think they need more time to rise before baking? That may help.
Wow, these knots look great and they will definitely taste great as well…Looking forward to trying this one out soon…
I made the parmesan breadstick knots today to go with our spaghetti and meatball dinner. They came out perfect and the video was very helpful. Will definitely be making again. Thanks Mel for another great recipe.
Thanks so much, Ann!
fun recipe, thank you, and really appreciate the walk through since my knott skills at the very least, are very rusty
Mel Does these freeze well? We have a family get together and I want to work ahead!;)
Tina
Yes, they freeze great!
What about freezing the dough after its shaped but before baking?
Yes, you could do that!
Hi Mel,
Have you ever made these rolls with regular flour? I don’t normally buy bread flour . . .
Thanks 🙂
I just noticed in the recipe it says all-purpose flour or bread flour. Took me two times reading it. 🙂
I made them with all purpose flour and they were very light and delicious!
Yes! I make them most often with all-purpose flour, but bread flour works great, too (makes them fluffier and chewier).